This repository contains an example implementation that demonstrate how to use Spring Boot and Spring Security to create an OpenID lient that authenticates to the Curity Identity Server using mutual TLS.
There are only two things to consider when configuring the client in the Curity Identity Server:
- choose the authentication method
mutual tlsand make sure it uses the self-signed certificate created below. - register the following redirect uri for your client:
https://localhost:9443/login/oauth2/code/idsvr.
The redirect uri is the path of the application where the Curity Identity Server will redirect to after the user was authenticated. In this case we assume that this example will be hosted on localhost.
We secure this client application with HTTPS on port 9443 and need a certificate for that. Since this is just an example we create a self-signed certificate. Do not use self-signed certificates in production environments.
keytool -genkeypair -alias https -keyalg RSA -keysize 4096 -keystore server.p12 -storepass Secr3t -storetype pkcs12 -validity 10 -dname "CN=localhost, OU=Example, O=Curity AB, C=SE"Place the key store server.p12 in src/main/resources. Update the application configuration file src/main/resources/application.yml to run HTTPS on port 9443:
server:
  port: 9443
  ssl:
    key-store: classpath:server.p12
    key-store-password: Secr3t
    key-store-type: pkcs12
key-store-alias: httpsNote: The browser will not trust this self-signed server certificate. You may notice an
SSLHandshakeExceptionin the console when running this example. Make sure your browser trusts the certificate if you want to get rid of the error.
For mutual TLS client authentication to work you need a client certificate. Create a Java keystore with the self-signed certificate.
keytool -genkeypair -alias demo-client -keyalg RSA -keysize 4096 -keystore demo-client.p12 -storepass Secr3t -storetype pkcs12 -validity 10 -dname "CN=demo-client, OU=Example, O=Curity AB, C=SE"Place the key store in src/main/resources. See Configure Application for details.
Export the certificate and use it to configure the client at the Curity Identity Server. See Curity Identity Server Configuration.
keytool -export -alias demo-client -keystore demo-client.p12 -storepass Secr3t -storetype pkcs12 -file demo-client.cerTo run this example you need to setup some configurations in the Curity Identity Server. The easiest way is to download and install the sample configuration from Curity Developer Portal. This sample configuration already has an authentication profile and an OAuth profile that can be used with this example.
-
Go to Token Service profile and make sure that
Mutual TLSis enabled forClient Authenticationon theClient Settingspage of that profile.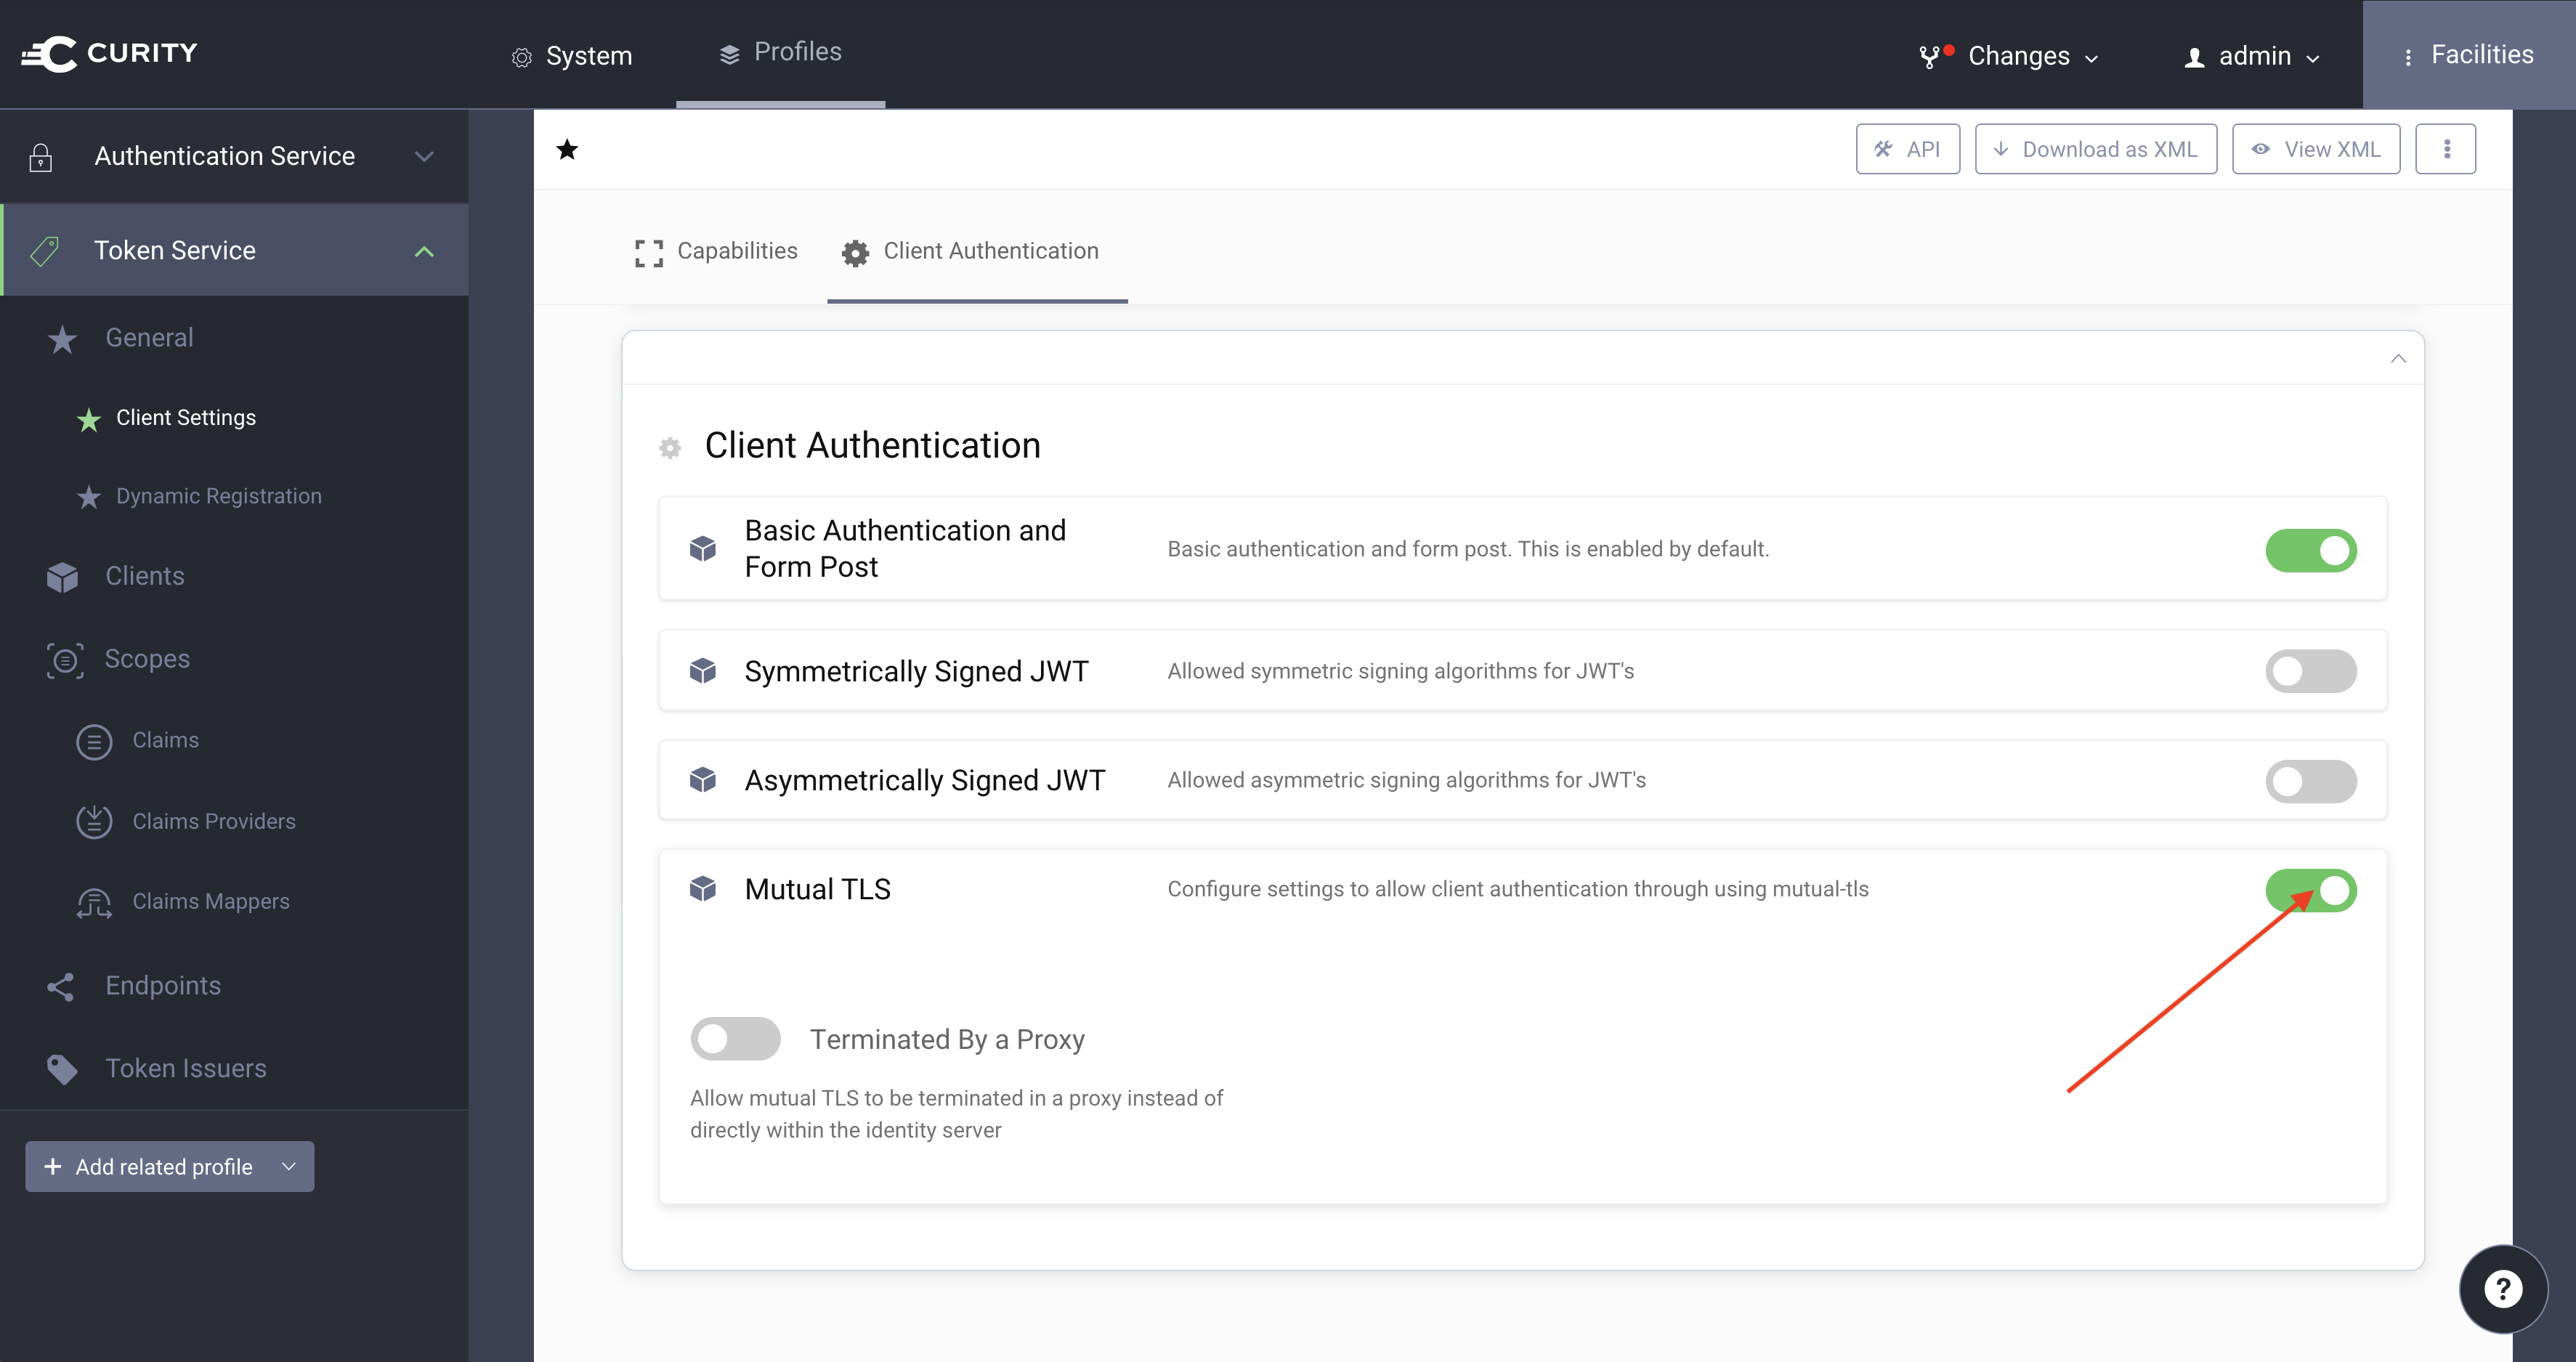
-
Go to the
Clientspage of the profile and create a client calleddemo-client. If you use the sample configuration from Curity Developer Portal create thedemo-clientclient by copying the example client calledwww.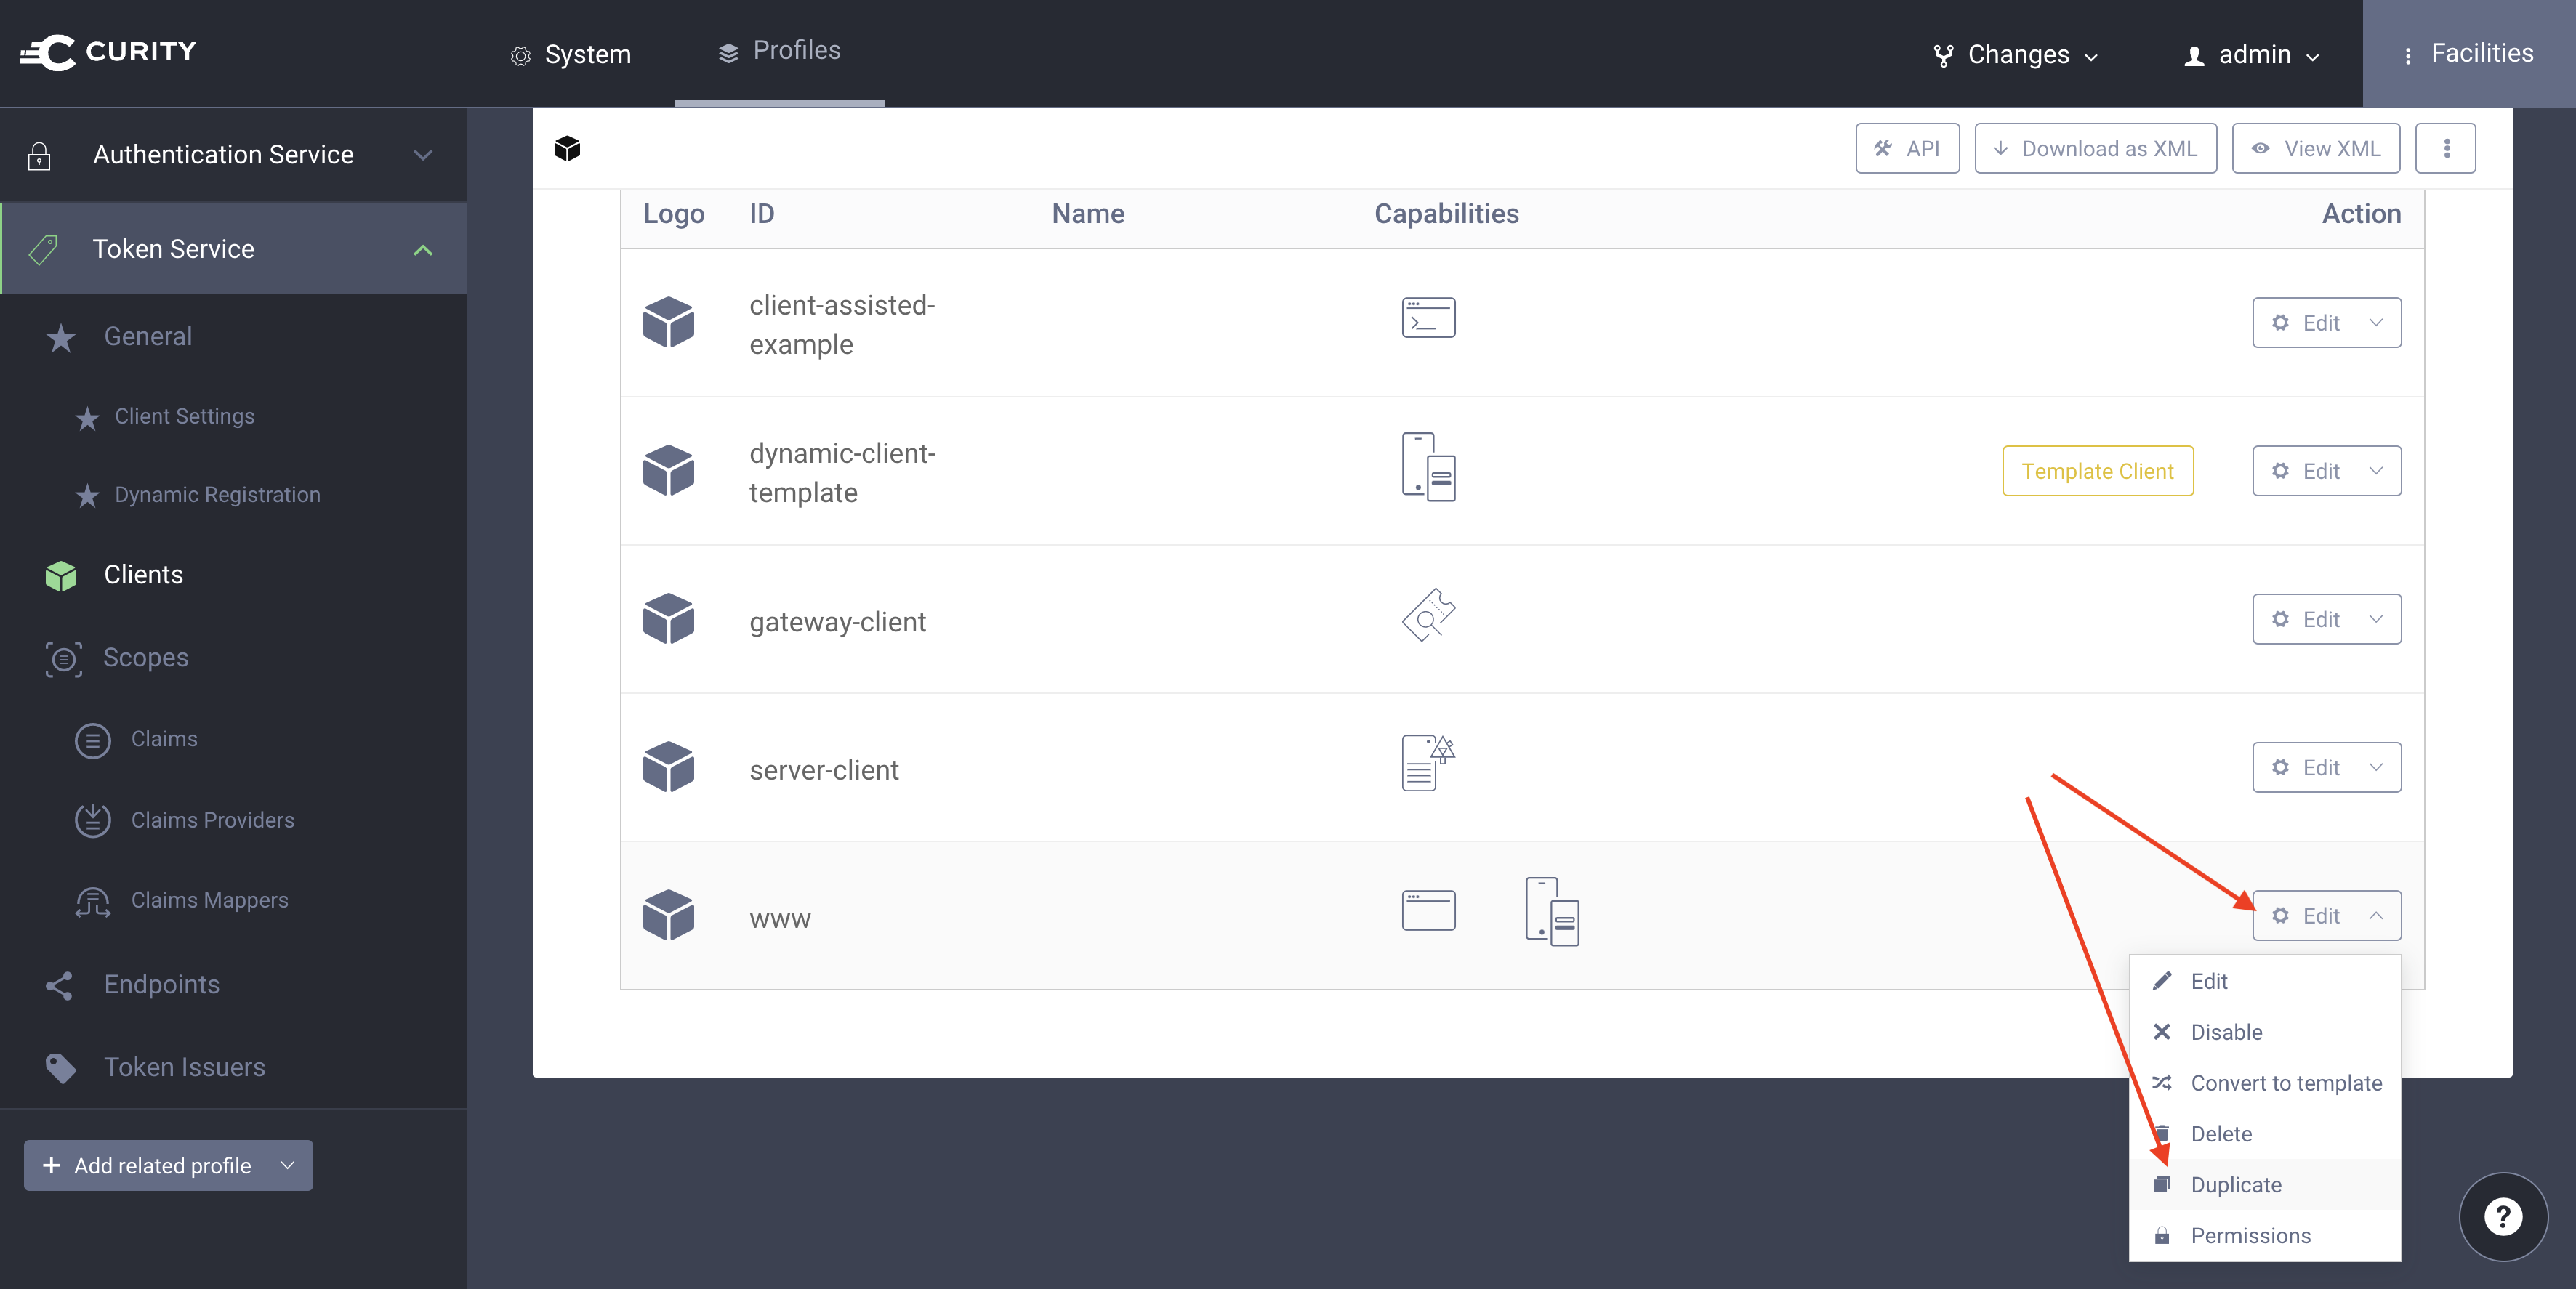
-
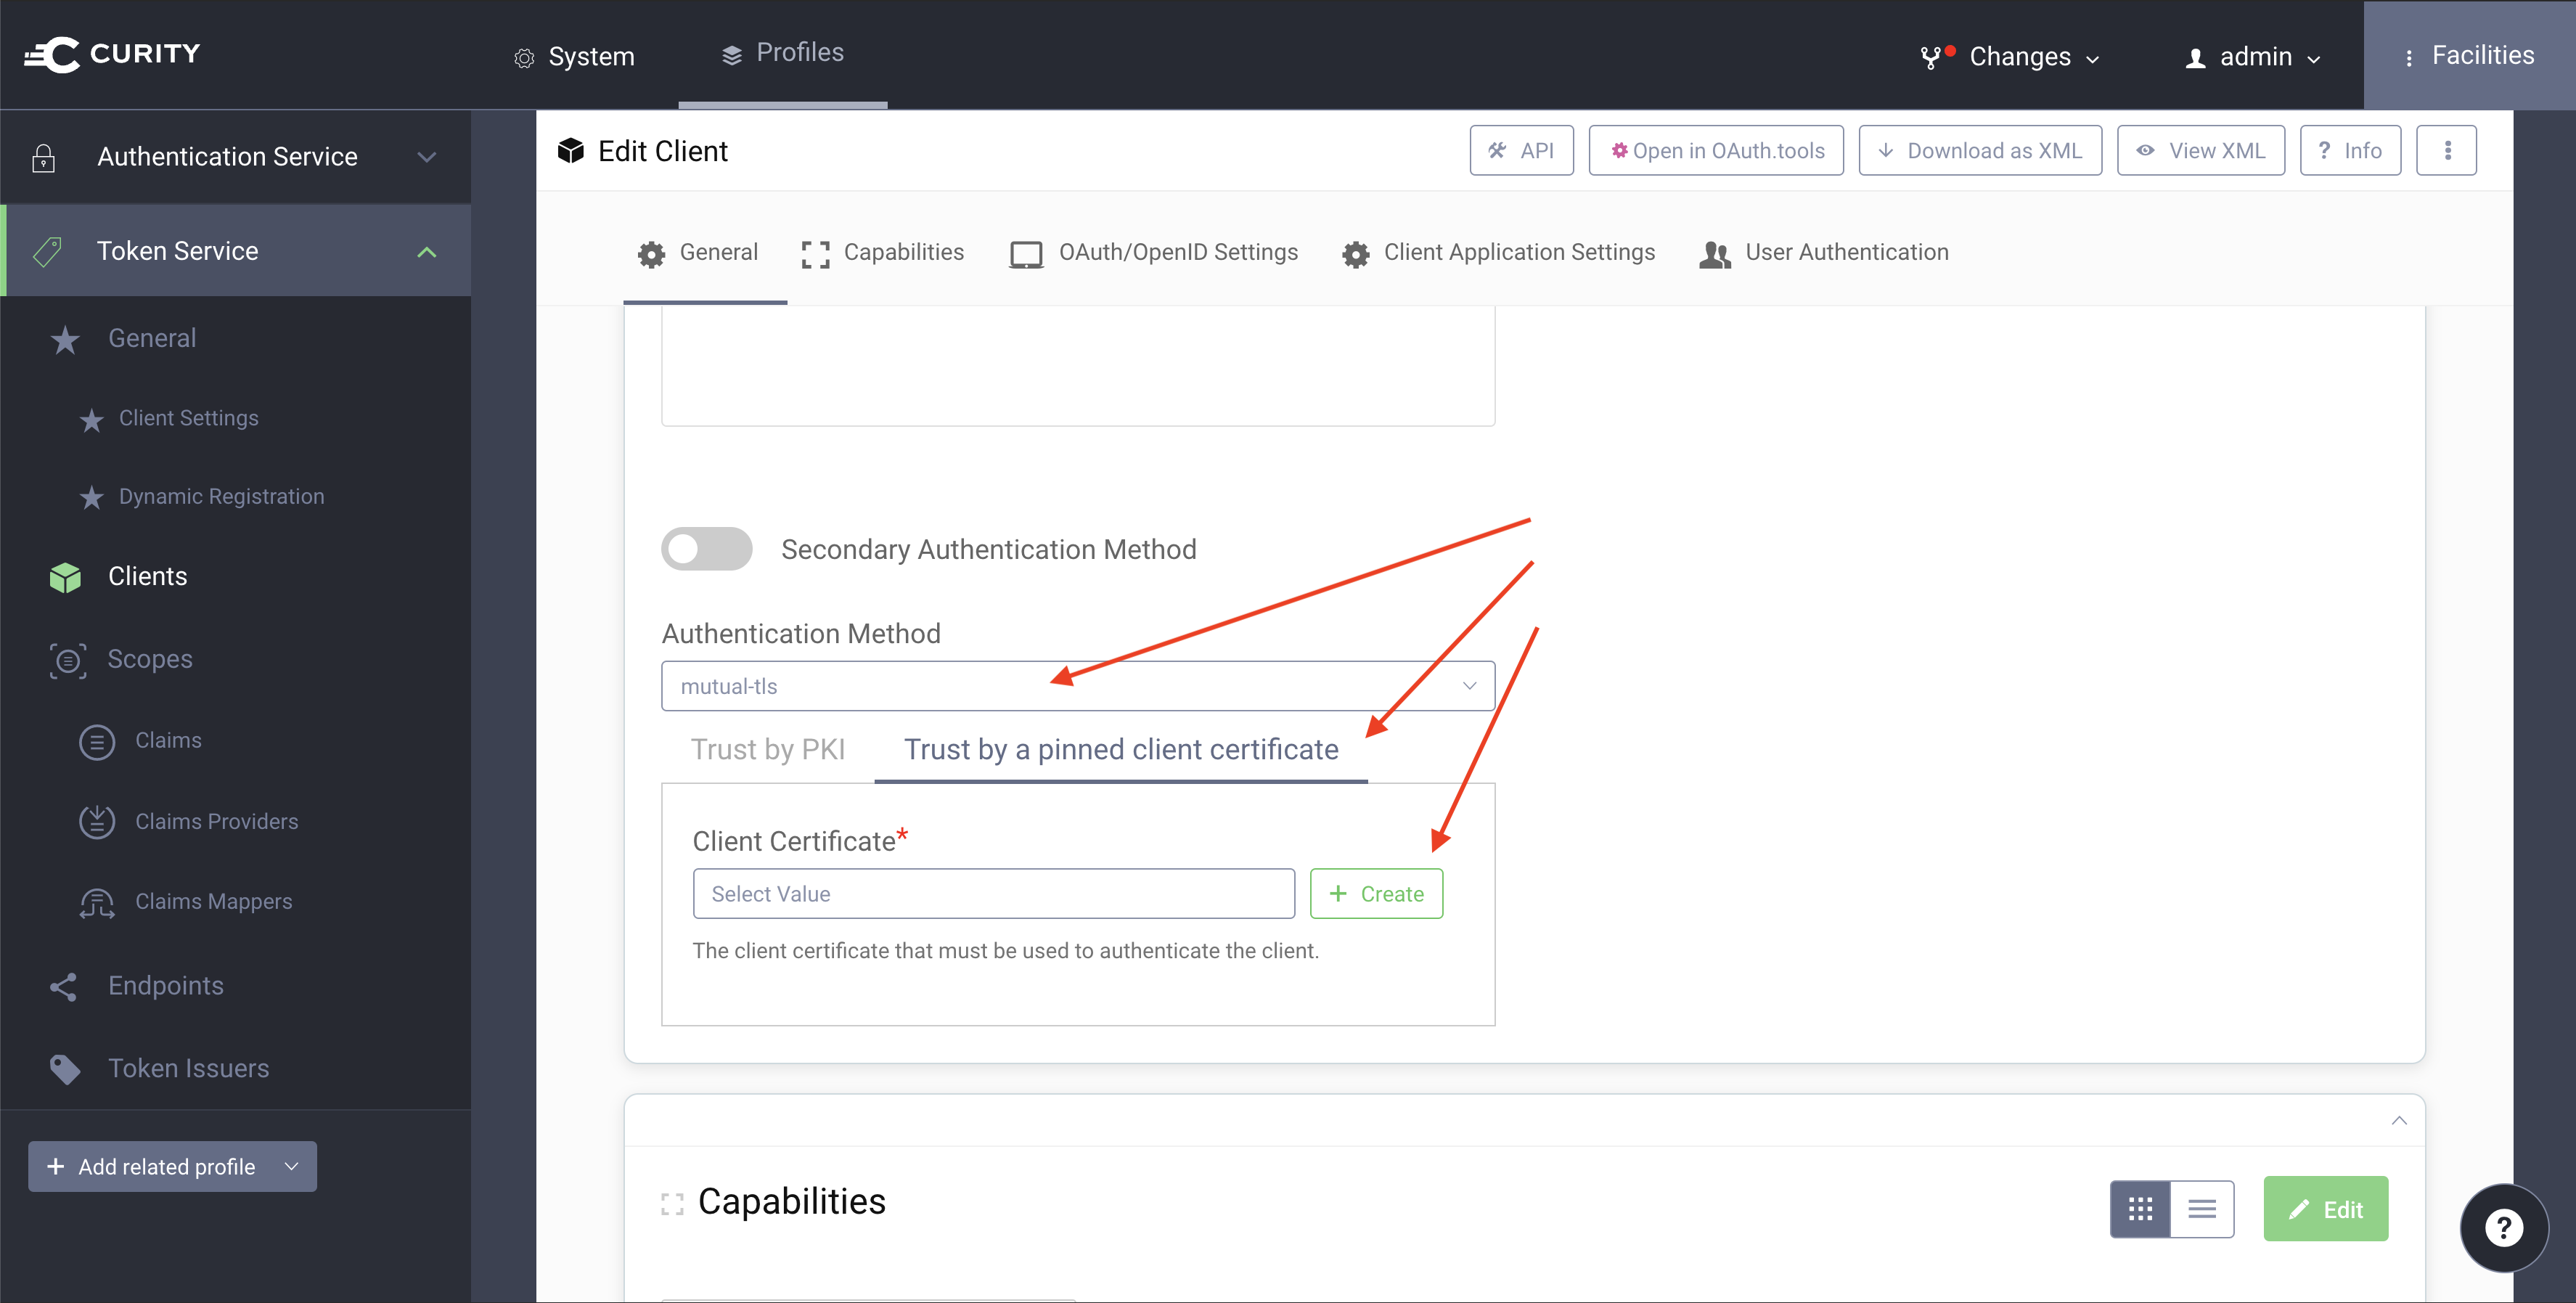
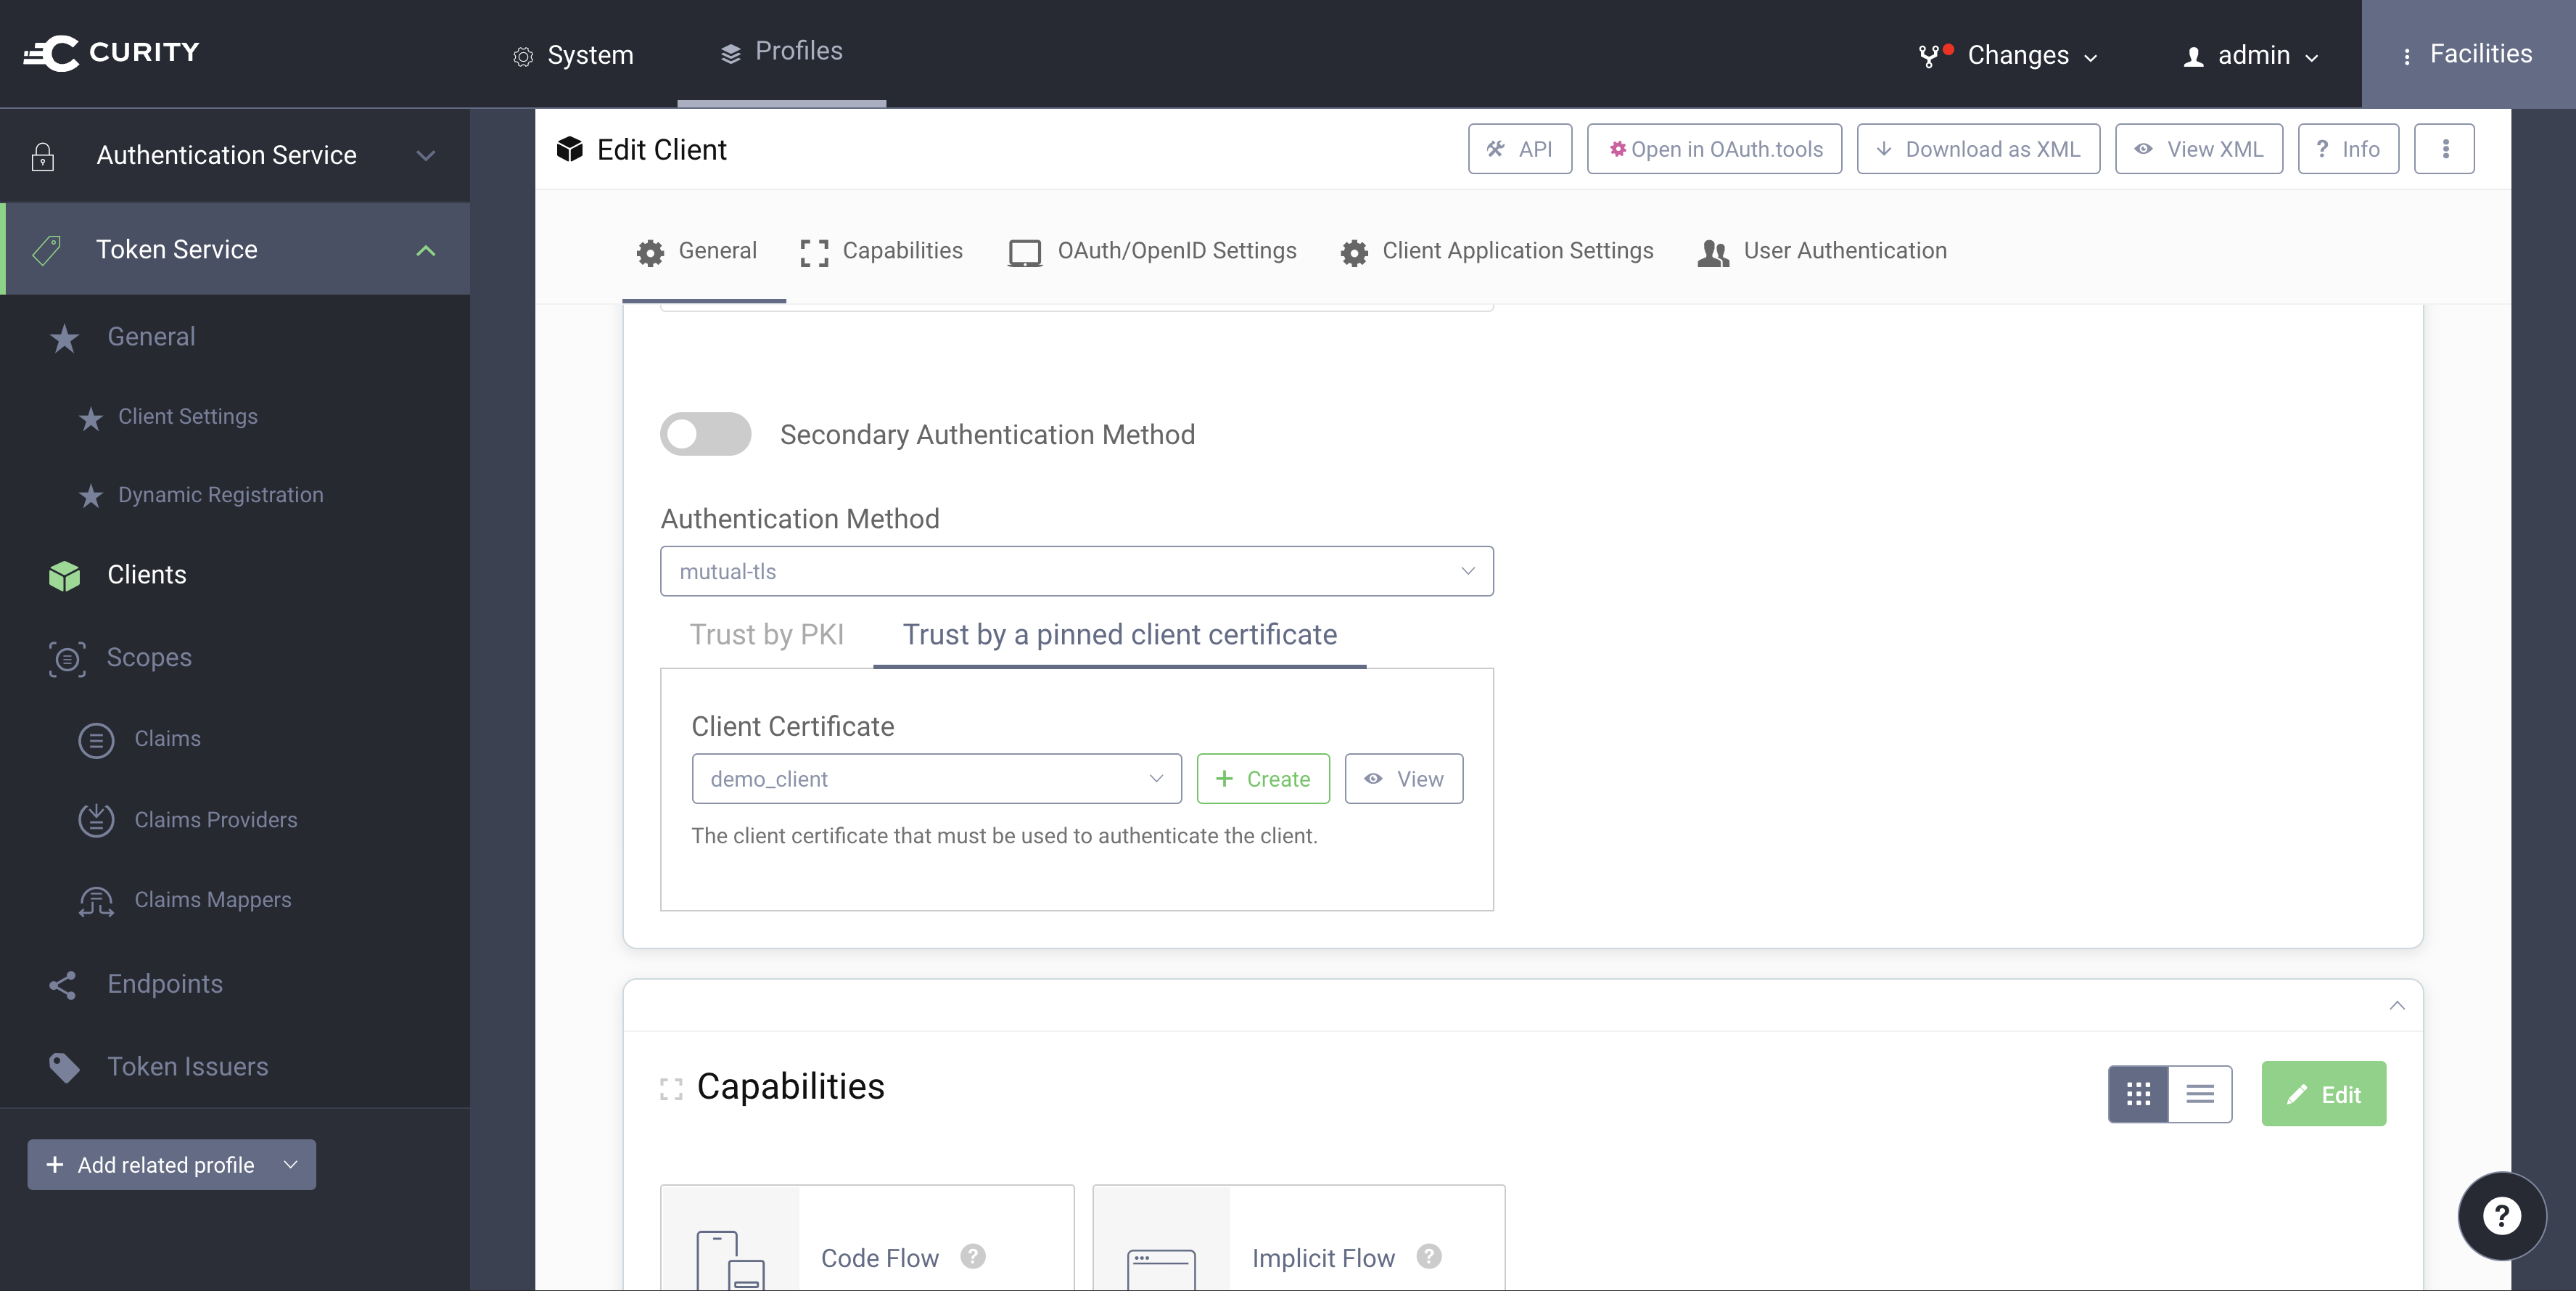
This new client (accessible from
Token Service -> Clients -> demo-client -> Edit Client) uses mutual TLS for client authentication.- Choose
mutual-tlsfrom the list of authentication methods. - Select
Trust by a pinned client certificate. - Click
Createto upload a client certificate.
- Choose
-
Select the client certificate that you created above. Give the newly created Client Trust Store the name
demo_clientand confirm the settings.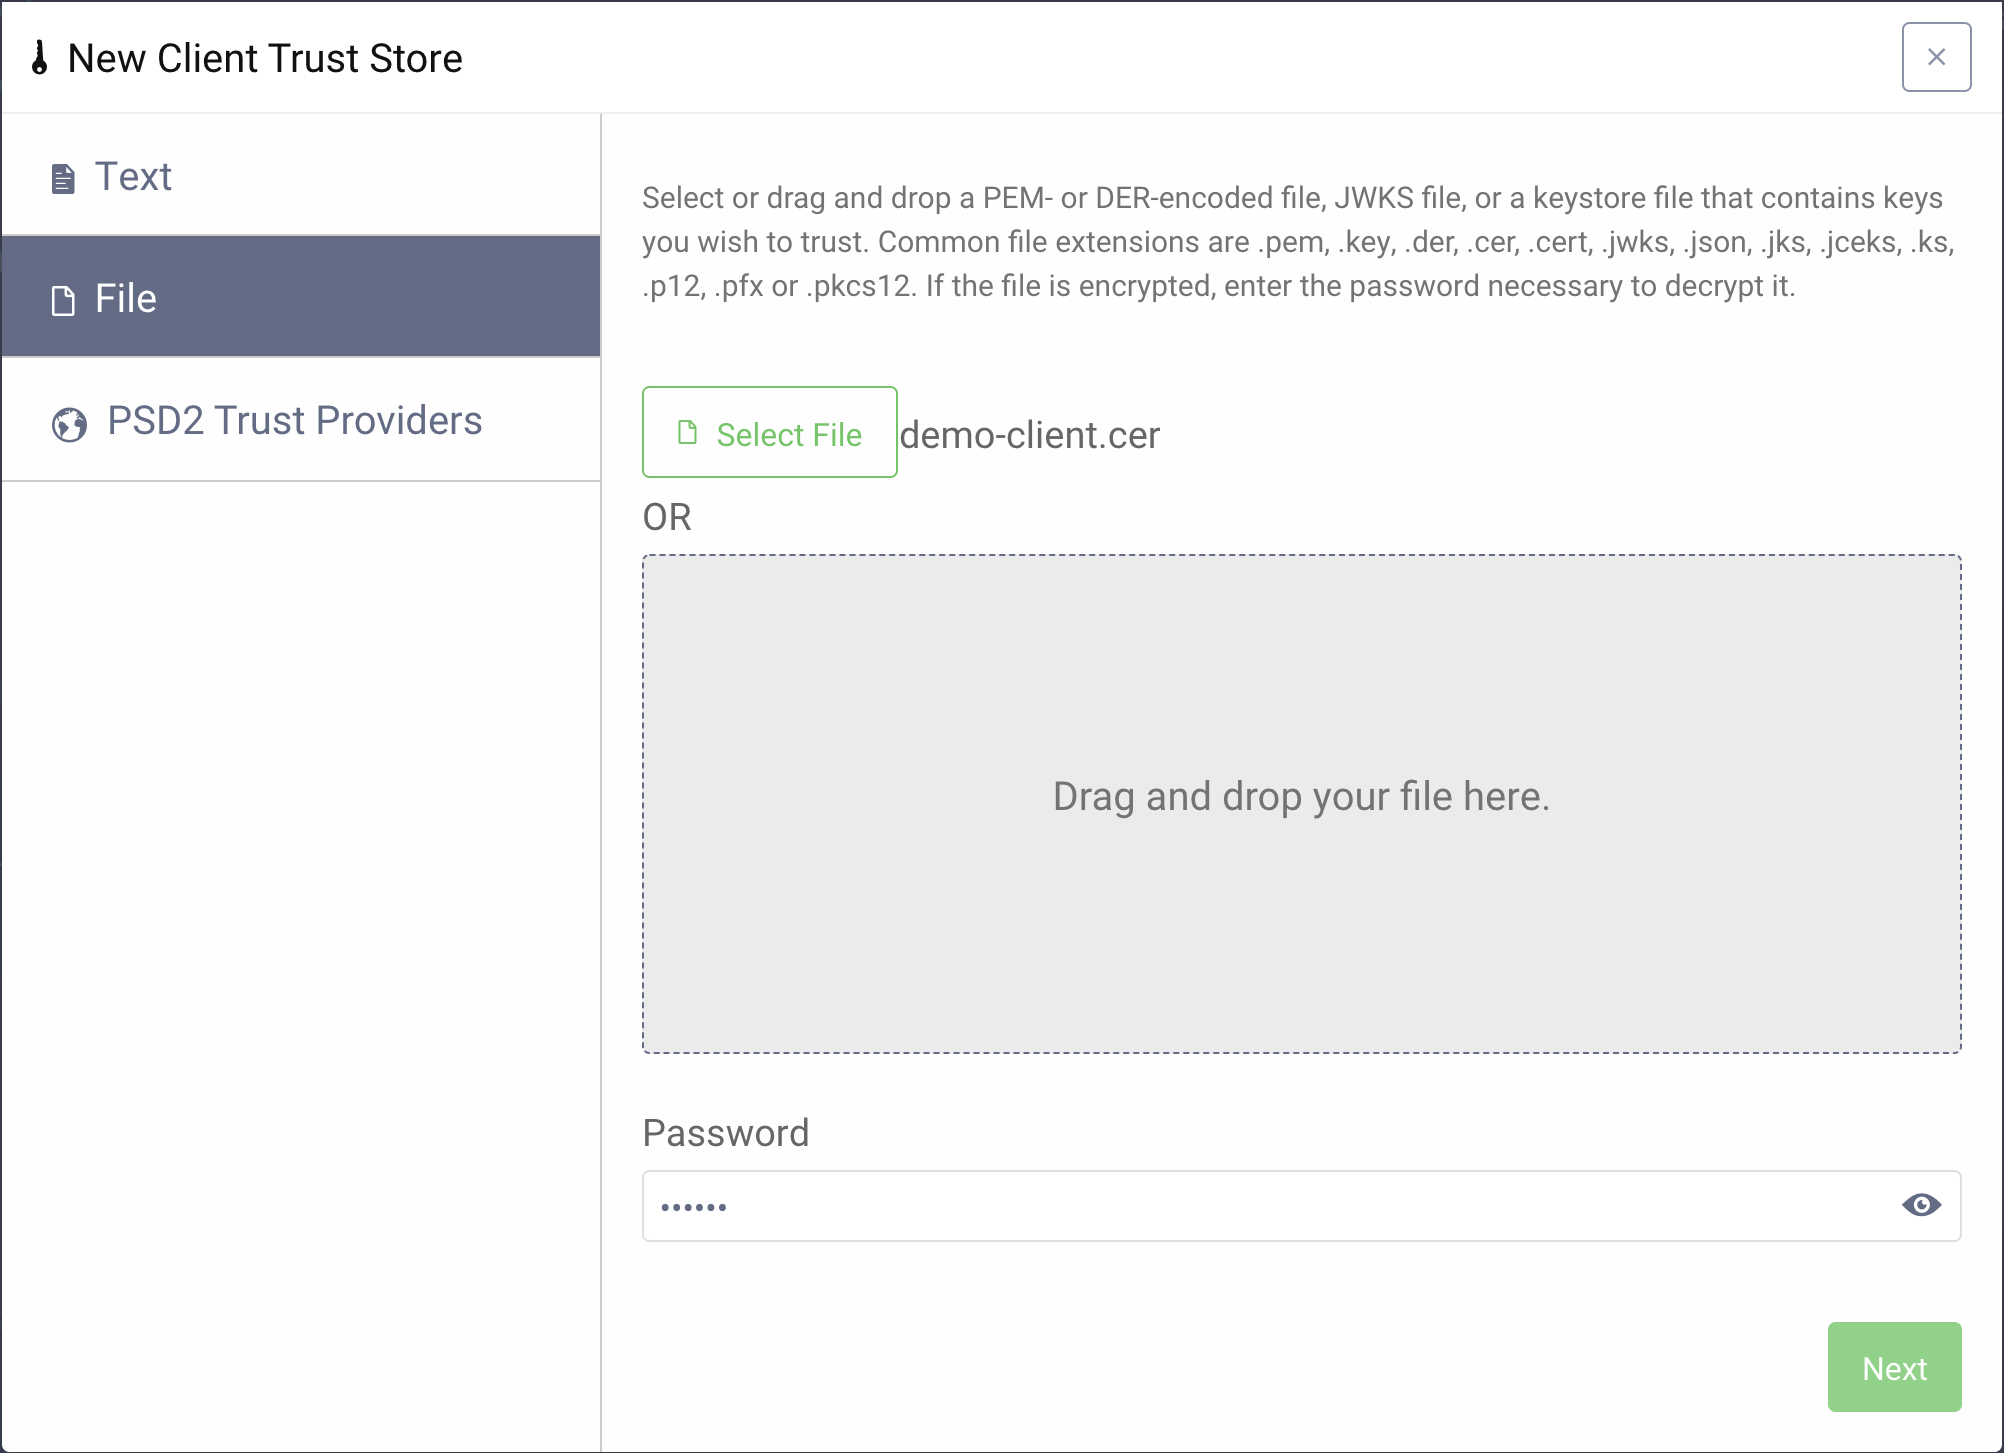
-
Continue with the
Capabilitiessection for thedemo-client. Make sure that the list contains at least theCode Flowcapability.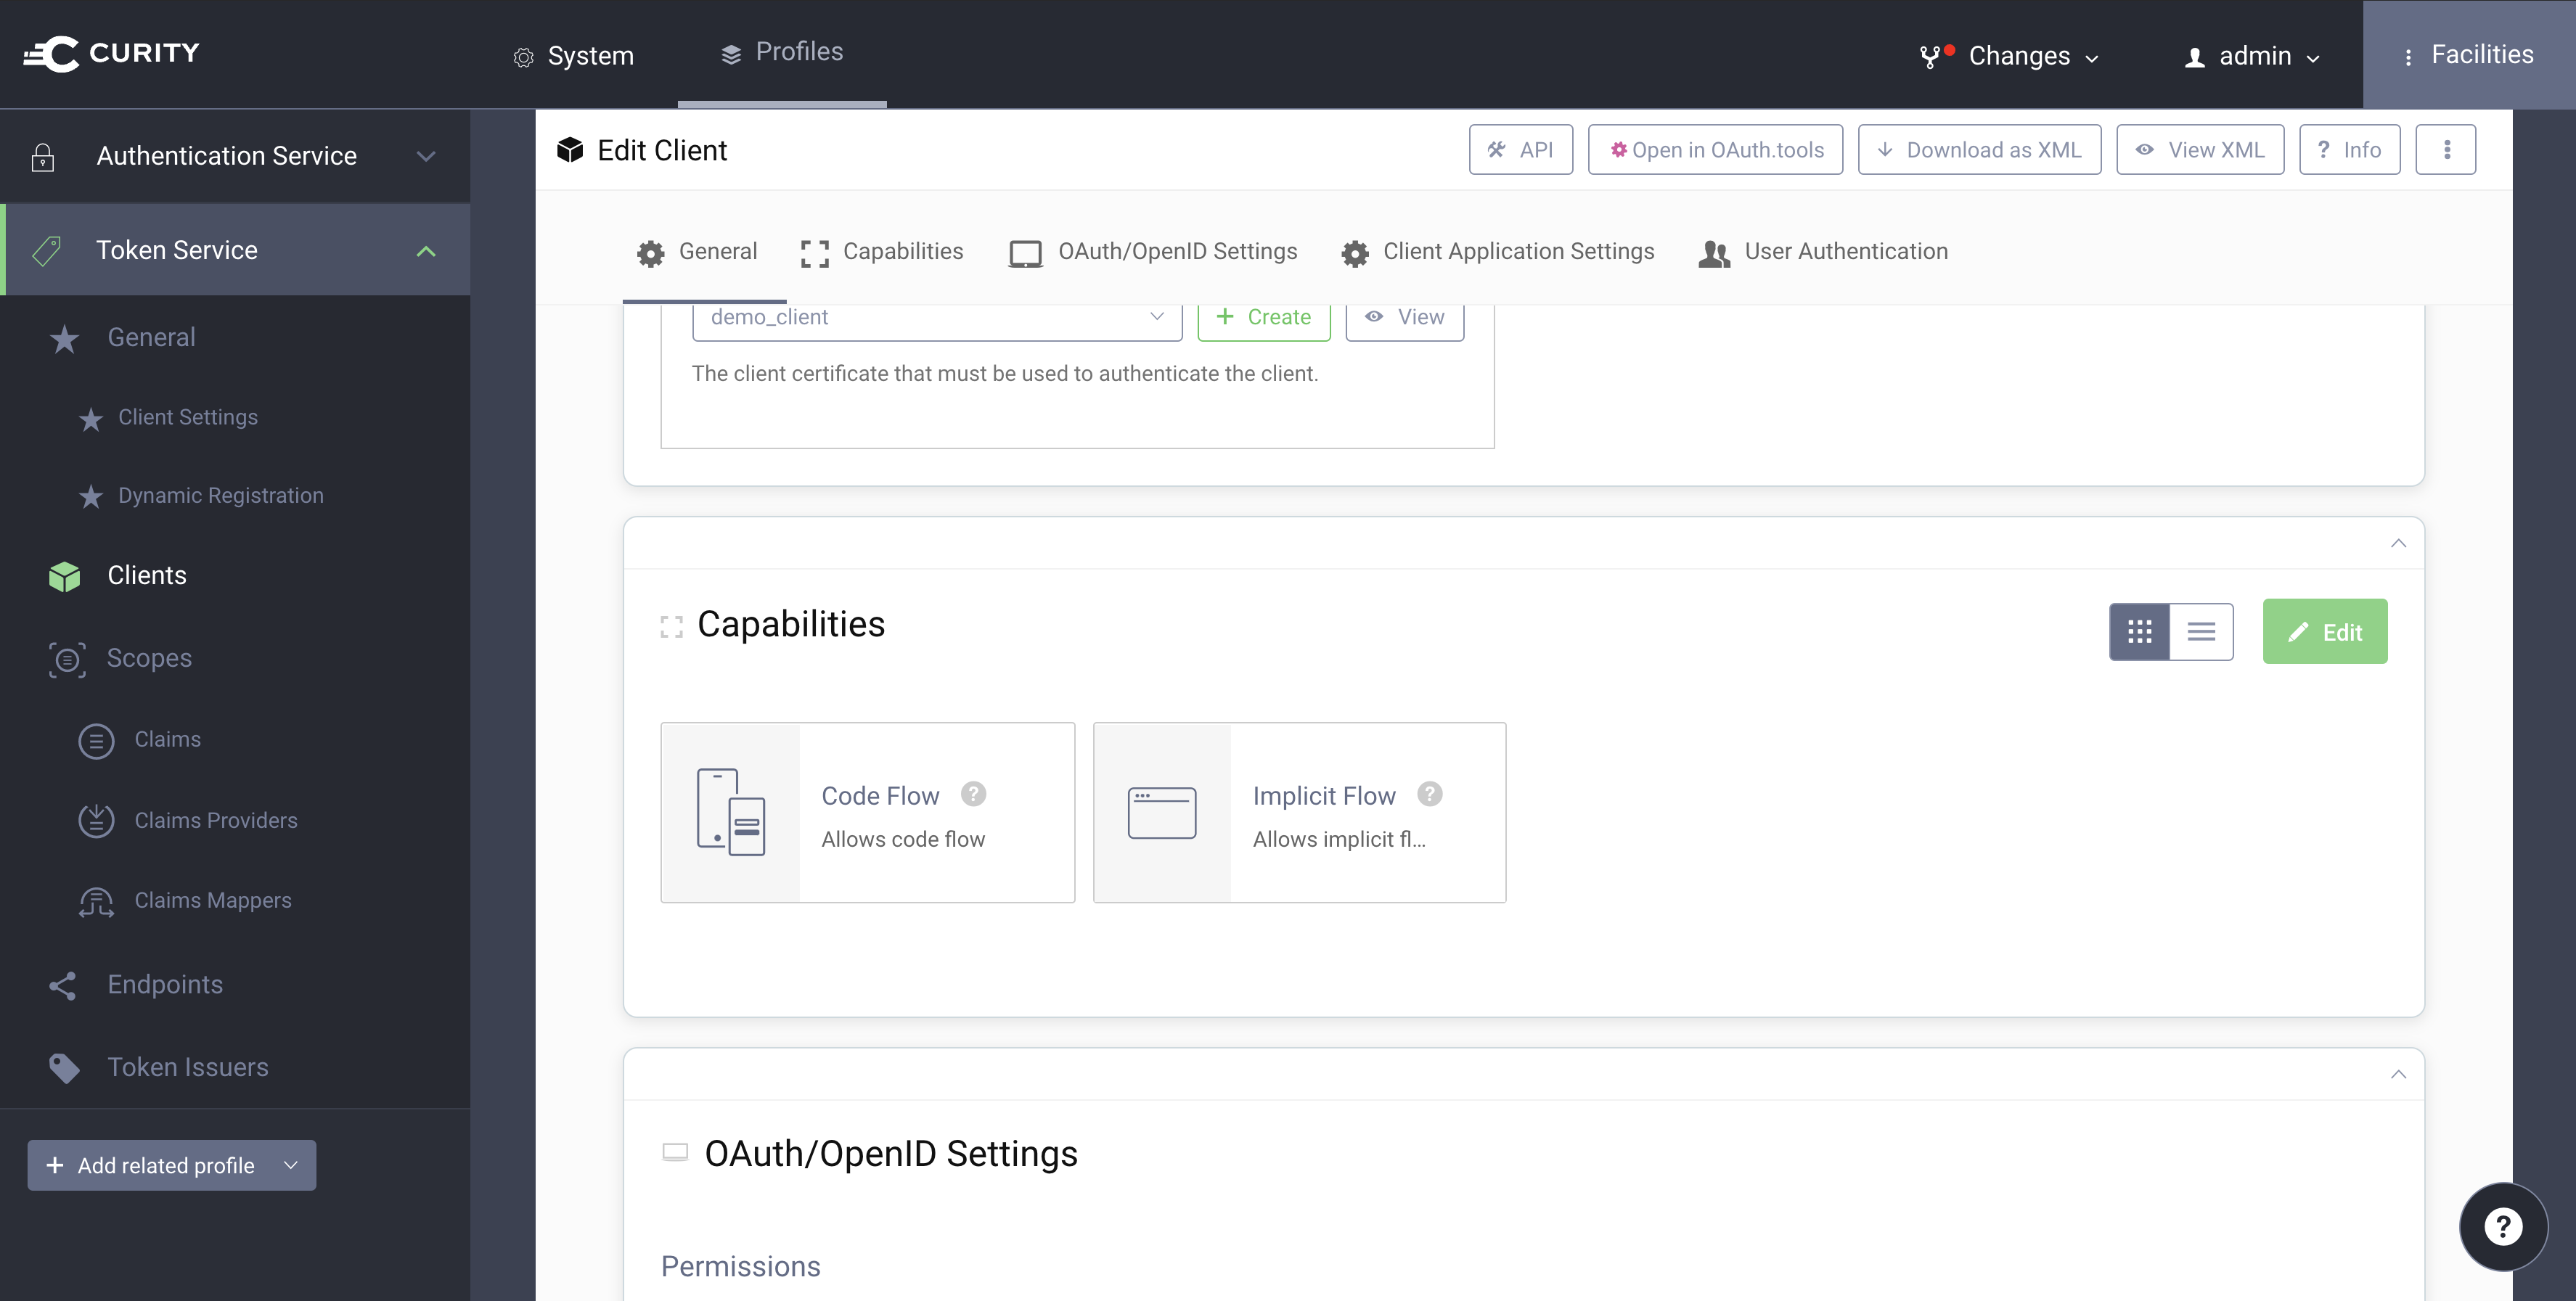
-
Update the
Redirect URIssetting for thedemo-client. The redirect URI should behttps://localhost:9443/login/oauth2/code/idsvr.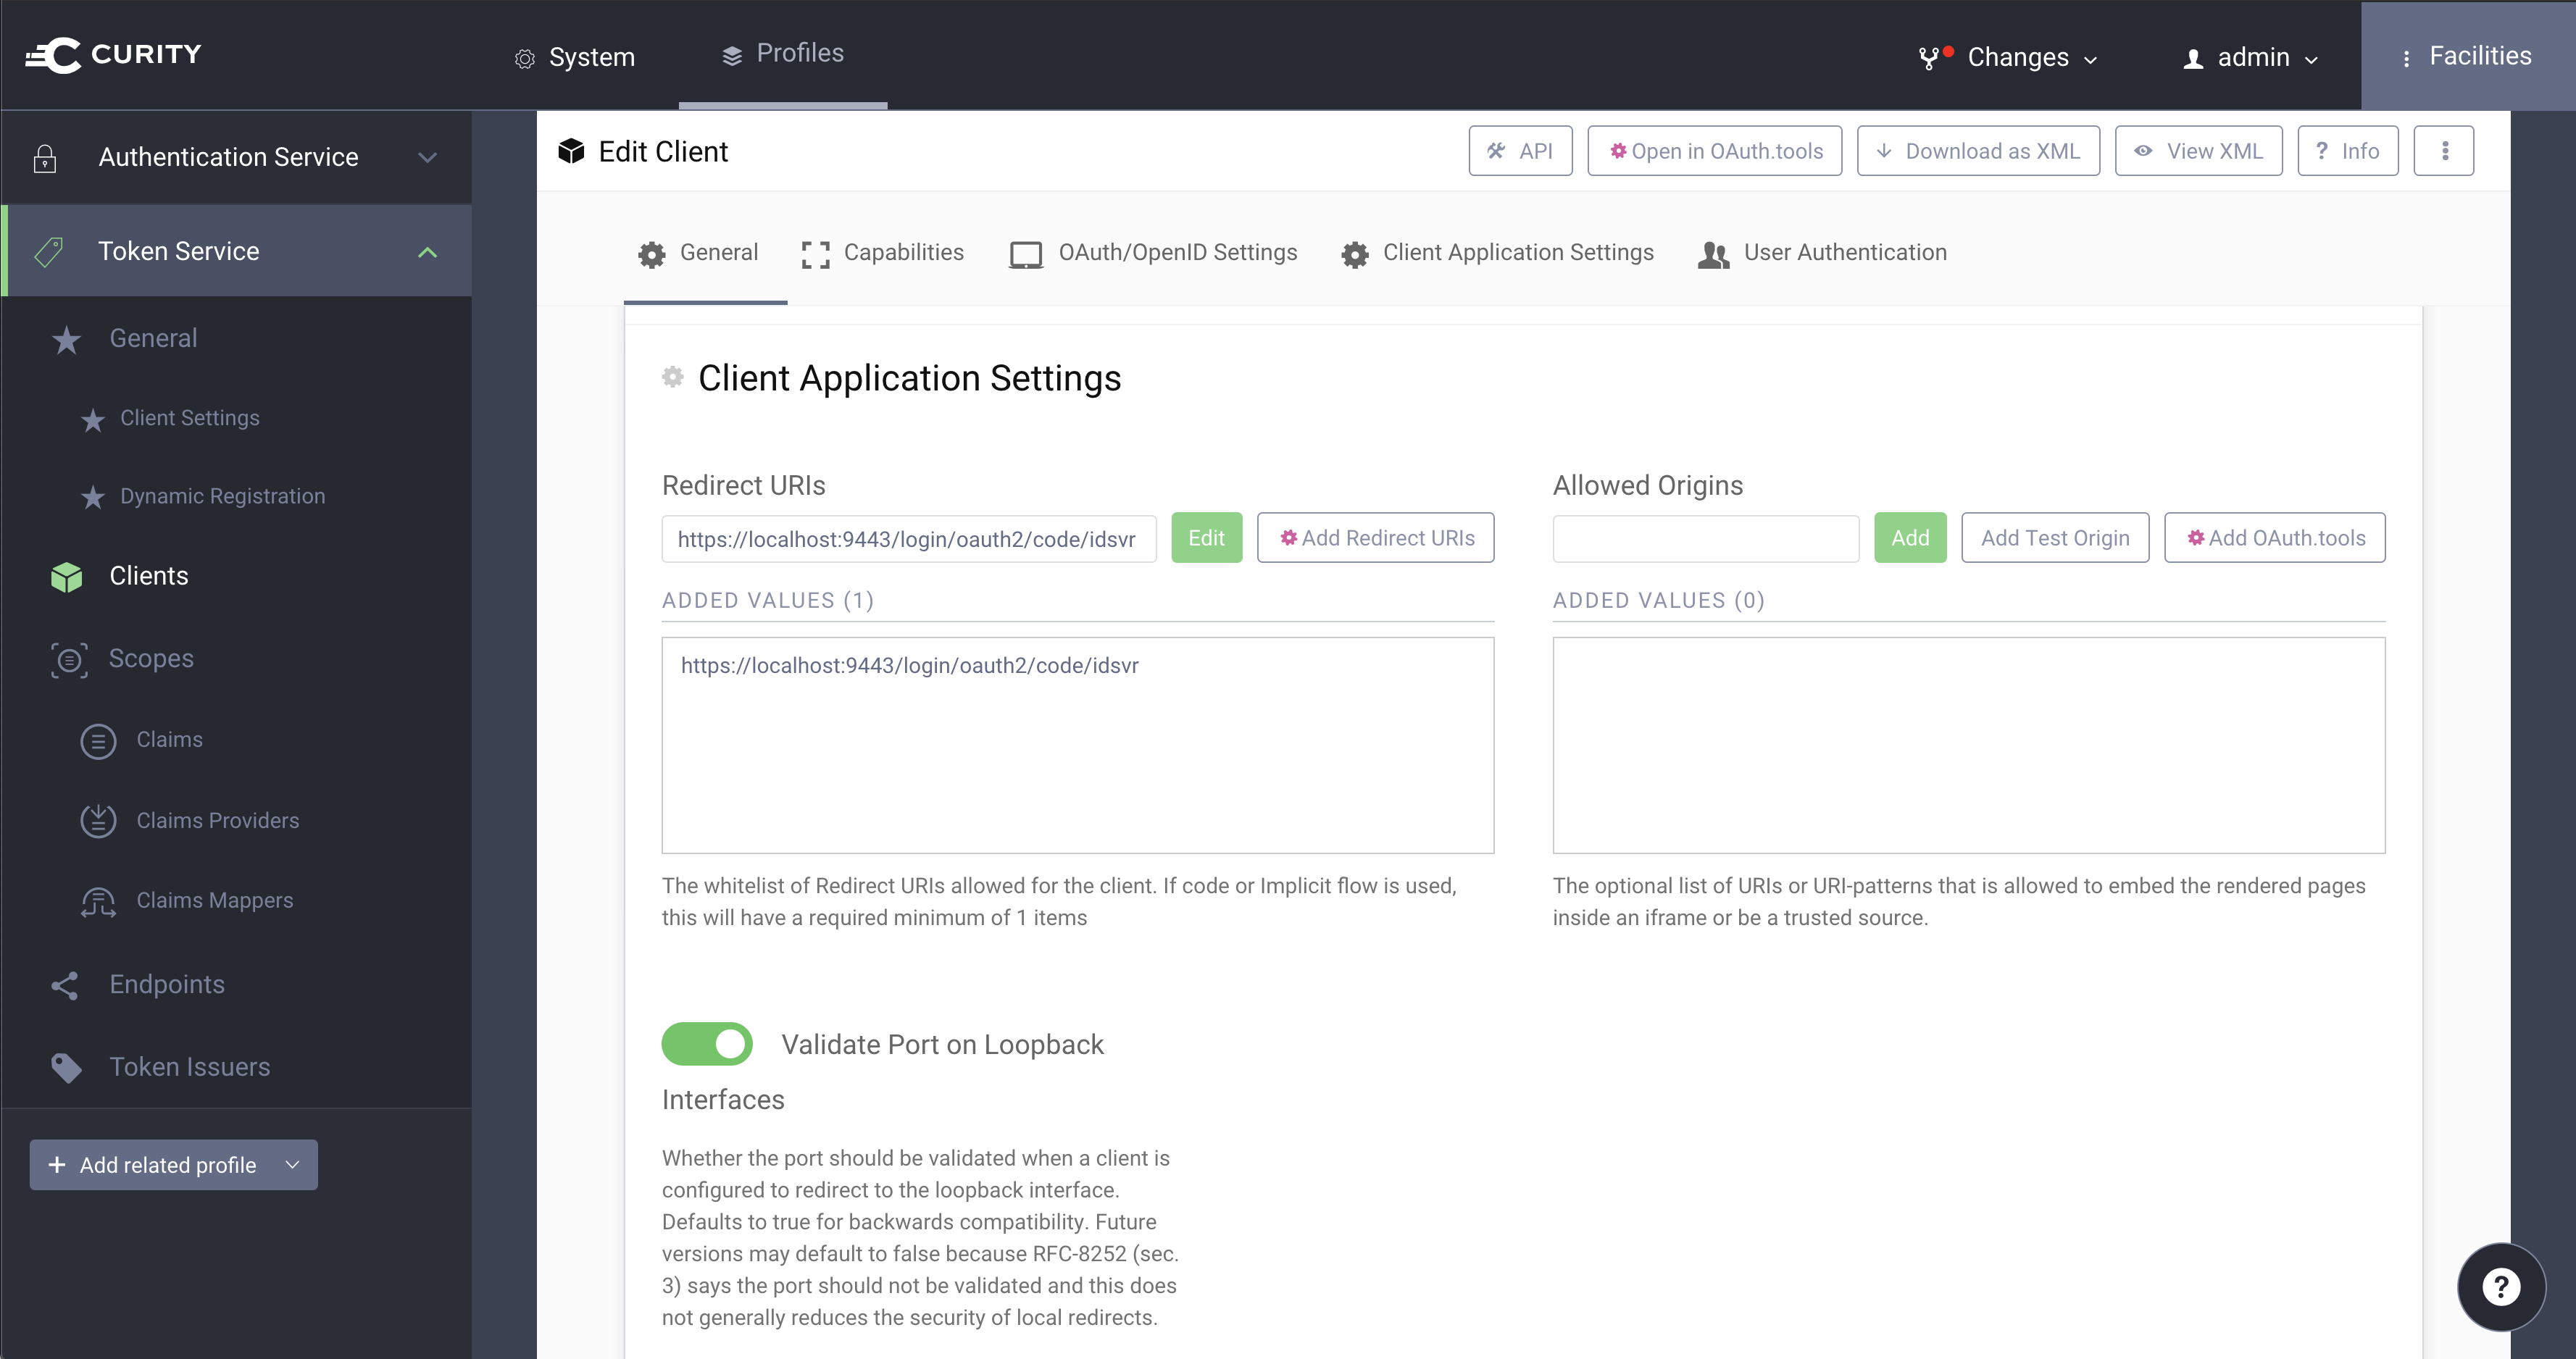
-
Finally, allow Client Authentication for the Token Endpoint. Go to Token Service profile and select
Endpoints. Look for thetoken-service-tokenendpoint and setClient Authenticationtoallowed.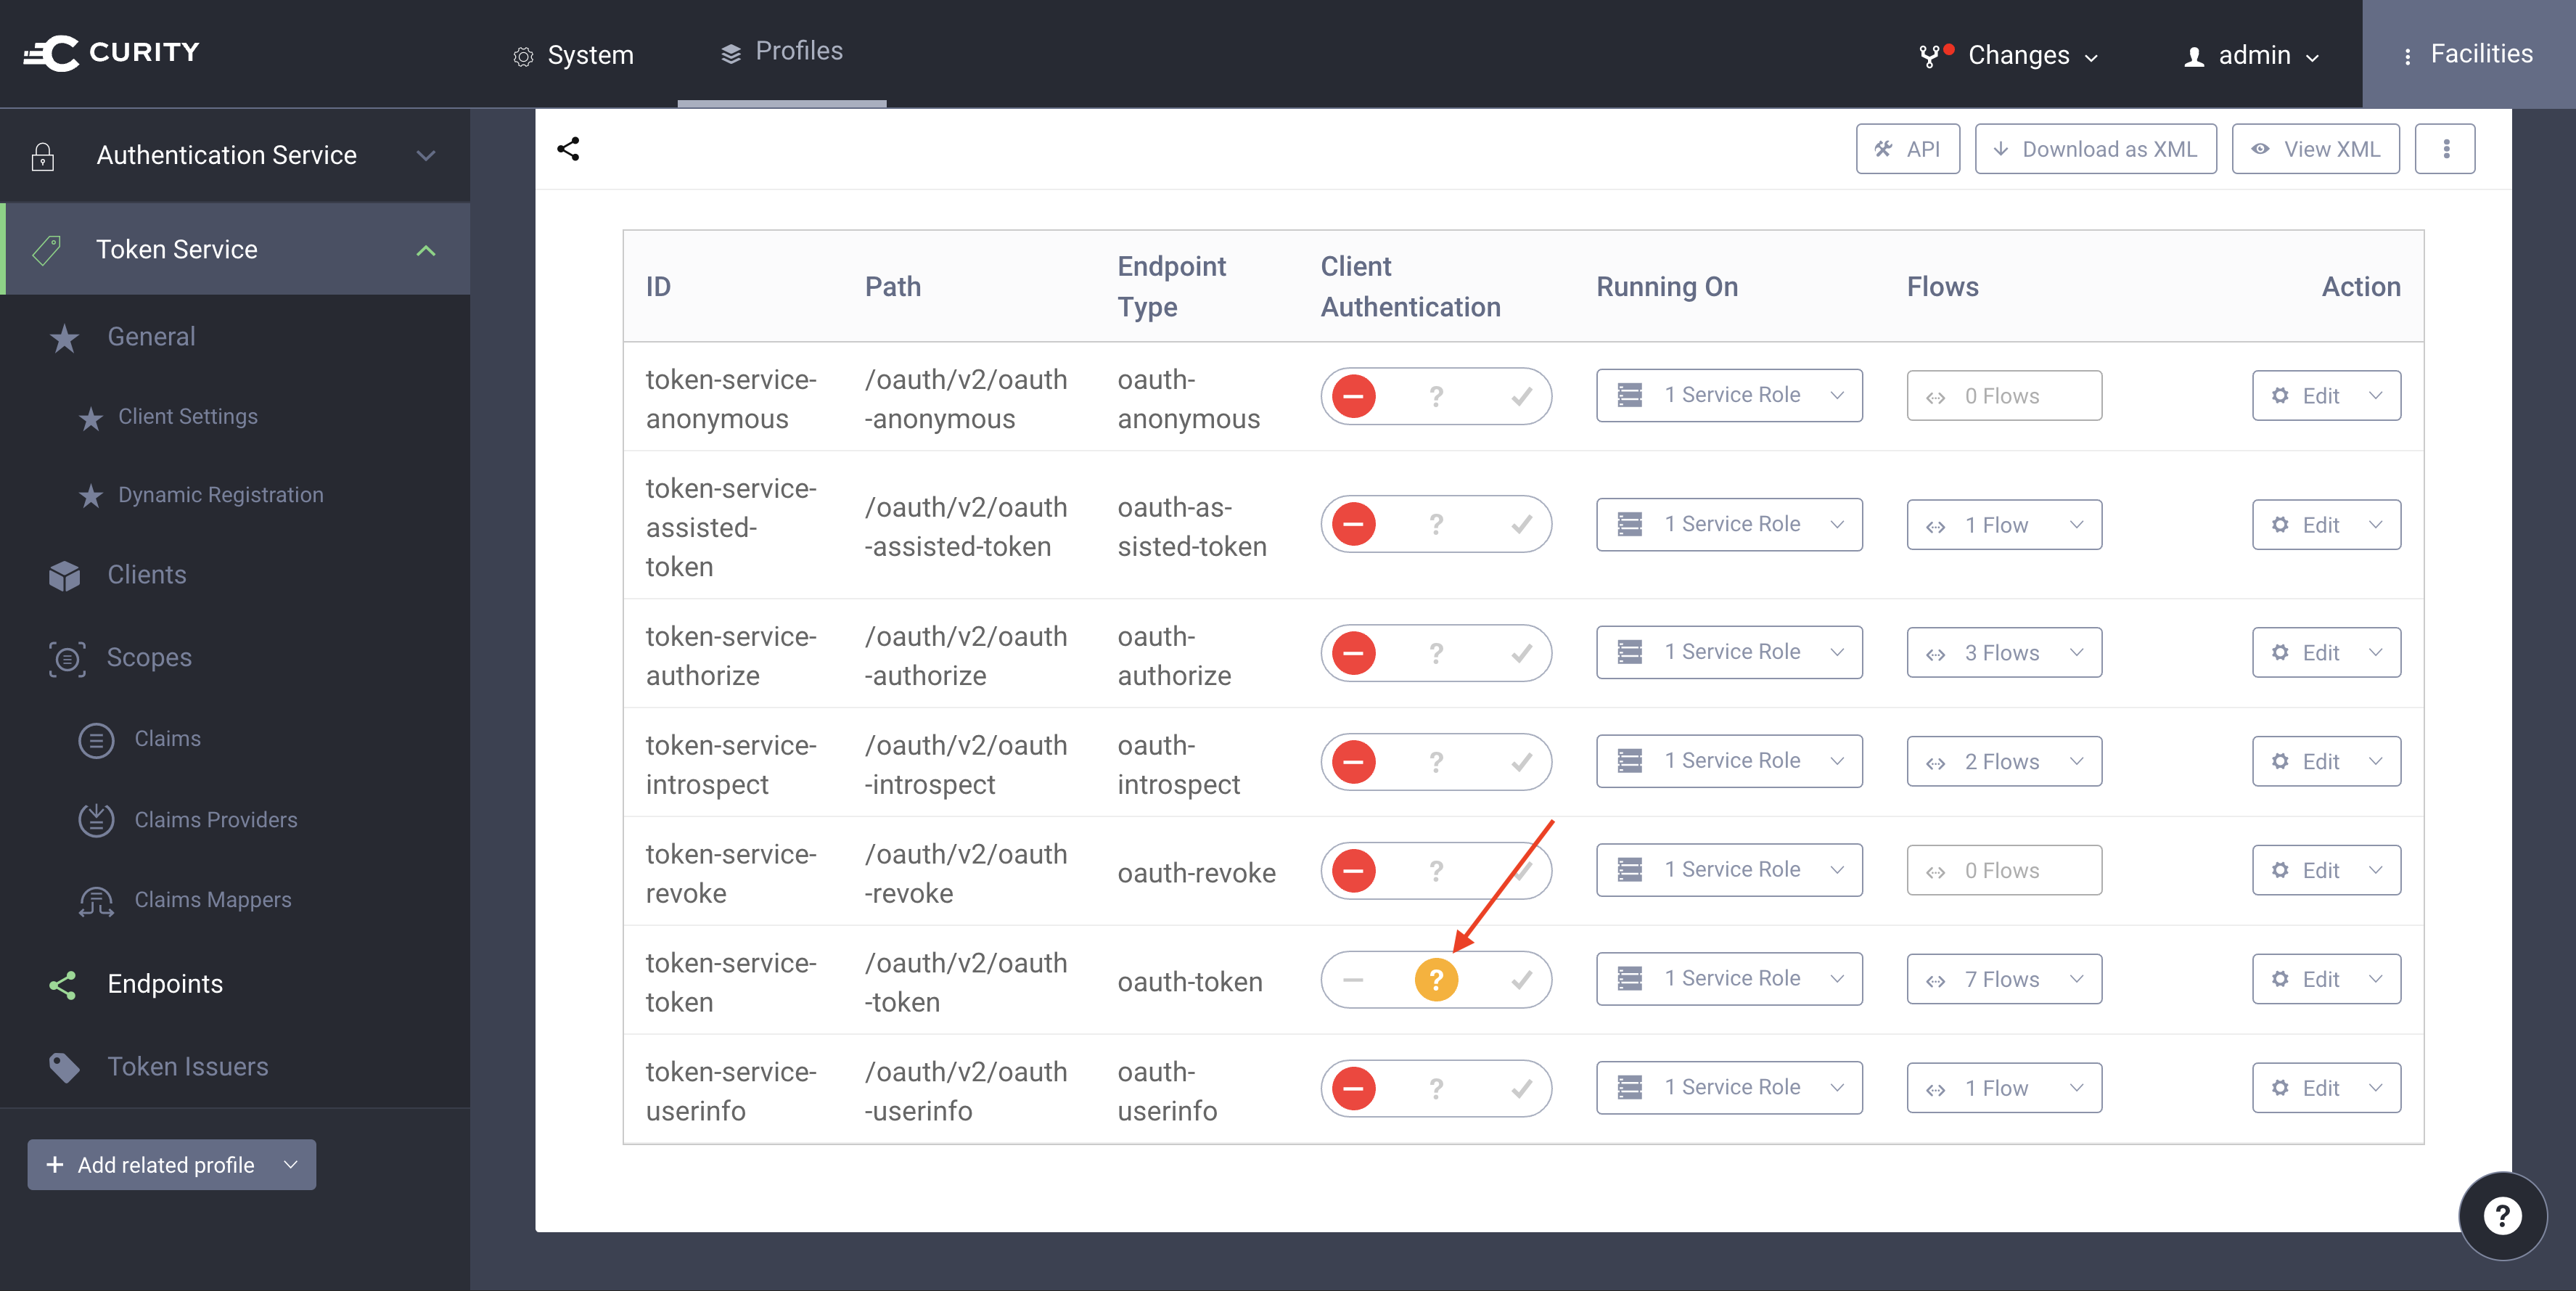
-
Commit the changes and you are all setup.


Update the client registration and provider in application.yml to fit your setup. If you followed the instructions in Curity Identity Server Configuration you do not need to change anything.
spring:
  security:
    oauth2:
      client:
        registration:
          idsvr:
            client-name: Spring Boot OpenID Demo Client
            client-id: demo-client
            client-authentication-method: none
            authorization-grant-type: authorization_code
            redirect-uri: "{baseUrl}/login/oauth2/code/{registrationId}"
            scope: openid
        provider:
          idsvr:
            authorizationUri: https://localhost:8443/oauth/v2/oauth-authorize
            tokenUri: https://localhost:8443/oauth/v2/oauth-token
            jwkSetUri: https://localhost:8443/oauth/v2/oauth-anonymous/jwks
Place the keystore created above in the resources folder and configure the SSL/TLS settings for the oauth client in application.yml:
custom:
  client:
    ssl:
      key-store: demo-client.p12
      key-store-password: Secr3t
key-store-type: pkcs12The application, in particular the underlying WebClient implementations that handle the requests to the token server namely to the Curity Identity Server, must trust the certificate provided by the server. Put the server certificate (idsvr.cer) in a trust store:
keytool -import -file idsvr.cer -alias idsvr -keystore idsvr.p12 -storepass changeit -storetype pkcs12 -nopromptPlace the trust store in the resources folder and update the SSL/TLS settings for the oauth client in application.yml:
custom:
    client:
      ssl:
        trust-store: idsvr.p12
        trust-store-password: changeit
        trust-store-type: pkcs12
Note You may use a self signed certificate for the Curity Identity Server but make sure it is a valid certificate for the server name, i.e the certificate must include the hostname of the server in the subject or the list of subject alternative names. The client will otherwise reject the certificate and communication with the server will not work.
To start the application run
./gradlew bootRunOpen https://localhost:9443 in your browser. It will automatically start a login flow.
More information about OAuth 2.0, OpenID Connect and the Curity Identity Server can be found here:
Check out the related tutorial of this repository:
Read up on OAuth 2.0 Mutual TLS Client Authentication
Spring Security OAuth 2.0 implementation does not support Mutual TLS Client Authentication out of the box (see Issue #4498 for status). As a result this example will only work with clients that run the "Code Flow". Further, any changes in the provider settings such as additional endpoints will most likely require adaption.
However, most of the customization is required because of the trust store. If you don't mind a global trust in your application you may consider using JVM arguments instead of custom.client.ssl.trust-store in application.yml and run the application with the following command:
./gradlew bootRun -Djavax.net.ssl.trustStore=/full/path/to/localhost.truststore -Djavax.net.ssl.trustStorePassword=changeitThis software is copyright (C) 2020 Curity AB. It is open source software that is licensed under the Apache 2 license.