INFO
The integration supports Grocy version 3.2 and above.
At least Home Assistant version 2021.12 is required for the integration from v4.3.3 and above.
You have to have the Grocy software already installed and running, this integration only communicates with an existing installation of Grocy. You can install the software with the Grocy add-on or another installation method, found at Grocy website.
The configuration is slightly different for those who use the official Grocy add-on from the add-on store.
- If you haven't already done so, install Grocy from the add-on store.
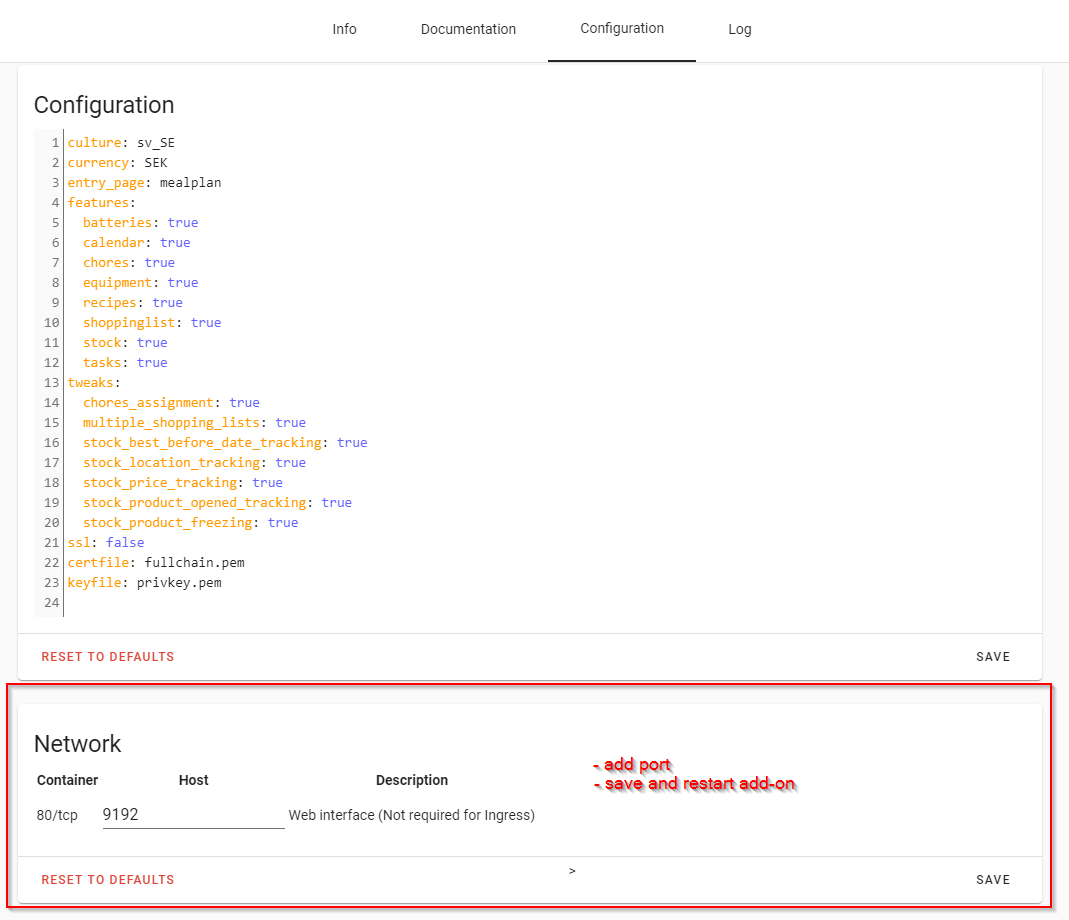
- In the 'Configuration' section of the add-on config, input
9192in the Network port field - see screenshot. Save your changes and restart the add-on. - Now continue with the instructions below.
- Install HACS, if you haven't already done so.
- In Home Assistant go to HACS > Integrations. Search for the "Grocy custom component" repository by clicking the "Explore & download repositories" button in the bottom right corner.
- In the bottom right corner click "Download the repository with HACS". Click "Download". Optional: for latest features and fixes choose "Show beta versions".
- Restart Home Assistant as instructed by HACS.
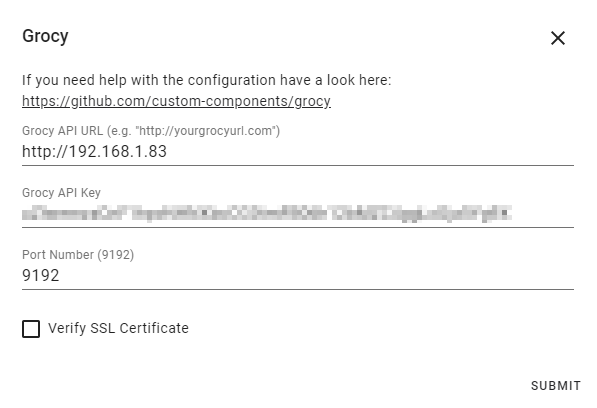
- Install the Grocy integration. Fill out the information according to this instruction.
- Before integration version v4.3.3, now restart Home Assistant again (with later versions you can skip this step).
- You will now have a new integration for Grocy. All entities are disabled from start, manually enable the entities you want to use.
Future integration updates will appear automatically within Home Assistant via HACS.
All entities are disabled from the start. You have to manually enable the entities you want to use in Home Assistant. You get a sensor each for chores, meal plan, shopping list, stock, tasks and batteries. You get a binary sensor each for overdue, expired, expiring and missing products and for overdue tasks, overdue chores and overdue batteries.
The following services come with the integration. For all available options check the Developer Tools: Services within Home Assistant.
- Grocy: Add Generic (grocy.add_generic)
Adds a single object of the given entity type.
- Grocy: Add Product To Stock (grocy.add_product_to_stock)
Adds a given amount of a product to the stock.
- Grocy: Open Product (grocy.open_product)
Opens a given amount of a product in stock.
- Grocy: Track Battery (grocy.track_battery)
Tracks the given battery.
- Grocy: Complete Task (grocy.complete_task)
Completes the given task.
- Grocy: Consume Product From Stock (grocy.consume_product_from_stock)
Consumes a given amount of a product from the stock.
- Grocy: Execute Chore (grocy.execute_chore)
Executes the given chore with an optional timestamp and executor.
- Grocy: Consume Recipe (grocy.consume_recipe)
Consumes the given recipe.
Translations are done via Lokalise. If you want to translate into your native language, please join the team.
If you have problems with the integration you can add debug prints to the log.
logger:
  default: info
  logs:
    pygrocy.grocy_api_client: debug
    custom_components.grocy: debug
If you are having issues and want to report a problem, always start with making sure that you're on the latest beta version of the integration, Grocy and Home Assistant.
You can ask for help in the forums, or make an issue with all of the relevant information here.
The Grocy url should be in the form below (start with http:// or https://) and point to your Grocy instance. If you use a SSL certificate you should have https and also check the "Verify SSL Certificate" box. Do not enter a port in the url field. Subdomains are also supported, fill out the full url in the field.
Go to your Grocy instance. Navigate via the wrench icon in the top right corner to "Manage API keys" and add a new API key. Copy and paste the generated key.
It should work with for example a Duck DNS address as well, but you still have to access it via a port, and the above instructions for the url still apply.
- If you have configured the Grocy add-on as described, use port 9192 (without https). Either be sure the port is open in your router or use your internal Home Assistant address.
- If you have configured an external Grocy instance and not sure, use port 80 for http or port 443 for https. Unless you have set a custom port for Grocy.


