The documentation website for this repo is published after each commit to the main branch.
You can find the last published version at https://design.cypress.io
First install the css package, tailwind and autoprefixer
npm install --save-dev @cypress-design/css tailwindcss autoprefixerThen configure your tailwind.config.cjs using the following template
// tailwind.config.cjs
const { TailwindConfig } = require('@cypress-design/css')

module.exports = TailwindConfig([
  './index.html',
  './src/**/*.{vue,js,ts,jsx,tsx}',
])
Check it out in the docs here
Components need the css package to work properly. Make sure you have fully setup the @cypress-design/css before installing any component.
To make sure each component fix is never blocked by an ongoing refactoring, we decided to publish each component as its own package.
If you want to install the Cypress Button, run
npm install @cypress-design/vue-buttonAt Cypress, we prefer using Vuejs to build new apps.
Since some projects at Cypress already use React as a framework, we decided to still publish each component as a react version and a vue version.
If you want to install the Cypress Button, and your project still uses React, install the react version
npm install @cypress-design/react-buttonSee the component ReadMe for the list of available components and the docs for their usage
yarn && yarn startThis will:
- install all dependencies if anything is missing
- build all the components, specially the ones needed for the docs
- start the docs website locally
- give you a link to open in your browser.
Using hygen we can scaffold all the tooling needed for a new components.
To start writing a new component, run this command:
yarn new:componentThe system will ask you to provide the name of the component and generate all the files needed to start writing it.
In the new directory, you will find a React and a Vuejs version to complete. Each framework folder will also contain a stories file.
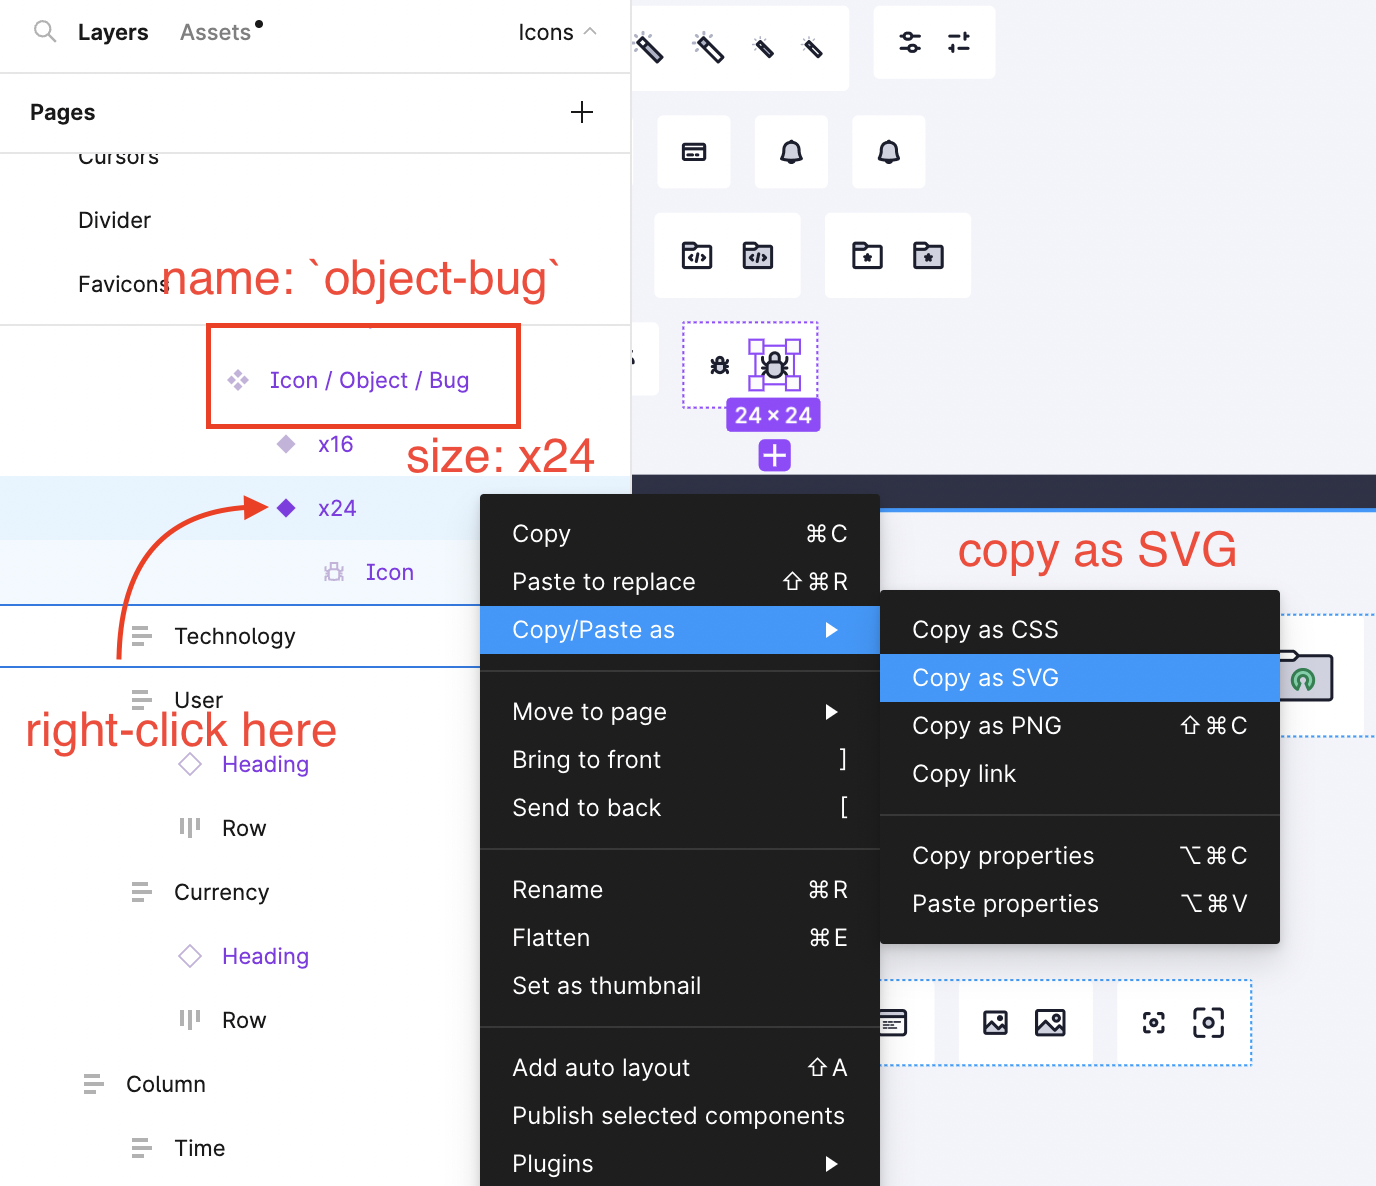
New icons should be added to the icon-registry/icons-static directory and named according to the format <category>-<icon-name>_x<size>.svg, for example, object-bug_x24.svg.
When grabbing the icon from Figma, make sure the width and height of the icon is equal to its name (e.g. x24 icons should be 24x24px). If it isn't, try going up a layer in Figma.
The name and size should match what's shown in Figma.
Once added, the svg attributes should be tweaked so as to integrate with the icon generation tooling.
- Replace the main color with
currentColor - Add
class="icon-dark"to paths that are dark, generally the strokes - Add
class="icon-light"to paths that are light, generally the fills - Remove the
widthandheightattributes of the SVG
To verify that the icon is properly hooked up, run yarn && yarn start and navigate to the icons page. Search for your icon and tweak the colors.
When an icon is added or updated, the changeset for '@cypress-design/icon-registry', '@cypress-design/react-icon' and '@cypress-design/vue-icon' should include a minor version bump. This can be helped by running yarn changeset.
When you use the yarn new:component command, the template used is called a generator. It could be useful to update it from time to time if the standards change.
First, create a scaffold for a component called ComponentName. The name matters because it will be used to generate the component templates and overwrite the old ones.
yarn new:component --name ComponentNameThen do all the changes you want to make to the component template.
Every time you use ComponentName in this template, it will be replaced in generated scaffolding.
Finally, to commit the changes to the template, run
# Remove the old template
rm -rf _templates/component/new
# start a new hygen-create session
npx hygen-create start component
# add all the files inside the component to the template
npx hygen-create add components/ComponentName/**/*
# remove the file automatically generated by hygen-create
npx hygen-create remove hygen-create.json
# Use ComponentName as a placeholder for the component name
npx hygen-create usename ComponentName
# generate the new template
npx hygen-create generate
# remove the temporary component
rm -rf components/ComponentName
# remove the metadata file
rm -f hygen-create.json
Finally, you should see the prompt.js file has been removed. Revert that change before committing.
To run in open mode, run yarn cy.
To run in CLI, run yarn cypress run --components.
- components A collection of components for building Cypress applications and websites.
- packages Some packages do not fit in css or in components but are used in multiple components. They are here.
- css What you need to install a pre-configured version of WindiCSS in a Cypress project.
- icon-registry contains the list of all the svg icons available in the vue-icon and react-icon components.
- docs the docs website.
- docs/.vitepress/theme where you will find all the components and the assets used in the docs website but not published to NPM.
- test Some sample test projects. We use them as sanity checks to see if the components we build are actually working with a real setup.
