GitHub: https://github.com/cyrus-xc/Springboot-highThroughput-webApp
This project is a high concurrency online shopping snap up system . It should handle order creation from hundreds of thousands of users simultaneously and determine which user gets the deal successfully.
A quick example: new iphone15 is released, but Apple only prepare 1,000 units for the first release and there are 5,000 people waiting to buy one on the first day. This system is needed to handle high request flow and create 1,000 orders exactly.
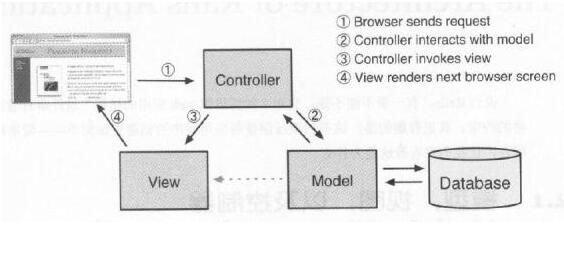
This is a SpringBoot-based high-concurrency system supports thousands and millions simultaneous visits. It is designed in SSM(Spring+SpringMVC+MyBatis)Structure, with implementations of Controller layer, MyBatis Mapper layer, DAO(Data Access Object) Layer, Service Layer and View Layer, which is a detailed version of MVC design pattern.
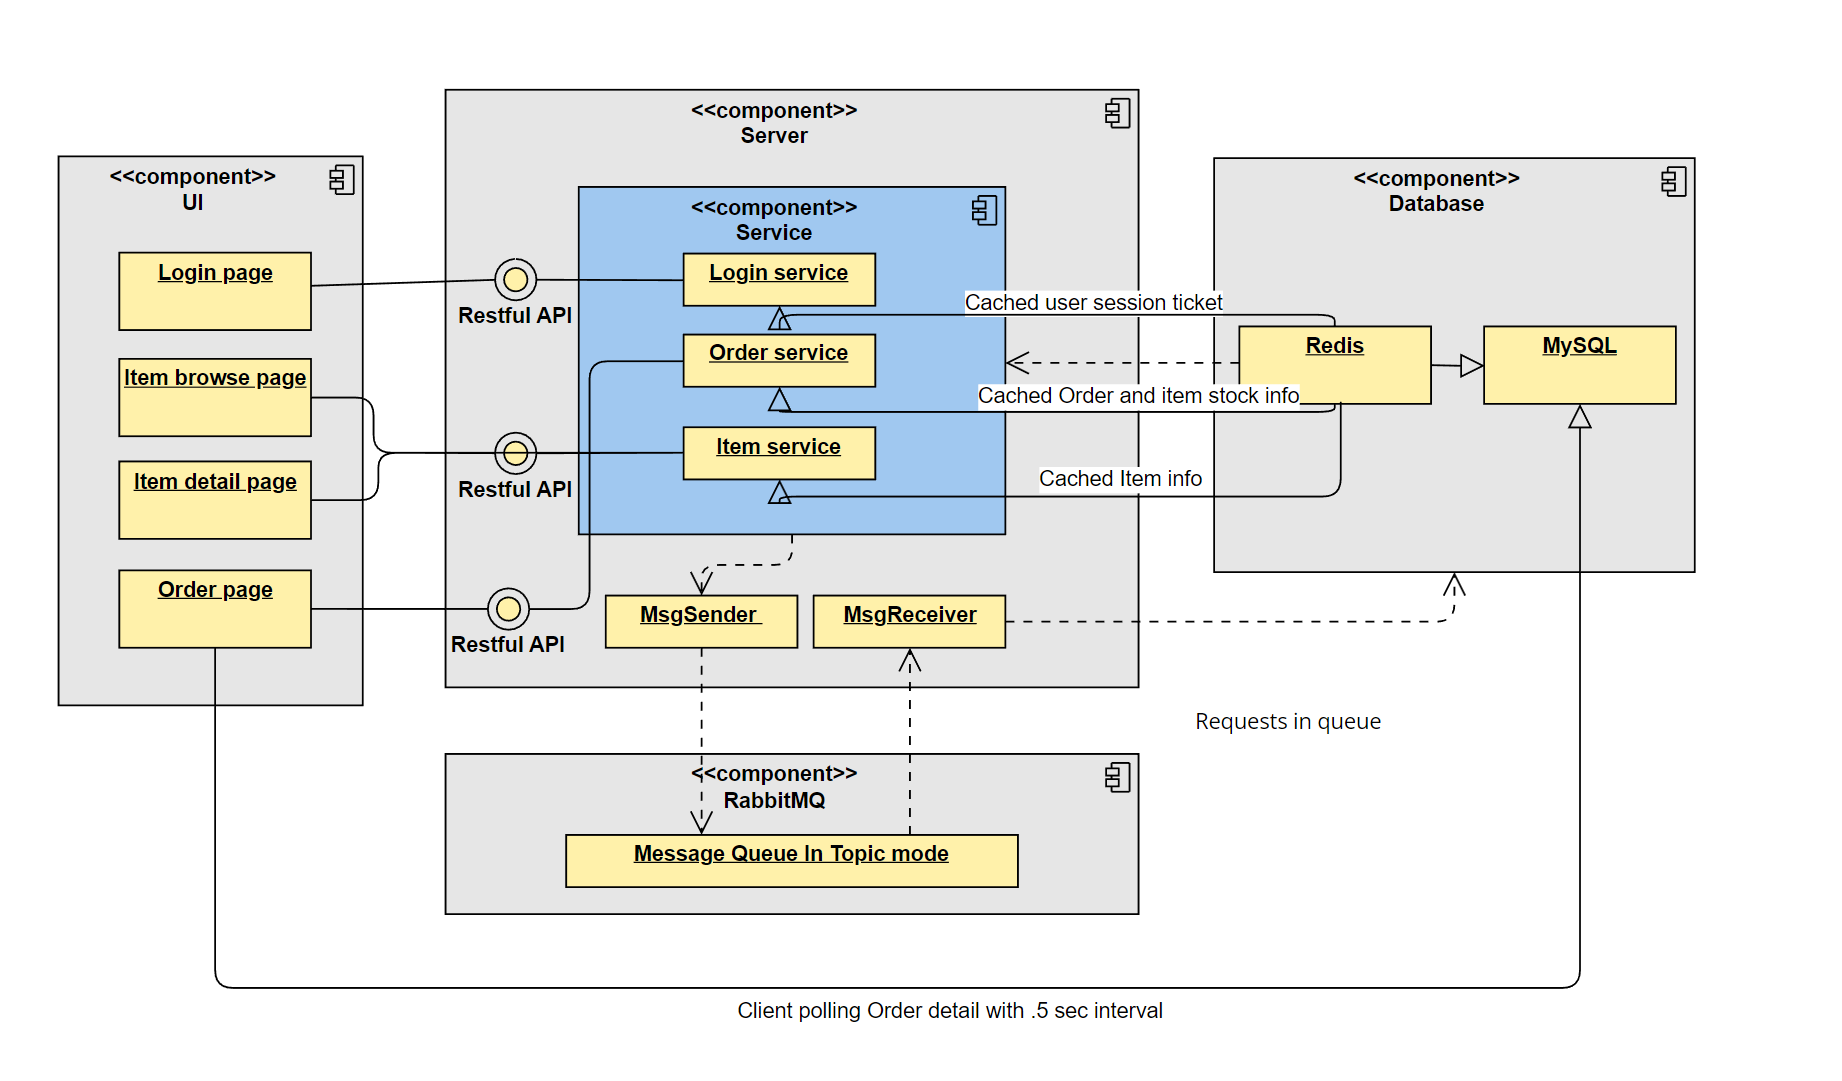
It uses a Redis database to cache high request data and RabbitMQ to desynchronize client request and server response. It also applied common web optimizations like static web pages and cache markers. Here is the full structure of the project:
User Interface:
- Login page: Login with username and password on webpage.
- Item List page: A table view of all items available; Show related info; Button to jump to detail page of selected item.
- Item Detail page: A table view of item details. A sale start count down clock. A sale status info: "Sale not started; Sale in progress; Sale ended". A button to create order.
- Order Page: Order status prompt: "Success/Fail/Out of stock", Order detail, and a button to make payment.
- Order Failed page: Fail to create order with a message.
Server:
- Login Controller: API for user login; Jump to Item List Page.
- Good Controller: API for item detail query; Parse sale status for selected item; Parse remain time;
- User Controller: API for query user info.
- Order Controller: API for creating order; Determine if order is legal, and put the create order request to RabbitMQ.
- User Service: Login session creation; MD5 password encryption; User ticket stored to Redis; Get User object by Cookie.
- Order Service: Create Order; Load order to Redis; Get order creation result: "Success/Fail".
- Goods Service: List items; Get item object by item ID.
- Goods Mapper: SQL query for goods
- Order Mapper: SQL query for order
- User Mapper: SQL query for users
- POJO (plain old java object) for all data objects; VO (value object) for RespBean objects.
- RabbitMQ sender(producer) and receiver(consumer).
Database and MQ:
- RabbitMQ: RabbitMQ service on local Linux server
- Redis: Redis service on local Linux server
- MySQL: SQL service on local Windows machine
- SpringBoot
- Redis
- MySQL
- MyBatis plus
- RabbitMQ
- Thymeleaf
- MD5
MySQL 8.0.22 or higher: https://dev.mysql.com/downloads/mysql/
Redis 6.0.9 or higher: https://redis.io/download
Redis Insight (optional UI for Redis): https://redislabs.com/redis-enterprise/redis-insight
JDK 20 or higher: https://www.oracle.com/java/technologies/javase-downloads.html
JMeter 5.4.1 or higher: https://jmeter.apache.org/download_jmeter.cgi
RabbitMQ 3.8.19 or higher: https://www.rabbitmq.com/download.html
- Clone the repository
- Import the project into your IDE, I am using Idea Intellij and JDK 20 for this project, simply import the project as a Spring project.
Other Java Version should work as well, just change the version in
pom.xmlfile. - Ensure all dependencies in
pom.xmlare installed and built with Maven.
-
Install MySQL with link provide above.
-
Make sure MySQL is running on your machine, on Windows, you can run
net start mysqlin command line to start MySQL service. -
Create a database named
springwebappin MySQL. Next we need to create 3 tables. -
Create a table named
t_userin the database, you can simply run this SQL script:CREATE TABLE `t_user` ( `id` BIGINT ( 20 ) NOT NULL COMMENT 'ID, Phone', `nickname` VARCHAR ( 255 ) NOT NULL, `password` VARCHAR ( 32 ) DEFAULT NULL COMMENT 'MD5(MD5(password(plain text) + salt) + salt)', `salt` VARCHAR ( 10 ) DEFAULT NULL, `avater` VARCHAR ( 128 ) DEFAULT NULL COMMENT 'user avater pic url', `last_login_date` DATETIME DEFAULT NULL, `login_count` INT ( 11 ) DEFAULT '0', PRIMARY KEY ( `id` )
copy and run the above.
May create a testing data with:
18520655614 Cyrus b7797cce01b4b131b433b6acf4add449 1a2b3c4d 0
-
Create a table named
t_goodsin the database, run this SQL script:
  CREATE TABLE `t_goods` (
  `id` BIGINT ( 20 ) NOT NULL AUTO_INCREMENT,
  `name` VARCHAR ( 16 ) DEFAULT NULL,
  `title` VARCHAR ( 64 ) DEFAULT NULL,
  `img` VARCHAR ( 128 ) DEFAULT NULL,
  `detail` LONGTEXT DEFAULT NULL,
  `price` DECIMAL ( 10, 2 ) DEFAULT '0.00',
  `stock` INT ( 11 ) DEFAULT '0' COMMENT '-1 means no limit',
  PRIMARY KEY ( `id` )
  );
copy and run the above.
May create a testing data as follows:
-
Create a table named
t_orderin the data base, run this SQL script:CREATE TABLE `t_order` ( `id` BIGINT ( 20 ) NOT NULL AUTO_INCREMENT, `user_id` BIGINT( 20 ) DEFAULT NULL, `goods_id` BIGINT(20) DEFAULT NULL, `goods_name` VARCHAR(16) DEFAULT NULL, `goods_count` INT(11) DEFAULT '0', `goods_price` DECIMAL(10,2) DEFAULT '0.00', `status` INT(4) DEFAULT '0' COMMENT 'order status, 0 for new, 1 for paid, 2 for shipped, 3 for delivered, 4 for finished', `create_date` DATETIME DEFAULT NULL, `pay_date` DATETIME DEFAULT NULL, PRIMARY KEY ( `id` ) );
copy and run the above.
May create a testing data as follows:
- You can either install Redis on your machine or use Redis Cloud service.
- I am using local Redis with WSL on Windows 10, follow this guide to install WSL and setup Ubuntu 20.04: https://docs.microsoft.com/en-us/windows/wsl/install-win10
- Follow this guide to install Redis on WSL: https://www.digitalocean.com/community/tutorials/how-to-install-and-secure-redis-on-ubuntu-20-04
- Once Redis is installed, you can run
sudo service redis-server startthen runredis-clito connect to Redis server. Take note of the IP address and port number. It is usually127.0.0.1:6379if you are running on local machine.
- Install RabbitMQ on a Linux system is recommended. You can follow this guide to install RabbitMQ on Ubuntu 20.04: https://www.rabbitmq.com/install-debian.html.
- Once RabbitMQ is installed, you can run
sudo service rabbitmq-server startto start RabbitMQ service. - You can check the status of RabbitMQ service by running
sudo service rabbitmq-server status. Take note of the IP address and Port number. - To access RabbitMQ management console, visit
http://127.0.0.1:15672to access the management console. The default username and password isguest.
- Run
SpringwebappApplication.javain your IDE. - Open your browser and visit
http://localhost:8080/login/toLogin
To simulate high request flow you want to use JMeter to test the application. You can download JMeter here: https://jmeter.apache.org/download_jmeter.cgi
You can either import the jmeter.jmx file in the root directory of this project or create a new test plan.
- Open JMeter and create a new test plan.
- Add a Thread Group to the test plan with 10,000 users.
- Add an HTTP Request to the Thread Group.
- Add a View Results Tree and Regression Result to the Thread Group.
- Run the test plan and you should see the result in View Results Tree.
Before RabbitMQ and Redis are introduced, the average Error% is 48.79 and the throughput is 367.9/s.
After RabbitMQ and Redis are introduced, the average Error% is 15.48 and the throughput is 1568/s.
For further reference, please consider the following sections:
- Official Apache Maven documentation
- Spring Boot Maven Plugin Reference Guide
- Create an OCI image
- Thymeleaf
- Spring Web
The following guides illustrate how to use some features concretely:


