A set of components to build experiments in React for A/B and Multivariate testing in Google Optimize or Optimizely.
Using an experiment object, an Experiment component can be used to render Treatment and Control components.
Via NPM:
npm install react-experimentifyVia Yarn:
yarn add react-experimentifyBefore jumping into Google Optimise you need to make sure your page will handle google optimise tags. For more info on configuring the Google Tag Managers and the windows dataLayer please see Google's Docs
- Decide on an experiment name
-
Guide
<Component under experiment>_<Placement Identifier>- eg:
h1_ListingPage
- eg:
- Set up an experiment in Google Optimize
-
Code to execute via Google Optimize
window.dispatchEvent(new CustomEvent('h1_ListingPage.render', {
  detail: {
    title: 'Treatment - ' + Date.now()
  }
}));
-
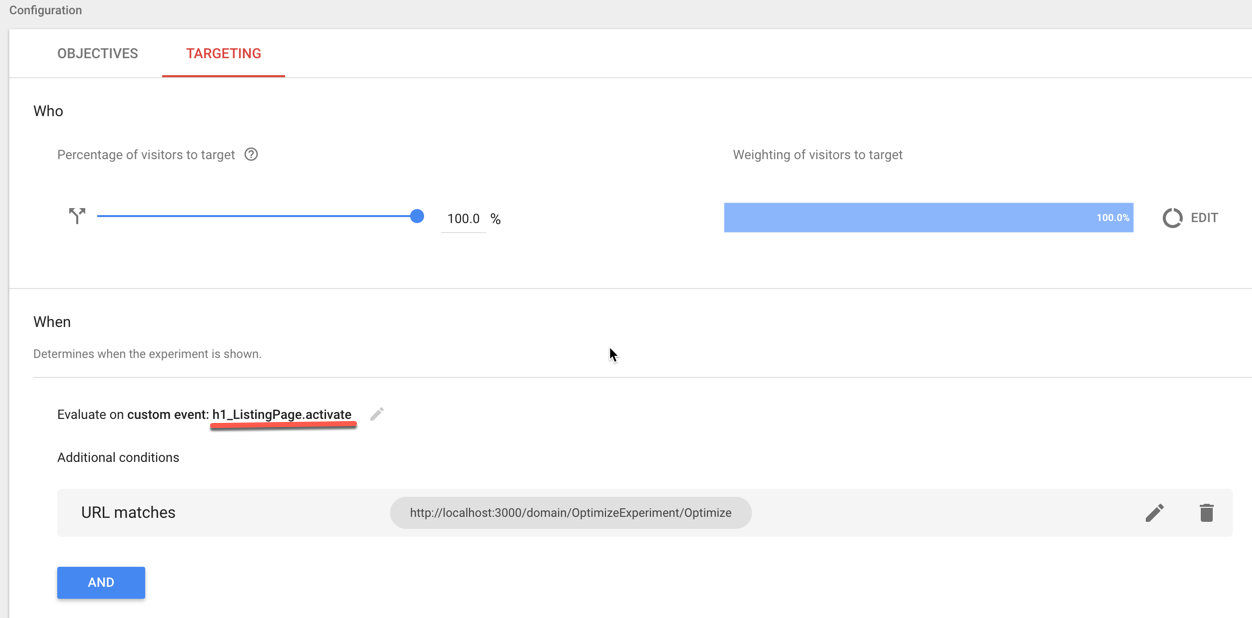
Add
h1_ListingPage.activateas custom event
- Import
  import React from 'react';
  import ReactDOM from 'react-dom';

import { Experiment, Treatment, Control, Optimize, ExperimentOpacifier } from 'react-experimentify';- Initialization
import { Experiment, Treatment, Control, Optimize, ExperimentOpacifier } from 'react-experimentify';
import React from 'react';
import ReactDOM from 'react-dom';

const experiment = new Optimize('h1_ListingPage');- Activation
- Experiment can be activated at any point in time after component has been mounted. We can activate it on the client side as well. If we want the experiment to be activated straight after the parent component is mounted, add following
experiment.activate() takes an optional callback, should you wish to fire any tracking events or specialised functionality once the experiment has been activated.
componentDidMount() {
  this.experiment.activate();
  this.unsubscribe = this.experiment.subscribe(state => this.setState(state));
}

componentWillUnmount() {
  this.unsubscribe();
}- Add following to render method. (Here we are experimenting h1 tag)
  <Experiment experiment={experiment}>
    <div>
      <Treatment>
        <h1>Treatment 1</h1>
      </Treatment>
      <Control>
        <p>Control</p>
      </Control>
    </div>
</Experiment>- With
ExperimentOpacifier
-
Helps to reduce the flickering effect when the experiment is loading.
-
How it works?
- Let the component under experiment to render the control version in transparent mode.
- Wait for the experiment to kick in within the
timeoutperiod. - If the experiment loads before timing out, user will see the variant of the experiment.
- If timed out, user will see control version.
  <Experiment experiment={experiment}>
    <ExperimentOpacifier
      wrapper={'div'}
      timeout={250}
      transition={250}
    >
      <div>
        <Treatment>
          <h1>Treatment 1</h1>
        </Treatment>
        <Control>
          <p>Control</p>
        </Control>
      </div>
    </ExperimentOpacifier>
  </Experiment>
- Override opacity behaviour
Because the ExperimentOpacifier initially renders with an opacity of 0,
this be override with the .experiment__opacity class.
Add a <noscript> element to the page to override the opacity
<noscript>
  <style>
    .experiment__opacity {
      opacity: 1 !important;
    }
  </style>
</noscript>import { Experiment, Treatment, Control, optimizely } from 'react-experimentify';
import React from 'react';
import ReactDOM from 'react-dom';
const experiment = optimizely(experimentId, {
'2': {
content: 'Treatment 2'
},
'3': {
content: 'Treatment 3',
},
});
ReactDOM.render((
<Experiment experiment={experiment}>
<div>
<Treatment groups={['1']}>
<h1>Treatment 1</h1>
</Treatment>
<Treatment groups={[2, 3]}>
{
({ content }) => (<h2>{content}</h2>)
}
</Treatment>
<Control group={4}>
<p>Control</p>
</Control>
</div>
</Experiment>
), document.querySelector('.react-experimentify-entry-point'));| Prop | Type | Default | Description | Required |
|---|---|---|---|---|
| children | node |
A single child element to render | No | |
| experiment | object |
An experiment object used to run the experiment | Yes |
| Prop | Type | Default | Description | Required |
|---|---|---|---|---|
| children | oneOf(node, func) |
The child elements or function to render the treatment | No | |
| render | func |
The function to render the treatment | No | |
| groups | oneOf(string, arrayOf(string)) |
The groups that will receive the treatment | Yes |
Note: You should not use <Control render> and <Control children> in the same control;
<Control children> will be ignored
| Prop | Type | Default | Description | Required |
|---|---|---|---|---|
| children | oneOf(node, func) |
The child elements or function to render the control | No | |
| render | func |
The function to render the control | No | |
| group | string |
The control group | Yes |
Note: You should not use <Treatement render> and <Treatement children> in the same treatment;
<Treatement children> will be ignored
A higher order component that injects the current experiment as a prop to the wrapped component
An experiment object for the Optimizely A/B testing platform
experimentId: the id for the current optimizely experiment
groupVariants: an optional map of variantIds to props. Used when rendering a Treatement for a given group
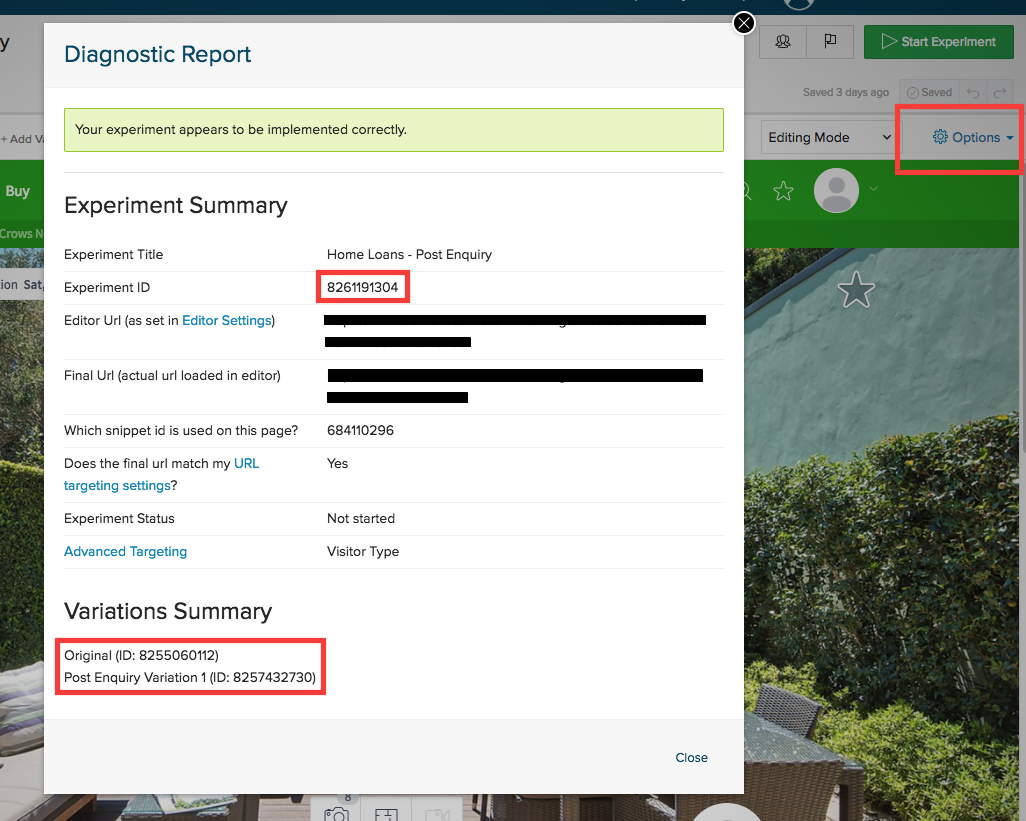
To setup an experiment in optimizely, create an experiment and add the required number of variants. You need to decide which variants will be the Treatments and which will be the Control.
The experimentId and variantId can be found visiting the edit page for the experiment
and opening the 'Diagnostic Report' under options.
Pushes events to optimizely for tracking.
Manually activates an experiment. Dispatches changes to all subscribers.
Determines if any of the variants are active for the current experiment.
Determines if the current experiment is active.
Determines if the current user is in the control group and no variants are active.
Subscribe listener functions to changes to the experiment. Returns the unsubscribe function.
Updates the current experiment by moving the current user into a different treatment group.
Dispatches changes to all subscribers.
An empty Array will move the current user into the control group.
Gets the props for the current variant from the groupVariants.
See CHANGELOG.md.

