-
The VR lenses are designed to make it possible for you to focus on a screen that is extremely near your face.
- They will also magnify the image from the phone display
- Each manufacture needs to come up with a lense that makes the best tradeoff: field of view, focal length, comfort, optical distortion, and cost
-
Low persistence: Shows just part of the image to the user (do not show the full image)
- It looks like one of those old CRT TVs where you can see the image being generated in real time
- We only show the slices because it reduces motion blur (clear image)
- That hides the pixels while they change color
- Keeps the image clear
-
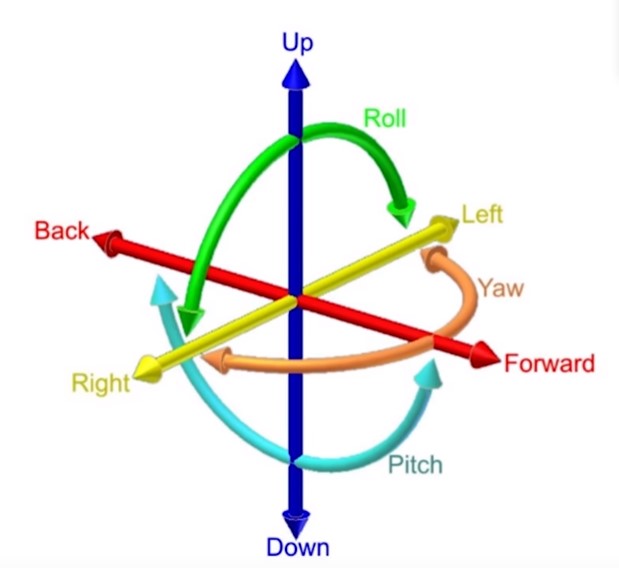
For tracking, all modern VR headsets uses a technology called Inertial Measurement Units (IMU).
- Enables hi speed rotation tracking
- It can't tell where an object is in space, but it can tell when an object rotates
- In order to track the users position, some VRs sets uses cameras, lasers, magnetic fields, etc..
- No universally acceptable technic
-
What causes discomfort while using a VR headset?
- Miss match between your body internal sense of motion, and the data your brain receives from your visual system
- What you see don't line up with what your body feels
- Miss match between your body internal sense of motion, and the data your brain receives from your visual system
-
The origin of VR comes from 3D displays
- 1838: Sir Charles Wheatstone
- To images being reflected at 45 degrees
- 1968: Ivan Sutherland
- Track users head motion and overlay synthetic 3d stereoscopic computer generated graphics
- 2012: Oculus Rift
- 1838: Sir Charles Wheatstone
-
Lesson Review
- What is virtual reality?
- Virtual reality is the creation of a synthetic, believable virtual world that is made possible by hardware and software.
- What hardware is needed for virtual reality to work?
- Hardware components include two lenses, a display panel or two and some sort of tracking hardware.
- Lenses
- Lenses help us focus on the displays that are really close to our eyes. They magnify the image to ensure that we can see everything.
- Display Panels
- Display panels are the component that will actually display the image that we’re going to see. Some hardware, like the Oculus Rift, Oculus Go, or HTC Vive, use embedded display panels. The display panels are included in the headset. Other hardware uses a phone as the display panels. For example, Google Cardboard, Google Daydream, and GearVR use a phone to do display the images. Display panels need to have a very high resolution and support low persistence. In order for a resolution to be as good as a photo, a display panel in a headset would need to have 16,000 by 16,000 pixels. For comparison, the HTC Vive has a resolution of 1080x1200. We have a long way to go! The low persistence is needed because this will help ensure we see clear visuals when rotating our heads in VR. It prevents what’s called “motion blur”. Since OLED pixels don’t change color fast enough, low persistence updates a small portion of an image at any given time, making the visuals clear as we turn in VR.
- Tracking
- VR requires some sort of tracking in order to work. Inertial Measurement Units (IMUs) are the chips that are used for tracking rotation. Google Cardboard, for example, would use IMUs to track our rotation as we move the headset around. The only drawback of this type of tracking is that IMUs don’t track position. To track our position in the space, we must use other techniques. Some headsets use cameras, lasers, or magnetic fields to track our position.
- What is simulator sickness?
- One of the most common challenges of developing for VR is called “simulator sickness” (or sim sickness). This is where someone gets sick (dizzy, queasy, or headaches) from a VR experience. Sim sickness is caused because there’s a mismatch between the body’s internal sense of motion and what we see.
- How did we get to where we are with VR?
- A very brief timeline: 1838 → The Stereoscope is invented by Sir Charles Wheatstone. This is our first foray into 3D graphics.
- 1968 → The Sword of Damocles is invented by Ivan Sutherland. His invention tracked user head motion and overlayed vision with synthetic computer generated graphics of primitive 3D object wireframes.
- 1990s → VR was first promoted to the general public but the devices didn’t live up to expectations.
- 2012 → Oculus Rift Kickstarter is launched and backed. Oculus would later be bought by Facebook for $2 billion.
- 2014 → Google Cardboard released.
- 2016 → Google Daydream was announced.
- A very brief timeline: 1838 → The Stereoscope is invented by Sir Charles Wheatstone. This is our first foray into 3D graphics.
- What is virtual reality?
-
The biggest difference between Mobile vs Desktop VR is DOF
- DOF is short for Degrees of Freedom
- How accurately a VR system can track you
- For a VR headset, it is the difference from knowing where are you looking and where are you looking and located in the room
- 3 DOF means your head can be tracked when:
- It rotates along the X, Y and Z axis
- To detect rotation a simple sensor called IMU (Inertial Measurement Unit) is used
- Combines the information from an accelerometer, magnetometer and gyroscope. Basically it is using gravity and the earth magnetic field to constantly infer where it is pointing.

- This can either come from the phone of the headset it self
- 6 DOF
- Can also be tracked when it moves along the X, Y and Z axis
- That means you are tracker around the room, and not only statically in the same position
- Position tracking mostly uses Optic technics
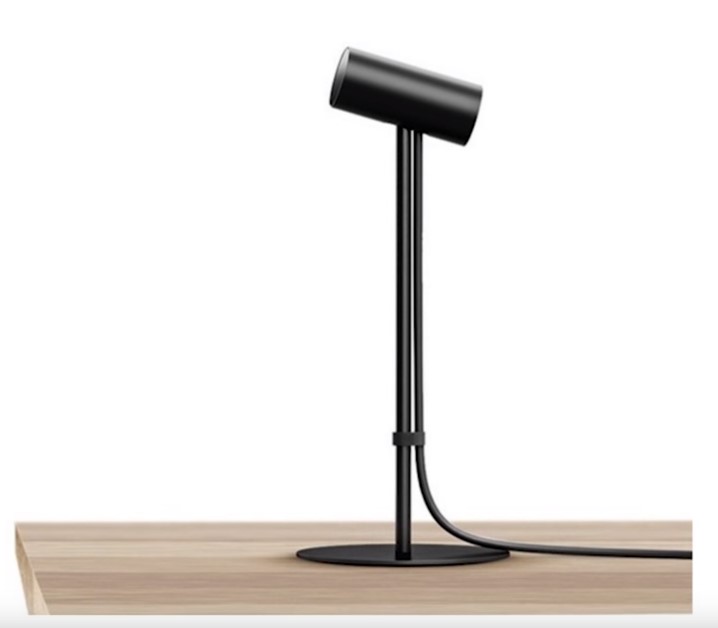
- Oculus Rift
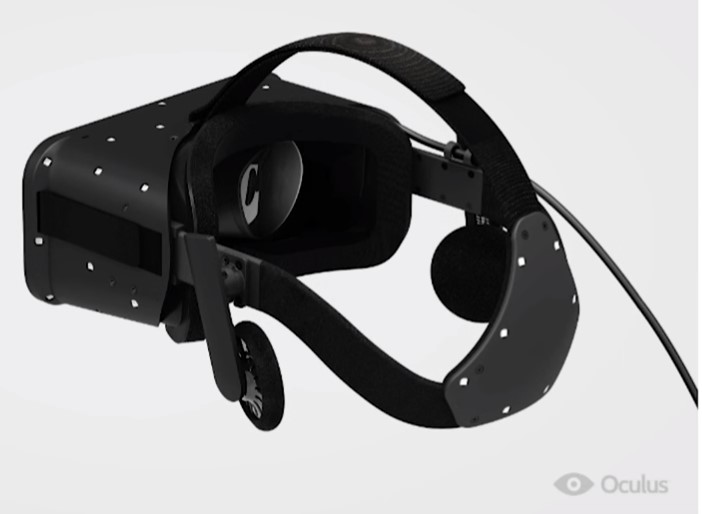
- Uses a tracking system called Constellation
- The headset contains a great number of infra red LEDs. Each LED is blinking super fast in a specific pattern
- Also has a separate camera that you place in your desk. The camera captures the light patterns and a computer program builds up a model of the light positions
- That then tries to fit a 3D model of the rift onto the 2d model of the camera
-
- Based on this 3d model, and measurements from an internal IMU it calculates your head position
- This model is cheap and has decent results, and that is why Oculus is doing it
- HTC Vive (HTC + Valve)
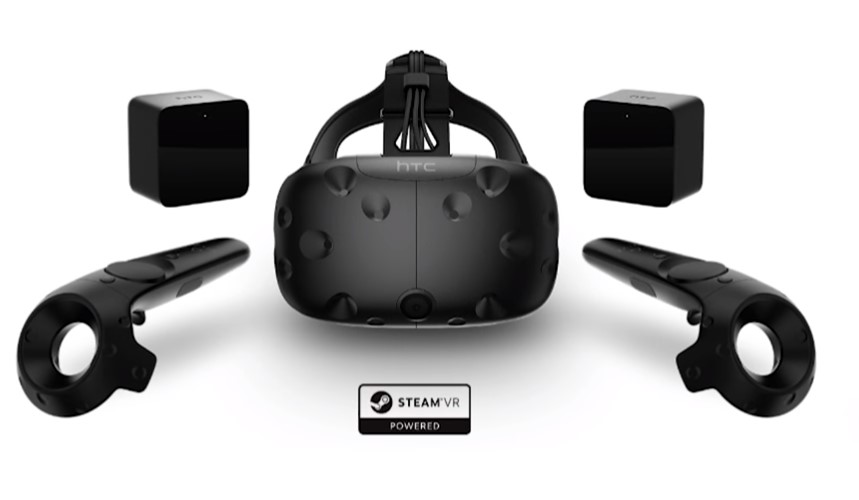
- Uses a tracking system called Light House
- Unlike the Oculus Rift, it uses infra red laser
- It works by measuring the time it takes for a laser to swipe horizontally and vertically across a fast photo sensor.
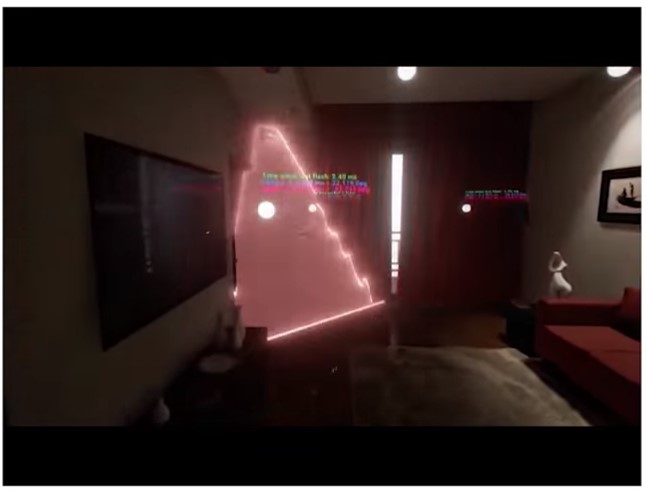
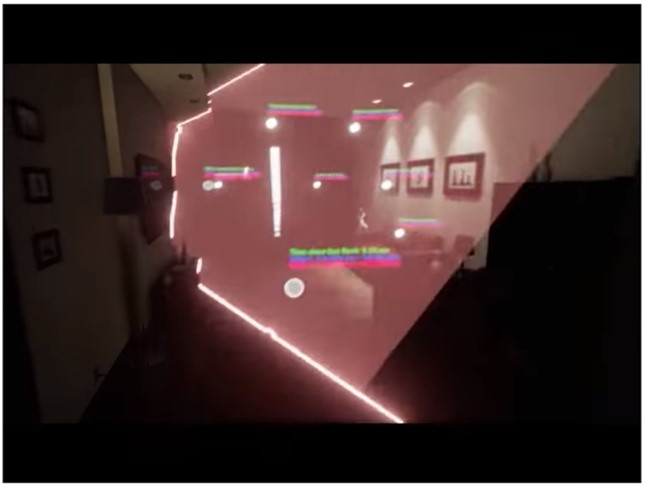
- It is a similar principal to how ships navigates using time measurements between light house flashes (hence the name light house)
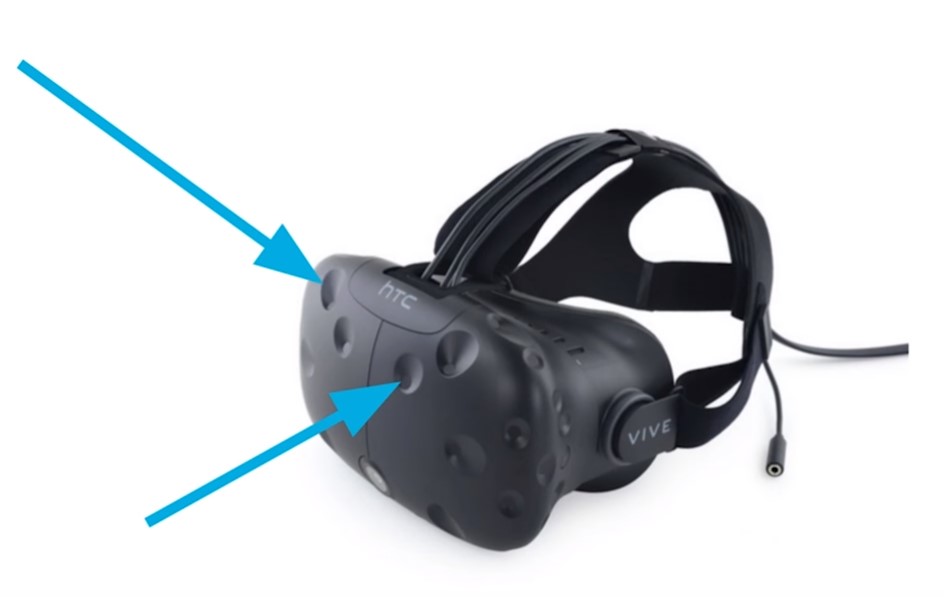
- Both the Vive head set and controllers are covered with little circular indentions for the photo sensors
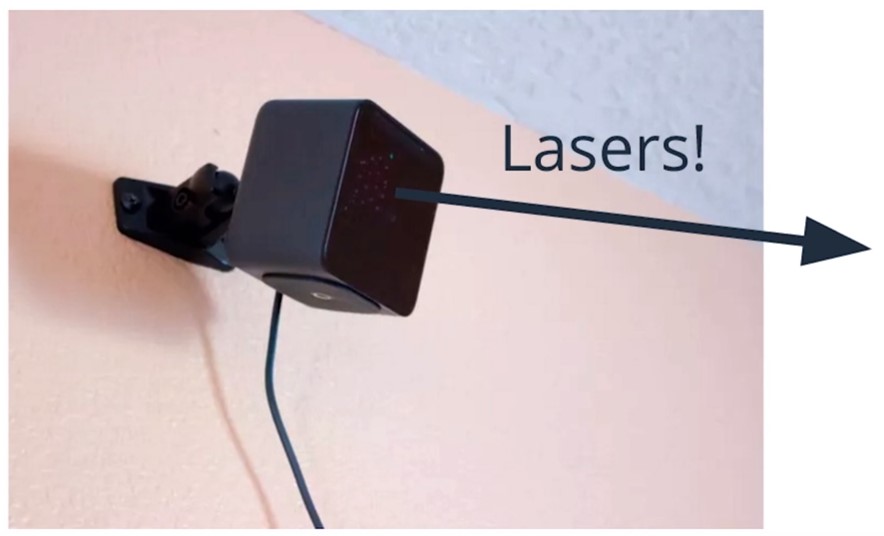
- A Vive base station is constantly swiping the room with a laser that hits the photo sensors. The swipe times are used to determine their positions in space. It uses this data and combines with readings from a embedded IMU to determine where your head and hands are located
- DOF is short for Degrees of Freedom
-
Mobile vs Desktop VR
- Mobile VR uses the phones IMU.
- This only leads us to 3DOF (only head rotation)
- No wires needed
- Less power full in terms of graphical performance
- Desktop VR gets full 6 DOF tracking
- Long cables from the headset to the PC
- More computing power (better visual quality)
- Desktop VR generally have hand controllers
- Mobile VR uses the phones IMU.
-
VR Development Platforms
- Their are two primary ways of rendering 3d environments
- Write code
- Use a graphical based environment
- Or a combination of both
- Unity Game Engine
- Makes it easier to develop games
- The engine provides
- 3D rendering
- Physics
- Sounds
- Scripting
- Animation
- Asset Management
- And more...
- Other game engines
- Unreal Engine
- Cryengine
- Lumberyard
- etc...
- Could also go native with OpenGL, Microsoft DirectX, etc..
- WebVR: Not ready, but good prospect
- Their are two primary ways of rendering 3d environments
-
Lesson Review
- What is DoF?
- DoF stands for degrees of freedom and deals with how accurately the VR system can track you.
- What is the difference between 3DoF and 6DoF?
- 3DoF tracking will track how the headset is rotated, so it will know where we’re looking. Most mobile VR platforms use 3DoF tracking. A 6DoF headset will track rotation PLUS position. It will know where we’re looking and where we are in the world. This is how high end VR systems, like the HTC Vive and Oculus Rift, allow you to move around the room.
- How does 3DoF tracking track our rotation?
- Inertial Measurement Units (IMUs) are used to track the rotation. IMUs use a gyroscope, accelerometer and a magnetometer to detect rotations. All modern 3DoF tracking uses an IMU.
- How does 6DoF tracking work?
- There are many different ways to accomplish 6DoF tracking.
- The Oculus Rift uses a large number of LEDs and external cameras that build a model and then it tries to fit a 3D model of the headset with the 2D model it sees of the camera. Then it uses information from an internal IMU to calculate head position.
- The HTC Vive uses infrared lasers to measure the time it takes to sweep vertically and horizontally across a photo sensor. It uses the data it gets and an internal IMU to determine where your head and hands are located.
- What are the key differences between mobile and desktop VR?
- Mobile VR uses IMU tracking, so it only has 3DoF tracking. It can only track your head’s rotation - not it’s position. It’s also “untethered”, meaning that there’s no wires connecting your headset to a computer. You can use it anywhere. It has less powerful graphics and is powered by a battery.
- Desktop VR uses 6DoF tracking and is typically tethered. It’s plugged into a computer and uses the computer to do the graphics work and to get its power. The graphics are generally more impressive. Most desktop VR headsets also come with hand controllers that allow for more interactivity and a more immersive experience.
- How can we develop for VR?
- Generally, developing for VR requires writing some code, using an editor, or a combination of both. We’ll be doing both over the course of this program.
- For our editor, we’ll be using Unity, a popular game engine. A game engine is a software development framework that makes it easier to develop games. Game engines typically provide 3D rendering, physics, sound, scripting, animation, asset management, and more. This will enable us to develop quickly and learn.
- Other popular game engines are: Unreal Engine, Cryengine, Lumberyard and more.
- You can also use native development tools like OpenGL and Microsoft DirectX. These options offer more flexibility, but typically have much longer development times and writing more code.
- WebVR is also an option. However, it’s not yet good enough for production apps.
- What is DoF?


-
Create a new project using Unity
-
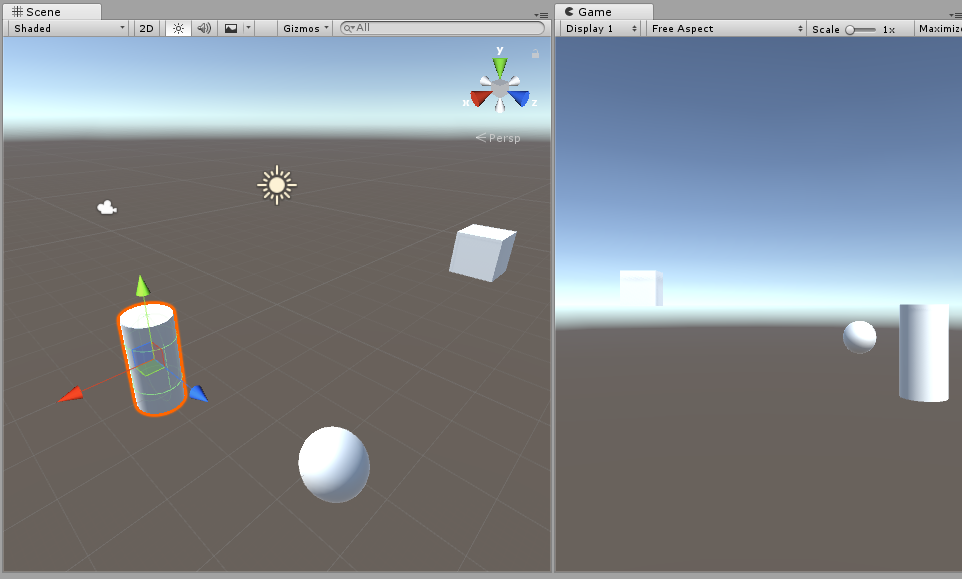
In the center of the screen you have the
Scene- If you right click and hold inside the
Scene, you can navigate it by using a,s,d,w 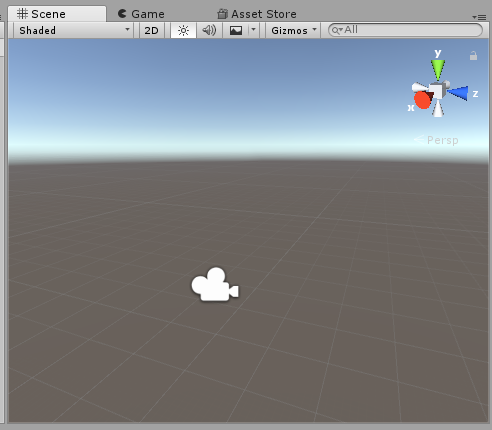
- If you right click and hold inside the
-
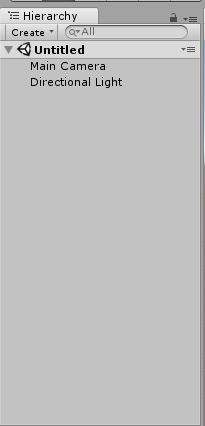
On the left side you have Hierarchy
- You can see a list of
Game Objectswe have added to our scene- A
Game Objectis Unity`s way of representing anything that can affect our scene- A light
- A cube
- A complex character
- Main camera
- A
- You can see a list of
-
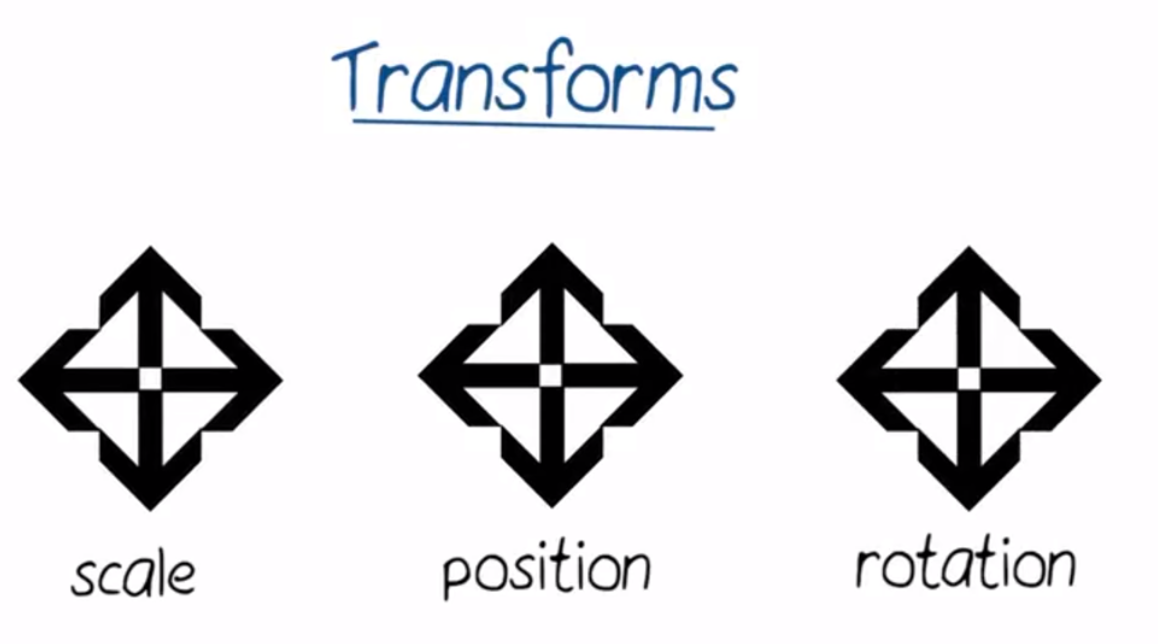
Each Game Object can have many
Components(which is the window in the right)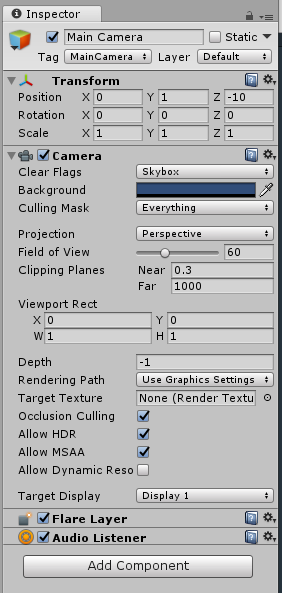
- Each
Componenthas a list of properties that we can change. For example, theTransformcomponent can be manipulated by using the buttons on the top left corner.
-
We can notice our changes to the
Transformcomponent not only reflect in theSceneit self, but also on something called theGameview.
- That is the view the users will see when you finally publish your app
- You can drag the
Gameview right next to theSceneview
-
Unity also provides a set of layouts that users can use (check the top right corner). We will stick with the
Defaultlayout for now -
On the bottom of the screen we can see the
Projectoption. This is the place where we can access any file we save or import to our project.- This includes code we write, 3d models we build, or full out scenes.
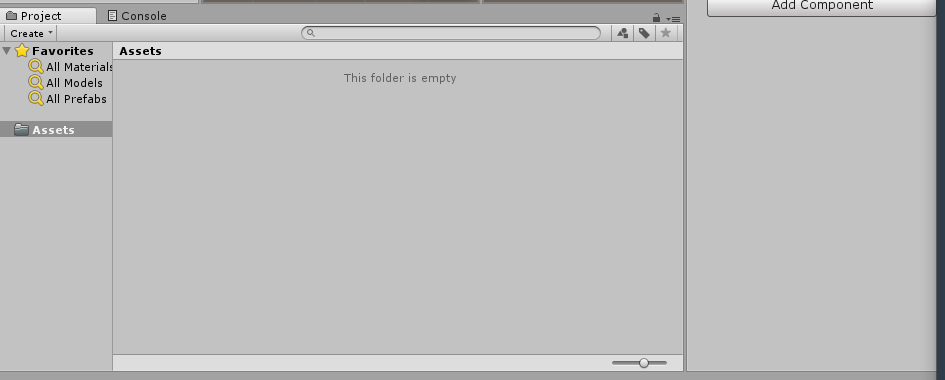
- Lets save our current scene inside the
Assetsfolder
-
Recommended Reading
-
Additional Reading
-
Extra notes based on Readings
- Gizmo or Scene Gizmo: A graphic overlay associated with a
GameObjectin aScene, and displayed in theScene View. Built-in scene tools such as the move tool are Gizmos, and you can create custom Gizmos using textures or scripting. Some Gizmos are only drawn when the GameObject is selected, while other Gizmos are drawn by the Editor regardless of which GameObjects are selected
- Gizmo or Scene Gizmo: A graphic overlay associated with a


-
Primitives
- Cubes
- Spheres
- Cylinders
- Cones
- Planes
-
To create a primitive you click on
GameObject->3D Objecton the top menu. -
-
Unity does support importing 3D models from other application. However, it is not a 3D modelling/texturing/character rigging tool it self. This makes it way easier to learn
- Rigging a 3D model creates a skeleton or a frame for that model. By rigging a 3D model you can make it move around and perform different actions. Otherwise, the model would be static and remain in the position that it was when the animator created it.
- Unity is a master at assembling 3D Scenes
- Maya, 3D Studio, Blender, etc..
- We will use those tools for 3D modeling
-
-
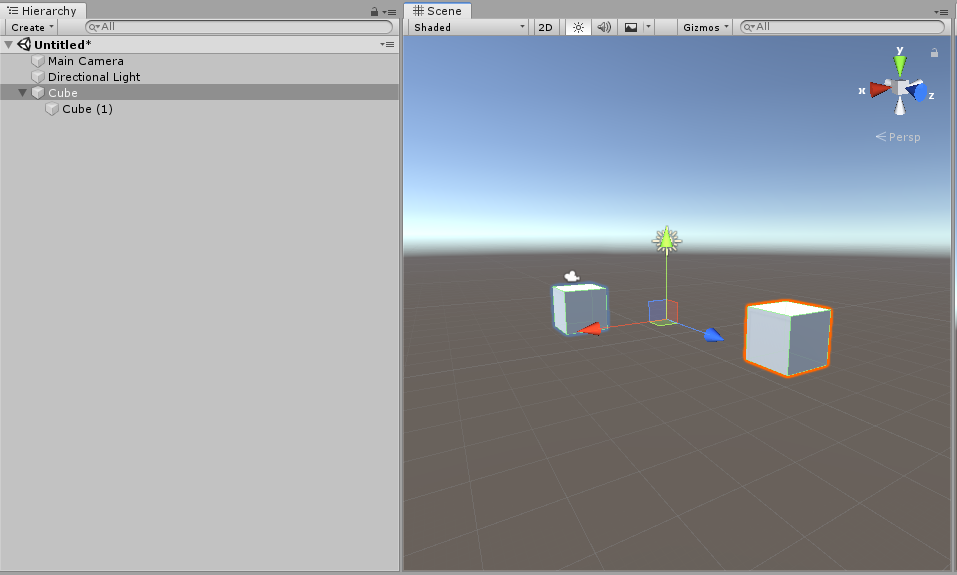
Transform Hierarchie
-
-
If you drag one
GameObjectinside another one, this will generate a unified transform. Whenever you change the scale, position or rotation of the parent object, all its chields will update -
Unity uses matrices to quickly process the parent/child transform hierarchies. This is a really good idea because matrix operations are extremely fast on modern computers.
-
-
Lesson Review
- What are VR scenes made of?
- Everything you see in a VR scene is made of something called meshes. Meshes are made of triangles which are made of points. We use triangles to represent 3D objects because it’s fast, easy, and computers are optimized for them.
- A polygon mesh is a collection of vertices, edges and faces that defines the shape of a polyhedral object in 3D computer graphics and solid modeling.
- Points / Vertices
- Edges
- Connect the Points to the Edges using a straight line in order to generate a polygon / poly (triangles in the case of Unity)
- Polygons are 2-dimensional shapes. They are made of straight lines, and the shape is "closed" (all the lines connect up).
- Connect the Triangles and you will have a Mesh/Polygonal Mesh
- Everything you see in a VR scene is made of something called meshes. Meshes are made of triangles which are made of points. We use triangles to represent 3D objects because it’s fast, easy, and computers are optimized for them.
- What are Primitives and how can I make some in Unity?
- Primitives are very basic 3D meshes. Some examples of them include cubes, planes, spheres, and cylinders. There are a couple of different ways to make a primitive object in Unity. One way is to go to GameObject > 3D Object and then select the object you wish to create.
- Does Unity support creating more complicated models?
- Unity focuses on rendering 3D scenes and does NOT support creating more complex models. You’d have to use a separate specialized program like Blender or Maya to create complex models. You can also get 3D models online (from a site like Poly) or through the Unity Asset store.
- How can I bring a 3D object into my scene?
- To get the model from your computer into Unity, you can go to Assets > Import New Asset and navigate to where the model is on your computer. Once the model is in your project. Drag the 3D object from the Project window into the hierarchy. Use the move tool arrows to position the object where you’d like it to be.
- What are transforms?
- Every
GameObjectin Unity has a Transform component. This is the component that tracks the object’s position, rotation, and scale. You can change the properties by changing the values in the Inspector or by using the move, rotate, or scale tools in the upper left corner of Unity.
- Every
- What are transform hierarchies and how can I create one?
- What are VR scenes made of?


-
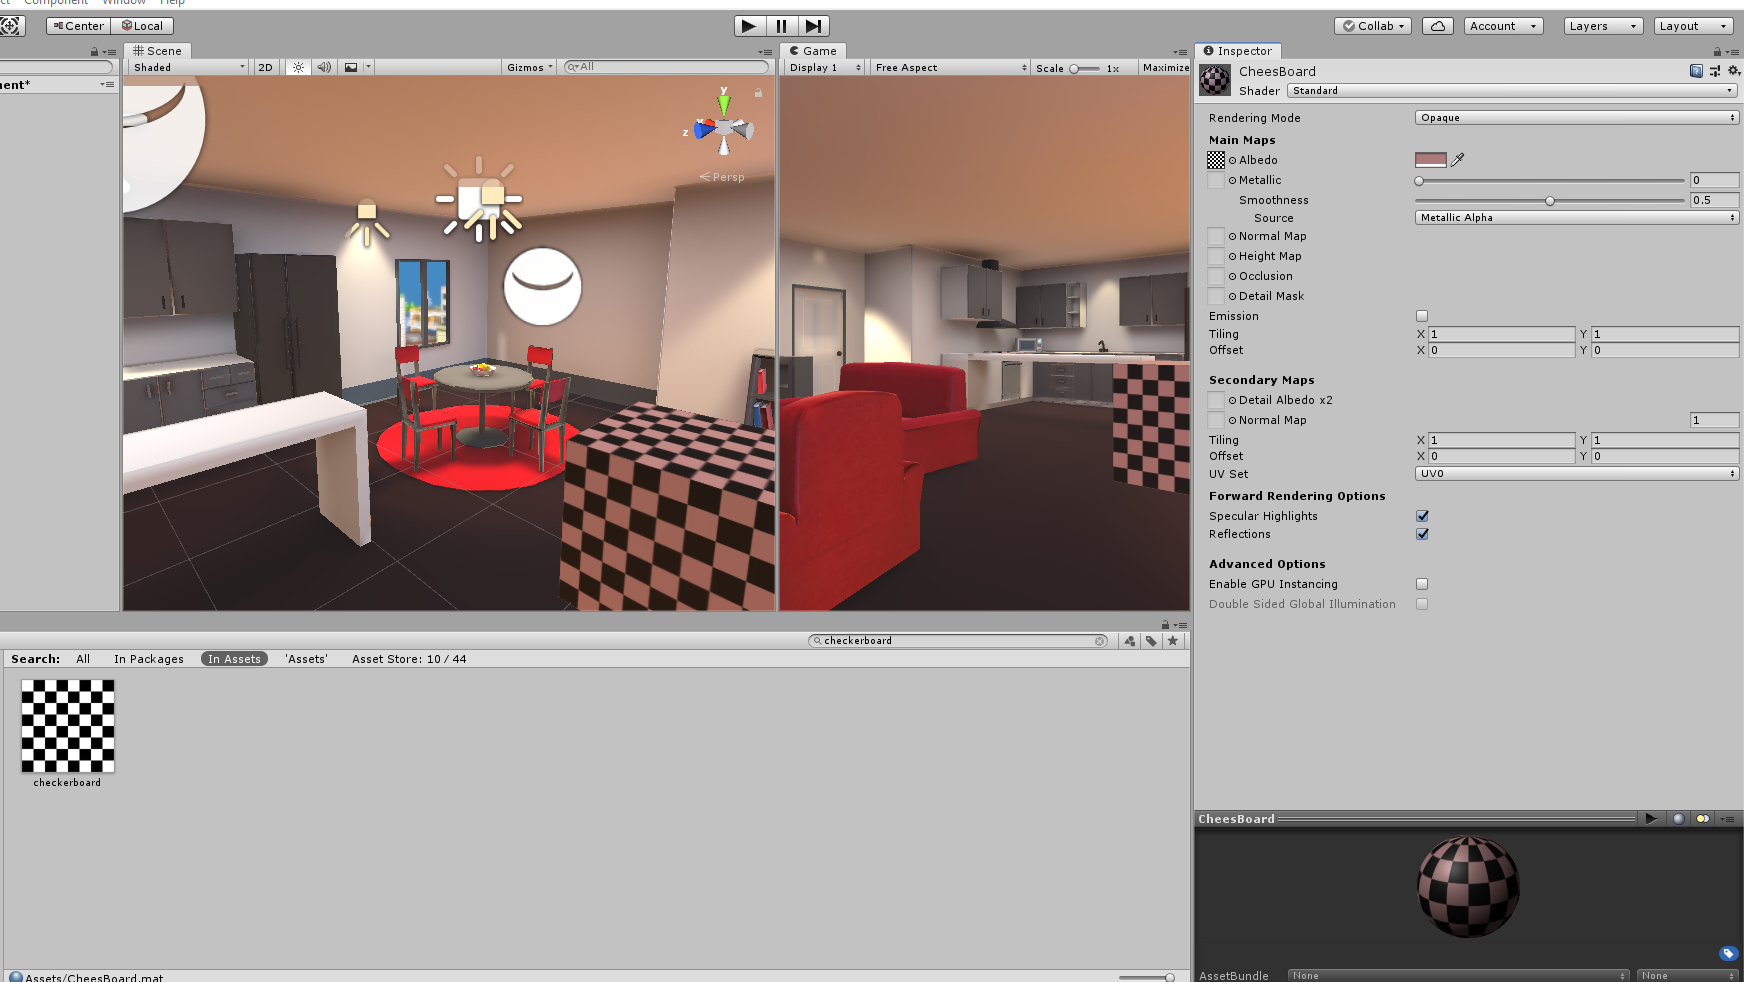
Materials are good for coloring, shading and texture
-
To create a
Materialnavigate to the project folder, more specifically to theAssetsfolder.- After that, click
Createon the top left corner, and then selectMaterial
- After that, click
-
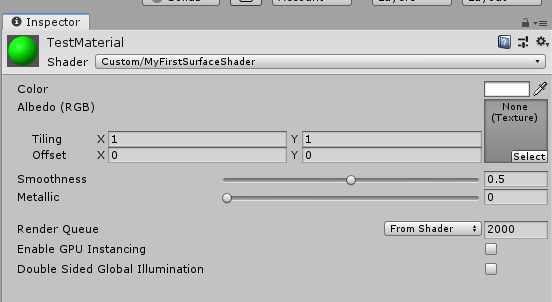
This
Materialrepresents a shader Shader: the production of appropriate levels of light, darkness, and color within an imageAlbedoparameter defines how light changes when it gets reflected by a surface- Lets say white light hits my shirt and then is reflected blue. That is the
Albedoof the shirt material - The
Albedois the materials main color
- Lets say white light hits my shirt and then is reflected blue. That is the
-
Texturesare images that get stretched aroundMeshes- They are used to adjust color, transparency, depth, shininess, metalness, light emission and many more
-
To create a
ShaderclickCreate->Shader->Standard Surface Shader-
We can change the
Albedoproperty of theShaderto be always green:o.Albedo = float3(0, 1, 0); -
After that, we can create a new
Materialand apply theShader -
float3(0, abs(sin(_Time.z)), 0);_Time.z: number of seconds passed after you pressed playsin: will give us a number from -1 and 1abs: from 1 to 0
-
Unity’s Standard Shader attempts to light objects in a physically accurate way. This technique is called Physically-Based Rendering or PBR for short. Instead of defining how an object looks in one lighting environment, you specify the properties of the object, for example, how metal or plastic it is.
-
Then, the shader computes its shading based on those factors. In practice, this works incredibly well to produce realistic 3D objects across a variety of lighting conditions. The big problem is that it is often computationally expensive.
-
For mobile VR, it is unlikely we will be able to hit our performance targets if we use the Standard Shader. So, we will be using simpler and less computationally expensive shaders for this course.
-
A super fast shader is the
Mobile->Unlit, but it is not attractive- Another option is to use
Mobile->Diffuse, it will look more like the standard shader- This is much much faster compared to the
Standard Shader
- This is much much faster compared to the
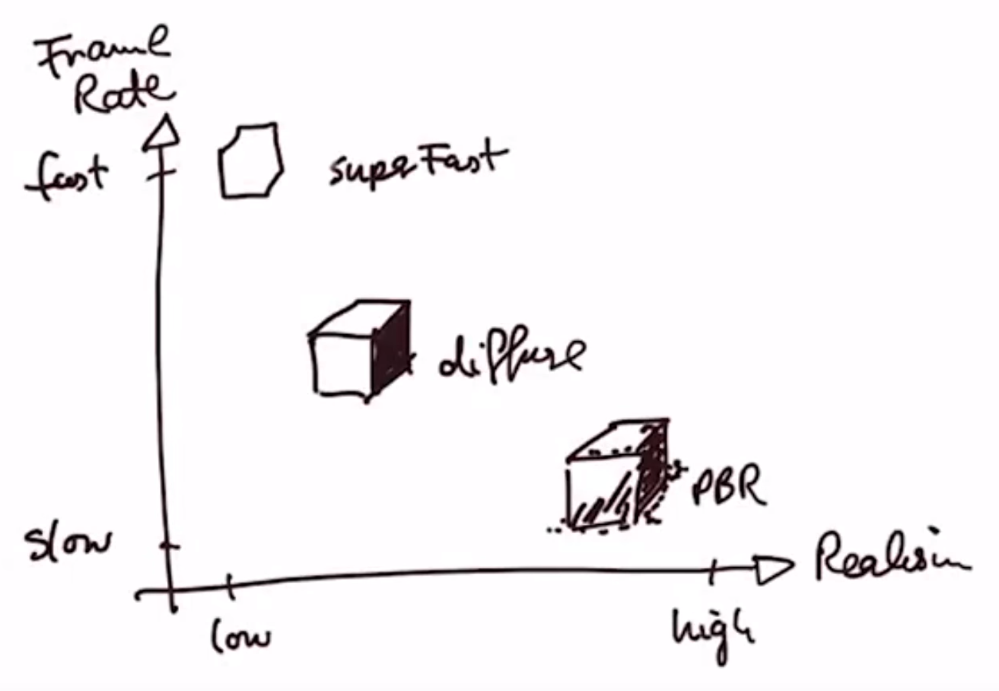
- Another option is to use
-
-
Lesson Review
-
What are materials?
- Materials are what we use to color and shade our objects. They consist of a shader and its settings. Without them, we wouldn’t be able to see objects in our scene at all!
-
How can I create and assign materials to an object?
- To create a material, go to the Project window and click Create > Material. There are a couple different ways you can assign a material to an object. Find the material in the Project window and click and drag the material onto an object in the Scene. Click on an object in the Hierarchy, so you can see the details in the inspector. Click and drag the material and drop it in the inspector.
-
What are textures and how can we assign them to an object.
- Textures are images that get stretched around meshes. They can adjust color, transparency, depth, shininess, metalness, light emission, etc. To assign a texture to an object, find the object’s material in the Project window and click on it, so you can see its properties in the Inspector window. Search for your image in the Project window. Click and drag the image into the small box to the left of the “Albedo” setting in the object’s material.
-
What are shaders?
-
Shaders are written in High Level Shader Language (HLSL). Shaders are essentially the code behind how an object is rendered.
-
For mobile VR, we’ll want to use simple shaders because the Standard Unity shaders will be too computationally expensive. To change the shader type of a material, click on the material in the Project window. In the Inspector, toward the top, you’ll see a dropdown for Shader.
-
-
What are some simple shaders?
- Mobile > Unlit (Supports Lightmap) - This super fast shader supports lightmaps, but doesn’t get any realtime lighting.
- Mobile > Diffuse - This is a fast shader, that does get some lighting information. The main difference between this shader and the standard shader, is that this one is much faster.
-
What makes up a model?
- Models are made up of materials, textures and meshes.
-


-
Click on
Window->Animation->Animationto open the animation screen (you can drag it if you want) -
In order to create an animation, you first need to select an object in the
Hierarchy -
Once we do that, the
Animationwindow will turn to a timeline also known as theDopesheet.- On the left we can click the
Add Propertybutton and we can animate any of this properties (example: the transform component associated to the object) 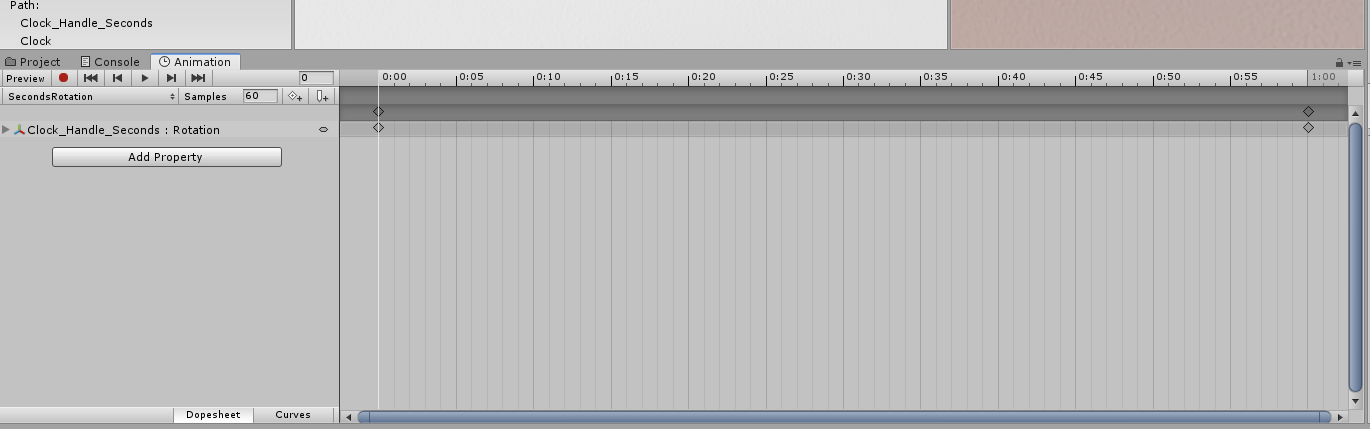
- On the left we can click the
-
You can also see some diamonds on 0 seconds and 1 second. These diamonds represent keyframes
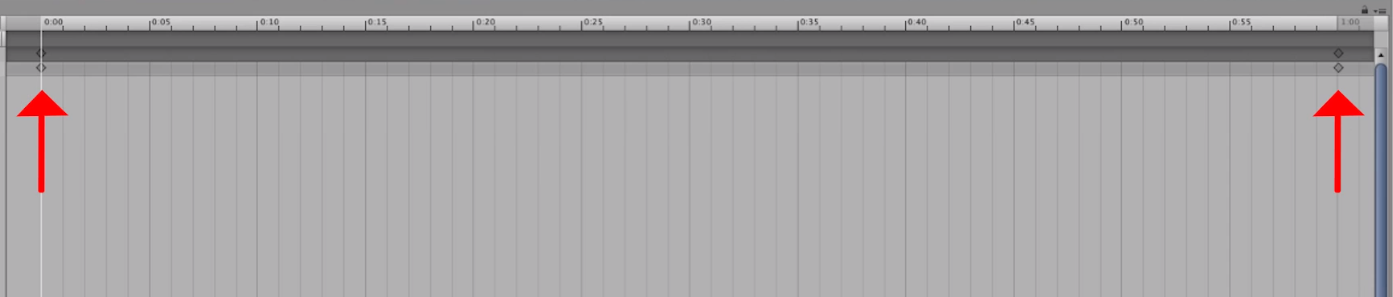
- Key frames are points in our animation where we can update our properties
- We can create new
Keyframesby clicking anywhere in the timeline.
- By dragging the time line (white line), you can change the property value associated to the
Keyframe. - How is the animation build based on those key frames (example: 360 rotation)
- Interpolation, Smoothing and Averaging
- By definition, interpolation is the process of constructing new data points within the range of the known data points.
- In our case, the known data points are the keyframes we specify. The new data points are calculated by averaging and smoothing values in between.
- In VR and computer graphics in general, interpolation is used quite regularly to speed up the process of creating beautiful scenes.
- Interpolation, Smoothing and Averaging
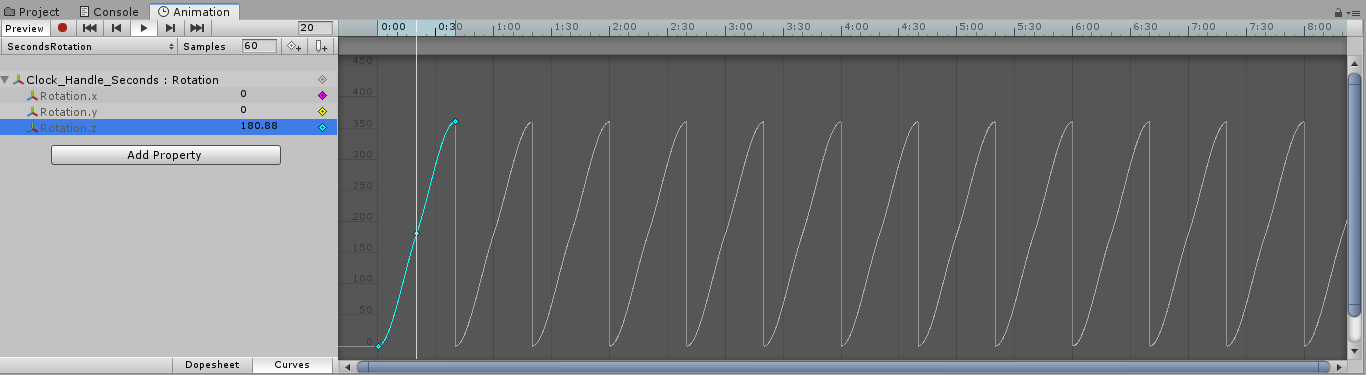
- If you click the
Curvebutton on the bottom of the screen, you will be able to see the interpolation that is done to generate a newRotation.zvalue. - Right now this graph has a curve, but we can make it linear by clicking on both ends of the line and selecting
Both Tangents->Linear - To learn more about the Animation Curves, check this link here
- If you click the
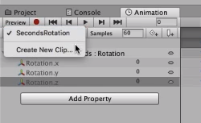
- By clicking on the animation, we can create another animation associated to this
Game Object
- By clicking on the animation, we can create another animation associated to this
- Inside the
Animationsfolder you will notice aClock_Handle_Seconds. As you can probably guess from the filename Clock_Handle_Seconds and its extension .controller, that file controls all the animations associated with the Clock_Handle_Seconds.- Both our animations clips that we created are accessible through the controller and it controls several properties of the animations, such as when they are played, how to transition between animations, and how to blend animations together, to name a few.
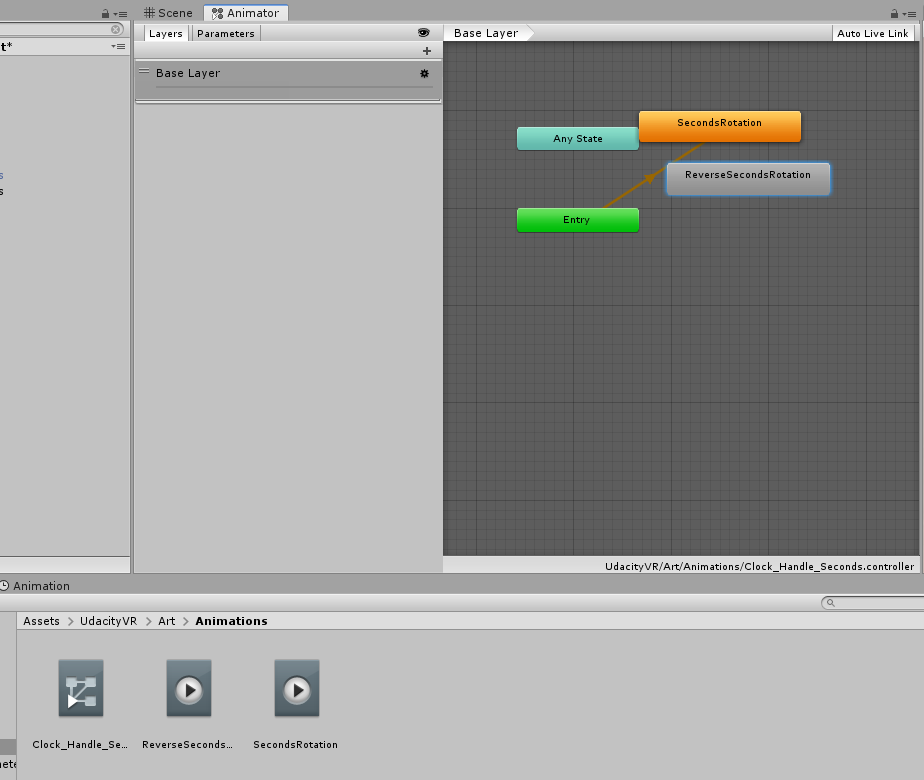
- To move around we can do
Alt + Left Click - Each block is called a
Statewhich are all part of a giganticState Machine 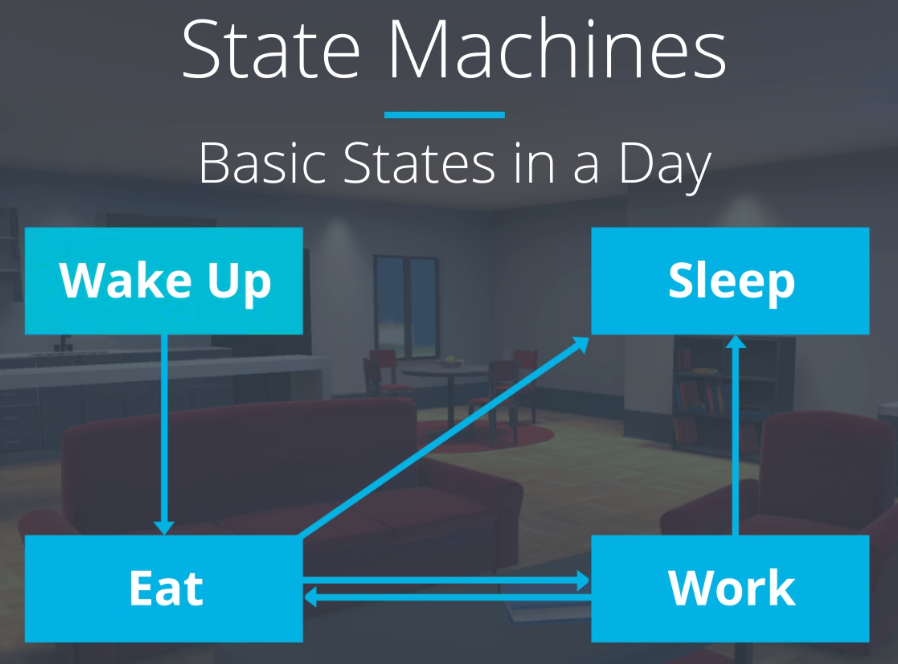
- A
State Machineis a system that connects manyStatestogether via transitions.
- A
- At any given point, our clock hand can be in one state, and that state represents which animation we are currently doing.
- The
EntryandExitstates are specialStatesthat represent when our machine starts up and ends. - The
Any Stateis a specialStatethat represent all animation states. - In order to transition to a different state, just right click on a
Statebox and selectMake transition - Read more about
Animation transitionshere
- To move around we can do
- To control our animations, we will also use
Parameters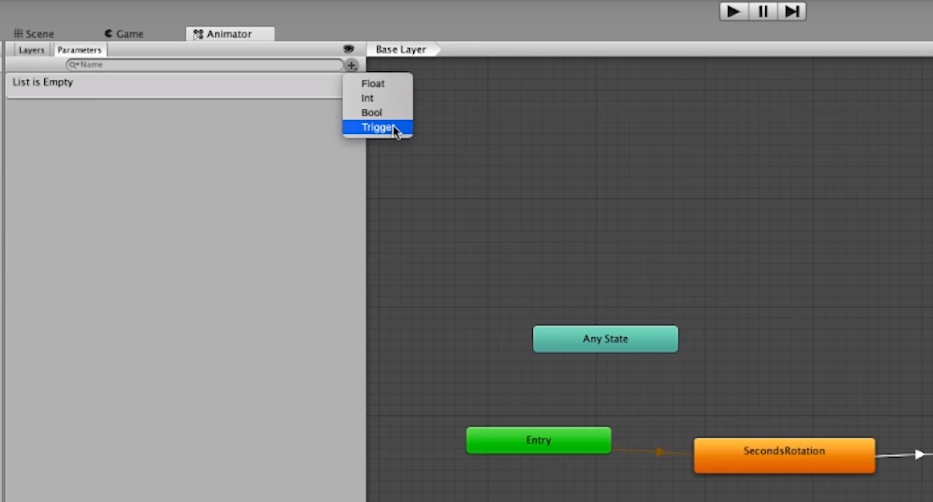
- We will use a
Trigger, a bool that resets back to False immediately after transition occurred 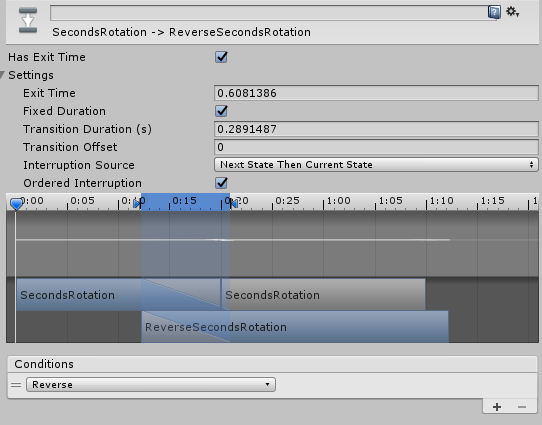
- We can un-check
Has exit timeto remove the transition between the twoStates
- We will use a
- To control animations without the animation window, we can use C# scripts.
-
We can drag an drop a script as a
Game ObjectComponent. -
Example of a animator script code
-
  using UnityEngine;
  using System.Collections;

  /// <summary>
  /// The TriggerAnimation class activates a transition whenever the Cardboard button is pressed (or the screen touched).
  /// </summary>
  public class TriggerAnimation : MonoBehaviour
  {
      [Tooltip ("The name of the Animator trigger parameter")]
      public string animationName;
      [Tooltip ("The Animator component on this gameobject")]
      public Animator stateMachine;

      void Update ()
      {
          // If the player pressed the cardboard button (or touched the screen), set the trigger parameter to active (until it has been used in a transition)
          if (Input.GetMouseButtonDown (0)) {
              stateMachine.SetTrigger (animationName);
          }
      }
  }
-
-
Another example:
    using UnityEngine;
    using System.Collections;

    /// <summary>
    /// The TriggerAnimation class activates a transition whenever the Cardboard button is pressed (or the screen touched).
    /// </summary>
    public class TriggerAnimation : MonoBehaviour
    {
        [Tooltip ("The Animator component on this gameobject")]
        public Animator animator;
        [Tooltip ("The name of the Animator trigger parameter")]
        public string triggerName;

        void OnMouseDown()
        {
            // If the player pressed the cardboard button (or touched the screen), set the trigger parameter to active (until it has been used in a transition)
            if (Input.GetMouseButtonDown(0))
            {
                if (animator == null)
                {
                    Debug.LogWarning("Please add an animator to your " + gameObject.name);
                    return;
                }
                if (triggerName == null)
                {
                    Debug.LogWarning("What's the trigger parameter name you want to call? Please add it to the TriggerAnimation script on your " + gameObject.name);
                    return;
                }
                animator.SetTrigger(triggerName);
            }
        }

        void Update ()
        {

        }

        private void Start()
        {
            animator = GetComponent<Animator>();
            if(animator == null) {
                Debug.LogWarning("Please add an animator to your " + gameObject.name);
            }
        }
    }
    ```
-
Click here for a full example of how to trigger an animation periodically.
-
-
Lesson Review
-
How can I create an animation?
- Select an object in the hierarchy. In the Animation window, click Create. Choose a name for your animation and save it to an appropriate folder in your project. Click Add Property and select a property you want to animate.
- The timeline (also known as a dopesheet) contains all of the frames of our animations. Keyframes are indicated by diamond shapes in the timeline and are key points in our animation where we can update properties. To create new keyframes, double click on the timeline. You only need to define a few keyframes to create smooth animations. The points in between keyframes are created using interpolation, averaging and smoothing.
-
What is the difference between the Play button in the Animation window and the Play button at the top of our Unity editor?
- Clicking the Play button in the Animation window, runs only the animation. The Play button in the top of the editor will play our entire scene.
-
Our animations might not loop seamlessly. It tends to lag a bit at the start or end of our animation. How can we fix that?
- This can happen if the tangents of our animation are not set to be linear. To resolve this, in the animation window, there are two tabs. One for “Dopesheet”, which is the one that we start on by default. The other is “Curves”. Click on Curves and you’ll see a line that represents our animation. Click on the first keyframe, and set “Both Tangents” to “Linear”. Do this for the last keyframe as well.
- Tip: If you’re working with a larger animation with more keyframes, you may want to do this with all your keyframes.
-
What are animation controllers?
- Animation controllers are the files that controls all the animations associated with a given object. These controllers control properties of the animations like when an animation is played, how to transition between animations and blending animations together.
-
What is the difference between the Animator window and the Animation window?
- The Animator window is what controls all our animations for a given object. The Animation window lets us see and modify a specific, individual animation.
-
What is the Mechanim State Machine?
- In the Animator window, you’ll see several boxes. By default, an animator controller has Entry, Any State, and Exit states. The Entry and Exit states are used for when the object starts up and ends, respectively. The Any State is a special state that represents all other animation states. There will also be one for each animation on the object. The Mechanim state machine is what connects the various states together and handles transitions between animations, or “states”. At any point, our object can only be in one state and playing one animation.
-
How do I transition between states in the Animator (Mechanim State Machine)?
- Right click on a state and select Make Transition. Then click on another state. This will create a transition (represented by an arrow) from one state to another.
-
How do I control states in the Animator?
- e use parameters to control the various states in our Animator. To create a parameter, click on the Parameter tab in the Animator window. Click the plus icon, then select the type of parameter you’d like to create. There are options for floats (decimals), int (whole numbers), bool (true or false), and trigger (a bool that resets back to false immediately after the transition occurred).
-
I have my parameter setup, but how do I actually use it?
- In the Animator window, click on the transition (arrow) you want to use the parameter. Then in the Inspector window, you will add it to the “Conditions” by clicking the plus icon.
-
I want my transitions to happen immediately. How can I adjust when my parameters take effect?
- By default, Unity assumes that an animation should complete before transitioning to another state or animation. This is a concept called “Exit Time”. To change this, click on the transition arrow in the Animator window. Uncheck “Has Exit Time”.
-
Tip: If you’re still noticing a little jump when shifting between states, it’s likely due to the animation clips being of different lengths. To avoid that jump, make your animations the same length.
-
Note: This lesson didn’t show you how to change the animations with your own scripts. That will be included in an upcoming lesson.
-


-
To view a
Scenein Unity we will use aCameraGame Object. -
Whenever you create a new
Scenein Unity, it will be populated with aMain Camera- If you check the
Inspectoryou should see aCameracomponent. Clear Flagsare a property that indicates what the camera should render if, for a given pixel on our screen, the camera does not see a 3D object.- Sort of a control for the background.
Skybox: just the plain old sky- You can replicate that by creating a
Materialand using a shader calledSkybox/Procedural - We can add a
Skyboxcomponent to theGame Objectand inject our brand newMaterialto it. 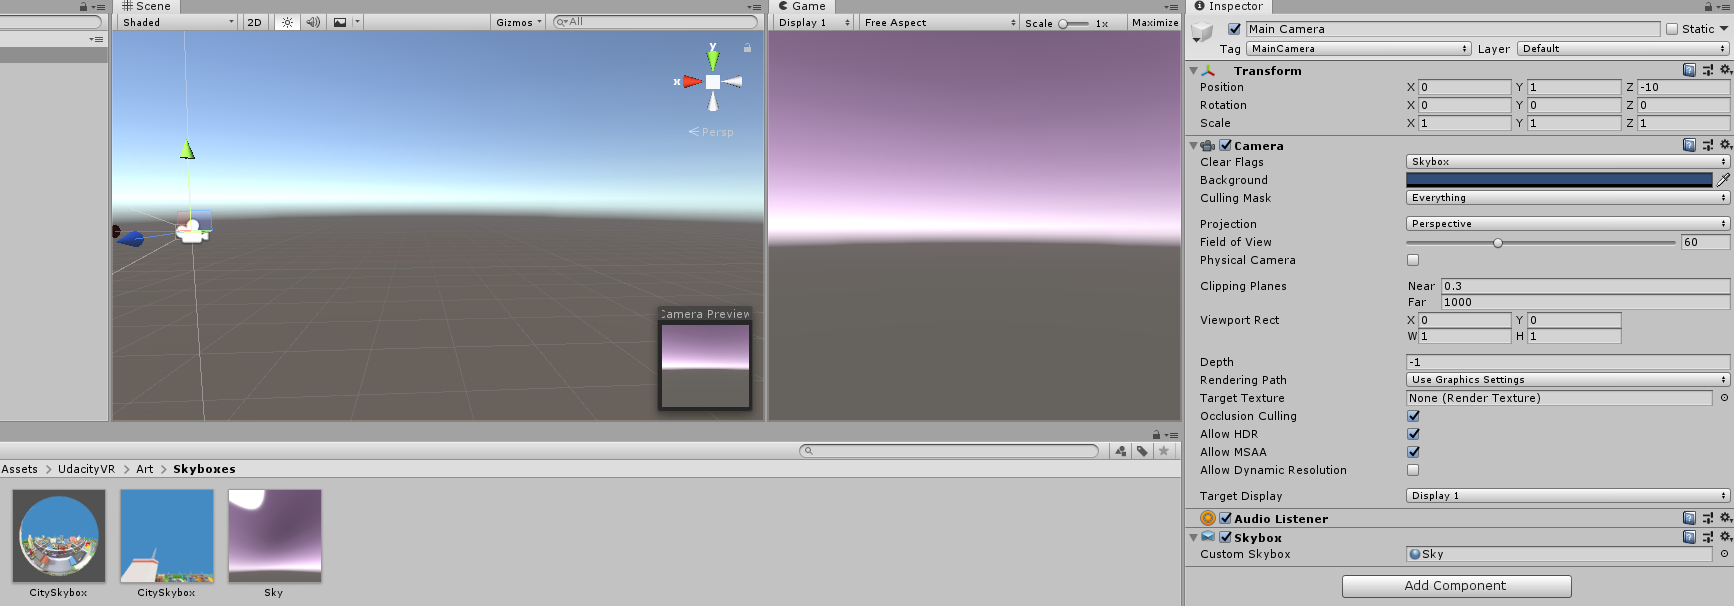
- You can replicate that by creating a
Clear Flagsoptions:Solid Color: Sets the background to a single color which we can change with the background propertyDepth onlyoption is useful in cases where we have multiple cameras. For example, in shooting mixed reality footage
- In that scenario, we need one virtual camera to capture foreground content without any background.
Don't Clear: Never use this for VR. This mode uses the previous image from the previous frame as the background for the next image. Results in a very disorienting experience
Culling Mask- The culling mask property tells the camera which layers of the scene it should render in the image. A layer is simply a group that we can place any
Game Objectinto. 
- Whenever you create a
Game Objectthat will be placed in theDefaultlayer. We can create our own layers by clickingAdd layer.
- Whenever you create a

- If we remove the
NinjaCubelayer from the list, theCubewon't be rendered in the Game View (but it will show in the Scene View).
- If we remove the
- The culling mask property tells the camera which layers of the scene it should render in the image. A layer is simply a group that we can place any
- The next property on the camera is titled
Projection. This refers to the way we capture 3D space and represent it on a 2D screen. Unity provides two options:PerspectiveandOrthographic.Perspectiveallows the camera to act similarly to a pinhole camera in which we take into account the fact that objects closer to the camera should appear larger, just like in real life.- One of the key selling points of virtual reality is that it is a medium that allows us to appreciate the scale and depth of a scene. For that reason, we want to simulate the way we perceive depth in real-life, which is why we use perspective camera projection in VR.
Orthographic, on the other hand, effectively renders objects based on their size and not based on how close they are.
Field of View/Size- This controls the vertical angle that the camera will capture with a perspective projection. Based on this value and the screen size, Unity will calculate the horizontal field of view. By default, Unity sets this field of view to 60 degrees.
Viewport Rect:- Allows us to control where on the screen our camera image is rendered. Normally, a camera renders to the whole screen width. But with this property, we can assign what percentage of the screen to use. This will be very useful in creating a virtual reality camera system (two images at the same time / two cameras).
Clipping Planes:- Primarily used for efficiency purposes. Unity defines two planes in front of the camera called the near and far clipping planes. Anything in between those planes will be rendered and anything outside of it wont. This is an optimization called FRSs Num Calling, and the close the near and far places are to each other, the better performance you will achieve.
- Read more here
- If you check the
-
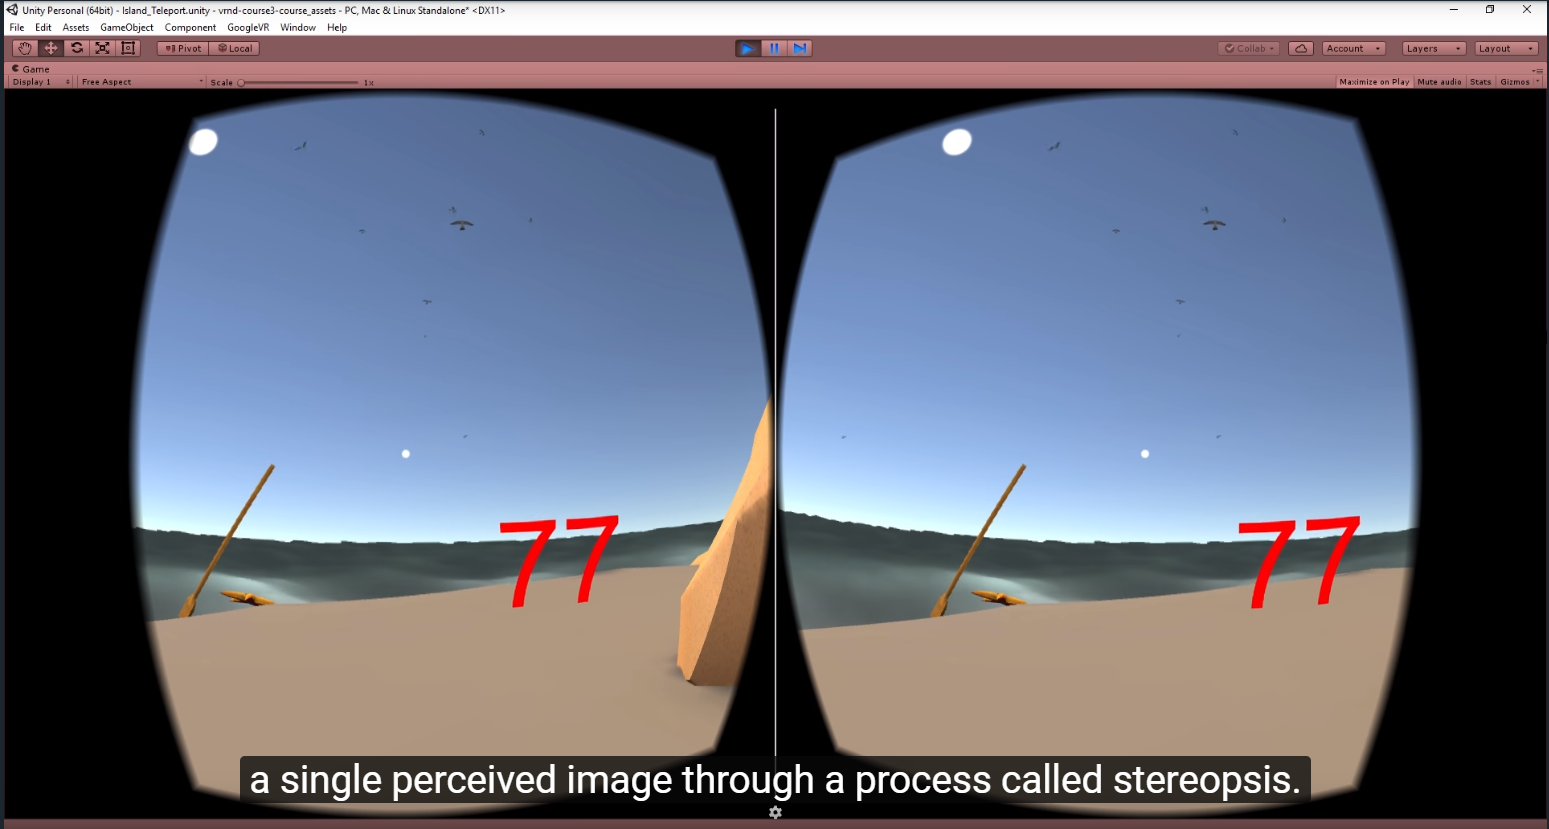
- For VR, we need to generate two slightly offset images, one for each eye. When viewed through an HMD (Head-mounted display), our brain is then able to magically fuse these images into a single perceived image through a process called stereopsis.
- Stereopsis is a term that is most often used to refer to the perception of depth and 3-dimensional structure obtained on the basis of visual information deriving from two eyes by individuals with normally developed binocular vision.
- In order to do that, we need 2 cameras in Unity (one for each eye)
- We need to offset the cameras based on the distance between the center of the two lenses on our HMD. This distance is called the lens separation distance or LSD for short. The LSD is tied very closely to the interpupillary distance or IPD, which is the physical distance between the centers of our eyes. IPD generally range anywhere from 52 to 78 millimeters.
- For VR, we need to generate two slightly offset images, one for each eye. When viewed through an HMD (Head-mounted display), our brain is then able to magically fuse these images into a single perceived image through a process called stereopsis.
-
There are amazing VR SDKs that are able to get a Unity Scene an enable it for VR.
- Google VR
- Steam VR
- Oculus
-
You can create your own VR look and feel by creating two cameras and offsetting them with the LSD/2 value.
-
To work with head rotation, we will need to create a C# script and add this as a component of the camera
Game Object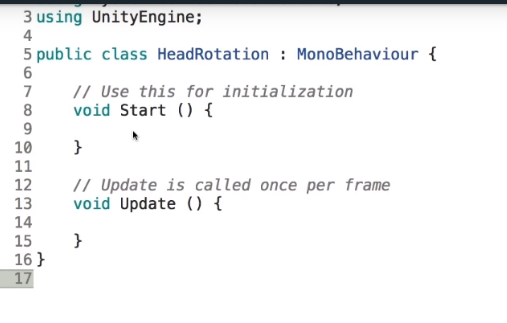
Startwill run as soon as your game startsUpdatewill be called every single time a frame is rendered onto your VR headset. We will need to use both these methods to access the gyro, which is a sensor in our phones that tells us how our phone is oriented.
- It is important to note that the Google SDK actually uses all IMU sensors (gyro, compass, accelerometer) to determine the head tracking.
-
At this point, we now have a basic VR camera system that we can throw into any VR scene. However, if you look at your app versus a normal Google Cardboard app, you will notice that we have a lot of black space and the images for each eye are not perfect rectangles.
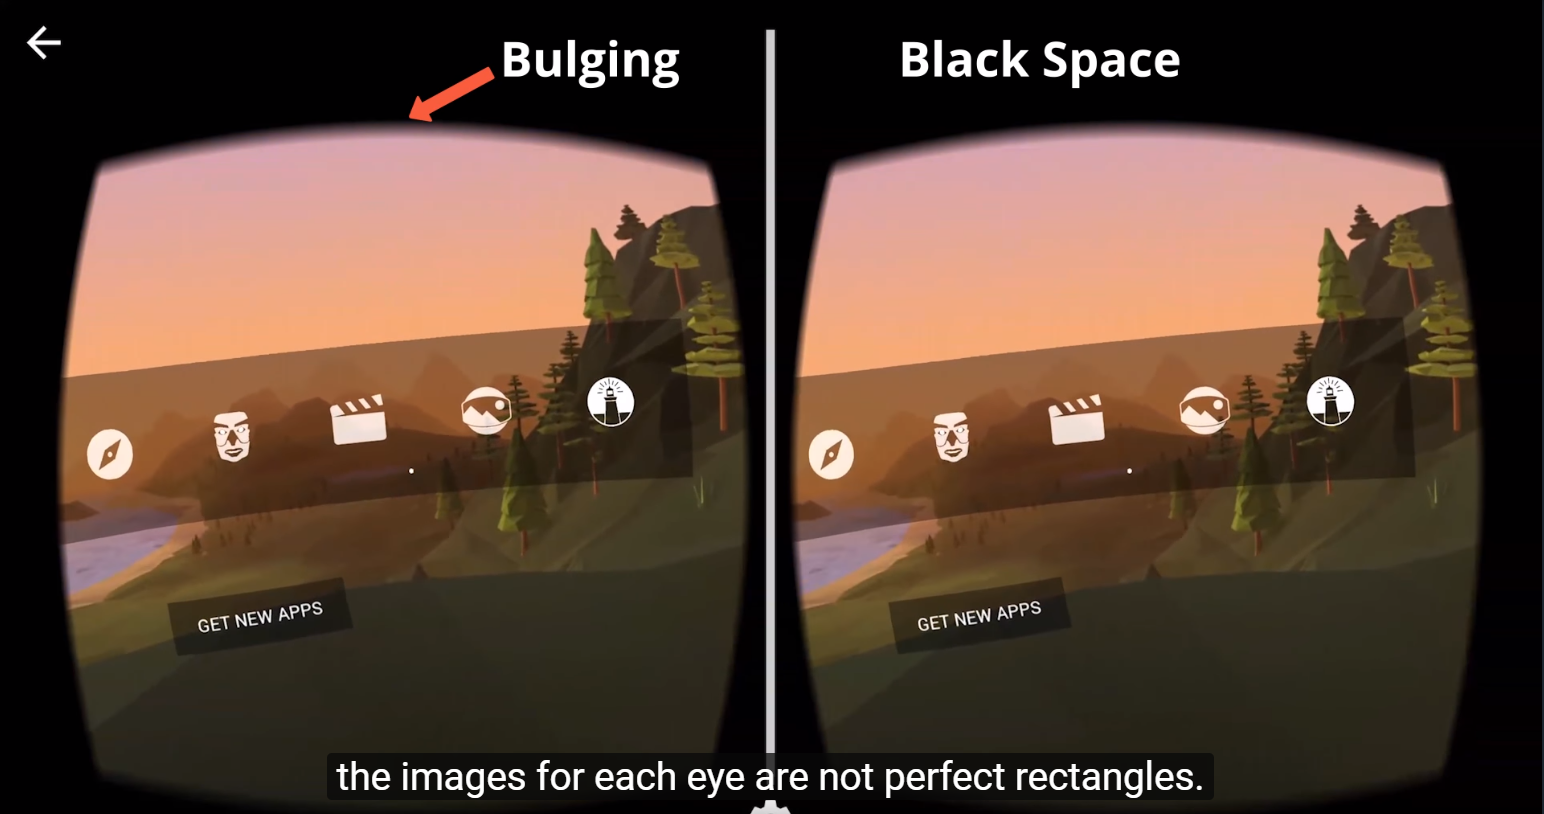
- The reason for that is because Google is trying to combat two problems when you view a screen through a lens, which you do when you viewing VR.
- One of them is pin cushion distortion which bulges (dilates) the images we see through the lenses because they're curved
- Google solves this issue by using a technic called barrel distortion which warps (bent) images on the screen but results in the effects of push cushion distortion being negated when viewed through a headset.
- One of them is pin cushion distortion which bulges (dilates) the images we see through the lenses because they're curved
- The second problem that arises from viewing a screen through a lens is chromatic aberration. This problem results in colors on the perimeter of the lens shifting out in a rainbow-like band, similar to how a prism breaks light into a rainbow. Just like pin cushion distortion, the colors on the edges of an image can be warped (bent) so that when viewed through a headset, the chromatic aberration is cancelled out.
- That is how the image Google creates is different from the one that we just created in our simple system.
-
Enabling VR Support and Adding Cardboard SDK
-
Assuming the Google VR SDK for Unity asset has been imported into your project, you can enable VR with just a few clicks!
-
Note: The course assets for this lesson have GoogleVR Unity SDK included so there should be no need to download and import it into your Unity project.
-
To enable VR, simply go to the Unity menu Edit > Project Settings > Player to open the Player Settings in the Inspector:
-
Next, under the XR Settings section for the platform you are targeting, i.e. iOS or Android:
- Check the Virtual Reality Supported checkbox.
- Click the plus symbol and add Cardboard.
-
Note: If there are other SDKs already added, you can delete them using the minus symbol.
-
As long as you have a camera in your scene, your project now supports VR!
-
-
Drag & Drop for Added Functionality
-
One of the neat things about Google VR SDK for Unity is that it has a built-in tool that lets us simulate head rotation and tilt directly in the Unity Game view.
-
To enable this, simply locate the GvrEditorEmulator prefab located in the Assets > GoogleVR > Prefabs folder, drag it into your scene and position it where you would like the camera located. Then make your camera a child of the GvrEditorEmulator in your scene hierachy and ensure the camera's transform is set to default values, i.e. Position and Rotation is 0, 0, 0 and Scale is 1, 1, 1:
-
Note: If you plan to move your camera during gameplay via code, make sure the camera is tagged MainCamera in the Inspector, as shown in the image above.
-
Now, once you enter Game mode, you can use the following controls:
- To simulate head rotation (rotate around Y axis): Alt + mouse movement.
- To simulate head tilt (rotate around Z axis): Ctrl + mouse movement.
-
Important! In general, the camera should always be nested under a parent gameobject, for example, the GvrEditorEmulator, and have a local position and rotation of 0, 0, 0. To reposition the camera, the parent gameobject should be repositioned and the camera itself should keep its local position and rotation of 0, 0, 0.
-
-
GoogleVR Related Changes affecting Course Assets and Starter Project
- Since the videos in this course was recorded, there has been multiple updates to Google VR SDK for Unity. The main changes affecting this course are:
- The GvrViewerMain prefab you see in the Hierarchy during the videos no longer exist in Google VR SDK for Unity and is now represented by the GvrEditorEmulator prefab.
- The Main Camera you see in the Hierarchy during the videos will typically be nested as a child of the GvrEditorEmulator prefab.
- Since the videos in this course was recorded, there has been multiple updates to Google VR SDK for Unity. The main changes affecting this course are:
-
Lesson Review
-
What are cameras in Unity?
- Cameras are a tool in Unity to show the virtual world to our users. Positioning the camera allows us to control and influence what our players see.
-
What is the camera’s clear flags property?
-
The
clear flagsproperty tells our camera what to render if it doesn’t see a 3d object.-
Skybox is the default setting. It shows what the world looks like around your 3d models. A skybox is another type of material and could be a cityscape, desert, or just the sky.
-
Solid color sets the background to a single color.
-
Depth only is used when there’s multiple cameras, like when creating mixed reality footage.
-
Don’t clear is NEVER used for VR. It uses the image from the previous frame as the background for the next frame. It’s very disorienting in VR.
-
-
-
How can I create my own skybox?
- Create a new material. Change the Shader from Standard to Skybox > Procedural. If you wanted to add this skybox to a camera, you’d add a Skybox component to the camera. Then drag the new skybox material to the Skybox component.
-
What is the Culling Mask?
- The culling mask tells the camera which layers (or groups) of the scene it should render. It can be useful when we want to hide parts of our scene until we want them to be seen.
-
What’s the difference between Perspective and Orthographic cameras?
-
Perspective cameras work just like real life. Closer objects appear larger, and objects further away appear smaller. This is the one we use for VR cameras.
-
Orthographic cameras render objects based on their size and not how close they are. A pencil that’s really close to the camera would appear smaller than a tree that’s much further away.
-
-
What about the rest of the camera’s properties?
-
Field of View controls the vertical angle that the camera will capture with a perspective projection. Based on that, Unity will calculate the horizontal angles. We typically don’t need to change this as the API we use for VR will typically handle this setting.
-
Clipping Planes are two vertical planes is used to determine what gets rendered. Anything between those two planes will be rendered. The closer the two planes are, the better performance you’ll see. This is also known as frustum culling.
-
Viewport Rect controls where on the scene our view is rendered. Normally a view is rendered to the whole screen width. We can change this if we wanted to change the percentage of the screen to use.
-
-
Why does the images for each eye need to be slightly offset?
- Our brains go through a process called Stereopsis that will fuse the two images together to create a sense of depth. Lens separation distance (LSD) is the space between the two lenses in our hmd and it directly correlates to the offset in the two cameras that are needed to render VR and the physical distance between the centers of our eyes (interpupillary distance or IPD). IPD ranges from 52 - 78mm (average is 63mm).
-
How could we build our own VR camera system?
- Create an empty gameobject and position it in your scene.
- Create two cameras - one for the left eye and the other for the right eye. Drag both cameras on top of the empty game object. Reset their positions.
- For the left camera, set the viewport width to 0.5.
- For the right camera, set the x coordinate of the viewport to be 0.5 and the width stay as 1.
- Shift the left camera to the left by an amount that’s half of the LSD value in meters. For example, if our LSD was 64mm, we’d shift the camera 32mm or 0.32 in Unity. (Remember that one Unity unit is equal to 1 meter.)
- Shift the right camera to the opposite. If our left camera was shifted to 0.32, like in our example, the right camera would move to -0.32.
-
What is the difference between the Start and Update methods?
- The start method is ran when an object is started up or created. The update method, however, is run each time a frame is rendered. For example, this could be as much as (or more than) 90 times per second for an Oculus Rift or HTC Vive or 60 times per second on a Google Cardboard headset.
-
How can we setup head tracking in our own VR system?
-
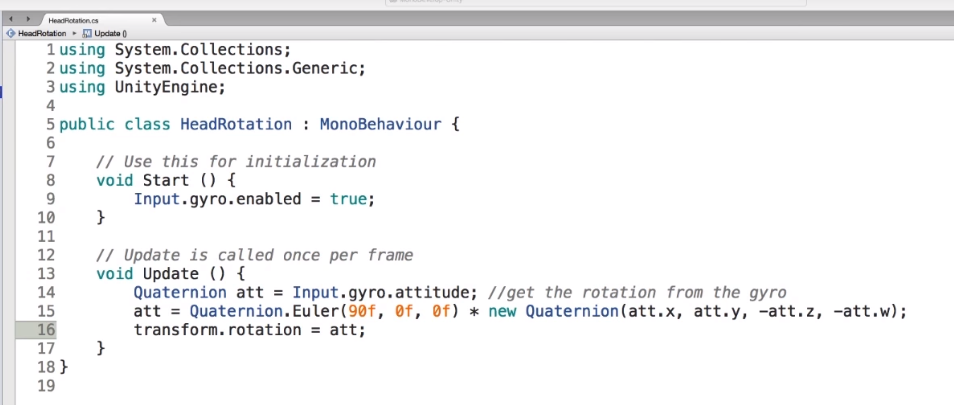
Create a new script and add it to the parent object of our two cameras. In the start method, we’ll enable the gyrometer.
-
  void Start() {
      Input.gyro.enabled = true;
  }
-
In our update method, we’ll use information from the gyrometer to adjust the cameras’ parent gameobject.
-
  void Update () {
      // This line will get the rotation data from the gyrometer.
      Quaternion att = Input.gyro.attitude;
      // This line will ensure that our gyrometer orientation lines up with our cameras’ parent’s orientation.
      att = Quaternion.Euler(90f, 0f, 0f) * new Quaternion(att.x, att.y, -att.z, -att.w);
      // Assign the converted rotation of the gyrometer to the camera’s parent orientation.
      transform.rotation = att;
  }
-
-
How does Google Cardboard sdk differ from the simple VR system we created?
-
Google’s sdk works to correct a couple of problem that occurs when you view a screen through a lense.
-
The first is “Pincushion Distortion”, this is the distortion we see when images appear to be “bulging” away from our eyes. Google fixes this by applying “Barrel Distortion” which effectively makes the image appear to bulge toward our eyes instead. When the images that’s bulging toward our eyes are viewed through our lenses, the pincushion distortion comes into play and makes the image appear flatter and more normal.
-
The second issue is “Chromatic Aberration”. This distorts the colors on the edge of the lens shifting out in a rainbow-like pattern. Google’s sdk warps (bending) the colors on these edges to cancel out the distortion when viewed through lenses.
-
In the VR system we created, we used the gyrometer to implement head tracking. Google’s sdk uses information from the gyrometer, accelerometer and the compass to achieve smoother tracking.
-
-
How do we setup Google’s VR sdk in our Unity scenes?
- Once the sdk has been imported into Unity, it’s really quick to get it implemented for use in our scenes.
-
Project Setup - Once per project.
- Enable XR Settings by going to Edit > Project Settings > Player> XR Settings. Click the checkbox next to Virtual Reality Supported. Click the plus symbol and add Cardboard.
-
Scene Setup - Once per scene.
- Add a GvrEditorEmulator to your scene. Place it where you’d want your camera to be located.
- Make your camera a child of the GvrEditorEmulator. Reset the camera’s transform component. Be sure your camera is tagged as “MainCamera”. Add a GvrPointerPhysicsRaycaster component to the camera. This will enable the camera to interact with 3D objects in your scenes.
- Add a GvrReticlePointer prefab as a child of your camera. This will give you the reticle (the little white dot) in the center of your camera. This is used to interact with things in your scene.
-


-
-
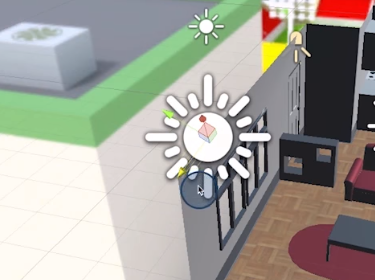
Right click on the scene
Hierarchy, the clickLight->Directional Light.- You can think of a directional light as a light that come from a far away object, something like the sun.
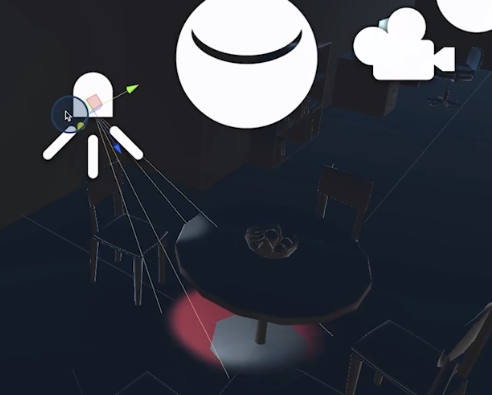
- As a result, no matter where we move our directional light, you will see that the lighting stays the same. However, if we rotate our light, you can see that the lightning in our apartment changes. You can think of this in the way that lighting from a sunset is different from a high noon.
- Both are coming from a distant object, in this case the sun, but the angle at which they hit our world is different, and that creates a different effect.
-
Lets click on the
Direction LightGame Object. You will notice it has aLightcomponent associated to it.- Withing that component there is a option for
Type.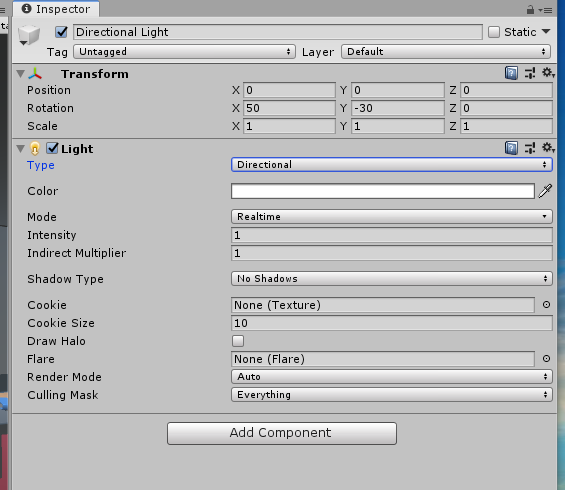
- Spot
- Like a point light a spotlight is dependent on its position but it is also dependent on its rotation.
- It's equivalent use in the real world is like a light house, flashlight, or stage spotlight, which is where the name comes from.
- We can control its range as well as how wide the cone is by using
Spot AngleandRange.
- Directional
- Point
- If we use this option you will notice the
Scenewill turn black. That is because adirectionallight, unlike apointlight, emits light from its current position, just like a light bulb. - Just like a light bulb, a point light emits light in a sphere around it, which means the rotations don't affect it unlike a directional light.
- If we change the
Rangefrom 10 to 100, you will notice the apartment will get much brighter. This is because Unity fades the light intensity as you travel further away from a point light. If we increase the range that fading slows down.
- If we use this option you will notice the
- Area (baked only)
- Unity pre-calculates the illumination from these Lights before run time, and does not include them in any run-time lighting calculations. This means that there is no run-time overhead for baked Lights.
- Know that an area like it will have to be baked, which means, we will need to do some computation before we run our experience in order to view this light.
- Withing that component there is a option for
-
Generic Light Properties
Color: We can select any type of color we want. Picking a color adds a tint to our light, just like what you would see at a concert.Intensity: This property allows us to control how bright or intense our light is. We can bring down the intensity value to zero for zero effect or we can max it out its highest value, which is eight, to supersaturate our apartment.Shadow: To use them we first need to change ourModetoRealtime. Shadows are the real selling point about using light in Unity. Done properly, you can get some really nice effects like this.- However, on mobile we should be careful about shadows as they are very computationally expensive when done incorrectly.
- To use shadows, you have three options. The first being no shadows which it defaults to. Second is hard shadows
- Second is
Hard Shadows, which are shadows with sharp edges. These shadows dont exist in the real world, but there are a lot more performant than their counterpart,Soft Shadow Soft Shadowstend to look a lot more like shadows in the real world, but at runtime, they are a lot more impactful on performance. On mobile, we highly recommend not using shadows for realtime lights.
- Second is
-
Render Modeis a property that let's us tell Unity how important are lights. For now, let's just leave it as auto. With auto, Unity automatically determines if this light is important to our scene. If a light is not important and Unity realizes the app isn't maintaining frame rate, it can then turn off that light to save on performance. Its is better to have higher FPS app than one that makes people sick. -
Culling Mask: Choose which layers to render on. In a similar fashion, the culling masks let us choose which layers this light should effect. So, if we set our layer to nothing, our light basically does not even exist. Just like the camera, we can determine which objects can and cannot interact with the light. -
Click here for more on lights.
-
About
Baking-
It is a method to compute advanced lighting effects like indirect light bounces and realistic shadows
-
It allows us to create lightmap textures that can than be referenced at runtime, which is cheaper than calculating lighting at runtime
-
It requires that our lights and any object we want to bake are static in the scene
-
Since we now know that in order to bake lights for a game object it must be static, i.e. not move during gameplay, we should figure out how to tell Unity that a game object will not move.
-
To do that, we first select the game object in the scene hierarchy. In this case, we have selected the Apartment game object. Now, if you look at the top right of the Inspector, you will see a checkbox named Static:
-
This is the property Unity uses to determine whether a game object is static or not.
-
As you can see, it is currently unchecked, so let’s enable it. When we do that, Unity asks if we want to apply this setting to all children. For this exercise, we don't need any of these child game objects to move, so let’s make them static as well by selecting the Yes, change children option:
-
What we have actually done is enabled static not only for lighting but also for a lot of other properties. If we click the down arrow next to the Static checkbox, you will see that we can choose for which properties we want this game object to be static:
-
For example, there may be cases where you know a game object will be static for lighting purposes but not necessarily for navigation. You will usually tackle those on a case-by-case basis, but in general, if you know a game object is never going to move, then you can mark it static for everything.
-
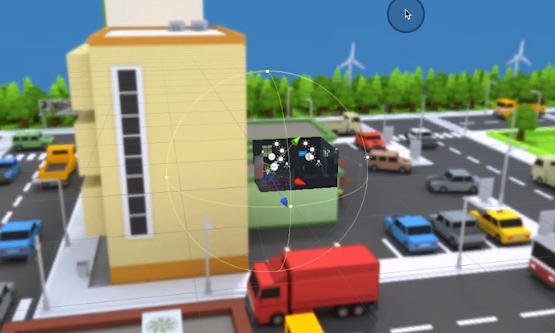
Now, let’s move on to the lighting aspect. In case you didn't notice, we have actually already added in several area lights to the scene under the Lights game object. Feel free to tweak these as you desire.
-
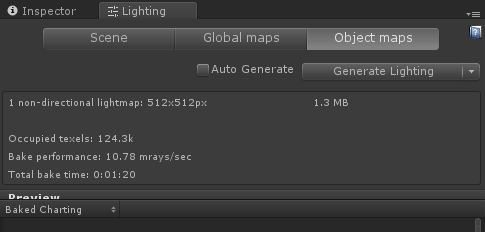
Let's begin baking those lights. To do that, we go to Window > Rendering > Lighting > Settings. Let’s dock that next to the Inspector, and then at the bottom, we hit Generate Lighting:
-
Give it some time, as this is a fairly complex calculation that can take a few minutes. Once it is done, you will have have a nicely lit apartment!
-
Tip: Moving game objects in your scenes should never be marked static. Non-moving game objects should always be static.
-
-
Lighting Modes
-
We just saw how we can bake lights for our scene game objects, but how do we set up our lights to choose whether or not they are baked?
-
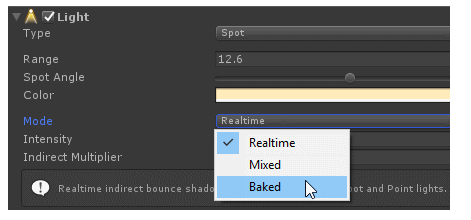
On any light, except the Area Light, we have the option to set it's Mode. This mode property can be set to Realtime, Mixed, or Baked:
-
-
As you might imagine, if we have a light that is set to Realtime, it will not be baked. Likewise, if you set a light to be Baked, it will be baked but not have any realtime effects.
-
Based on those two descriptions, you might be able to infer what Mixed mode is? In Mixed mode, Unity will both bake the light and use the light for realtime effects. The specific effects of the mixed light will vary depending on the Mixed Lighting Mode settings which we will discuss towards the end of this lesson.
-
-
Introducing the Lighting Panel
-
In order to bake our scene we needed to open up the lighting window. This window allows us to control a lot of settings that will make our scene optimized and really come to life.
-
At the top, it is divided into three tabs: Object, Scene, and Lightmaps.
-
First up, we have the scene tab
-
This tab really lets us control the settings of the light in our scene. It broken into 6 sections: Environment Lighting, Precomputer Realtime GI, Baked GI, General GI, Fog, and Other Settings. We will take a closer look at this tab over the next few videos.
-
-
-
Next up, we have global maps
-
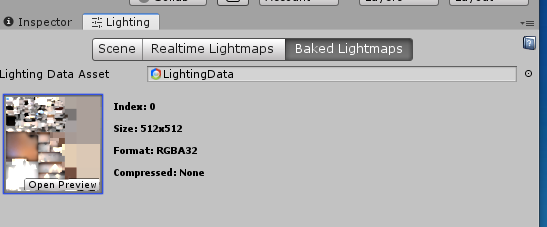
Once we bake a scene, we can come to this tab to check out what our light maps actually look like.
-
-
Here you can see the files and textures were actually created. It is pretty hard to glean information from the image, but this tab is useful for seeing how much data is being stored tuning your parameters to optimize the number or size of textures.
-
-
Last up, we have object maps
-
In a similar fashion to the inspector, this tab allows us to look at the specific properties of a selected Game Object. By using the drop down, you are able to select from a variety of properties that would affect the lighting of our objects:
- Albedo
- Emissive
- Realtime Intensity
- Realtime Direction
- Realtime Charting
- Baked Intensity
- Baked Direction
- Baked Charting
- Baked Shadowmask
-
-
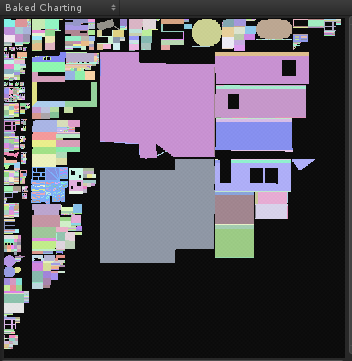
By default, the dropdown selects Albedo. Click on the Book_Shelf in the inspector. Then go to the Object maps tab and select Baked Charting.
-
-
When you do so, you will see the map that the Book_Shelf is in. An if you press 'F' while your mouse cursor is over the the map, you will zoom into the specific area that relates to the Book_Shelf. You can also use your Scroll Wheel to zoom in and out of the map.
-
Next up, we will be diving A LOT deeper into the Scene view and how we can use it to optimize the lighting in our scene. But before moving on, feel free to explore other Game Objects and take a look at what their light maps look like. Now's a great time to appreciate the fact that Unity has this built in and you don't have to code it yourself :)
-
-
-
Lighting from the Sky
-
Now that we have a general overview of the Lighting window, let’s dive deep into Scene tab.
-
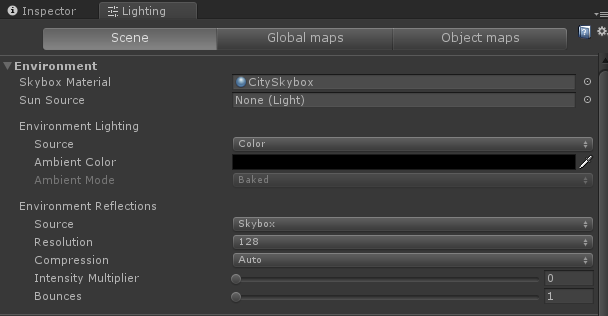
Starting from the top, we have the Environment Lighting section.
-
-
Remember the Skybox from last lesson? In that lesson, we added a Skybox to a component on our Camera. But that resulted in us not being able to see our Skybox in the Scene view. If we want to see it in the scene view as the default Skybox for our Cameras, we can actually set a Skybox in this section. Let’s set the Skybox to the one we created last lesson by dragging and dropping it onto the tab.
-
If you don't see a red tinted skybox in the Scene View, it may be because either you don't have a directional light in the scene OR the rotation of your directional light is incorrect. You can easily fix this by creating a directional light and rotating it.
-
- Awesome, we have our Skybox set up properly!!
-
Now, moving to the next property in the Lighting panel, we have Ambient light.
-
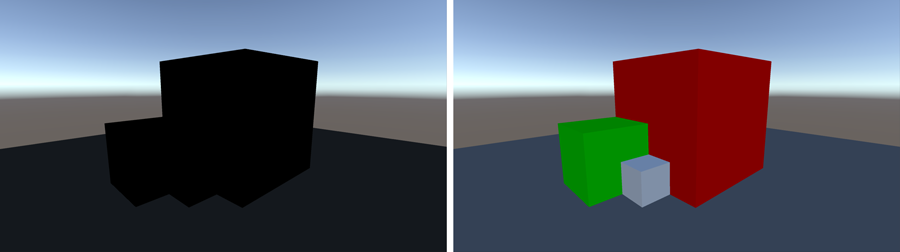
Unlike any light we have discussed before, Ambient light is a light source that affects all objects in the scene at a fixed intensity and from all directions. Basically, think of it as a a 360 degree directional light. In the image below from the Unity documentation, the same objects are rendered except the left image has no lighting and the right has just ambient lighting.
-
-
We can set Ambient Lighting to be sampled from the Skybox, a gradient, or a simple color. For the purposes of our apartment, we will be using a color. Once we select Color, we can then change the Ambient Color property. Since most of the lighting will come from our area lights, we will choose to set the Ambient color to black, which is the same as no ambient light.
-
-
The last core component of Environment Lighting is Reflections.
-
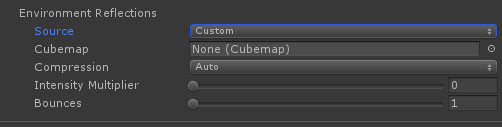
In the real world, light bounces off a bunch of object, but calculating that in real-time is an expensive process. Unity has a system in place for calculating reflections for use with shiny objects and in the Environment tab allows us to specify how reflections are calculated from the sky. Since our apartment is indoors, we don’t want to be affected by the sky, and thus want to turn off Environment Reflections.
-
To do that, simply make sure that our Reflection Source is set to Custom and its Cubemap is set to none.
-
-
If you do make a scene that you want Reflections for, make sure to read here for more information.
-
-
-
Global Illumination
-
After the Environment section, we will start to dive deeper into the core of how we can optimize our lighting! These next 3 sections in the Scene tab fall under what Unity calls the Global Illumination.
-
Global Illumination (GI) is Unity’s system to model complex lighting such as indirect light that bounces off nearby objects. It works really well with Unity’s Standard Default Material to really bring our scenes to life! These four sections are:
- Realtime Lighting
- Mixed Lighting
- Lightmapping Settings
-
They let us fully control the parameters Unity uses when it makes it calculations for pre-computed lighting.
-
The first section is Realtime Lighting
-
If you added real-time lights in your scene, you could use this section to enable precomputation of some lighting effects for static objects in your scene. If you enable Realtime Lighting, you will see that you will have the option to change the Ambient Mode in Environment Settings and the Indirect Resolution in the Lightmapping Settings.
-
-
Basically, Precomputed Realtime GI calculates how light could bounce off a static object (indirect light) and can then use that information in realtime for moving objects when you start your application.
-
Since we we don’t have any real time lights in our Apartment scene, we can leave our Realtime Lighting disabled.
-
Next up, let’s talk about Mixed Lighting and Lightmapping Settings, so we can get the most performance from baking.
-
-
-
Mastering Baking
-
Let's talk a bit about Mixed Lighting!
-
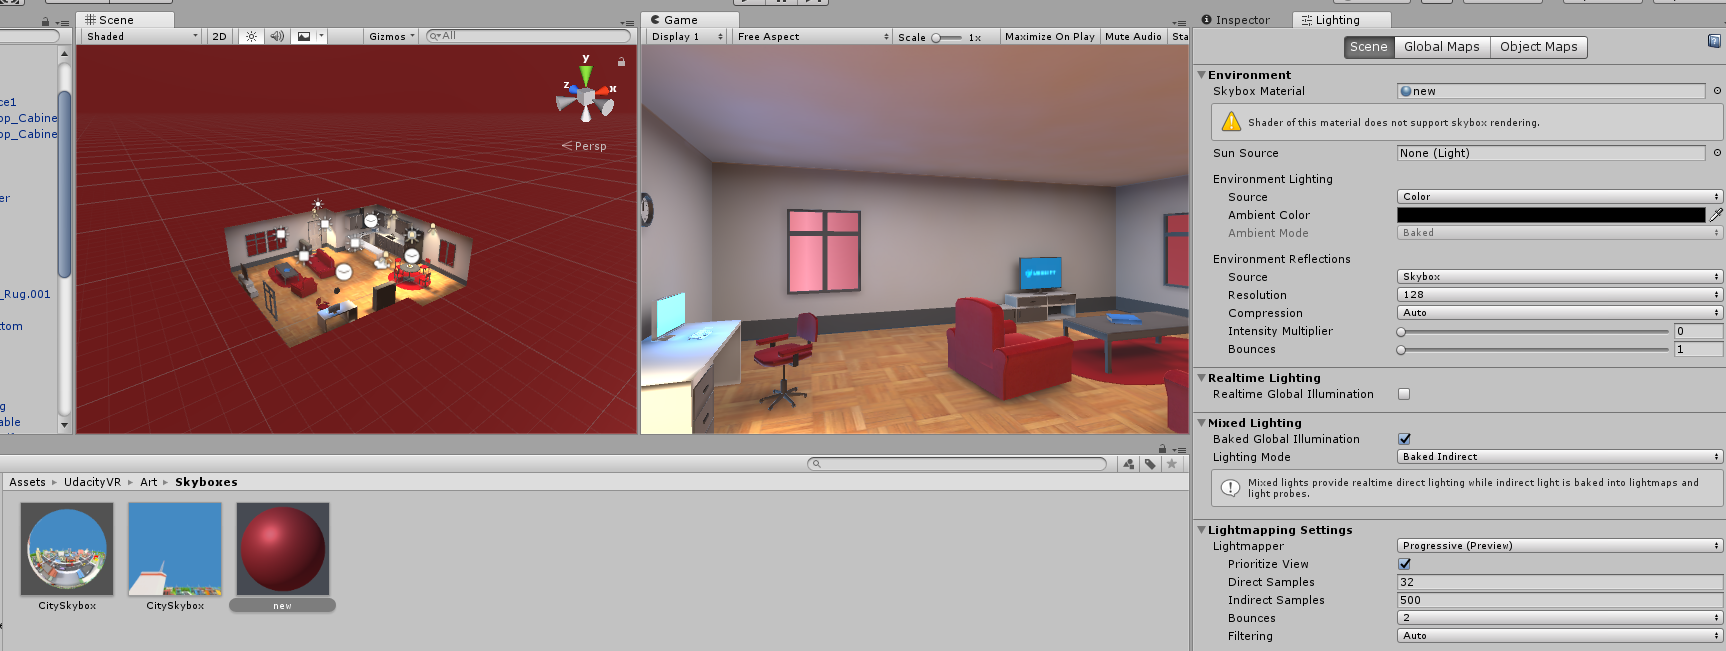
Much like the Realtime Lighting section, the Mixed section is pretty light with regards to options. We have the option to enable or disable Baked Global Illumination. If we enable Baked Global Illumination, we then can choose a Lighting Mode and a Realtime Shadow Color.
-
Remember the Mixed Lighting Mode? This Lighting Mode property lets us specifically control how Mixed Lights behave once we bake them. There are 3 main modes:
- Subtractive
- Shadowmask
- Baked Indirect
-
Since we are not using mixed lights, we will be skipping this panel for now. But if you want more information on what each mode does, feel free to read the information boxes in the panel for each mode and also the Unity documentation on it.
-
Just make sure you have Baked Global Illumination enabled, and let's continue onto the Lightmapping Settings.
-
-
Currently in Unity, there is support for two types of Lightmapping Algorithms:
- Enlighten
- Progressive
-
Enlighten was Unity's primary lighting system up until Unity 5.6. In that version, they added the Progressive Lightmapper.
-
Moving forward, Unity will be continuing to upgrade the Progressive Lightmapper as it offers some extra benefits such as eventually being able to run on the GPU and faster previewing of your scene.
-
As such, we will be focusing on using the Progressive Lightmapper, so make sure you have that selected.
-
You can use the "prioritize view" option to prioritize lightmapping some areas of your scene over others based on where you are looking in your scene. However if you do not care about this, it is best to turn that off.
-
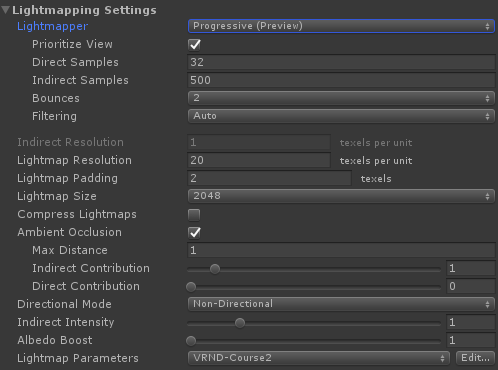
You also have several settings that control the the fidelity of your light mapping process, specifically:
- Direct Samples
- Indirect Samples
- Bounces
- Filtering
-
The way Light Mapping works at a high level is that for each light, you will be shooting rays of light in various directions depending on the type of light. If these rays hit an object, we then calculate how the light should look at that position based on the object and its material. If we want to simulate indirect light, we can then have a ray "bounce" off that object and continue the same process. All those settings above control how many rays (samples) are produced and how much they bounce. So the higher the values, the higher quality you will get but the longer it will take to lightmap.
-
-
Lightmap Texture Properties
-
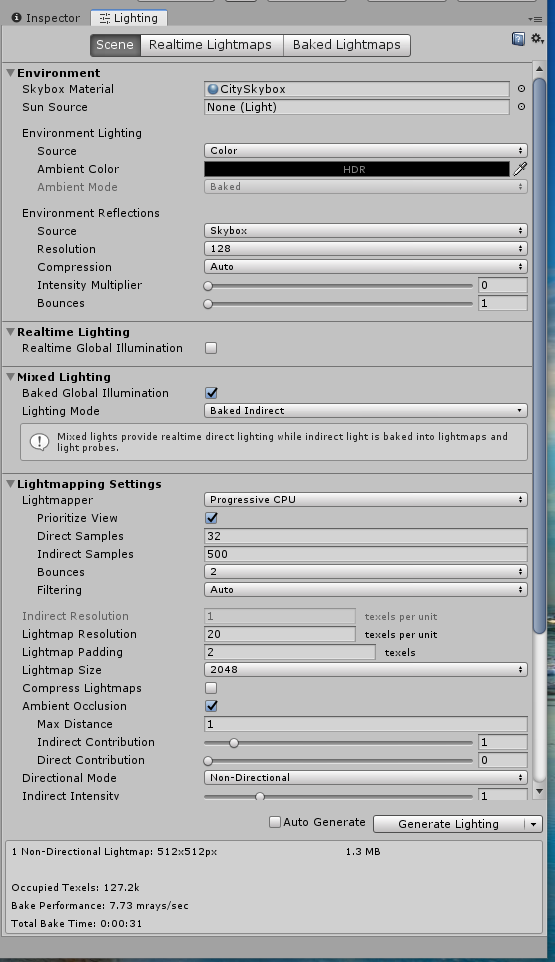
After the Lightmapper specific settings, we will see that we have a few settings for the resolution of your light maps. We want to set this value high enough so that the resolution of our lighting is good, but not too high that we run into performance issues. Let’s set the Lightmap Resolution to 20.
-
The next property is the Padding, which is the separation between all the baked calculations we do for every object. Currently, it is set 2. If you go the lightmaps tab, and look very closely you might be able to see some small spacing in between each images. In general, we want to keep the spacing small so as to take up less space, which again is really important on mobile for efficiency. In general you would only want to change this to be higher if you want to move the optimize where certain objects are in your lightmap. Let’s go ahead and set it back down to 2.
-
We also have Ambient Occlusion, which is a property that lets us control how ambient light bounces off and gets occluded by static meshes. The property becomes most apparent near the intersection of meshes like the wall of our apartment.
-

-
To really see the effect, try increasing the Max Distance property to 10 and see if there is a difference. Reminder, you will need to re-generate your lightmaps.
-
The last property to discuss is the Atlas Size. This property lets us control the actual size of the light map texture. If we look at the choices, you will notice that they are all powers of 2 and this is purely so that Unity can perform some optimizations when it uses the Atlas. If this value is too small, it will result in creating many small light map textures, which is not optimal. Too big, and we will be wasting space in our map.
-
-
Just to see what happens, try setting the Atlas size to 128 to and see how many lightmaps are created in the Global Maps tab.
-
It just so happens that 1024 is the smallest size that captures all our lighting data into one texture, so set it back to 1024 and bake it again.
-
And that covers the lighting panel! There is a lot more we could talk about, but we have cover all we need in this panel to make our lights amazing. We only have one more window we need to look at to up the quality of our lights!
-
-
-
Bringing it Home with Some Quality
-
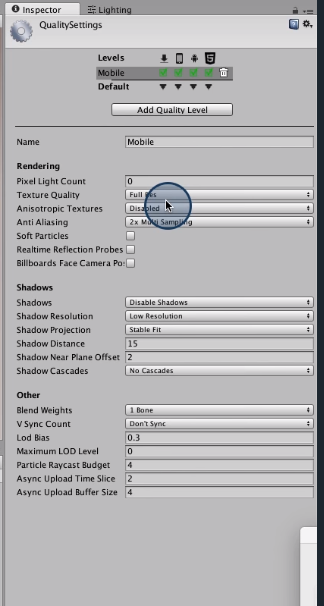
Edit->Project Settings->Quality -
Leave a single setting for Mobile
- Pixel Count set to
0- How many real time lights it should consider for each given pixel
- No real time lights in our scene
- Texture Quality set to
Full Rec - Anti Aliasing is set to
2x Disable Shadowswill only disable realtime shadows, but it will keep our baked shadows.
- Pixel Count set to
-
-
Lesson Review
-
What are the difference between the light types?
- Directional lights are lights that simulate the sun. Moving a directional light doesn’t change how things are lit in the scene. However, rotating the light does change things a bit. It can simulate a setting or rising sun, for example.
- Point lights work like light bulbs. They emit light from a sphere around its current position. Rotating a point light, has no effect on the lighting. Unity fades the light intensity as you get further away from the light. Closer to the light will appear much brighter than lighting at the end of its range.
- Spot lights work like flashlights, stage lights, or lighthouse light. These lights shoot a cone of light out from its origin and change lighting based on the spot light’s position AND rotation. The Spot Angle value changes the width of the cone.
- Area lights act like flood lights in a stadium and are much more complex and can’t be run in realtime. They must be baked or precomputed.
-
How are the four light types similar?
-
All of the lights have the following properties that can be adjusted to suit your experience.
-
Color - This property lets us change the color tint of our light. Make a light red and another blue to simulate emergency lighting. Or make a traffic light by making a red, a yellow, and a green light.
-
Intensity - This is how bright or intense our light is, and ranges from 0 (no effect) to 8 (max effect that’s almost blinding).
-
Shadows - Can be computationally expensive when done incorrectly. Options:
-
No Shadows - no shadows at all. This is the recommended setting for mobile, realtime lighting.
-
Hard Shadows - only shadows with hard edges. This type of shadows don’t exist in the real world, but they are more performant.
-
Soft Shadows - most realistic shadows with softer edges. These are the most expensive type of shadows and can impact performance.
-
-
Render Mode - Lets us define how important our lighting is. Keep on Auto generally. If Unity sees that we’re struggling with performance, it can turn off the light to improve performance.
-
Culling mask - Choose which layers to render the lighting on.
-
-
-
What is baking?
-
Baking is the process of calculating our shadows and lighting data before we actually run our experience. We can compute lighting effects, light bounces, and realistic shadows. This data is saved in a lightmap texture that is referenced at runtime. In order to get the most out of baked lighting, the light and objects in the scene need to be marked as static. Baked lighting doesn’t work for objects or lights that move in the scene as those can’t be computed in advance. To bake our lighting:
- Set non-moving objects to static by clicking the box in top of the Inspector window. This needs to be done for each object.
- Set light(s) to static by changing the light “Mode” property.
- Window > Lighting > Settings to open the Lighting window.
- In the lighting window, hit Generate Lighting.
-
-
What’s the lighting window about?
-
The lighting window has 3 tabs. This window contains a lot of information about how we light our scene. We open the lighting window by going to Window > Lighting > Settings and docking the window in our Unity editor.
-
Scene: This tab lets us control the settings of light in our scene.
-
Environment Lighting - Remember that skybox material we created a couple of lessons ago? We can use that material here, to apply it to the scene. Ambient Lighting, a light source that affects all objects in the scene in all directions, can also be set here.
-
Global Illumination - This is Unity’s model of how light bounces off of nearby objects. This portion (containing Realtime Lighting, Mixed Lighting, and Lightmapping Settings) allows us some control over the parameters Unity uses when baking lighting.
-
-
Global Maps: After we bake a scene, we can see what our light maps look like on this tab. It’s pretty hard to see much in the small image here, but you can see stats about how much data is being stored to make decisions to optimize your maps.
-
Object Maps: We can look at specific properties of a selected game object in this tab.
-
-
What other quality settings can I use to make my scenes look more polished?
-
-
Go to
Edit > Project Settings > Qualityto see the Quality Settings. If we’re only interested in mobile for our project, we can delete most of the default settings (by clicking on the Trash can icon in the inspector) and leave only “Fastest”. Click on Fastest so we can edit some of the settings for this quality setting. -
Set Pixel Light Count to 0
- This setting tells Unity how many realtime lights it should consider for a single pixel. If we have no realtime lights in our scene, setting this to 0 is ideal.
-
Set Texture Quality to Full.
- This will help reduce the quality of textures, if they aren’t optimized for mobile. If we’ve already optimized the textures in our scene, we can set this to full for mobile and be fine.
-
Set Anti Aliasing to 2x Multi Sampling.
- This helps reduce blurred edges and lines in our VR scenes. It’s a little more computationally expensive, but in VR we’re using less than half of the resolution of the display so it’s more of a problem to have the blurry lines. Making the computational cost, worth it.
-
Set Shadows to Disable Shadows.
- This only disables our realtime shadows and has no effect on baked shadows.
-
-


-
In unity we write scripts that define
Behaviorsattached to anGame Object -
For VR, this might be called 60, 90, or even 120 times per second.
- This speed depends on hardware and a variety of software factors
-
Time.deltaTimegives you framerate-independent animation.- Contains the amount of time it took to render the previous frame.
Time.timestores the amount of time elapsed since the start of the game, whileTime.deltaTimestores the amount of time it took to render the previous frame and can be used to produce smooth framerate-independent rates of change over time.transform.Translate(0, -2.5f * Time.deltaTime, 0, Space.World);Space.World: This means that the GameObject’s Transform is altered via the world’s space instead of the GameObject’s local space
-
transform.position = new Vector3(0, 5 + Mathf.Sin(Time.time * 5.0f), 0);- Make a
transformthat follows thesinfunction
- Make a
-
Lesson Review
-
What are scripts?
- Scripts are behaviors that get attached to Game Objects in Unity. Scripts are made up of methods and properties. Methods are typically the major verbs. For example, the Start method contains all the instructions that need to be run when you first load the scene. Methods are a great way to organize your scripts into logical parts. For example, you might have a method that contains instructions for when a certain thing happens.
-
How could we add physics to an object to make it fall?
-
One way is to add a collider on the object and then add a rigidbody. This will use Unity’s physics system to simulate gravity and it will fall realistically.
-
If we wanted to be more specific about how we wanted our object to fall, we would remove the rigidbody and collider from the object and add some code (in a script). If we decide that we want an object to fall until it hits the ground and then stop, we could add the following code in a script attached to the object we want to fall.
-
  void Update() {
      // First we check to see if the coconut is above the ground.
      if(transform.position.y > 0.6f) {
          // If the coconut is above the ground, we’ll make it drop a little.
          transform.Translate(0, -2.5f * Time.deltaTime, 0, Space.World);
      }
  }
-
-
What does Time.deltaTime do?
- If we’re doing something in an Update method, we don’t really know how often it will be called. It could be anywhere from 60 to 120 times a second for VR. Time.deltaTime helps smooth out any animations or updates over time, which means that it helps give framerate-independent animations and updates. This means that the animations or updates will look the same regardless of the frame rate. The variable Time.deltaTime contains the amount of time it took to render the previous frame. If we multiply that by a constant variable, our animation will run (or, in the given example, our coconut will fall) at the same speed if your frame rate is 60, 90, or 120 fps.
-
How could we get an object move back and forth between two points?
-
Our Mathf.Sin function is great for these types of use cases. In a script attached to an object we want to move between two points along the vertical (Y) axis, we’d add this bit of code in the Update method.
-
  void Update() {
      // x, y, z
      transform.position = new Vector3(0, 5 + Mathf.Sin(Time.time * 5.0f), 0);
  }
-
This line of code is basically, changing the object’s Y position every frame to a new position which is a Vector3. A Vector3 is a variable that contains an X, a Y, and a Z. In our example above, we create a new Vector3 each frame that has a 0 for X and Z and then the Y is the only variable that changes based on the Mathf.Sin function.
-
-
-
Unity Documentation
- Divided into two sections:
- Manual
- Design and components
- Scripting API
- Programming
- Divided into namespaces
- namespaces establish a grouping between related objects
UnityEngine: functions that unity offers in order for you to develop your gameUnityEditor: functions that you can integrate to unity in order to enhance the tool it self.
- Manual
- Divided into two sections:
-
Almost all scripts start with using
UnityEngine -
This gives you access to all the objects in the UnityEngine namespace
-
Every
Componenthas a question mark that will lead you to theUnityandScriptingdocs. -
Creating objects using code
- Passing an object that exists in a
Sceneas aReferenceto you script 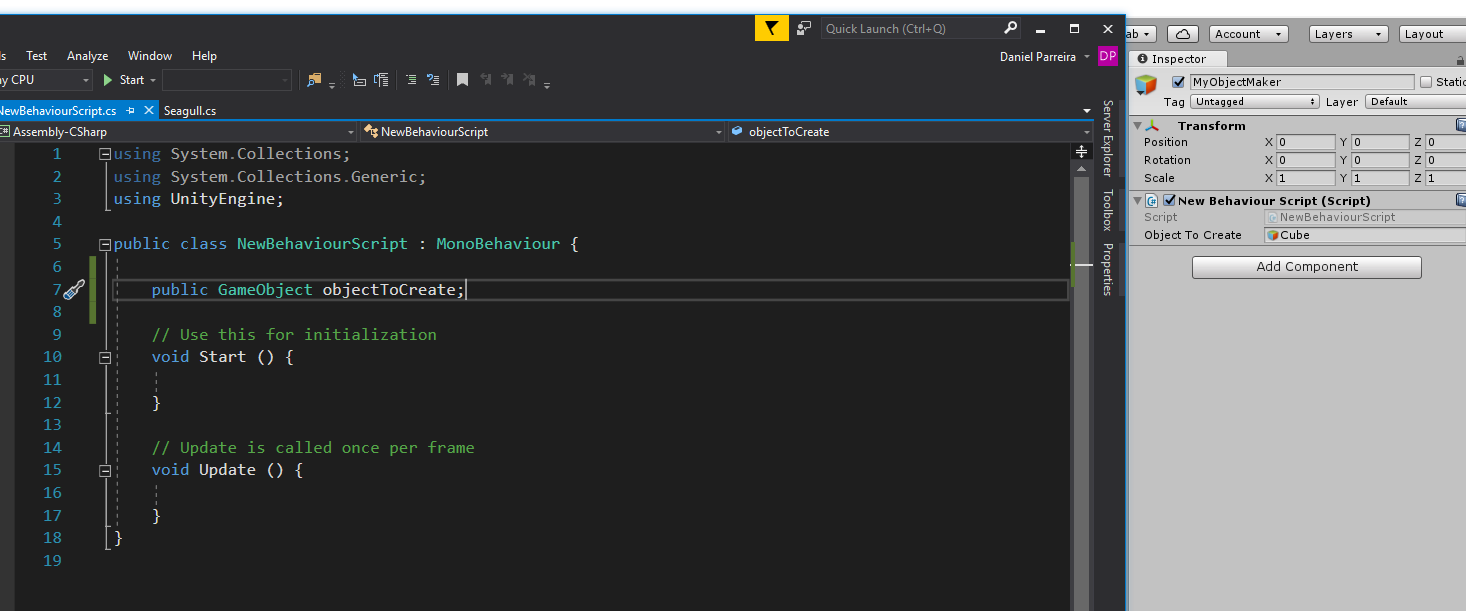
- Passing an object that exists in a
-
Creating a copy from a reference
Object.Instantiate(objectToCreate, new Vector3(2, 4, 5), Quaternion.identity);- We use
Vector3in order to specify a location in 3D space Quaternions: How unity handles 3D rotation. Better for simulations than Euler angles
- We use
-
Prefab
-
Allow you to store a
GameObject, all of its componenets, and settings in a file on your hard drive. -
Think of prefabs as a "plan" that Unity follows to create certain GameObjects.
-
To create a
Prefabyou just need to drag-and-drop aGameObjectfrom theHierarchysection.
-
-
Controlling Components Using Code
-
  using System.Collections;
  using System.Collections.Generic;
  using UnityEngine;

  public class NewBehaviourScript : MonoBehaviour {

      public GameObject objectToCreate;

      // Use this for initialization
      void Start () {
          for (int i = 0; i < 50; i++) {
              GameObject newSeagull = (GameObject)Object.Instantiate(objectToCreate, new Vector3(i, 0, 0), Quaternion.identity);
              Renderer objectRenderer = newSeagull.GetComponentInChildren<Renderer>();
              objectRenderer.material.color = Color.white * Random.value;
          }

          //Object.Instantiate(objectToCreate, new Vector3(2, 4, 5), Quaternion.identity);
      }

      // Update is called once per frame
      void Update () {

      }
  }
-
-
Lesson Review
-
Unity Documentation
- The Unity Documentation is divided up into two main sections, the manual and scripting. The manual shows you how Unity is designed and how to use the editor. The scripting section is concerned with Unity programming. For the course, we’ll primarily be focusing on the scripting.
-
What are namespaces and how do I include them in my scripts?
-
The scripting API is divided into namespaces, which establish groups between related objects. Unity uses UnityEngine and UnityEditor primarily. The UnityEngine namespace contains objects that have to do with when the app is actually running. The UnityEditor namespace is all about extending the Unity editor. We’ll primarily be using what’s in the UnityEngine namespace.
-
To use the UnityEngine namespace, for example, we’d write this at the top of our scripts.
using UnityEngine;
-
This line of code gives us access to everything within that grouping or namespace.
-
The UnityEngine.Classes namespace contain all the important classes or objects that we should learn in Unity. Classes represent what’s common between objects. For example, all cameras have things in common and those things are described in the camera class.
-
Tip: To jump directly to a components documentation, click the icon of the book with the question mark in the Inspector window.
-
-
What are references and how can I create one?
-
References allow you to pass objects and components into a script through the Unity Editor so you can control them in the script. References are defined in scripts at the top, above any methods the script may have. For example, you might have some of the following references in a script:
-
  public float runSpeed;
  public GameObject player;
  public string playerName;
-
The word public in each of the lines above, allow us to see and change these in the Inspector. It’s also an “access modifier.” This means that other scripts in the project can see these things and use them. Other access modifiers are private and protected. Private means that only this script can access the references and we won’t be able to see them in the editor.
-
The next part of the references is the “data type” of the reference. In our example above, we’ve got float, GameObject, and string. A data type lets our code know what kind of data we’re storing. In our runSpeed variable, we’d be storing a float like 2.5.
-
Tip: A script can also be a data type. For example, let’s say we have a Door script.
-
  public class Door {
      public bool isOpen;

      void Start() {
      isOpen = false;
      }

      public void Open() {
          isOpen = true;
          // Open door.
      }
      public void Close() {
          isOpen = false;
          // Close door
      }
  }
-
We could have a second script that has a reference to an this door script that’s attached to a gameobject.
public Door myDoor;
-
Inside that second script, we’d be able to call methods in our door script, by doing the following:
myDoor.Open();
-
The last part of references is the variable name. These names are written in “Camelcase,” which means that the first word is lowercase and each subsequent word is capitalized. Notice how there’s no spaces between the words? The capital letters help indicate a new word and make it easier to read. For example, playerrunspeed is much harder to read than playerRunSpeed.
-
-
What are Vector 3s?
- The Vector3 variable type is how we specify positions in 3D space. Each Vector3 has an X coordinate, a Y coordinate, and a Z coordinate.
-
What are Quaternions?
- Quaternions are how Unity handles 3D rotations. Unity uses them because they’re better for simulations. Unity handles all the complex math for us.
-
I know I can control objects with code. Can I also create objects with code?
-
Yes! We can “Instantiate” objects, create a new instance of something, through code. We used the Instantiate method to create copies of gameobjects.
-
  // objectToCreate is a GameObject that we have a reference to.
  Object.Instantiate(objectToCreate, new Vector3(2, 4, 6), Quaternion.identity);
-
The instantiate can be used in a variety of ways. In the above example, the method is called and we pass in the reference to what we want copied (objectToCreate), where we want the object to be (the new Vector3 position), and how we want it rotated (Quaternion.identity is equal to the same rotation as the objectToCreate reference has).
-
Sometimes we may want to save a reference to an object we create to change it in some way. (Like changing the color, adjusting the position, etc.) To do that we need to add a few more things to our instantiate line.
-
GameObject newObject = (GameObject) Object.Instantiate(objectToCreate, new Vector3(2, 4, 6), Quaternion.identity); -
The first GameObject is the data type of the object we’re creating. The second part (newObject) is the variable name that we make up. The “(GameObject)” is called a “cast”. When we call the Object.Instantiate method, an object with a datatype of object gets returned. The cast is how we say that we plan on using that object as a Unity GameObject and not as a generic object type.
-
-
What are comments?
-
Comments are great for writing programming notes for ourselves and others. For example, comments might be used to summarize what a method is doing.
-
They’re also useful for saving code for later reference. Before publishing and submitting your code, commented out code should be removed. This will help make your code cleaner and easier for others to read.
-
To create comments in a C# script add two forward slashes (//) before a line. If you want to comment out multiple lines of code, you can add a forward slash and asterisk (/) before and an asterisk and forward slash (/) after the code you want commented out. For example:
-
  /*
  This is an example.
  It will comment out many lines.
  If you don’t add the ending asterisk and forward slash,
  it will comment out everything through the end of the file.
  */
-
-
What are for loops?
-
For loops are how we tell Unity to do something several times. For example,
-
  for(int i = 0; i < 5; i++) {
       Debug.Log(i);
  }
-
In this example, we set the variable i to be 0. Then we check to see if i (0) is less than 5. Since it is, it will run our Debug.Log() line and print the value of i (which is 0) to our console. Then it goes up to the i++ which will increment i by one. I will now be 1. Then it goes back to the conditional to see if i (which is now 1) is less than 5. Our code continues through this loop until i is 5. At that point, 5 is not less than 5, so we’re done. Our console would have logs for 0, 1, 2, 3, and 4.
-
-
What are prefabs and how can I make one?
-
Prefabs are Unity’s way of allowing you to save a GameObject in a file. This file includes all of the GameObject’s components and settings. Prefabs are a way for you to setup objects and reuse them across scenes. Prefabs are shown with little blue cube icons.
-
To create a prefab, click and drag the object from your Hierarchy to your Project window.
-
Tip: References can be created by dragging objects from the Hierarchy and the Project window. If you are creating objects via scripts and they aren’t looking like you expect, it’s likely because your reference is the object in the Hierarchy and not the prefab. To fix this, drag the prefab from the Project window into your scripts reference instead.
-
-

-
Right Click->UI->Text- That will create a
Canvasobject that fills up the entire screen- This canvas will be feeling up the screen in 2d, but in case you want to use the text in a 3d space you can use the
World Spaceoption
- This canvas will be feeling up the screen in 2d, but in case you want to use the text in a 3d space you can use the
- Set the
Canvasto useWorld SpaceRender Mode - You can make the text more clear by clicking on
Canvasand settingDynamic Pixel Per Unit5 - Inside the
Textobject you can setVertical Overflowto break a line of text
- That will create a
-
To interact with things in the VR environment we need to setup an
Event System.-
This system listen for things that are happening in the
Scenelike clicks, hovering and more -
To use the
Event Systemright-click on the Hierarchy ->UI->Event System- Remove
Standalone Input Moduleand addGvr Input Module
- Remove
-
In order for events to be triggered, our
Game Objectmust have a collider associated to it.- You can add a
Box Colliderfor the Vacation Box in this case - The collider is perfectly sized to the vacation box size
- You can add a
-
In our Vacation Box
Game Objectwe also need to create aEvent Trigger.- After creating it, click on
Add New Event Typeand selectPointerClick - Also click the plus button
- After that, create a new
Scriptcomponent by click onAdd component 
- Link our
Scriptto the objectsEvent Trigger -
  using System.Collections;
  using System.Collections.Generic;
  using UnityEngine;

  public class ChangeScene : MonoBehaviour {
      public void GoToScene()
      {
          Debug.Log("My method was called");
      }

  }
- Link our
- After creating it, click on
-
Since we want to change the
Scenein the game, we need to first go toFile->Build Settings.- You will see a
Scene In Buildarea that supports drag-and-drop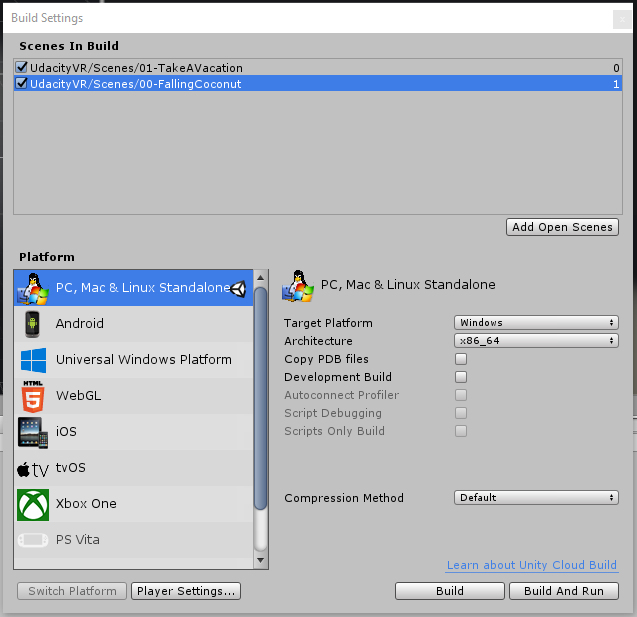
-
  using System.Collections;
  using System.Collections.Generic;
  using UnityEngine;
  using UnityEngine.SceneManagement;

  public class ChangeScene : MonoBehaviour {
      public void GoToScene()
      {
          Debug.Log("My method was called");
          SceneManager.LoadScene("00-FallingCoconut");
      }

  }
- If you right-click the code editor, it may help with some auto-complete
-
  using System.Collections;
  using System.Collections.Generic;
  using UnityEngine;
  using UnityEngine.SceneManagement;

  public class ChangeScene : MonoBehaviour {
      public void GoToScene(string sceneName)
      {
          Debug.Log("My method was called");
          SceneManager.LoadScene(sceneName);
      }

  }
- You will see a
-
-
Lesson Review
-
How can I use Unity’s UI elements in my VR scenes?
-
Unity’s Canvas defaults to a “Screen Space - Overlay”, which renders everything over the whole main camera. However, in VR we can’t use it in that mode. We need to switch the canvas Render Mode to be “World Space”.
-
After we change the render mode, we then have to size the canvas appropriately. We can use the scale tool to resize the entire thing down. Then we need to position it in the scene.
-
-
The text on my canvas is blurry. How can I fix it?
- To fix blurry text on a canvas, we’ll increase the Canvas’s Dynamic Pixels Per Unit. This value defaults to 1. Increasing it will sharpen the text. Increasing this number too much can lead to performance issues, so it’s recommended to keep this as low as possible.
-
How do I make a 3D object interactable?
-
We need to add a couple of things to make an object interactable.
-
Add the GvrEventSystem to the scene. Or you can make your own by creating a new event system and adding the GvrPointerInputModule component to it.
-
Add a collider to the 3D object. This can be a box collider, a sphere collider, or any type of collider.
-
Add an Event Trigger component to the 3D object.
- Click Add New Event Type to add a PointerClick event.
- Click the plus to add an empty object holder. This will hold the object that will perform some action when the event happens.
- Wire up the object by clicking and draging the object with the method you want to call from the Hierarchy over to the object holder box in the PointerClick event trigger.
- Decide on a method to run by clicking on the “No Function” dropdown. Navigate to the script and method you want to call when the event happens.
-
-
What’s a debug log statement and what are they used for?
-
Debug log statements are used a lot for testing and problem solving our code. We’ll see these messages in the Console window. To write one:
Debug.Log(“My message here”);
-
You can include any message in a debug log statement. If we wanted to test if a method was called that could be
Debug.Log(“My method was called.”);
-
Debug log statements can also include variables through a process called “Concatenation”. It will essentially put strings together. For example, let’s say we wanted to print out a player’s score when he scores a point.
-
  public float score = 0;

  public void ScorePoint() {
      score++;
      Debug.Log("We’ve scored a point. We now have " + score + " point(s).");
  }
-
-
Whenever the ScorePoint method is called, we would increment the score value by one and print out a line with the score’s value. The first time the method is called, we’d print out a line that would say “We’ve scored a point. We now have 1 point(s).”
-
-
How can I write a script that changes the scene?
-
Be sure that your scenes have been added to the build settings.
- Open build settings by going to File > Build Settings.
- Click and drag your scenes from your Project window into the “Scenes in Build” box at the top of the Build Settings.
- Tip: The first scene listed in the build settings is going to be the first scene that loads up in your build files.
-
Add some code in a script to change the scene.
-
  using UnityEngine.SceneManagement;

  public class ChangeScene : MonoBehaviour {
      public void GoToScene() {
          SceneManager.LoadScene(“Name of scene to load“);
      }
  }
-
Replace the “Name of scene to load” with the name of the scene you want to switch to.
-
Another way we can accomplish the same thing is to use a variable (also known as a parameter) to set the scene name. This would give us some flexibility with our script, so we could change the scene we load in the Unity editor.
-
  using UnityEngine.SceneManagement;

  public class ChangeScene : MonoBehaviour {
      public void GoToScene(string sceneToLoad) {
          SceneManager.LoadScene(sceneToLoad);
      }
  }
-
When we do the next step (setting up the Event Trigger), we’ll need to include the name of the scene we want to go to in the box underneath the function name.
- Call the script with an Event Trigger. (See the above review question for making 3D objects interactable if you need a review.)
-
-


-
Imagine you're in a car. You have a position and rotation relative to in the car. You're in the driver seat facing out the window. BUT, as the car drives around, and turns, your position on earth is changing, as well as your cardinal facing direction, but your position within the car has not changed.
-
Same goes with the GameObjects. If you nest a GameObject in another, and then move the parent GameObject around, the child GameObject moves with it. It's local position is that inside its parent, where as the global is its position in the scene.
-
Lerp stands for linear interpolation and Slerp stands for spherical linear interpolation, and both rely on a time parameter that indicates how much to interpolate.
-
The Lerp and Slerp methods are available in several UnityEngine classes. The parameters the method takes depends on the class it belongs to, for example:
Mathf.Lerp- Takes three floatsVector3.Lerp- Takes two Vector3s and one floatQuaternion.Lerp- Takes two Quaternions and one float
-
  using System.Collections;
  using System.Collections.Generic;
  using UnityEngine;

  public class RotateLight : MonoBehaviour {


      public GameObject directionalLight;

      // Use this for initialization
      void Start () {

      }

      float startTime = 0f;

      // Update is called once per frame
      void Update () {
          Quaternion startRotation = Quaternion.Euler(50f, 20f, 0f);
          Quaternion endRotation = startRotation * Quaternion.Euler(0f, 180f, 0f); // adding rotations by multiplying
          // directionalLight.transform.Rotate(0f, Time.deltaTime, 0f);
          directionalLight.transform.rotation = Quaternion.Slerp(startRotation, endRotation, startTime / 10f);
          startTime += Time.deltaTime;
      }
  }
-
      using UnityEngine;
      using System.Collections;

      public class RotateLight : MonoBehaviour
      {

          public GameObject directionalLight;

          public Animator sunRotationAnimation;

          float startTime = 0f;
          bool isPressed = false;
          string whoRocks = "Udacity Rocks";

          // Use this for initialization
          void Start()
          {
              //GvrViewer.Instance.OnTrigger += ActivateRotation;
              sunRotationAnimation.StartPlayback();
          }

          // Update is called once per frame
          void Update()
          {
              Quaternion startRotation = Quaternion.Euler(50f, 30f, 0f);
              Quaternion endRotation = startRotation * Quaternion.Euler(0f, 180f, 0f);
              if (isPressed == true)
              {
                  //directionalLight.transform.rotation = Quaternion.Slerp(startRotation, endRotation, startTime / 10f);
                  /*
                  //sunRotationAnimation.StartPlayback ();
                      sunRotationAnimation.enabled = false; // Disable the Animator component

                      //sunRotationAnimation.StopPlayback ();
                      sunRotationAnimation.enabled = true; // Enable the Animator component

                  */
                  sunRotationAnimation.StopPlayback();
                  startTime += Time.deltaTime;
              }

              // Replaces 'GvrViewer.Instance.OnTrigger += ActivateRotation;'
              // Typically would be placed at the top of the Update() method, but
              // placed here for the script to better match up with the video
              if (Input.GetMouseButtonDown(0))
              {
                  ActivateRotation();
              }
          }

          public void ActivateRotation()
          {
              isPressed = true;
              sunRotationAnimation.SetBool("ChangeColor", true);
          }
      }
-
Lesson Review
-
How can we rotate a gameobject through a script?
-
There are a couple of different ways we could rotate objects in scripts. In our script, we’ll need to create a public reference to the object we plan to rotate. Then we’ll need to assign it in the inspector.
-
Use the Rotate method. If we wanted to use the Rotate method to rotate an object really slowly around the Y axis, our code would look something like this.:
-
  public GameObject objectToRotate;

  void Update() {
      objectToRotate.transform.Rotate(0f, Time.deltaTime, 0f);
  }
-
-
Use Slerp. Using Slerp, we must define the start and ending rotations (these are stored as Quaternions).
-
We also need to define a time value for the Slerp method. This time value must be a number between 0 and 1. If it’s 0, it’ll stay at the start rotation, and if it’s 1 it’ll stay at the end. Can you guess what it’ll be if we enter 0.5? If you guessed in the middle of the two points, you’re right. To calculate this time value, we’ll use Time.time and divide it by a value. In the example here, I used 50. This will make the rotation much slower. Using a smaller number, will make the rotation faster.
-
  public GameObject objectToRotate;
  public float timeScale = 50f;

  void Update() {
      Quaternion startRotation = Quaternion.Euler(50f, 30f, 0f);
      Quaternion endRotation = startRotation * Quaternion.Euler(0f, 180f, 0f);
      objectToRotate.transform.rotation = Quaternion.Slerp(startRotation, endRotation, Time.time / timeScale);
  }
-
Tip: To add two Quaternion’s together, you need to multiply them.
-
-
What is interpolation, “lerp”, and “slerp”?
-
Interpolation is the process of creating data points between two given points. For example, if we have two points A and B that are sitting on a table 1 foot apart. The process of interpolation would be the process of creating the points that lead from point A to point B. For example, these might be points 1 inch apart along the distance between the two points.
-
Lerp is “linear interpolation” and Slerp is “spherical linear interpolation”. Both use a time variable to determine how much to interpolate. Lerp uses two points, and interpolates in a straight line from point A to point B. Slerp, on the other hand, also uses two points, but interpolates in an arch from point A to point B. Slerp could be used, for example, to animate a rising and setting sun.
-
-
How can we control our Animator in a script?
- There are a lot of ways we can interact with our Animator.
-
Stop or Start Animator Component
-
If we wanted to stop our animator, we could do that with the enabled property.
-
  public Animator animator;

  public void StopOurAnimator() {
      animator.enabled = false;
  }

  public void StartOurAnimator() {
      animator.enabled = true;
  }
-
Play An Animation
-
If we wanted to play a specific animation, we could do that with the Play method. We’d need to provide the name of the animation state to play.
-
  public Animator animator;

  public void StartOurAnimator() {
      animator.Play(“animationStateName”);
  }
-
-
Set Animation Parameters
-
A lot of times we’ll use parameters in our animator. We can edit those through scripts as well. For example, let’s say we have a boolean parameter in our Animator called “isLocked”. We have an animation set up to play when the isLocked is false. In our code, we’d use the Animator’s SetBool method.
-
  public Animator animator;

  public void Unlock() {
      animator.SetBool(“isLocked”, false);
  }
-
Tip: The animator has other methods for different types of animator parameters. These include SetTrigger, SetFloat, and SetInt. The only one that is used differently is the SetTrigger. Instead of providing two values like the example above (which has the parameter name and the value we want to set it to), the SetTrigger method only needs the parameter name.
-
-
-
-
Types of Collider Components
- Box Collider
- Capsule Collider
- Sphere Collider
- Mesh Collider
-
This collider specify the area we want to apply physics into our object
-
All primitive objects already have a
Collidercomponent associated to them -
If our object does not fit any of those Colliders we can use our own Mesh
Mesh Colliderand use that for collision detection -
Once we have specified a
Collisioncomponent, then we need to specify aRigidbodycomponent to interface with the Unity physics simulation -
The
Colliderenables collision and theRigidbodyenables physics (gravity); -
Ray Casting: shooting a ray for a location and hoping that it hits the colliders at a given moment.- Example: detect when someone is looking at an object in VR
-
Fixed Update: Similar to theUpdatemethod, but it is the appropriate place to write code for Object collision and Ray Casting in the Unity engine. -
  using System.Collections;
  using System.Collections.Generic;
  using UnityEngine;

  public class DetectTreasure : MonoBehaviour {

      public GameObject chest;
      private Animator chestAnimator;
      private bool chestOpen = false;

      void Start()
      {
          chestAnimator = chest.GetComponent<Animator>();
      }

      void FixedUpdate()
      {
          Vector3 fwd = transform.TransformDirection(Vector3.forward);

          // We provide our position, the vector the ray will travel and how far we want the ray to travel (10 meters)
          if (Physics.Raycast(transform.position, fwd, 10) && !chestOpen)
          {
              print("There is something in front of the object!");
              chestAnimator.SetTrigger("LookedToChest");
              chestOpen = true;
          }
      }
  }
-
In order to add audio to our
Scene, we will create an emptyGameObjectand associate anAudio Sourceto it.Spatial Blend: this dictates wheter the position of our object inSceneaffects how we hear it. Some sounds like background music we want to hear from anywhere (2d spatial blend), but other ones need to be 3d
-
Unity knows our distance from the objects because of the
Audio Listenercomponent associated to theCamera. This acts as the position to calculate all spatial audio -
  using System.Collections;
  using System.Collections.Generic;
  using UnityEngine;

  public class AudioPicker : MonoBehaviour {

      public AudioClip[] soundFiles;

      public AudioSource soundSource;

      // Use this for initialization
      void Start () {
          int index = Random.Range(0, soundFiles.Length);
          soundSource.clip = soundFiles[index];
          soundSource.Play();

      }

      // Update is called once per frame
      void Update () {

      }
  }
-
Lesson Review
-
How can I get physics setup in my project?
-
Adding physics to our VR projects help our virtual environments feel more realistic. To use Unity’s physics system, we’ll need to add a collider on our 3D objects. Unity has box, capsule, sphere, and mesh colliders. Colliders help define areas where we want physics to work on.
- Tip: Primitive colliders are more performant than mesh colliders. Use them when you can to improve performance.
-
We’ll also need to add a Rigidbody component to our object. This is what will actually be used to calculate forces like gravity, drag and mass.
-
-
What is raycasting?
-
Raycasting is a way we can simulate looking for something.
-
For example, let’s say we lost our keys or someone moved them. Our eyes would scan around the room looking for them. When we find them, we can pick them up and go about our day.
-
In that example, imagine we’re drawing a line from our eyes to the point we are looking at. That line would move around the room as we look. That’s what raycasting does. It allows us to start at one point (our eyes) and draw a line (look) in a direction. If our line intersects with something we care about (our keys), we can take action. If not, we continue our search.
-
To use Raycasting in Unity, we need two pieces of information. The point we start at (like our eyes) and the directions we’re looking (forward). Because raycasting uses the Unity physics engine, FixedUpdate is the best place for this code. FixedUpdate works like the Update method, but instead of updating every frame, it runs it at fixed intervals (whenever there’s a fixed framerate frame).
-
Our call to Physics.Raycast takes a starting point, our direction, and the distance you want the ray to go.
-
  void FixedUpdate()
  {
      Vector3 fwd = transform.TransformDirection(Vector3.forward);

      if (Physics.Raycast(transform.position, fwd, 10))
          print("There is something in front of the object!");
  }
-
Tip: Rigidbodies and Physics code should go in the FixedUpdate method instead of the Update method.
-
-
Setup Objects For Use With Raycasting
-
Anything we want to detect with a raycast needs to have a collider on it.
-
Learn more about raycasting by checking out the Unity Documentation for Raycasting.
-
-
How can I add audio in my scene?
-
First, we need to be sure we’ve include the audio file into our project. Bringing an audio file into Unity, it is automatically converted into an audio clip.
-
On the object that we want to play the sound, we’ll add an Audio Source component. Then click and drag the audio clip into the “AudioCilp” slot of the Audio Source component.
-
To ensure our audio is setup properly for VR, we’ll change the Spacial Blend property. In the real world, the closer we are to an object making noise, the louder it is. Most of the audio we use in VR we’ll want to be setup similarly. Move the Spacial blend slider to 3D to make our audio realistic. If you’re wanting to add things like background audio clips or anything that you want the users to be able to hear the same way regardless of their position in the scene, we’ll move this slider to 2D.
-
In order for audio to work properly in our scenes, we’ll need some audio sources (the objects that make the sounds) and one audio listener. The audio listener is typically found on the main camera (or on the camera rig in many VR sdks).
-
-
How can I get a random number?
-
To generate a random number in a script, you can use the Random.Range method. This method takes in two values. The first is the minimum, the second is the maximum. This method uses the maximum as the first number that would NOT be returned. For example, if we do something like the line below, we could get a value as low as -10 and as high as 9:
-
Random.Range(-10f, 10f);
-
-
-
Waypoints: let you teleport between areas in yourScene- Check project code for full implementation
-
Shaderis code to create a customMaterialand run it on the GPU. Like the oceanShaderwe can manipulate materials in real time. -
What method is used to create a new object in the scene?
Instantiate
-
Lesson Review
-
One of the best ways of developing an application quickly is to reuse code. This lesson focused a lot on a couple of the scripts that was provided in the course and project assets.
-
The goal of this lesson was not to teach you all the specifics of each script, but to get you comfortable looking at another’s code to see how you can use and adapt it to suit your needs.
-
This will be a vital skill as you progress though your development career. Getting assets from the Unity asset store, for example, may require you to look at their documentation, if they have any, and experiment with what they’ve created. Not all assets are going to have tutorials provided, so you have to be willing to spend some time looking at examples, and experimenting to learn new skills.
-
Udacity Teleportation Script Example
-
In our experiment, we brought a prefab into the scene. This let us explore the components on the prefab to get a better idea of how it worked.
-
The Waypoints prefab has a script on it called Navigation. Looking at the script, we can see some helpful comments that give us hints and explanations about how things work and what they do. This script is responsible for moving the camera
-
It also has several child game objects which are individual waypoints. Each of those have a Waypoint script attached. The waypoint script has a variety of properties that affect the individual waypoint.
-
-
Udacity Ocean Shader Example
-
We learned that the Ocean shader is attached to a Scene Setup script which is attached to Scene gameobject. The ocean is dynamically generated at runtime, so when we aren’t in play mode, the ocean won’t show up.
-
When we look at the Ocean shader, we can see all of the properties that we can change. We could opt to change values directly in the shader, but most shaders expose their most important properties publicly. We’re opting to change those in the inspector rather than editing the shader.
-
-
Udacity Flocking Example
- In this example, we edited a script to suit our needs. We wanted to change the object that was flocking, so we edited a property. We got several errors in our console. By reading the error, we learned that we were missing a mesh renderer because there wasn’t one on our objects. We commented out the lines that mentioned mesh renderer, and running it again, worked.
-
- Making the UI Interactive
- During this step we will make the SignPost interactive by adding script and event trigger components to it. The process is almost identical to what we did with the Coin, Key, and Door in the previous step, but we don't need a collider to interact with UI game objects. Instead, we need to verify that the Canvas game object has a Graphic Raycaster component, and because we are using GVR, we will replace Unity's Graphic Raycaster with Google VR's GvrPointerGraphicRaycaster.
- Remove the Graphic Raycaster component that is automatically added when creating a new canvas game objects.
- You don't need to associate a collider with the UI object, the RayCaster will do the magic trick.
- Remove the Graphic Raycaster component that is automatically added when creating a new canvas game objects.
- During this step we will make the SignPost interactive by adding script and event trigger components to it. The process is almost identical to what we did with the Coin, Key, and Door in the previous step, but we don't need a collider to interact with UI game objects. Instead, we need to verify that the Canvas game object has a Graphic Raycaster component, and because we are using GVR, we will replace Unity's Graphic Raycaster with Google VR's GvrPointerGraphicRaycaster.