| Name | Contact Info |
|---|---|
| danithompson74 at gmail.com | |
| gman9mm at live.com | |
| posten.coding at gmail.com |
No known bugs at this time.
Report bugs here. | Request features here.
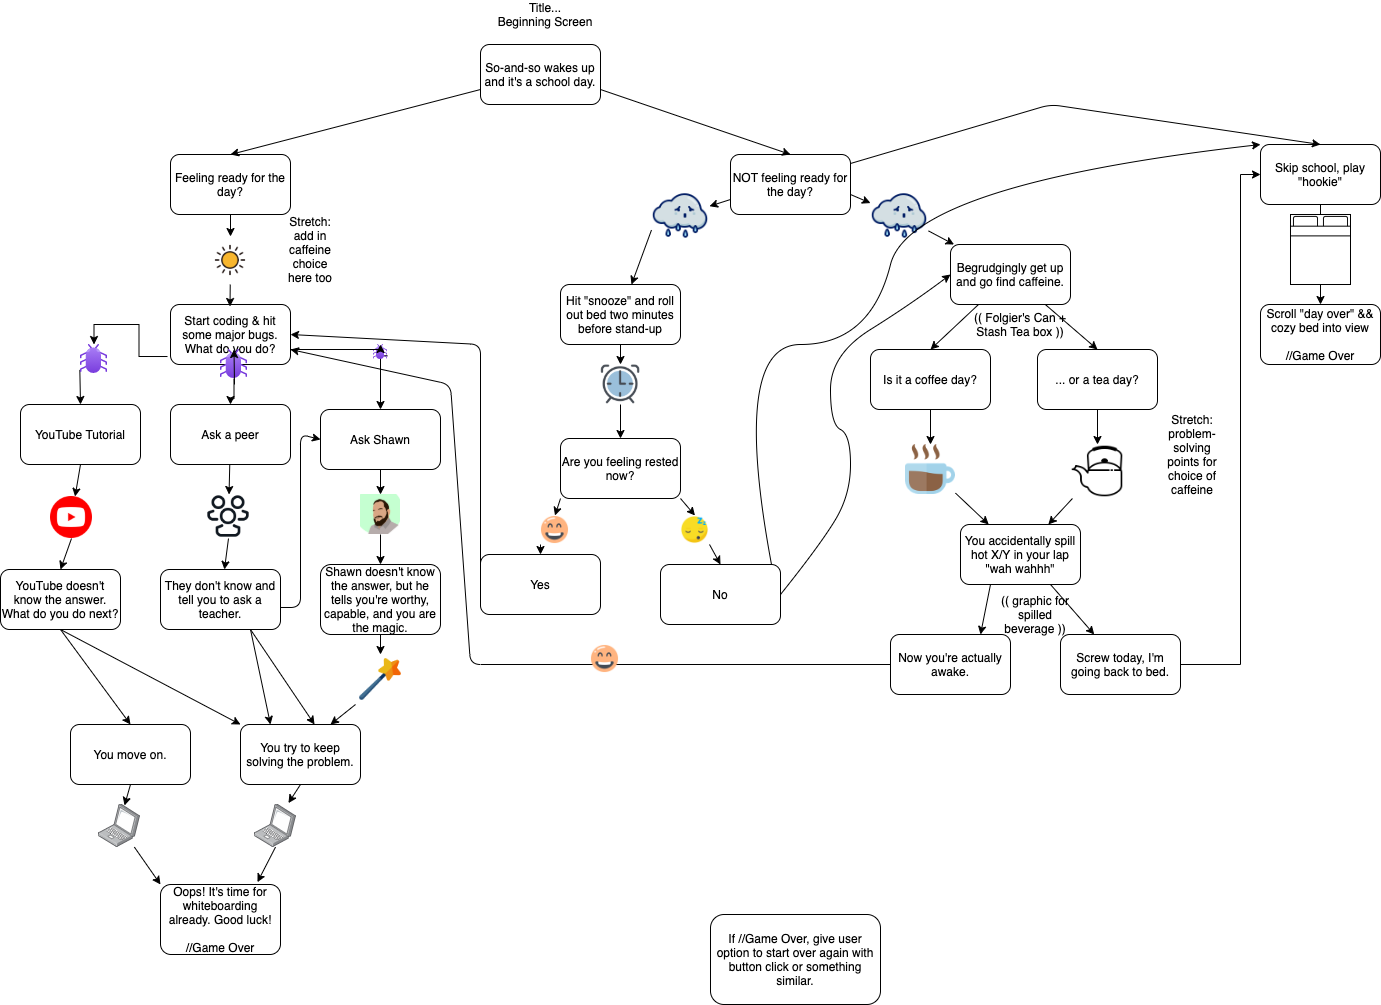
This application walks you through the various choices an Epicodus faces during any given day of class.
-
#ILoveBlob #BlobLife.
-
React.js front-end with a focus on animations & parallax scrolling with React-Spring
-
Hard-code back-end responses (prompts/choices)
-
Stretch goal: refactoring hard-coded responses, etc. with C# as back-end
-
Make sure that we systemize how hard coding, etc happens. (CRUD??) Start by setting up front end ...
-
with state(gameStarted: true/false, prompt, choices, turn(?)) --> React only, no Redux.
Things that are repeatable:
- Form to make choices
- Prompts
- Parallax scroll with repeatable background/images
Splash Page & Intro --> Billboard wakes up --> feeling ready for the day (sunrise png) --> starts coding but bugs (bugs) --> ask Shawn (Shawn avatar) --> you are the magic (magic images) --> keep trying to solve the problem (laptop) --> oops its whiteboarding (end day)
| # | Stories |
|---|---|
| 1 | A user should be able to pull the pink button. |
| 2 | A user should be able to move the blue blob. |
| 3 | A user should be able to click the "Day in the Life" header away, and click it back into view. |
| 4 | A user should be able to scroll through the parallax components and see new images and storyline info come into view. |
| 5 | A user should be able to click the round buttons to scroll to the next story segment. |
- Take in a user's name with an input box to plug into the story line.
- Find a way to add in a choose your own adventure element to the prompts and images that come into view - perhaps with multiple parallax pages per storyline or maybe using ternary conditionals to toggle between views.
- Find a way to refactor the GameControl page & parallax to not be so dang wieldy.
- Homebrew
- VS Code
- Git & GitHub
- ES6 JavaScript
- JSX
- React Framework v17.0
- React-Spring v8.0
- React-DOM v.17.0.1
- React Bootstrap v1.5.0
- @react-spring/addons v.9.0.0-beta.33
- react-use-gesture
- hooks:
useState(),useSpring(),useGesture(),useTrail(),useDrag() create-react-appnpm install --save-exact react-scripts@3.2.0npm install react-spring- webpack v5.11.1
- Babel
- ESLint
- npm
- node.js v15.8.0
- Unsplash
To access the live page visit this site.
- Access Terminal in your Finder, and open a new window.
- Install the package manager in the Terminal, Homebrew, on your device by entering this line of code:
$ /usr/bin/ruby -e "$(curl -fsSL https://raw.githubusercontent.com/Homebrew/install/master/install)". - Once homebrew is installed, install Git, a version control system for code writers, with this line of code:
brew install git. - Now, install Node.js through Homebrew with the following command:
brew install node. - Confirm that node and npm (Node's package manager that is automatically installed alongside Node) are on your working system with two command lines
node -v&npm -v, respectively returning something resemblingv14.5.0&6.14.5(or higher).
- Open a new Command Prompt window by typing "Cmd" in your computer's search bar.
- Determine whether you have 32-bit or 64-bit Windows by following these instructions.
- Go to Git Bash, click on the "Download" button, and download the corresponding exe file from the Git for Windows site.
- Follow the instructions in the set up menu.
- Go to the Node.js website and download the appropriate source code for your Windows operating system.
- Go to this GitHub repository and click the green 'Code' button.
- Clone this application with the following command:
git clone https://github.com/dani-t-codes/choose-your-own-adventure.git. - (Optional) If you would like to save your own copy to your GitHub account, click the "Fork" button in the upper right hand corner of the main repository page.
- Open the project in the code editing application of your choice like VS Code.
In the project directory, you can run:
Runs the app in the development mode.
Open http://localhost:3000 to view it in the browser.
The page will reload if you make edits.
You will also see any lint errors in the console.
Launches the test runner in the interactive watch mode.\
Builds the app for production to the build folder.
It correctly bundles React in production mode and optimizes the build for the best performance.
Note: this is a one-way operation. Once you eject, you can’t go back!
- Building a Create-Your-Own Adventure Game using Rails and React!
- Building a “Choose Your Own Adventure”-Style Game Engine in 48 Hours
This software is licensed under the MIT License.
Copyright (c) 2021 Patrick Osten, Garrett Dean Brown & Danielle Thompson
