(This repository is to complete the requirements for Astra DB's Build-A-Thon Round-3 hackathon submission)

The "la8el" wrote with "8" at the middle, pronounced as "phygital label" (phygital = physical + digital)
The la8el is a physical and digital labeling system that uses compressed and encrypted JAB-Code as a replacement for regular QR-Code to extend the data capacity and security ; using Astra DB as a bridge to Ultra Wide-Band (UWB) technology for Real-Time Location System (RTLS) in assets tracking.
The Apache Cassandra is the ideal choice as a backend database for apps that need scale. Aside from offering high performance and reliability, Cassandra’s architecture makes it possible to scale horizontally to handle very high loads. Since Astra DB simplifies cloud-native Cassandra application development, when you combine the IoT / Internet-of-Things system with Astra DB you get all the benefits of Cassandra with the flexibility of a multi-cloud, serverless database-as-a-service (DBaaS).
We need to first create an Astra DB instance and gather all your credentials. If you haven’t already, you can sign up for a free Astra DB account; no credit card required and $25.00 USD credit every month (roughly 20M reads/writes, 80GB storage monthly) which is sufficient to run small production workloads.
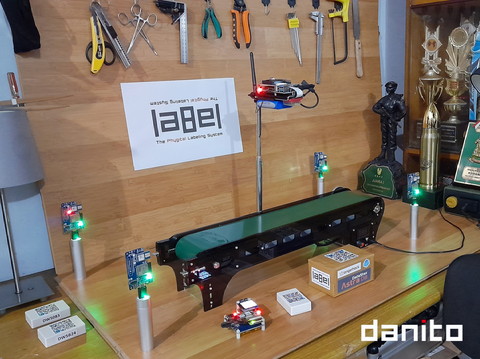
There are three types of la8el's device prototype for labeling system:
- la8el JAB-Code reader, using Raspberry Pi Compute Module 4 CM4 8GB for computing / processing unit, equipped with a high resolution auto-focus camera
- la8el-anchor devices (4 units); using ESP32 micro controller for controlling unit, equipped with a DecaWave Module DWM1000; these units is a 'satellites' for indoor positioning system / asset tracking
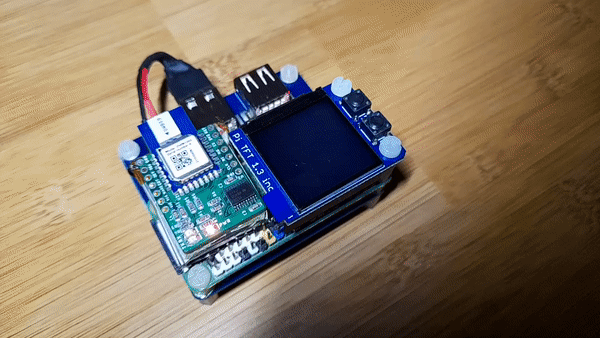
- la8el-tag device, using Raspberry Pi Zero 2 W for computing / processing unit, also equipped with a DecaWave Module DWM1000; this unit is an IoT based digital label display
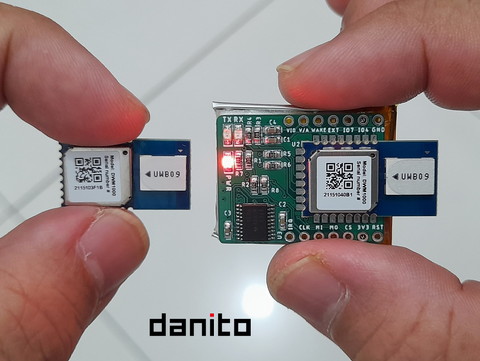
The Ultra Wide-Band (UWB) technology in la8el devices are using Decawave's DWM1000 chip:

For anchors and tags device using Cerdas UWB Tracker (an opensource ESP32 microcontroller based UWB development board from Gerai Cerdas - Indonesia):
![]()
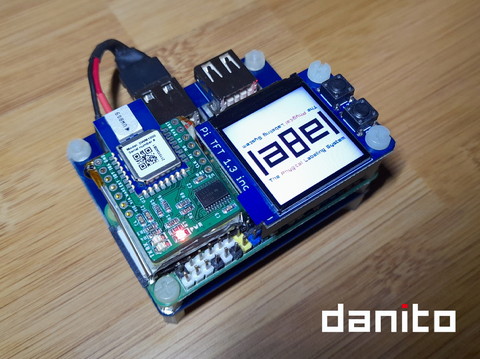
The minimalist version of la8el-tag (prototype):
The la8el-tag prototype version 0.1 (using 2 x 18650 lithium batteries and Cerdas UWB Tracker):
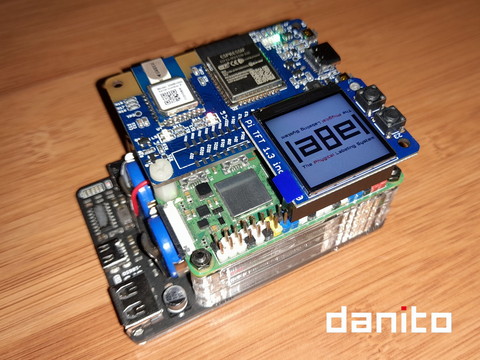
The la8el-tag prototype version 0.2 (using 3800 mAH lithium polymer battery and UWB Breakout + DWM1000):
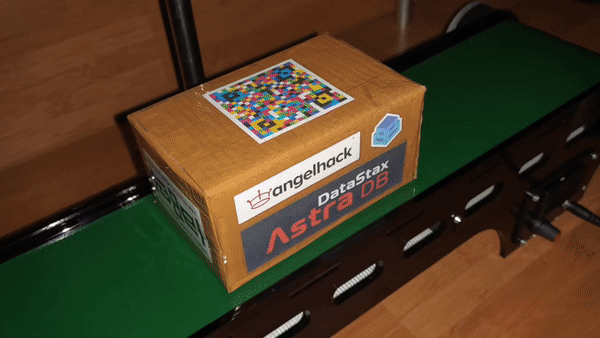
A package with a physical label (encrypted and compressed JAB-Code) on conveyor:
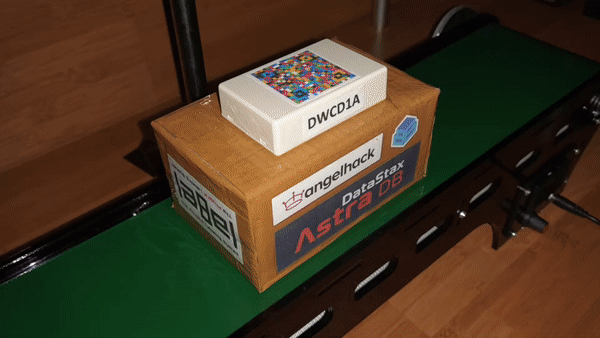
A package with a physical label (encrypted and compressed JAB-Code) along with a la8el-tag as a digital label:
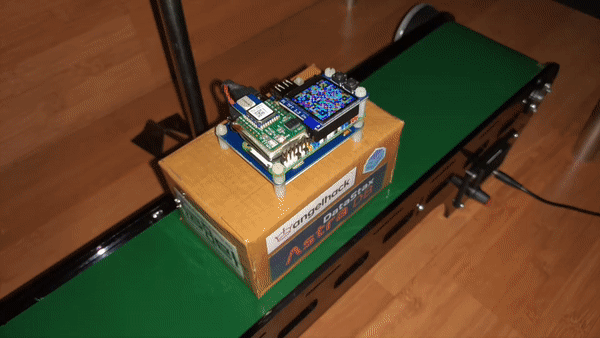
A package with a fully digital label (a la8el-tag with LCD as a digital label):
Please follow these steps to prepare the working la8el JAB-Code reader and label tag prototype:
- Windows:
https://downloads.raspberrypi.org/imager/imager_latest.exe - Linux:
https://downloads.raspberrypi.org/imager/imager_latest_amd64.deb - MacOS:
https://downloads.raspberrypi.org/imager/imager_latest.dmg - Raspberry Pi OS, do this command on 'terminal':
sudo apt install rpi-imager
- Direct download:
https://downloads.raspberrypi.org/raspios_oldstable_armhf/images/raspios_oldstable_armhf-2022-04-07/2022-04-04-raspios-buster-armhf.img.xz - Torrent download:
https://downloads.raspberrypi.org/raspios_oldstable_armhf/images/raspios_oldstable_armhf-2022-04-07/2022-04-04-raspios-buster-armhf.img.xz.torrent
1.3. Deploy ('burn') the latest version of Raspbian OS into a 32GB micro SD using Raspberry Pi Imager application
- Extract the
2022-04-04-raspios-buster-armhf.img.xzfile - Use 32GB Micro SD Class-10 (better using a High Endurance type; usually used for CCTV / live camera purposes)
- Run the Raspberry Pi Imager application as administrator
- Operating System > CHOOSE OS > Use custom > select
2022-04-04-raspios-buster-armhf.imgfile - SD Card > CHOOSE SD CARD > select SDHC SCSI Disk Device - 31.9 GB
- Click WRITE and please wait until writing and verification process finish
- Use Raspberry Pi Zero 2 W
- Use 5V 3A power adapter and plug in to the Micro USB port
- Plug in the HDMI cable into Raspberry Pi's Mini HDMI port to connect to a display monitor (please use HDMI-to-MicroHDMI converter)
- Plug in the USB Keyboard into Raspberry Pi's USB port
- Plug in the power adapter to AC electrical socket
- Raspberry Pi OS (RasPiOS) 2022-04-04 is not using default username
pi, but will asking for a username; in these steps we will usepias a username (please change all of/home/piwith your prefer username, example:/home/danito) - Choose the appropriate configuration for: setting country, location / region, language, keyboard layout, user password, etc
- Connect to wireless network using WiFi to available Access Point
- Activate
SSHandVNCfor easy access (so you can copy paste from other computer); select from start menu (Raspberry pi's logo at upper left screen) > Preferences > Raspberry Pi Configuration > Interfaces tab > enable SSH and VNC
After connected to the internet using WiFi, using the "terminal" application give the following commands:
sudo apt update
sudo apt upgrade
sudo apt dist-upgrade
sudo apt autoremove
Using the "terminal" application give the following command:
sudo apt install xscreensaver
When installation finished, please disable the screensaver also disable blank / sleep-mode display:
Menu > Preferences > Screensaver > Display Modes tab > Mode > Disable Screen Save
Using the "terminal" application give the following command:
sudo pip3 install --upgrade setuptools
sudo pip3 install --upgrade adafruit-python-shell
wget https://raw.githubusercontent.com/adafruit/Raspberry-Pi-Installer-Scripts/master/raspi-blinka.py
sudo python3 raspi-blinka.py
sudo pip3 install adafruit-circuitpython-rgb-display
Notes:
- For RasPiOS 2022-0404 the
libssl-devalready installed by default, you can skipsudo apt install libssl-devcommand - Please change every
make -j$(nproc)intomakeif you want to use only 1 core of processor (slower but will avoid overheat that cause an error)
Using the "terminal" application give the following commands:
sudo apt install libssl-dev
sudo apt install autoconf
sudo apt install libtool
sudo apt install uuid-dev
sudo apt install ninja-build
sudo apt install lrzip
sudo apt install lzma-dev
sudo apt install liblzma-dev
or in just one line command:
sudo apt install libssl-dev autoconf libtool uuid-dev ninja-build lrzip lzma-dev liblzma-dev
and then do a ldconfig command:
sudo ldconfig
Using the "terminal" application give the following commands:
cd ~
git clone https://github.com/Kitware/CMake.git
cd CMake
./bootstrap
make -j$(nproc)
sudo make install
sudo ldconfig
ImageMagick is a tools for image processing and converting purposes. Using the "terminal" application give the following commands:
cd ~
git clone https://github.com/ImageMagick/ImageMagick.git
cd ImageMagick
./configure
make -j$(nproc)
sudo make install
sudo ldconfig
Using the "terminal" application give the following commands (for the newest release number of zlib please reffer to https://zlib.net/):
cd ~
wget https://zlib.net/zlib-1.3.tar.gz
tar xvzf zlib-1.3.tar.gz
cd zlib-1.3
./configure
cmake .
make -j$(nproc)
sudo make install
Note: Please refer to zlib's official website (https://zlib.net/) for the latest version of zlib
Using the "terminal" application give the following commands:
cd ~
wget https://onboardcloud.dl.sourceforge.net/project/libpng/libpng16/1.6.40/libpng-1.6.40.tar.gz
tar xvzf libpng-1.6.40.tar.gz
cd libpng-1.6.40
./configure
make -j$(nproc)
sudo make install
Using the "terminal" application give the following commands:
cd ~
wget http://download.osgeo.org/libtiff/tiff-4.5.1.tar.gz
tar xvzf tiff-4.5.1.tar.gz
cd tiff-4.5.1
./configure
make -j$(nproc)
sudo make install
Using the "terminal" application give the following commands:
cd ~
wget https://www.ijg.org/files/jpegsrc.v9e.tar.gz
tar xvzf jpegsrc.v9e.tar.gz
cd jpeg-9e/
./configure
make -j$(nproc)
sudo make install
Using the "terminal" application give the following commands:
cd ~
wget https://www.cl.cam.ac.uk/~mgk25/jbigkit/download/jbigkit-2.1.tar.gz
tar xvzf jbigkit-2.1.tar.gz
cd jbigkit-2.1
make -j$(nproc)
Using the "terminal" application give the following commands:
For Raspberry Pi OS 64bit please change sudo cp /usr/lib/arm-linux-gnueabihf/liblzma.a . into sudo cp /usr/lib/aarch64-linux-gnu/liblzma.a .
For machine with Intel-family processor and 64bit OS Linux please change sudo cp /usr/lib/arm-linux-gnueabihf/liblzma.a . into sudo cp /usr/lib/x86_64-linux-gnu/liblzma.a .
cd ~
git clone https://github.com/danito-net/jabcode.git
cd jabcode/src/jabcode/lib
mkdir BAK
mv *.a BAK/
sudo cp /usr/local/lib/libz.a .
sudo cp /usr/local/lib/libpng16.a .
sudo cp /usr/local/lib/libtiff.a .
sudo cp /usr/local/lib/libjpeg.a .
sudo cp /usr/lib/arm-linux-gnueabihf/liblzma.a .
cp ~/jbigkit-2.1/libjbig/libjbig.a .
export UserName=$(whoami)
export UserGroup=$(id -g -n $UserName)
sudo chown -R $UserName.$UserGroup ~/jabcode
cd ..
sudo mkdir -p /opt/jabcode/bin
make -j$(nproc)
cd ../jabcodeWriter
make -j$(nproc)
sudo cp bin/jabcodeWriter /opt/jabcode/bin
cd ../jabcodeReader
make -j$(nproc)
sudo cp bin/jabcodeReader /opt/jabcode/bin
cd ~
echo "export PATH=\"/opt/jabcode/bin:\$PATH\"" >> ~/.bashrc
source .bashrc
To create a jabcode image do the following command:
jabcodeWriter --input "Astra DB's Build-A-Thon by DataStax and AngelHack" --output message.png
The generated JAB-Code:
To read a jabcode image do the following command:
jabcodeReader message.png
For Android OS of JabCode reader, you can manually install from APK file on my GitHub repository : JabCode Reader for Android