A declarative-style Bot framework
tgflow supports Telegram Bot API, WhatsApp via Chat-API and Vk Bot API. Looking forward to add Slack!
In one line: use this framework to declare bot logic and launch it on multiple platforms seamlessly.
Here's how you declare a vanilla counter bot:
import tgflow
states = {
'start':{
    'text':tgflow.paste("Hello, i'm hooray bot. Hooray %i times!",
                   'count',default=1), # paste 'count' value to '%i' in string,
		   	               # assign it as text to send
    'buttons':[{
        'Say hooray':lambda count=1: #tgflow will pass 'count' if it's set before
        ('start',{'count':count+1}) # go to 'start' state, set 'count' value
    }]
  }
}
tgflow.configure(token='TOKEN',state='start') # display 'start' state by default
tgflow.start(states)- Getting started.
- Writing your first bot
- Using different APIs
- Architecture
- Types
- Usage
- CofeeUI
- What you should care of
- More examples
There are two ways to install the library:
pip3 install tgflow
- Installation from source (requires git):
git clone https://github.com/DaniloZZZ/tgflow
cd tgflow
python3 setup.py install
It is generally recommended to use the first option.
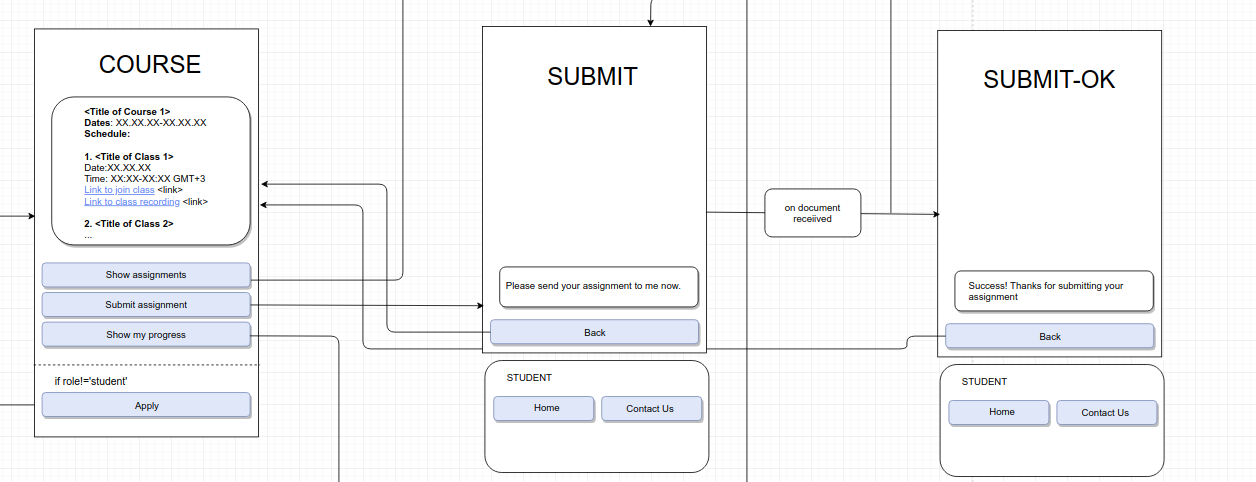
Tgflow is a state-based framework. Each user has a state and data, and each state corresponds to some text and buttons - generally speaking, UI. It's a good way to imagine your bot as some schema like this:
Here's how you to declare states for your bot:
# States.py
from enum import Enum
class States(Enum):
	START=1
	SAY_HOORAY=2
	SET_FAV=3
	ERROR=9
Basically, you define state names in separate file and include it everywhere. You can use just strings instead on Enum class, but you can't use some functionality then.
Then, for each state you create a dictionary that defines UI and some simple actions. To handle user input you define your functions and assign them to buttons in UI dict. You store user-specific data in a dictionary which is passed to you by 'd' argument. Here is a brief example of usage:
import tgflow
from States import States # here you define your states
import logic # some arbitrary code with buisness logic

UI={
States.START:{
	'text':"Hello, wanna see some news?",
	'buttons':[
		{'yes, show me the news':tgflow.action(show_news)},
		{'no, tell me the weather':tgflow.action(show_weather)}# you can also use tgflow.a as a shortcut
		]
	},
	States.NEWS:{
	# t is short for text b is for buttons
	't':tgflow.paste("here are your news:\n %s", 'news'),
	 #  tgflow.paste pastes value from user's data to string
	 'b':[{'Back':States.START}] # you can leave just state(Enum) without wrapping.
								 # this will forward user to this state.
							 # equivalent to tgflow.a(lambda(s): States.START)
							 # or tgflow.action(lambda(i,s,**d):(i,States.START,d))
	}
States.WEATHER:{...},
States.NO_PERMISSION:{...},
}

def show_news(input,data):
# here input will be callback_query (https://core.telegram.org/bots/api#callbackquery)
# as show_news action is used on inline keyboard
	user_id = input.message.from.id

	# don't call news if already exists.
	if not data.get('news'): # data dictionary stores all user's varibles.
		news=logic.get_news(user_id)
	else:
		news=data['news']
	if news:
		new_state=States.NEWS
	else:
		new_state=States.NO_PERMISSION
	upd_data = {'news':news} # assign user's data to pass forward and store in dict
	return new_state,upd_data

# Unnececary parameters can be omitted.
# Tgflow will automatically determine what to pass.
def show_weather(input,location=None): # you can get user's data by key like this
	user_id = input.message.from.id
	upd_data = {'weather': logic.get_weather(location)} # assign user's data to pass forward and store
return States.WEATHER,upd_dataChanging backend for your bot is as easy as
import tgflow as tgf
from tgflow.api.vk import vkAPI

tgf.configure(token="",state='start',apiModel=vkAPI)
Currently available models:
- telegramAPI (default)
- vkAPI (for group bots)
- vk_userAPI (for individual users)
- cliAPI
this stuff is super useful: you can emulate the bot right in your terminal!
Just try it, or check out the examples. To "press" a button hit _N where N - number of buttonAnd you can test the bot in one command using pipes! Guess what this command does?
echo -e "hello\n_1\n_2\n" | python3 cli_debug.py
It sends "hello", then presses first, then second button. (check out /examples/cli_debug.py file)
The event handling process is following:
- Find an action for message received
- Do the action, get new_state and new_data
- Call prepare scripts for the new_state such as database connecting
- Render the UI dict, performing operations and pasting values to UI
- Register actions and triggers, save data and state of user
then Send resulting message and buttons.
The main types you should use are these:
tgfow.action
tgfow.post
they're both defined in handles.py and, to be fair, are quite similar
helpers:
tgflow.send		# send a message without any processing
tgflow.paste		# interpolate the string with value in data
tgflow.choose		# use dict to paste string by key from data
a = tgflow.action(clb_function)
# function should no more than 3 positional arguments state and data and return new_state or (new_state,new_data)
# you can use keys from dict keys as argument names - tgflow will pass them for you
You build logic of the bot in functions and create actions from them, then assign to button or reaction trigger ('react' key of state dict). Designed to make data conversions, condition checking, etc.
This can be replaced by Action called but it's a good practice to write action as pure function without side effects. All interactions with outer world is recommended to perform in prepare. To set prepare action just add 'prepare' key to your state dict and assign action as value
p = tgflow.post(function)
# function should take 2 arguments state and data and return string or object that will be pasted instead of post object
Any data formatting, string interpolation is done here
If you find annoying these large dicts and the sea of {"":""},] signs - use coffeescript to declare the dict!
documentation is still in development
Please check out examples folder to see usage and full set of features!


