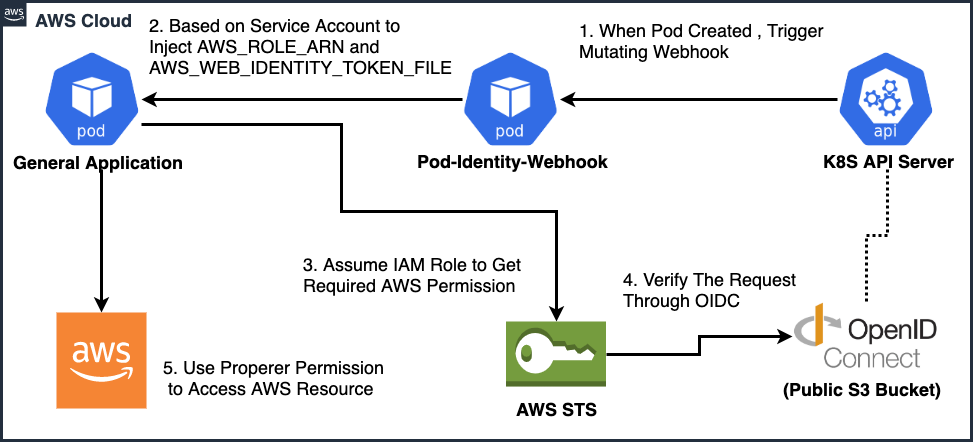
When Kubernetes comes to public cloud AWS, there is a issue that each K8S Pod needs specific permission to access AWS cloud resource, but AWS only can grant the permission under EC2 instance level, instead of K8S Pod level, hence, there are two workaround methods emerging in the community:
-
Grant the permission that all of K8S Pods are required in the EC2 IAM Role Profile ← This is a bad idea, it broken the Principle of Least Privilege
-
Use the third-party solution like kube2iam, kiam and Zalando's IAM controller ← Intercepting the requests to the EC2 metadata API to perform a call to the STS API to retrieve temporary credentials
Finally, AWS made changes in the AWS identity APIs to recognize Kubernetes pods, so each K8S Pod can have specific IAM Role to acquire proper permission to access AWS cloud resource (This feature called IRSA). For the AWS Hosted K8S (A.K.A. EKS), official provided detail document and blog post to demonstrate how to achieve it, but there is still not many online resource to talk about how to enable it for Self-Hosted K8S in AWS, hence, I write this post to go through how to enable IRSA in Self-Hosted K8S.
There are many steps need to be done when enabling AWS IRSA in Self-Hosted K8S, So allow me to simply summarize what I will do in this post first.
- Create a self-signed certificate for the pod identity webhook
- Create a RSA key pair and AWS S3 Bucket as a OIDC discovery endpoint
- Change Kubernets API Server parameter to integrate with OIDC
- Deploy the pod identity webhook into K8S Cluster
- Leverage Official Example to verify whether the IRSA feature works or not
In order to let the demonstration more smoothly in this post, I refer to the AWS official GitHub amazon-eks-pod-identity-webhook to create a simple repository, the major flow and steps arethe same, but I made some customization to fulfill my requirement.
There something need to be install in your environment
- The Golang need to be installed in the environment
~$ go version
go version go1.13 linux/amd64
- Make sure the aws cli is installed, and you have the iam and s3 permission
~$ aws --version
aws-cli/1.16.243 Python/3.5.2 Linux/4.4.0-1092-aws botocore/1.12.233
- Of cause, this demo need the kubectl
$ kubectl version
Client Version: version.Info{Major:"1", Minor:"16", GitVersion:"v1.16.0", GitCommit:"2bd9643cee5b3b3a5ecbd3af49d09018f0773c77", GitTreeState:"clean", BuildDate:"2019-09-18T14:36:53Z", GoVersion:"go1.12.9", Compiler:"gc", Platform:"linux/amd64"}
Server Version: version.Info{Major:"1", Minor:"14", GitVersion:"v1.14.6", GitCommit:"96fac5cd13a5dc064f7d9f4f23030a6aeface6cc", GitTreeState:"clean", BuildDate:"2019-08-19T11:05:16Z", GoVersion:"go1.12.9", Compiler:"gc", Platform:"linux/amd64"}
- Finally, let us start by git clone the demo repository!
~$ git clone https://github.com/smalltown/aws-irsa-example.git
~$ cd aws-irsa-example
The self-signed certificate will be generated and under the folder certs, there is also a K8S secret created for storing the certificate
~$ ./gen-certificate.sh
Generating a 2048 bit RSA private key
...................+++
........+++
writing new private key to 'certs/tls.key'
-----
secret/pod-identity-webhook created

~$ ls certs/
tls.crt  tls.key
After execute the gen-oidc-endpoint.sh, the key pair for OIDC service account is created under folder keys, and it create AWS S3 Bucket as a OIDC discovery endpoint, and use the endpoint to create OIDC provider in the AWS IAM, the key pair and service-account-issuer will be used by Kubernetes API Server later
~$ ./gen-oidc-endpoint.sh
Generating public/private rsa key pair.
Your identification has been saved in keys/oidc-issuer.key.
Your public key has been saved in keys/oidc-issuer.key.pub
...
The service-account-issuer as below:
https://s3-us-west-2.amazonaws.com/aws-irsa-oidc-1569484781

~$ ls keys
oidc-issuer.key  oidc-issuer.key.pub  oidc-issuer.pub
In order to integrate API service with the OIDC provider, there are 4 flags need to be added when start it
--service-account-key-file
# Please make sure the public key (oidc-issuer.pub) generated by previous step can be read by api service, and input the path for this parameter flag
# e.g. --service-account-key-file=/etc/kubernetes/secrets/oidc-issuer.pub

--service-account-signing-key-file
# Please make sure the private key (oidc-issuer.key) generated by the previous step can be read by api service, and input the path for this parameter flag
# e.g. --service-account-signing-key-file=/etc/kubernetes/secrets/oidc-issuer.key

--api-audiences
# Identifiers of the API parameter, using value "sts.amazonaws.com" in this Demo
# e.g. --api-audiences=sts.amazonaws.com

--service-account-issuer
# The issuer URL, just using the value generated from the previous step
# e.g. --service-account-issuer=https://s3-us-west-2.amazonaws.com/aws-irsa-oidc-1569489612
Finally, we complete the integration between Kubernetes API Server and OIDC, the last step is to deploy Pod Identity Webhook
~$ ./deploy-pod-identity.sh
Applying configuration to active cluster...
serviceaccount/pod-identity-webhook created
clusterrole.rbac.authorization.k8s.io/pod-identity-webhook created
clusterrolebinding.rbac.authorization.k8s.io/pod-identity-webhook created
deployment.apps/pod-identity-webhook created
service/pod-identity-webhook created
mutatingwebhookconfiguration.admissionregistration.k8s.io/pod-identity-webhook created
The Pod Identity Webhook is running in the K8S cluster now, and starting to monitoring the creation of Pod, once there is Pod created, mutating webhook will be triggered, and inject environment AWS_IAM_ROLE_ARN and AWS_WEB_IDENTITY_TOKEN_FILE into Pod
Here I use the official example to verify whether the IRSA works or not, there is a K8S job which will put one file into the S3 bucket, that approve the Pod can assume role to get the S3 write permission
# need to input the issuer url
~$ ./deploy-s3-echoer-job.sh https://s3-us-west-2.amazonaws.com/aws-irsa-oidc-1569489612
...
serviceaccount/s3-echoer created
serviceaccount/s3-echoer annotated
{
    "Location": "http://s3-echoer-1569492654.s3.amazonaws.com/"
}
job.batch/s3-echoer created
The Demo S3 bucket as below:
s3-echoer-1569492654

# replace the bucket name, and the object put by the Pod will show up!
~$ aws s3api list-objects --bucket s3-echoer-1569492654 --query 'Contents[].{Key: Key, Size: Size}'
[
    {
        "Size": 27,
        "Key": "s3echoer-1569492669"
    }
]
Although enable IRSA in Self-Hosted K8S is complicated, but I feel it's worthy, hoping the official and community can make the flow more and more easy and smooth, and due to the aws-iam-token mount in a stranger path /var/run/secrets/eks.amazonaws.com/serviceaccount, hence, don't forget to use the latest AWS SDK to implement the application, then application can assume role successfully
