NOTE: These sample applications use the Twilio Video 2.x APIs. For examples using our 1.x APIs, please see the 1.x branch.
Twilio Video Quickstart for Android
Get started with Video on Android:
- Quickstart - Run the quickstart app
- Examples - Customize your video experience with these examples
- Using an Emulator - Setup an emulator in Android Studio
- Reducing APK Size - Use ABI splits to reduce your APK size
- Troubleshooting Audio - Mitigate audio issues in your application
- Rendering Video - A guide to rendering video in your application
- Setup an Access Token Server - Setup an access token server
- More Documentation - More documentation related to the Video Android SDK
- Issues & Support - Filing issues and general support
Quickstart
To get started with the Quickstart application follow these steps:
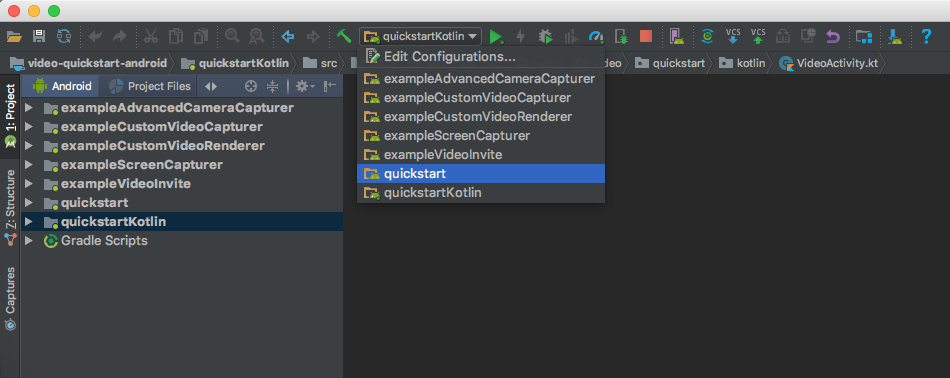
- Open this project in Android Studio and select the quickstart or quickstartKotlin app module.
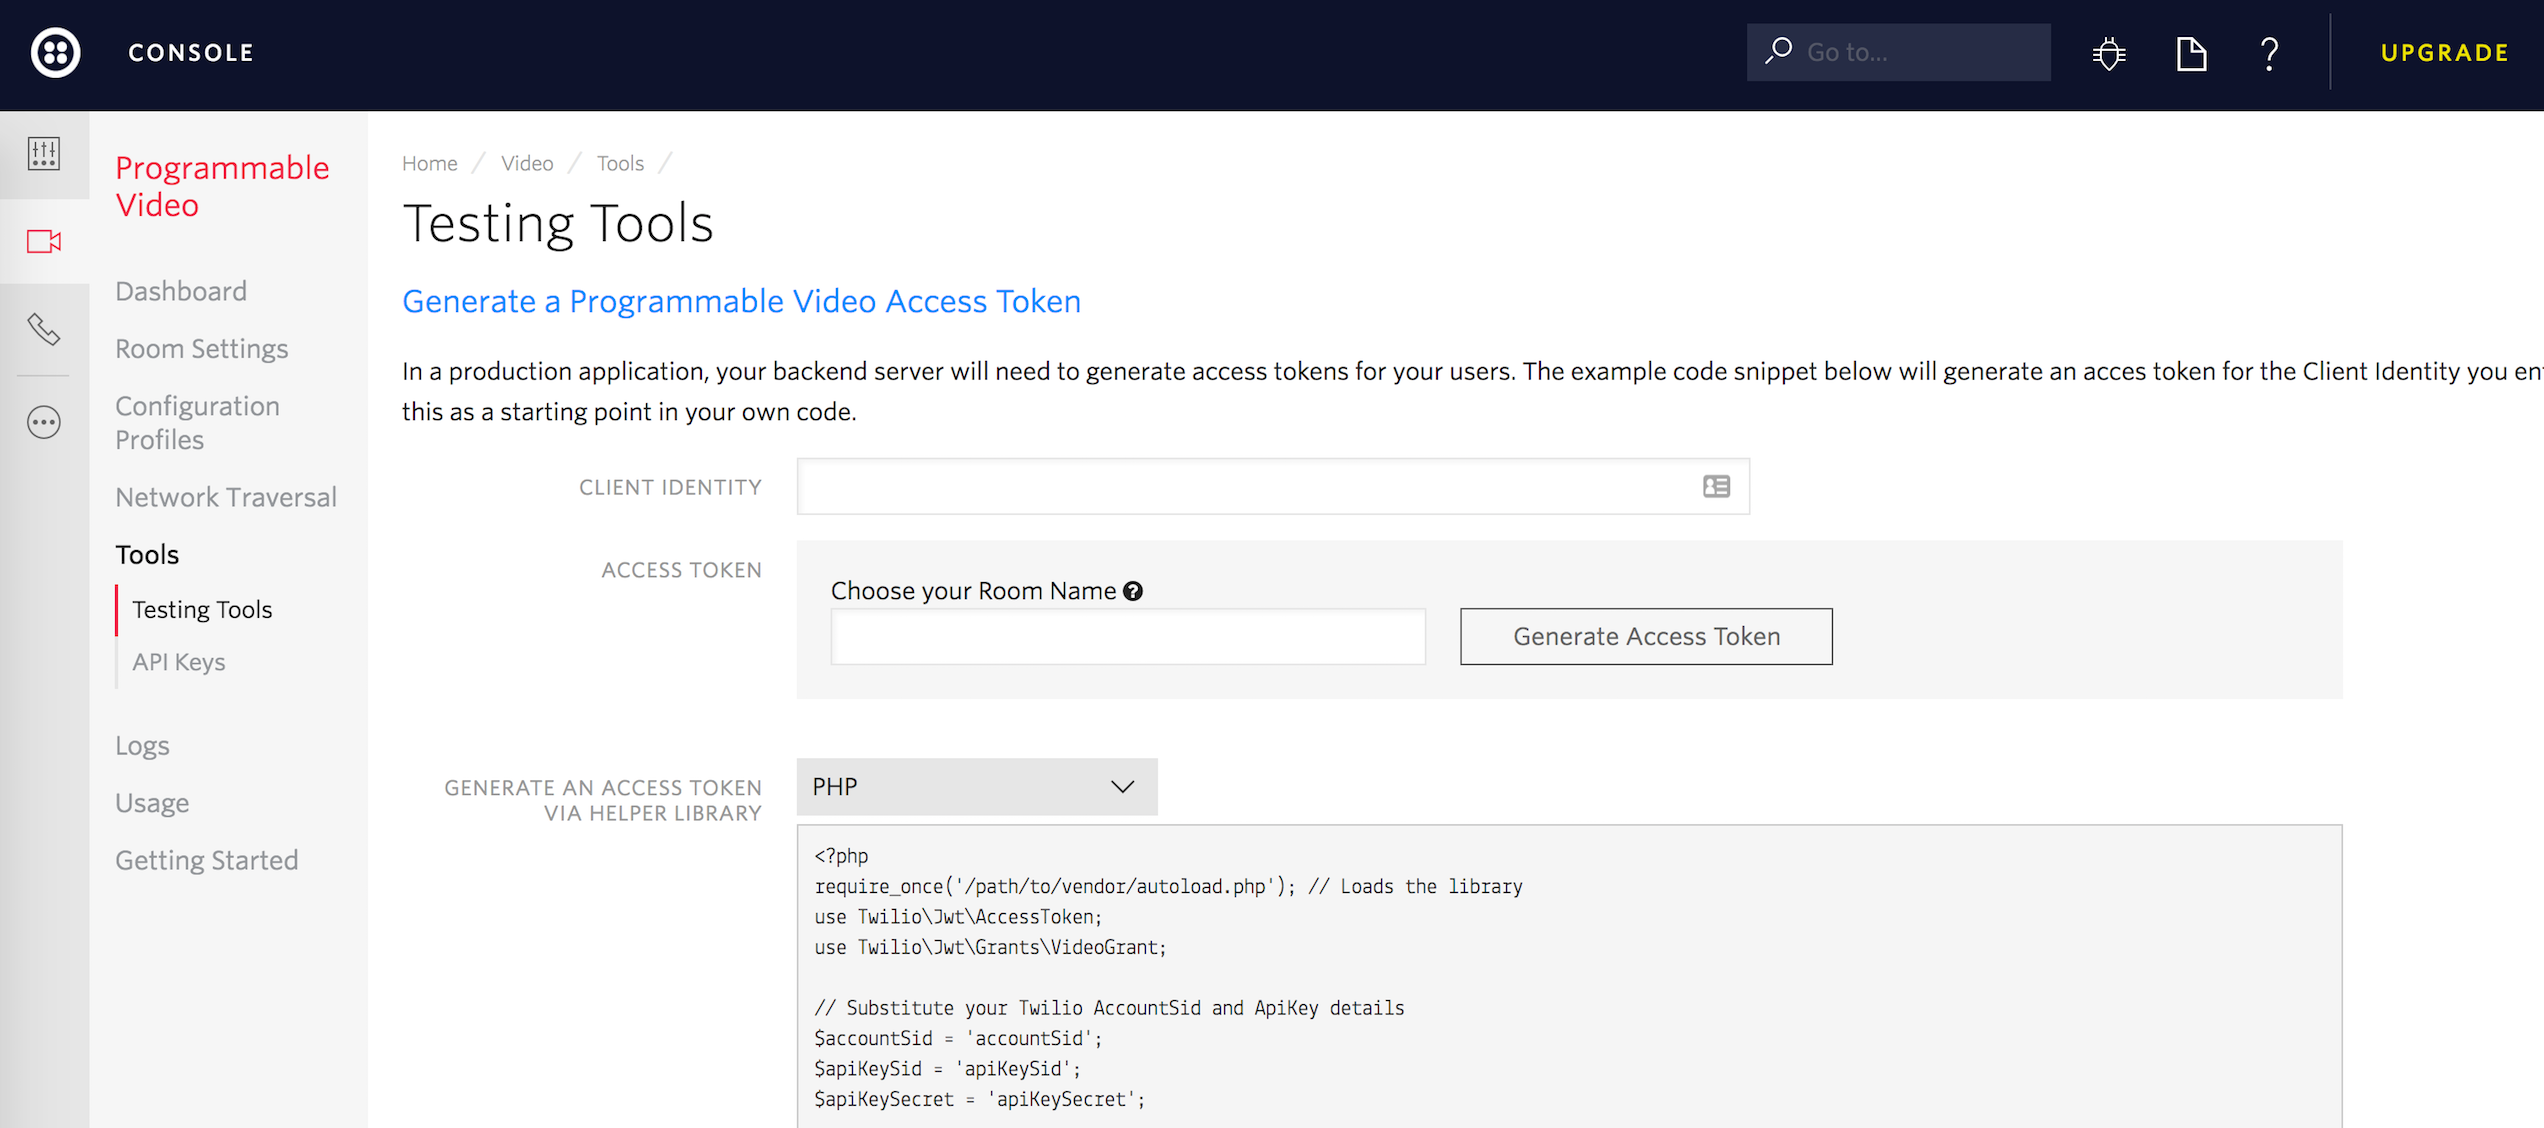
- Type in an identity and click on "Generate Access Token" from the Testing Tools page.
- Add the access token string copied from the console to a variable named
TWILIO_ACCESS_TOKENin your local.properties file.
TWILIO_ACCESS_TOKEN=abcdef0123456789
-
Run the quickstart app on an Android device or Android emulator.
-
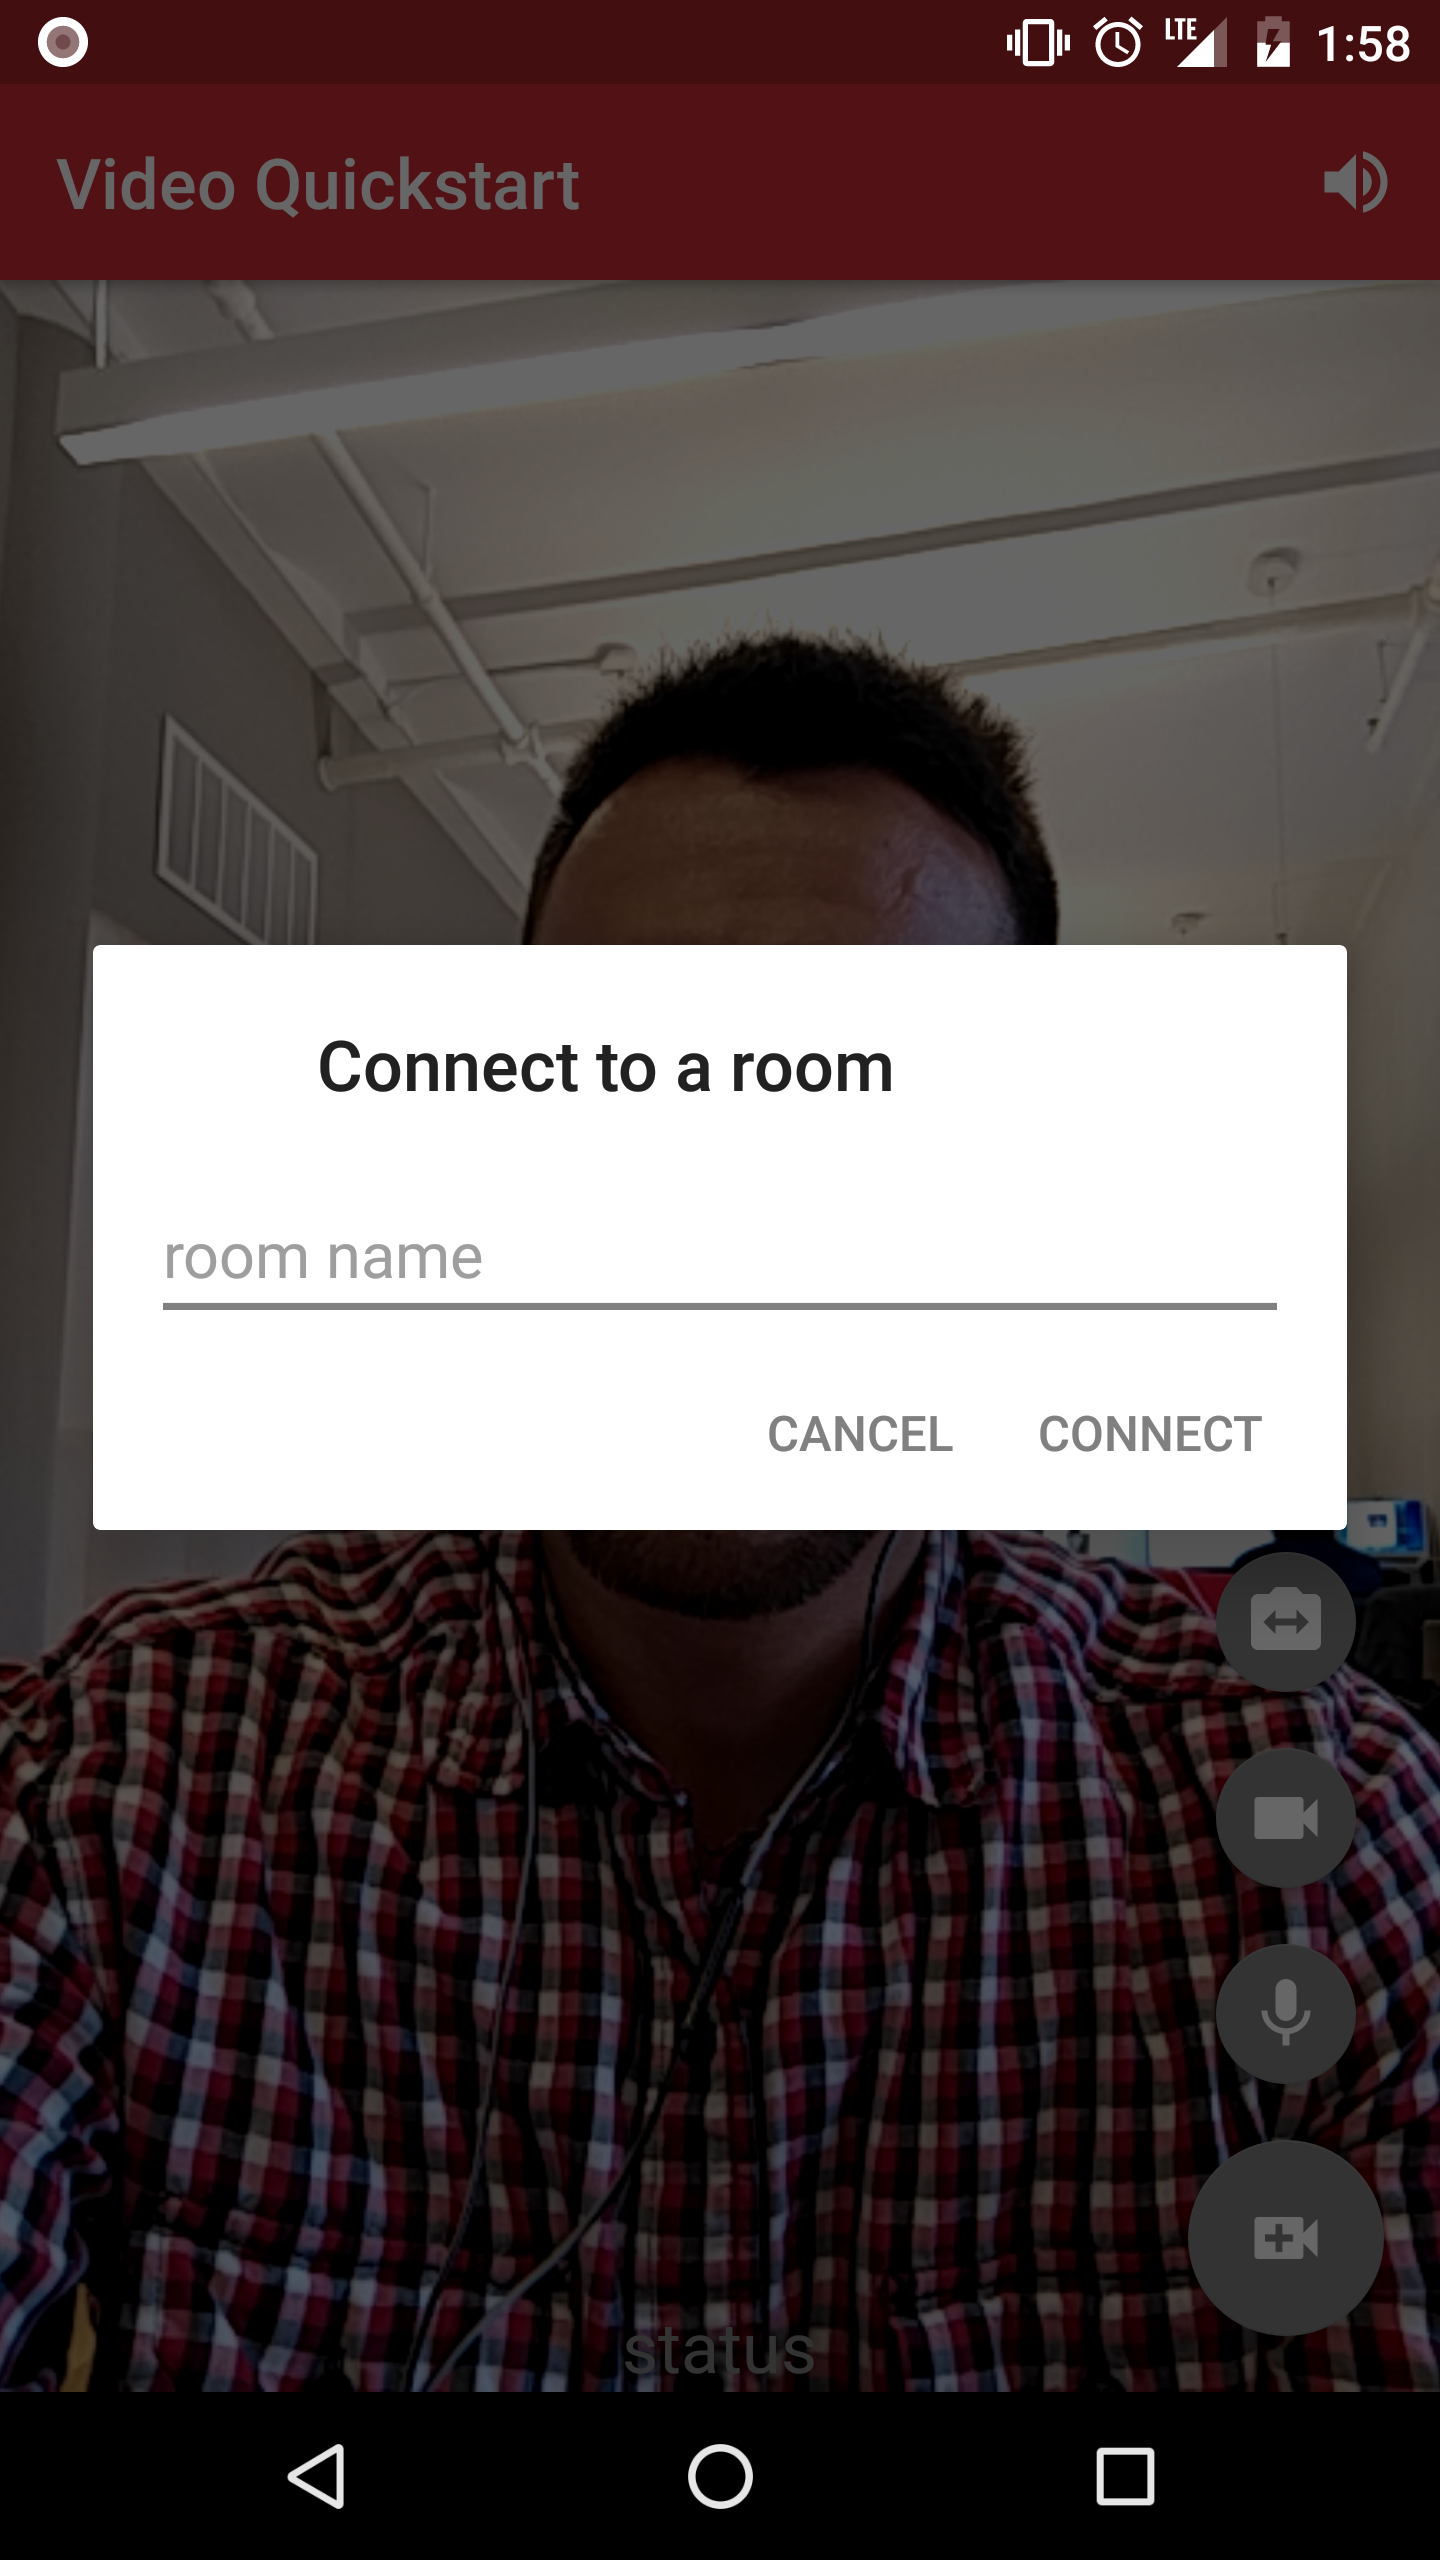
Press the video call button at the bottom right portion of the screen and type a room name to connect to a Room.
- On another device, use an additional access token with a different identity to connect to the same room.
Examples
In addition to the quickstart we've also added a few examples of use cases that show you how to create and customize your media as follows:
- Custom Video Capturer - Demonstrates how a custom
VideoCapturercan be implemented to capture the contents of aView. - Custom Video Renderer - Demonstrates how to implement a custom
VideoRendererthat captures aBitmapof the last rendered frame. - Screen Capturer - Demonstrates how to use the screen capturer.
- Advanced Camera Capturer - Demonstrates advanced use cases of
CameraCapturerlike injecting custom camera paremeters. - Video Invite - Demonstrates how to use Twilio Notify to invite other participants to a room.
- Data Tracks - Demonstrates how to use
DataTracks to write a simple collaborative drawing app.
Using an Emulator
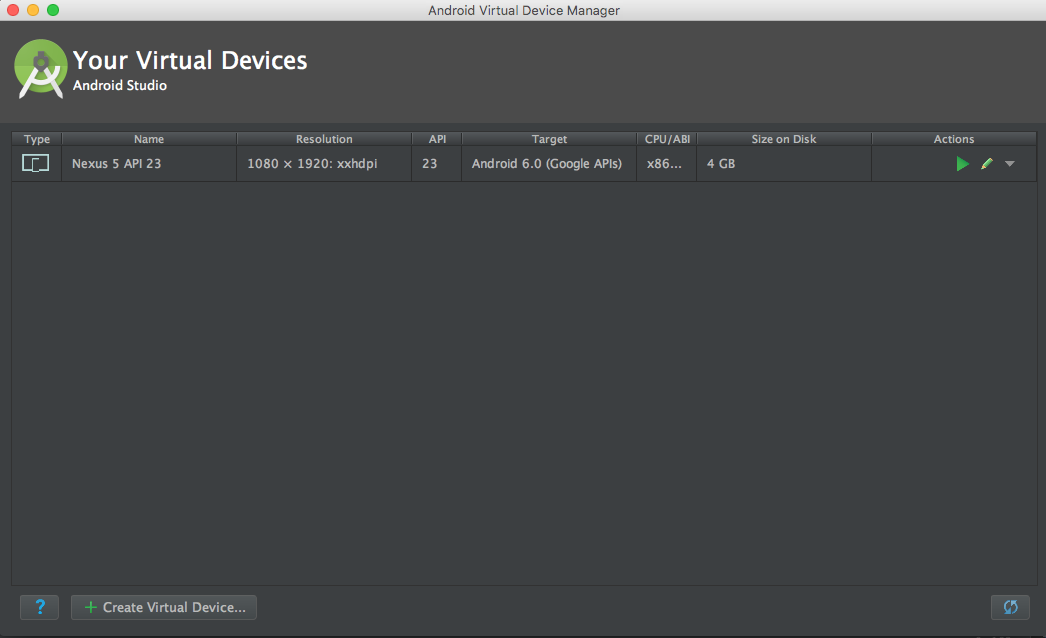
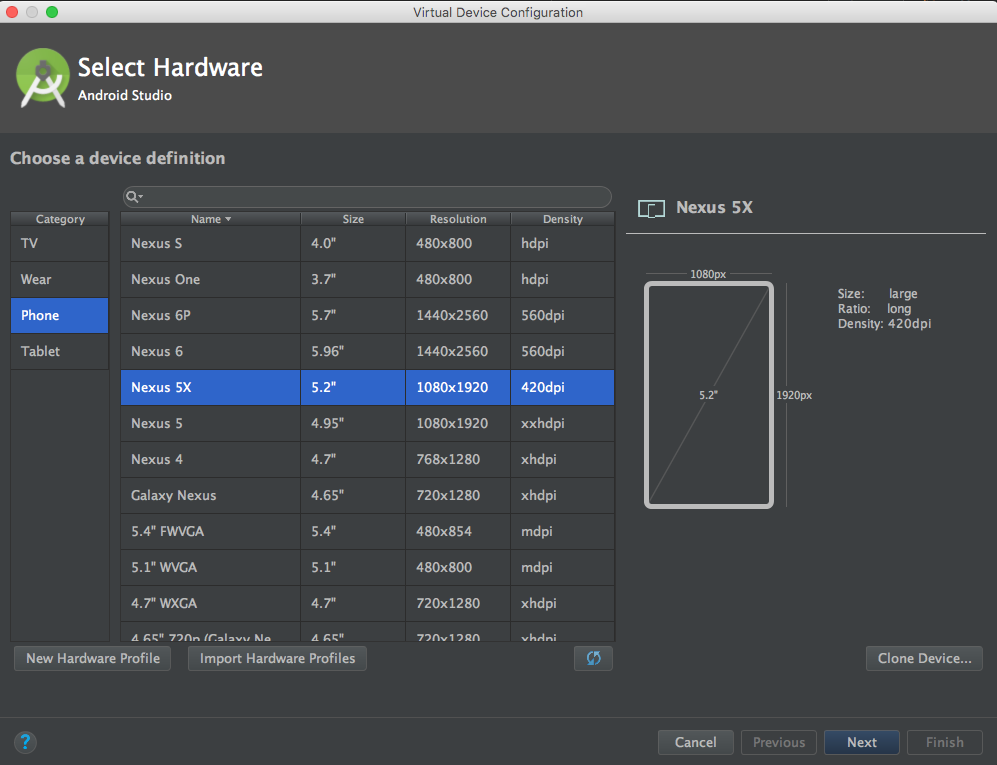
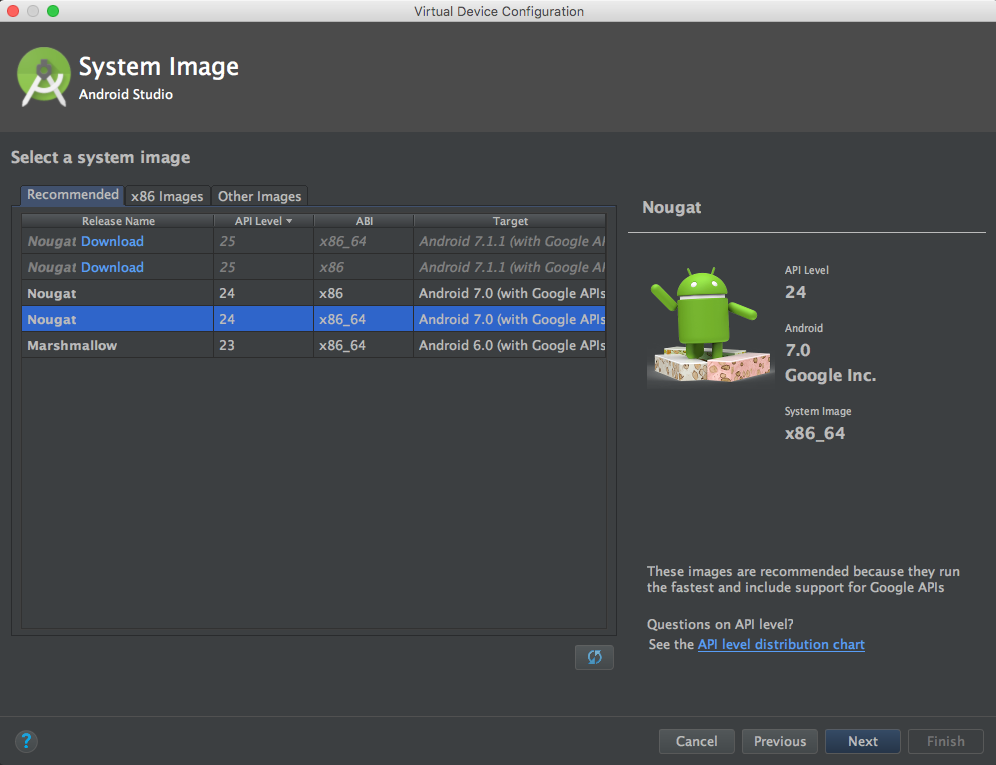
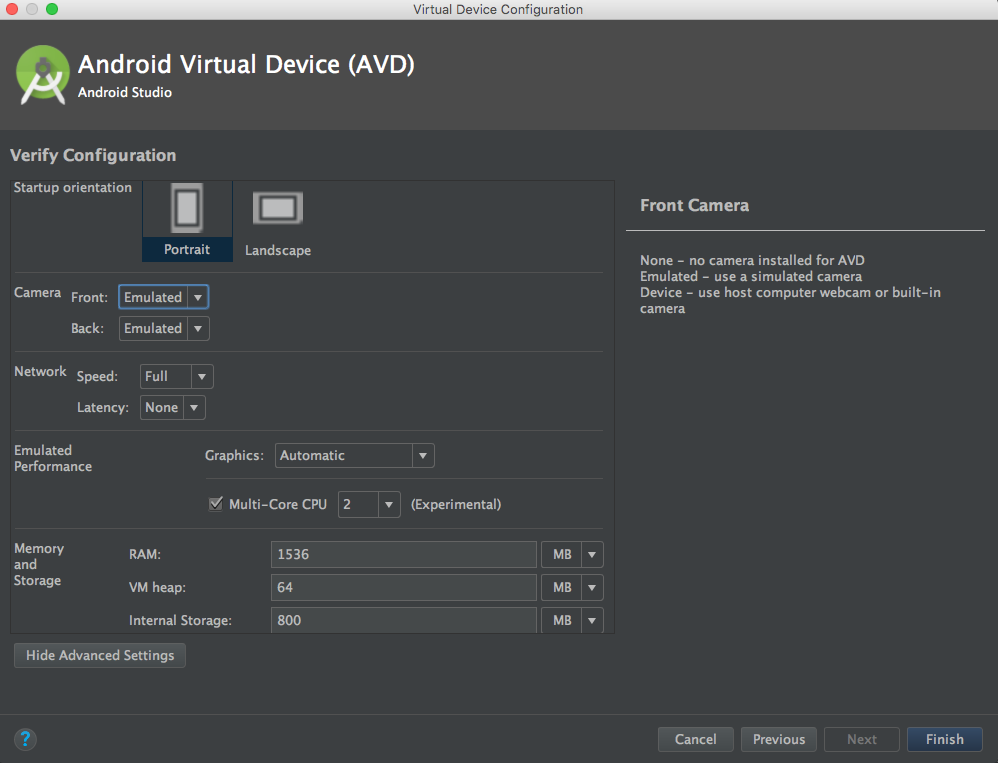
Using an Emulator This guide will walk you through setting up and emulator that is compatible with the Video SDK.
Requirements
- Android Studio 2.0+
Guide
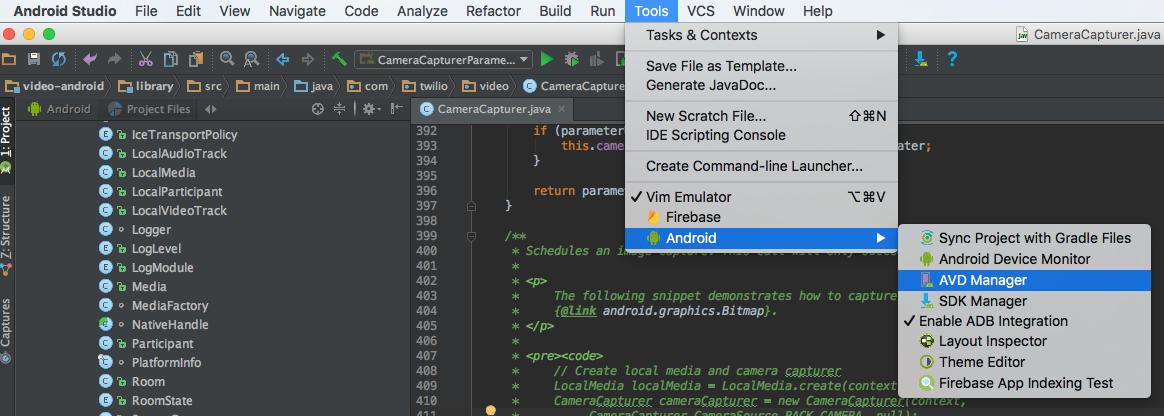
- Open Android Studio and navigate to Tools → Android → AVD Manager.
Reducing APK Size
Our library is built using native libriares. As a result, if you use the default gradle build you will generate an APK with all four architectures(armeabi-v7a, arm64-v8a, x86, x86_64 in your APK.
APK splits allow developers to build multiple APKs for different screen sizes and ABIs. Enabling APK splits ensures that the minimum amount of files required to support a particular device are packaged into an APK.
The following snippet shows an example build.gradle with APK splits enabled.
apply plugin: 'com.android.application'

android {
    compileSdkVersion 24
    buildToolsVersion "24.0.2"

    defaultConfig {
        applicationId "com.twilio.video.quickstart"
        minSdkVersion 16
        targetSdkVersion 24
        versionCode 1
        versionName "1.0"
    }

    // Specify that we want to split up the APK based on ABI
    splits {
        abi {
            // Enable ABI split
            enable true

            // Clear list of ABIs
            reset()

            // Specify each architecture currently supported by the Video SDK
            include "armeabi-v7a", "arm64-v8a", "x86", "x86_64"

            // Specify that we do not want an additional universal SDK
            universalApk false
        }
    }
}

dependencies {
    compile "com.twilio:video-android:1.0.0-beta4"
}
The adoption of APK splits requires developers to submit multiple APKs to the Play Store. Refer to Google’s documentation for how to support this in your application.
Troubleshooting Audio
The following sections provide guidance on how to ensure optimal audio quality in your applications.
Configuring AudioManager
The following snippet shows how to configure
AudioManager for optimal
experience when sharing audio to a Room.
private void configureAudio(boolean enable) {
    if (enable) {
        previousAudioMode = audioManager.getMode();
        // Request audio focus before making any device switch.
        requestAudioFocus();
        /*
         * Use MODE_IN_COMMUNICATION as the default audio mode. It is required
         * to be in this mode when playout and/or recording starts for the best
         * possible VoIP performance. Some devices have difficulties with
         * speaker mode if this is not set.
         */
        audioManager.setMode(AudioManager.MODE_IN_COMMUNICATION);
        /*
         * Always disable microphone mute during a WebRTC call.
         */
        previousMicrophoneMute = audioManager.isMicrophoneMute();
        audioManager.setMicrophoneMute(false);
    } else {
        audioManager.setMode(previousAudioMode);
        audioManager.abandonAudioFocus(null);
        audioManager.setMicrophoneMute(previousMicrophoneMute);
    }
}

private void requestAudioFocus() {
    if (Build.VERSION.SDK_INT >= Build.VERSION_CODES.O) {
        AudioAttributes playbackAttributes = new AudioAttributes.Builder()
                .setUsage(AudioAttributes.USAGE_VOICE_COMMUNICATION)
                .setContentType(AudioAttributes.CONTENT_TYPE_SPEECH)
                .build();
        AudioFocusRequest focusRequest =
                new AudioFocusRequest.Builder(AudioManager.AUDIOFOCUS_GAIN_TRANSIENT)
                        .setAudioAttributes(playbackAttributes)
                        .setAcceptsDelayedFocusGain(true)
                        .setOnAudioFocusChangeListener(
                                new AudioManager.OnAudioFocusChangeListener() {
                                    @Override
                                    public void onAudioFocusChange(int i) { }
                                })
                        .build();
        audioManager.requestAudioFocus(focusRequest);
    } else {
        audioManager.requestAudioFocus(null, AudioManager.STREAM_VOICE_CALL,
                AudioManager.AUDIOFOCUS_GAIN_TRANSIENT);
    }
}
Configuring Hardware Audio Effects
Our library performs acoustic echo cancellation (AEC), noise suppression (NS), and auto gain control (AGC) using device hardware by default. Using device hardware is more efficient, but some devices do not implement these audio effects well. If you are experiencing echo, background noise, or unexpected volume levels on certain devices reference the following snippet for enabling software implementations of AEC, NS, and AGC.
/*
 * Execute any time before creating a LocalAudioTrack and connecting
 * to a Room.
 */

// Use software AEC
WebRtcAudioUtils.setWebRtcBasedAcousticEchoCanceler(true);

// Use sofware NS
WebRtcAudioUtils.setWebRtcBasedNoiseSuppressor(true);

// Use software AGC
WebRtcAudioUtils.setWebRtcBasedAutomaticGainControl(true);
Configuring OpenSL ES
Our library will use OpenSL ES for audio playback if the device is compatible. Using OpenSL ES is more efficient, but can cause problems with other audio effects. For example, we found on the Nexus 6P that OpenSL ES affected the device's hardware echo canceller so we blacklisted the Nexus 6P from using OpenSL ES. If you are experiencing audio problems with a device that cannot be resolved using software audio effects, reference the following snippet for enabling OpenSL ES:
/*
 * Execute any time before creating a LocalAudioTrack and connecting
 * to a Room.
 */

// Disable OpenSL ES
WebRtcAudioManager.setBlacklistDeviceForOpenSLESUsage(true);

// Check if OpenSL ES is disabled
WebRtcAudioUtils.deviceIsBlacklistedForOpenSLESUsage()
Rendering Video
A VideoTrack can be rendered in your application using addRenderer which takes an
implementation of VideoRenderer. A VideoRenderer is most commonly used to render video to a UI,
but could be used for other scenarios such as rendering to a file. The following section provides
guidance on how to render video in your application.
Working with VideoView
For simply rendering video to your application's UI, we recommend using VideoView. VideoView extends
SurfaceView and can be added to your view hierarchy in a layout file or programmatically. To render
a VideoTrack to a VideoView simply call videoTrack.addRenderer(videoView). The
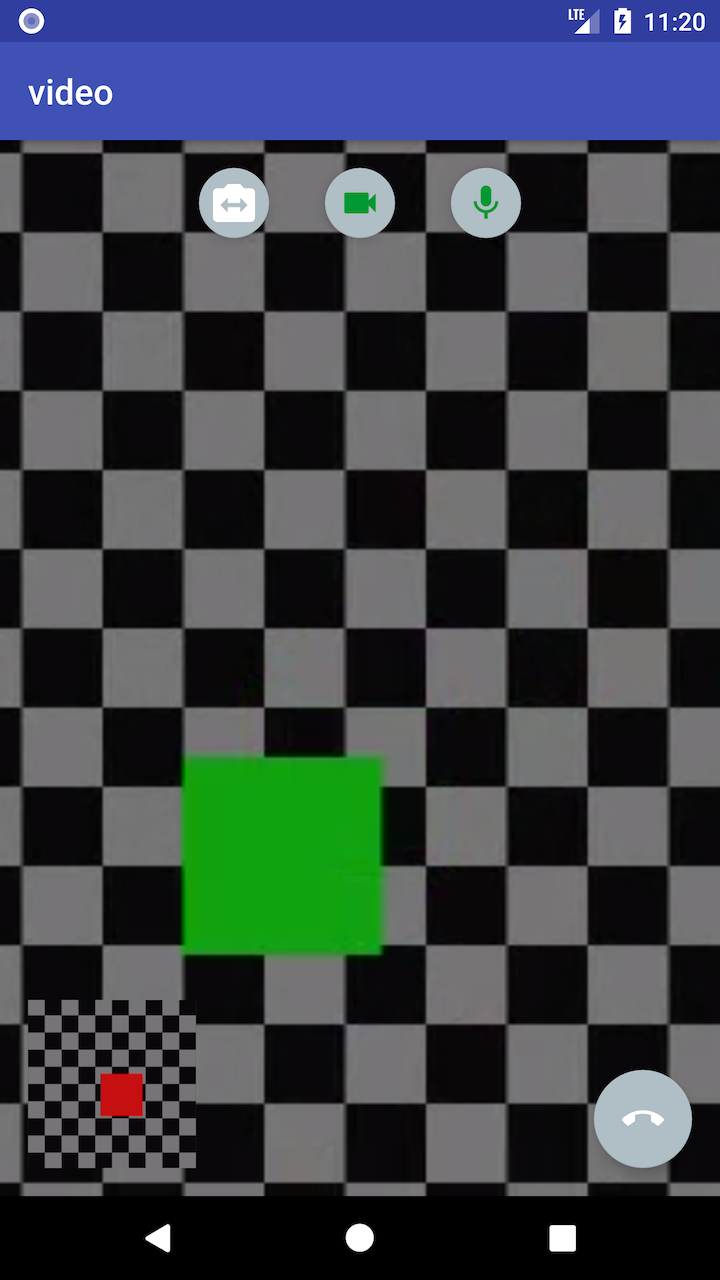
following snippets demonstrate how to setup the a thumbnail video overlayed on a primary video as
seen in the screenshot below.
VideoView in a Layout File
<?xml version="1.0" encoding="utf-8"?>
<FrameLayout xmlns:android="http://schemas.android.com/apk/res/android"
             xmlns:app="http://schemas.android.com/apk/res-auto"
             android:id="@+id/video_container"
             android:layout_width="match_parent"
             android:layout_height="match_parent"
             android:keepScreenOn="true">

    <com.twilio.video.VideoView
        android:id="@+id/thumbnail_video_view"
        app:overlaySurface="true"
        app:mirror="true"
        android:layout_width="96dp"
        android:layout_height="146dp"
        android:layout_margin="16dp"
        android:layout_gravity="bottom|start"/>

    <com.twilio.video.VideoView
        android:id="@+id/primary_video_view"
        android:layout_width="match_parent"
        android:layout_height="match_parent" />

</FrameLayout>
Adding VideoView Programmatically
/*
 * Get videoContainer
 */
FrameLayout videoContainer = findViewById(R.id.video_container);

/*
 * Create thumbnail video view
 */
VideoView thumbnailVideoView = new VideoView(context);

/*
 * Mirror the video. Set to true when rendering video from a local video track using the
 * front facing camera. Set to false otherwise.
 */
thumbnailVideoView.setMirror(true);

/*
 * Overlays the thumbnail video view on top of the primary video view
 */
thumbnailVideoView.applyZOrder(true);

/*
 * Create primary video view
 */
VideoView primaryVideoView = new VideoView(context);

/*
 * Add video views to container
 */
videoContainer.addView(thumbnailVideoView);
videoContainer.addView(primaryVideoView);
Custom Renderers and I420Frame
For advanced use cases you can provide a custom VideoRenderer where your custom renderer will be
provided with an I420Frame to render. An I420Frame can be represented with a ByteBuffer array
of Y, U, and V pixel data with an array of strides for each plane or as a texture. When a frame is
represented as a texture, I420Frame#textureId will be set to a positive non zero value with
I420Frame#yuvPlanes and I420Frame#yuvStrides set to null. The YUV data can be extracted from
the texture using an instance of org.webrtc.YuvConverter and the I420Frame#samplingMatrix. When
a frame is represented as an array of ByteBuffer, I420Frame#textureId will be 0,
I420Frame#yuvPlanes contains the YUV pixel data, and I420Frame#yuvStrides contains each plane's
stride. For an example of implementing a custom VideoRenderer we recommend referencing the
Custom Video Renderer module.
Setup an Access Token Server
Using Twilio's Video client within your applications requires an access token.
You can run your own server that provides access tokens, based on your Twilio credentials. This server can either run locally on your development machine, or it can be installed on a server. If you run the server on your local machine, you should use the ngrok utility to give the server an externally accessible web address. That way, you can run the quickstart app on an Android device.
Configuring the Access Token Server
If you want to be a little closer to a real environment, you can download one of the video quickstart applications - for instance, Video Quickstart: Node and either run it locally, or install it on a server.
You'll need to gather a couple of configuration options from your Twilio developer console before running it, so read the directions on the quickstart. You'll copy the .env.example file to a .env file, and then add in these credentials:
| Credential | Description |
|---|---|
| Twilio Account SID | Your main Twilio account identifier - find it on your dashboard. |
| API Key | Used to authenticate - generate one here. |
| API Secret | Used to authenticate - just like the above, you'll get one here. |
A Note on API Keys
When you generate an API key pair at the URLs above, your API Secret will only be shown once - make sure to save this in a secure location.
Running the Video Quickstart with ngrok
If you run your video chat application on an Android device, you'll need to provide an externally accessible URL for the app. The ngrok tool creates a publicly accessible URL that you can use to send HTTP/HTTPS traffic to a server running on your localhost. Use HTTPS to make web connections that retrieve a Twilio access token.
When you get a URL from ngrok, go ahead and update local.properties. Reference the following snippet.
# Insert the URL from ngrok
ACCESS_TOKEN_SERVER=http://localhost:3000

# Inform quickstart you want to use a token server
USE_TOKEN_SERVER=true
More Documentation
You can find more documentation on getting started as well as our latest Javadoc below:
Issues and Support
Please file any issues you find here on Github. Please ensure that you are not sharing any Personally Identifiable Information(PII) or sensitive account information (API keys, credentials, etc.) when reporting an issue.
For general inquiries related to the Video SDK you can file a support ticket

