eXtra-fast Essential Video Encoder (XEVE)
The eXtra-fast Essential Video Encoder (XEVE) is an opensource and fast MPEG-5 EVC encoder.
MPEG-5 Essential Video Coding (EVC) is a video compression standard of ISO/IEC Moving Picture Experts Grop (MPEG). The main goal of the EVC is to provide a significantly improved compression capability over existing video coding standards with timely publication of terms. The EVC defines two profiles, including "Baseline Profile" and "Main Profile". The "Baseline profile" contains only technologies that are older than 20 years or otherwise freely available for use in the standard. In addition, the "Main profile" adds a small number of additional tools, each of which can be either cleanly disabled or switched to the corresponding baseline tool on an individual basis.
Quality comparison
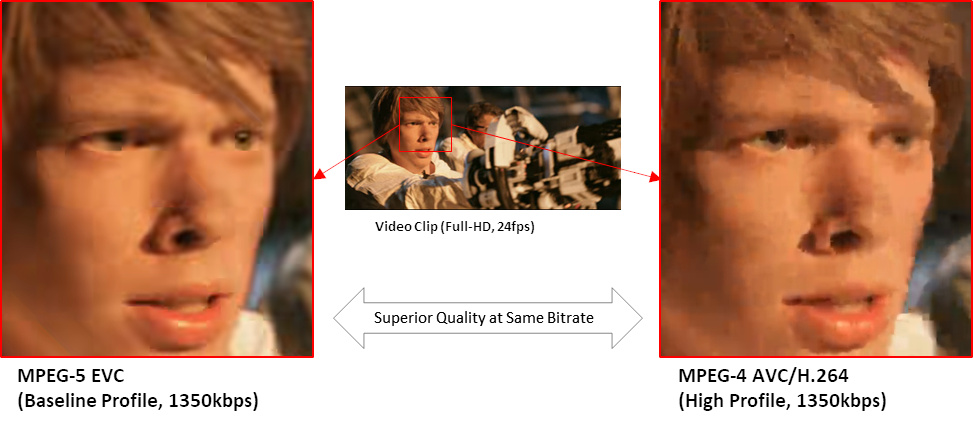
MPEG-5 Baseline Profile vs. MPEG-4 AVC/H.264
MPEG-5 EVC Baseline Profile can show 2-times better coding gain over MPEG-4 AVC/H.264 codec and superior quality on the same bitrate
(CC) Blender Foundation | mango.blender.org
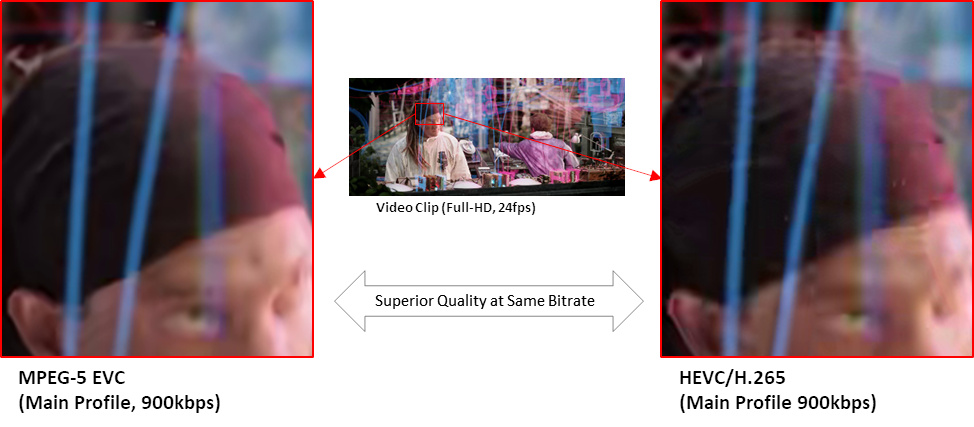
MPEG-5 Main Profile vs. HEVC/H.265
MPEG-5 EVC Main Profile can show 2-times better coding gain over HEVC/H.265 codec and superior quality on the same bitrate
(CC) Blender Foundation | mango.blender.org
How to build
Linux (64-bit)
-
Build Requirements
- CMake 3.12 or later (download from https://cmake.org/)
- GCC 5.4.0 or later
-
Build Instructions for Baseline Profile
$mkdir build $cd build $cmake .. -DSET_PROF=BASE $make $sudo make install- Output Location
- Executable application (xeveb_app) can be found under build/bin/.
- Library files (libxeveb.so and libxexeb.a) can be found under build/lib/.
- Output Location
-
Build Instructions for Main Profile
$mkdir build $cd build $cmake .. $make $sudo make install- Output Location
- Executable application (xeve_app) can be found under build/bin/.
- Library files (libxeve.so and libxexe.a) can be found under build/lib/.
- Application and libraries built with Main Profile can also support Baseline Profile operation.
- Output Location
Windows (64-bit)
-
Build Requirements
- CMake 3.5 or later (download from https://cmake.org/)
- MinGW-64 or Microsoft Visual Studio
-
Build Instructions for Baseline Profile
- MinGW-64
$mkdir build $cd build $cmake .. -G "MinGW Makefiles" -DSET_PROF=BASE $make $sudo make install - Microsoft Visual Studio
You can change '-G' option with proper version of Visual Studio.
$mkdir build
$cd build
$cmake .. -G "Visual Studio 15 2017 Win64" -DSET_PROF=BASE
$make
- MinGW-64
-
Build Instructions for Main Profile
- MinGW-64
$mkdir build $cd build $cmake .. -G "MinGW Makefiles" $make $sudo make install - Microsoft Visual Studio
You can change '-G' option with proper version of Visual Studio.
$mkdir build $cd build $cmake .. -G "Visual Studio 15 2017 Win64" $make - Application and libraries built with Main Profile can also support Baseline Profile operation.
- MinGW-64
How to generate installer
Linux (64-bit)
-
Generation of DEB packages instructions
- Follow build instruction and build the project
- Generate DEB packages
or
$make packagecpack -G "DEB" - Output
- Base DEB package for Baseline Profile:
- package: xeve-base-dev_1.0.0_amd64.deb
- checksum file: xeve-base-dev_1.0.0_amd64.deb.md5
- Developer DEB package for Baseline Profile::
- package: xeve-base_1.0.0_amd64.deb
- checksum file: xeve-base_1.0.0_amd64.deb.md5 generated.
- Base DEB package for Main Profile:
- package: xeve-main-dev_1.0.0_amd64.deb
- checksum file: xeve-main-dev_1.0.0_amd64.deb.md5
- Developer DEB package for Main Profile:
- package: xeve-main_1.0.0_amd64.deb
- checksum file: xeve-base_1.0.0_amd64.deb.md5 generated.
- Base DEB package for Baseline Profile:
-
Generation of RPM packages
- Follow build instruction and build the project
- Generate RPM packages
cpack -G "RPM" ..
-
Generation of ZIP archives
- Follow build instruction and build the project
- Generate ZIP archive
cpack -G "ZIP" ..
Windows (64-bit)
-
Requirements
- NSIS 3.08 or later (download from https://nsis.sourceforge.io/Download)
-
Generation of NSIS windows installer instructions
- Follow build instruction and build the project
- Generate NSIS Windows installer
-
Command Prompt for Visual Studio
- Go to the build directory and issue the following command
msbuild /P:Configuration=Release PACKAGE.vcxproj
- Go to the build directory and issue the following command
-
Visual Studio IDE
- Open up the generated solution (XEVE.sln)
- Change build type from Debug to Release
- Go to the Solution Explorer, then select and mouse right click on the PACKAGE project located in CMakePredefinedTargets folder
- Choose Build item, when a pop down menu appears
As a result CPack processing message should appear and NSIS installer as well as as checksum file are generated into build directory.
-
MinGW-64
- Go to the build directory and issue the following command
$make package
-
- Output:
-
Baseline Profile:
- xeve-base-1.0.0-win64.exe
- xeve-base-1.0.0-win64.exe.md5
-
Main Profile:
- xeve-main-1.0.0-win64.exe
- xeve-main-1.0.0-win64.exe.md5
-
How to use
Full help message will be presented if xeve application is executed with '--help' option.
Syntax:
  xeve_app -i 'input-file' [ options ]

Options:
  --help
    : list options
  -v, --verbose [INTEGER] (optional) [1]
    : verbose (log) level
      - 0: no message
      - 1: simple messages
      - 2: frame-level messages
  -i, --input [STRING]
    : file name of input video
  -o, --output [STRING] (optional) [None]
    : file name of output bitstream
  -r, --recon [STRING] (optional) [None]
    : file name of reconstructed video
  -w, --width [INTEGER]
    : pixel width of input video
  -h, --height [INTEGER]
    : pixel height of input video
  -q, --qp [INTEGER] (optional) [32]
    : QP value (0~51)
  -z, --fps [INTEGER]
    : frame rate (frame per second)
  -I, --keyint [INTEGER] (optional) [0]
    : I-picture period
  -b, --bframes [INTEGER] (optional) [15]
    : maximum number of B frames (1,3,7,15)
  -m, --threads [INTEGER] (optional) [1]
    : force to use a specific number of threads
  -d, --input-depth [INTEGER] (optional) [8]
    : input bit depth (8, 10)
  --codec-bit-depth [INTEGER] (optional) [10]
    : codec internal bit depth (10, 12)
  --input-csp [INTEGER] (optional) [1]
    : input color space (chroma format)
      - 0: YUV400
      - 1: YUV420
  --profile [STRING] (optional) [baseline]
    : profile setting flag  (main, baseline)
  --level-idc [INTEGER] (optional) [0]
    : level setting
  --preset [STRING] (optional) [medium]
    : Encoder PRESET	 [fast, medium, slow, placebo]
  --tune [STRING] (optional) [None]
    : Encoder TUNE	 [psnr, zerolatency]

  AND MORE...
Example
$xeve_app -i RaceHorses_416x240_30.yuv -w 416 -h 240 -z 30 -o xeve.evc
$xeve_app -i RaceHorses_416x240_30.y4m -o xeve.evc
Programming Guide
The following code is a pseudo code for understanding how to use the library
#include <xeve.h>

#define MAX_BITSTREAM_SIZE (10*1000*1000) /* 10Mbyte, need to be set properly */

/* prepare coding parameters ***************************/
XEVE_CDSC cdsc;
cdsc.max_bs_buf_size = MAX_BITSTREAM_SIZE;

/* get default parameters */
xeve_param_default(&cdsc.param);

/* set specific profile, preset, tune, if needs */
xeve_param_ppt(&cdsc.param, XEVE_PROFILE_BASELINE, XEVE_PRESET_SLOW, XEVE_TUNE_NONE);

/* create new instance *********************************/
XEVE id = xeve_create(&cdsc, NULL);

/* encode pictures *************************************/
XEVE_BITB bitb; /* bitstream buffer */
memset(&bitb, 0, sizeof(XEVE_BITB));
bitb.addr = malloc(MAX_BITSTREAM_SIZE); /* assign buffer */
bitb.bsize = MAX_BITSTREAM_SIZE;

XEVE_STAT stat; /* encoding status */
XEVE_IMGB image; /* input picture */

while (!end_of_sequence)
{
    end_of_seqeunce = read_image(&image); /* read new image */

    xeve_push(id, &image); /* input new image to encoder */
    ret = xeve_encode(id, &bitb, &stat); /* actual encode image to bitstream */

    if (ret == XEVE_OK && stat.write > 0)
    {
        write_bitstream(bitb.addr, stat.write); /* write encoded bitstream */
    }
}

/* clean-up ********************************************/
xeve_delete(id);
License
See COPYING file for details.

