The automagic builder that can 1) build tested components for Hubspot and 2) build fully-responsive HTML emails as painless as email building can be.
The gateway to do everything:
- Clone repo
- Install node (if you haven't)
- Install Gulp
npm install -g gulp - Install all dependencies with
npm installfrom your terminal in the root directory.
Note For Windows users: You may need to configure SASS after step 4 with npm rebuild node-sass
To create, update, test, and transfer custom and bullet-proof email components to Hubspot.
<iframe width="560" height="315" src="https://www.youtube.com/embed/HRHIBYca23U" frameborder="0" allowfullscreen></iframe>gulp create --component [component-name]
This will create a new component in src/components. In it are:
/components
    /[component-name]
        src.html    // HTML for your component
        main.css  // CSS for your component
        preview.html   // (Don't edit) Preview your component with all Hubspot/Global Styles
        dist.html   // (Don't edit) What you copy and paste into Hubspot
gulp
Hooray, we're watching for all changes now and 1) inline styling 2) applying global styling 3) wrapping it Hubspot base 4) spitting out all the html in dist.html and test.html
To make component content able to be driven by content authors and not coders, Hubspot allows for data structures as variables for their components.
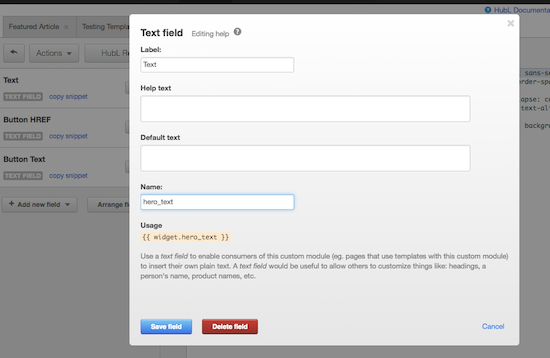
In Hubspot, when you create components, they will ask you to create the data structure for your component:
Then, in your code, just include the variable in:
Example:
{{widget.hero_text}}
Read more about Hubspot's scripting language:
- http://designers.hubspot.com/docs/cos/custom-modules
- http://designers.hubspot.com/docs/hubl/intro-to-hubl
See your component tested in Litmus:
gulp test --component [component-name]
Unfortunately, there's no way to automatically create components in Hubspot. So what you'll basically do is copy the contents of dist.html to your Custom Module. This is similar to relationship between the lrdcom repo and templates in Liferay.com
- Wrap all components in a
tablewith class name of the component. E.g:<table class="signature">...</table - Use only these Inky Components (otherwise it will break):
- Button
- Row
- Spacer
We often have to send full HTML emails. Create fully responsive and tested emails in minutes with a few commands.
gulp create --email [email-name]
This will create a new email in src/emails. In it are:
/emails
    /[email-name]
        src.html    // HTML for your email
        main.css  // CSS for your email
        dist.html   // (Don't edit) Your fully baked HTML email
gulp
Hooray, we're watching for all changes now.
You can include components that you've built for hubspot. Anywhere in your HTML email:
{{components.[component-name]}}
This will only work for components with hard-coded content and not those with hubspot variables.
See your email tested in Litmus:
gulp test --email [email-name]
Here's some details to understand how the system works and features you may want to leverage.
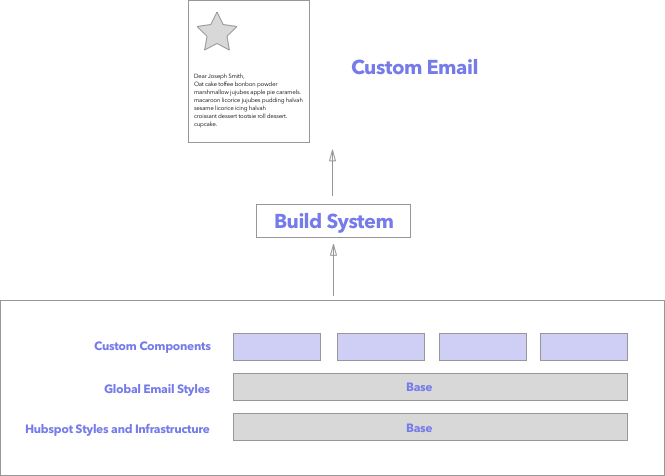
This is how the build system works:
What's what:
- Hubspot Styles and Infrastructure (
/src/base/) The base is used to create a code environment as close to Hubspot as possible so that when component are being built, it should reflect what you see on Hubspot.com. what base archictecture for emails. This should include all code that Hubspot uses. - Global Email Styles (
/src/styles) - This will contain global styles that will apply to every component.main.cssis the final file that will be included in every component. - Custom Components (
/src/base/components) - Where our collection of components go.
In /src/styles you'll find global styles for all components.
- This allows global theming and styling as it will write css for every component.
- Supports SASS.
- If you have
gulprunning, it will automagically process and update all components on save.
This email builder has Inky fully integrated.
For any components, you can leverage any of the Inky syntax and it will spit out correct styling and HTML. Note: For components, don't rely so much on the Inky grid system as we are locked into Hubspot's grid system.
Some of Hubspot's email setting styles are found in config.js. These will affect the base, which will then affect how components are viewed.
LiveReload is a Chrome plugin that allows for auto reload when changes to a page are made and the page is saved. To leverage this during development:
- Install the plugin
- Allow for local URLs (Extensions -> Check "Allow Access to File URLs")
- Run
gulp - Check the Livereload Button in Chrome Toolbar (Make sure the dot is filled)
Sometimes you need to keep the style rules in the dist.html after inlining (e.g. for responsive styling).
After all, the tool by default will 1) take all styles, 2) inline them, 3) then remove the original to avoid redundancy. This is true for style includes (e.g. <link rel="stylesheet" href="main.css">).
But in order to provide functionality to allow written styles to remain in the component in addition to them being inlined, write styles in a <style></style> tag versus being included in.
So in short,
- If you want styles to be inlined AND removed, put it in
main.css - If you want styles to be inlined and preserved, put it in
<style></style>insrc.html
Sometimes you need to use Hubspot variables for styles before they are inlined.
To avoid breaking the inliner present in the application, use a double carret syntax << variable >> and the application will convert it to a hubspot double curly syntax {{ variable }}.
Example:
table.button tr td {
    background: << hex_color >> !important;
    border: 0px solid << hex_color >> !important;
}
Outputs to:
table.button tr td {
    background: {{ hex_color }} !important;
    border: 0px solid {{ hex_color }} !important;
}
Sometimes you need to link an external stylesheet to your components (e.g. for web fonts).
By default, the inliner removes any references to local stylesheets to avoid any HTTP errors, but sometimes you want to keep an external stylesheet.
To keep your external stylesheet:
// elink will be escaped
<elink href="https://fonts.googleapis.com/css?family=Source+Sans+Pro:300,300i,400,400i,600" rel="stylesheet">

