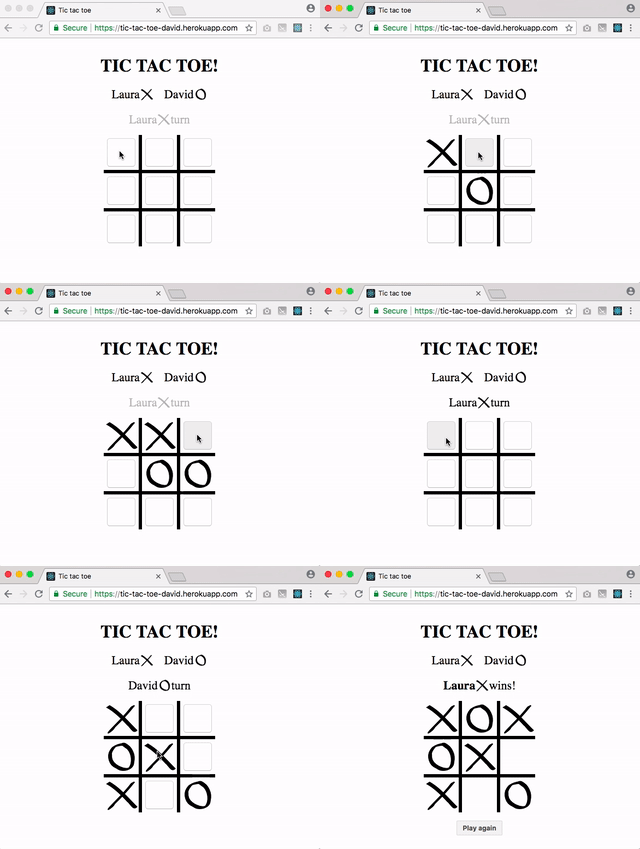
Since all my relevant development work is focused on private, commercial codebases, I am writing this small tic tac toe game to showcase my skillsets to the world. Hello, world!
This is how I develop an app to make it easy to test.
| Status | |
|---|---|
| CI service |  |
| Tests |  |
View the live demo on Heroku or the individual UI components of my Storybook on Github Pages.
- Super-high test coverage (see the reports for more details), including unit tests, integration tests and end to end tests.
- Application of the DRY principle.
- Usage of a linter and code formatting.
- Atomic design and Component Driven Development for the UI. Each UI component does only one thing and one thing well and are tested in isolation then later in conjunction and build their documentations as I write the code using Storybook.
- Test Driven Development for the business logic.
- Good separation of concerns between the views (React components) and their state management (Redux).
- Pixel-perfect CSS on the react components (see how I use styled components on
Board.jsxandSquare.jsx. - A Domain Specific Language (DSL), extremely easy to learn, suitable to play the game programmatically and evaluate results (used for testing). Useful to make it easy to write tests (for the QA team, for example) or to run the game programmatically in headless mode (in the real world this could be useful for maintenance tasks, for example). I got this idea from The Pragmatic Programmer book. TODO: Use babel to simplify the DSL even more (a la JSX). Example:
Scenario('Game over! X wins');
I.placeMove(TOP_LEFT);
I.placeMove(BOTTOM_RIGHT);
I.placeMove(TOP_CENTER);
I.placeMove(BOTTOM_CENTER);
I.placeMove(TOP_RIGHT);
I.expect().gameOver();
I.expect(X).toBeWinner();
- Create-react-app, which includes: React, JSX, ES6, Webpack, Babel and other amazing projects.
- Prettier Code Formatter + ESLint setup with Airbnb's style guide + VSCode integration
- Jest + Enzyme for tests, including
@storybook/addon-storyshotsto snapshot test my Storybook and puppeteer for e2e tests. - Storybook of my UI components
- Travis CI to build the production bundles and deploy it to Heroku, run the tests, creating and publishing the test coverage report and the UI documentation as a Storybook on Github Pages.
Install redux-devtools-extension in your browser (optional, use this browser extension during development).
then clone the repo via git:
git clone https://github.com/davps/tic-tac-toe.gitAnd then install dependencies.
cd tic-tac-toe && npm installRun these two commands simultaneously in different console tabs.
npm start
npm run storybook
And open http://localhost:3000/ to run the web app, http://localhost:9009/ to open the storybook and Menu > Debug > Start Debugging on VSCode to run the test on each file change. If that didn't work for you, you can try Menu > Debug > Start without debugging or you can use this command on your terminal:
npm test
You can generate a report of the test coverage with this command
npm test -- --coverage
and then open the ./coverage/Icov-report/index.html file to explore the coverage details.
In your local environment, the puppeteer tests will pass only if your server is up and running (you need to do that manually) Why? Because reinitializing the server to run the test is too slow. In the CI server, the test suite will automatically start the server and tear down when it is done.
We will always want to extend the actual syntax of our DSL to cover new cases of the business domain. This section document the steps you can follow to extend the DSL.
I'll explain it with an example: We want to add the new method isAvailable() to use it as
I.expect(TOP_LEFT).isAvailable()Below are the steps:
1- Add isAvailable to DSL.js, as a descriptor on the createDescriptor method, in this case, as part of the expectation object. Note that we pass the arg value here:
isAvailable: () => dispatch(expect.isAvailable(arg))2- Add an expectation creator for isAvailable. It will look like this (from the architectural point of view, this is equivalent to the action creator of redux):
  isAvailable: position => ({
    type: EXPECT_IS_AVAILABLE,
    position
  })
3- Add an expectation type (also, equivalent to action types of Redux):
export const EXPECT_IS_AVAILABLE = 'EXPECT_IS_AVAILABLE';4- Now we need to modify the App.DSLto****.adaptor.test.jsx files, to implement this new
expectation type for each file. The implementation is optional for expectations but mandatory
when the new interface is not an expectation.
So, for App.DSLtoRedux.adaptor.test.jsx, for example, we add:
case EXPECT_IS_AVAILABLE: {
    expect(store.getState().moves[action.position]).toBe(ACTOR.PENDING);
    break;
}
5- In case you are writing the new tests on a new file, make sure to concat all the tests
on the tests array of your adaptor that run implement file.
At the time of writing this tutorial, we used these tests on the redux adaptor (retrieved the JSON description of the tests with import:
import testsWithDSL from './App.testsWithDSL';
import testFeaturePlaceMove from './App.test.feature.placeMove';
and then put all the test scenarios on a single array with:
const tests = [].concat(testsWithDSL, testFeaturePlaceMove);and start running the tests from there
Setup build stages for my Heroku deployments.
