Here at General Assembly, we use Installfest to install a group of applications which we consider essential for any software developer to have. We use these applications regularly in our classes, and it's essential for all of our students to have them.
-
The instructions below are made for macOS users. For Linux users, please follow the instructions here instead.
-
Enter the commands in the Terminal unless otherwise noted.
-
In the code blocks, do not copy the
$symbols at the start of the line unless otherwise noted.The
$is commonly used to represent the start of the prompt in the Terminal, and everything that follows the$is the command itself. -
We don't recommend typing the commands manually wherever possible, since a single typo can make a command malfunction.
-
Use
CMD + Cto copy a command. -
Use
CMD + Vto paste a command.
Copy and paste one command at a time. Each command should be a single line, but if your window is narrow some lines may "wrap" and appear as multiple lines.
For longer lines, make sure you copy the entire line.
-
-
If you're asked to enter your password, that means the password for your computer.
When you type it in, Terminal won't give you any visual feedback to indicate you're typing things in: you won't get a black dot for each character you typed.
That's OK – just type your password and hit Enter!
-
Terminal is not big on visual feedback – it usually doesn't tell you when something worked.
No news is good news! If you enter a command and Terminal doesn't print anything, it probably worked fine.
If something didn't work, you'll get an error message that gives useful information.
-
Some of the commands do not give immediate feedback so if it looks like something stalled give it a moment.
If the Terminal prompt (
$) isn't present on the current line, be patient. -
Your output could be slightly different from the Example Output. As long as they are similar you are good to move on to the next step.
-
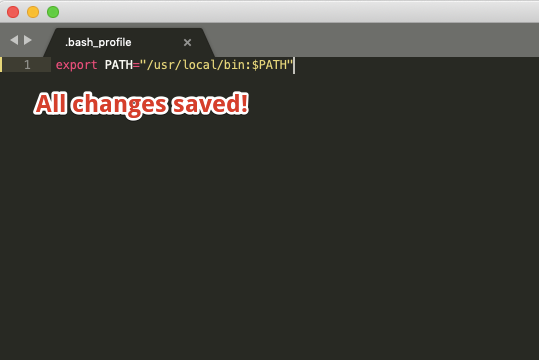
There are a few steps where it is important that a file is saved before proceeding. Here are a few things to look out for:
Unsaved:
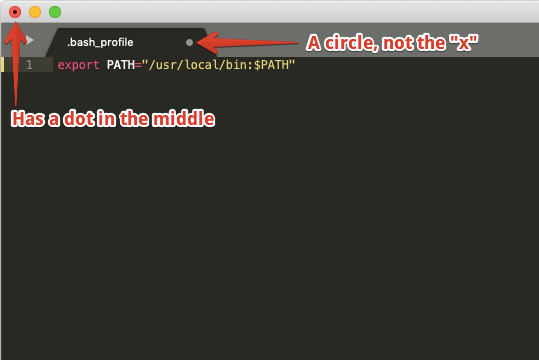
Saved:


- First, verify that you've typed the given commands letter for letter.
- Then, check the board if any changes were made during the installfest.
- Finally, ask an instructor for help.
For our class, you'll need the latest release of macOS Catalina.
Starting Installfest with the most recent macOS update is vital!
-
Open Spotlight by clicking the little magnifying glass in the top-right corner of your screen, or hitting
CMD + Space. -
Type "Terminal" into the Spotlight text input and select the Terminal app. A new Terminal window should pop up.
Run:
# Remember: the "$" is the start of the Terminal prompt!

$ chsh -s /bin/bashClose the Terminal completely (CMD + Q), then open it again.
Run:
$ touch ~/.bash_profile$ source ~/.bash_profile
# Example Output
# Nothing! if you do not get any errors that means the .zshrc is in good shape.Run:
$ xcode-select --install$ xcode-select --version
# Example Output
xcode-select version 2370.-
Check to see if you have Homebrew installed.
Run:
$ brew --version

# Example Output – Homebrew installed

Homebrew 2.1.9
Homebrew/homebrew-core (git revision 9e49; last commit 2019-07-30)

# Example Output – Homebrew not installed

-bash: brew: command not found
-
If Homebrew is installed, update it.
Run:
$ brew update; brew upgrade; brew cleanup; brew doctor
If not, install Homebrew.
Run:
$ /usr/bin/ruby -e "$(curl -fsSL https://raw.githubusercontent.com/Homebrew/install/master/install)"
$ brew --version

# Example Output

Homebrew 2.1.16
Homebrew/homebrew-core (git revision 2d19; last commit 2019-11-06)-
See initial version of git installed on the system.
Run:
$ git --version # Example Output git version 2.20.1 (Apple Git-122) -
Install latest version of git.
Run:
$ brew install git
-
Completely close Terminal (
CMD + Q) and open a new window with Spotlight.
Run:
$ git --version

# Example Output

git version 2.24.0If the output from the brew install git command mentions brew link git near
the end, try...
Run:
$ brew link git

# If you get an error message, try:

$ brew link --overwrite git
After that, try the Confirm step. If that doesn't work, completely close
Terminal (CMD + Q) and open a new window.
We will be using Sublime Text during Installfest, and recommend using it for the first few weeks before trying out the more complex but powerful editor: VS Code.
Run:
$ brew cask install sublime-text visual-studio-code# 1/2
$ subl ~/.bash_profile
# Keep this window open
# 2/2
$ code ~/.bash_profileYou can either use VS Code or Sublime Text to edit your .bash_profile. Keep
either window open.
If Sublime Text is installed but subl ~/.bash_profile does not work...
- Run:
$ ln -sv "/Applications/Sublime Text.app/Contents/SharedSupport/bin/subl" /usr/local/bin/subl- Run the "Confirm" command again. Worst case, completely close Terminal
(
CMD + Q) and open a new window.
If VS Code is installed but code ~/.bash_profile does not work...
-
Anywhere on your computer, press
CMD + Spaceto open the Spotlight and type "Visual Studio Code" to open the application. -
In VS Code, press
SHIFT + CMD + Pto open the Command Palette, and enter...Shell Command: Install 'code' command in PATHVS Code should autocomplete the rest of the command when you enter the first few characters. `
-
Back in the terminal...
Run:
$ source ~/.bash_profile
-
Run the "Confirm" command again. Worst case, completely close Terminal (
CMD + Q) and open a new window.
In the .bash_profile file open in your editor (Sublime or VS Code), add this
line to the top:
export BASH_SILENCE_DEPRECATION_WARNING=1# In the Terminal
$ source ~/.bash_profileNote: Installfest provides an
example .bash_profile with all of additions we'll
be making. It might be helpful to open it in a new browser tab to refer to
alongside the instructions.
Add the following line to the very top of the .bash_profile and then save
(CMD + S).
export PATH="$PATH"Updated .bash_profile:
export BASH_SILENCE_DEPRECATION_WARNING=1

# The "+" is just to show the added line, it is not a part of the final code.

+ export PATH="$PATH"
Note: If you already have code in .bash_profile, that's awesome! Just make
sure there is a line that says export PATH="<blah blah blah>" because we will
need to add to it later.
$ source ~/.bash_profileIn your .bash_profile, add this line and save the file (CMD + S).
source /usr/local/etc/bash_completion.d/git-completion.bashUpdated .bash_profile:
export BASH_SILENCE_DEPRECATION_WARNING=1
export PATH="$PATH"

+ source /usr/local/etc/bash_completion.d/git-completion.bash$ source ~/.bash_profileRun:
$ node --version

# Expected Output – Node not installed

-bash: node: command not found
If you get command not found, you can move on to the step.
If got any other answer, follow these steps to uninstall Node!
Note: Save (CMD + S) your .bash_profile before starting this step – it
will automatically update the .bash_profile so we need to save the file first
to avoid file conflicts.
Run:
# 1/2

$ curl -o- https://raw.githubusercontent.com/creationix/nvm/v0.34.0/install.sh | bash

# 2/2

$ source ~/.bash_profile
Updated .bash_profile:
export BASH_SILENCE_DEPRECATION_WARNING=1
export PATH="$PATH"

source /usr/local/etc/bash_completion.d/git-completion.bash

# There might not be an empty line between the previous code and these new lines, feel free to add it in!
+ export NVM_DIR="$HOME/.nvm"
+ [ -s "$NVM_DIR/nvm.sh" ] && \. "$NVM_DIR/nvm.sh"  # This loads nvm
+ [ -s "$NVM_DIR/bash_completion" ] && \. "$NVM_DIR/bash_completion"  # This loads nvm bash_completion
Confirm:
$ command -v nvm

# Example Output

nvmRun:
$ nvm install 13.9.0Confirm:
# 1/2

$ node --version

# Example Output

v13.1.0

# 2/2

$ npm --version

# Example Output

v6.12.1Note: Save (CMD + S) your .bash_profile before starting this step – it
will update the .bash_profile so we need to save the file first to avoid file
conflicts.
-
Run:
$ brew install pyenv
-
Add to
.bash_profile:if command -v pyenv 1>/dev/null 2>&1; then eval "$(pyenv init -)" fi
Updated
.bash_profile:# In .bash_profile export BASH_SILENCE_DEPRECATION_WARNING=1 export PATH="$PATH" source /usr/local/etc/bash_completion.d/git-completion.bash export NVM_DIR="$HOME/.nvm" [ -s "$NVM_DIR/nvm.sh" ] && \. "$NVM_DIR/nvm.sh" # This loads nvm [ -s "$NVM_DIR/bash_completion" ] && \. "$NVM_DIR/bash_completion" # This loads nvm bash_completion + if command -v pyenv 1>/dev/null 2>&1; then + eval "$(pyenv init -)" + fi
-
Run (in Terminal):
$ source ~/.bash_profile
$ pyenv --version

# Example Output

pyenv 1.2.15Run:
# 1/3

$ pyenv install 3.8.0

# 2/3

$ pyenv global 3.8.0

# 3/3

$ source ~/.bash_profile$ python --version
# Example Output
Python 3.8.0Refer the the pyenv wiki
Run:
$ pip install --upgrade pipWhile we're here...
$ pip install ipythonRun:
$ pip install --user pipenv$ pipenv --version
# Example Output – Success
pipenv, version 2018.11.26
# Example Output – More work needed
-bash: pipenv: command not foundIf pipenv cannot be found, we need to make one change to the .bash_profile so
the Terminal can find the application.
How do we determine what to change the line to?
-
We need to find the location we need to add to our
$PATH.Run:
$ python -m site --user-base
This will give us a location such as...
/Users/<your_user_REPLACE_THIS>/.local

# Yours will be different!
-
We want to add "/bin" to this location when we add it to the
$PATH. So in in this example, we'd get...- /Users/<your_user_REPLACE_THIS>/.local + /Users/<your_user_REPLACE_THIS>/.local/bin
Just make a note of this line, we will add it to the
.bash_profilein the next step. -
Update your
.bash_profileby adding this path to theexport PATHline.Keep the final
:$PATHat the very end, and insert the location of the pipenv installation immediately before it.Note: be mindful of the
:s between different file locations in the$PATHThe updated line could look something like...
Update
.bash_profile:# In .bash_profile export BASH_SILENCE_DEPRECATION_WARNING=1 - export PATH="$PATH" + export PATH="/Users/<your_user_REPLACE_THIS>/.local/bin:$PATH" source /usr/local/etc/bash_completion.d/git-completion.bash export NVM_DIR="$HOME/.nvm" [ -s "$NVM_DIR/nvm.sh" ] && \. "$NVM_DIR/nvm.sh" # This loads nvm [ -s "$NVM_DIR/bash_completion" ] && \. "$NVM_DIR/bash_completion" # This loads nvm bash_completion
# 1/2

$ source ~/.bash_profile

# 2/2

$ pipenv --version

# Example Output

pipenv, version 2018.11.26-
Run:
# 1/2

$ brew cask install postgres

# 2/2

$ sudo mkdir -p /etc/paths.d && echo /Applications/Postgres.app/Contents/Versions/latest/bin | sudo tee /etc/paths.d/postgresapp
-
Completely close Terminal and reopen a new window.
-
Use Spotlight (
CMD + Space) and type "Postgres" to open the application.If this is the first time running Postgres.app, click the "Initialize" button. This will create the database and start your local server.
$ psql

# Example Output

psql (12.0)
Type "help" for help.
This opens a new type of prompt in Terminal, type \q and then hit Enter to
exit.
Run:
# 1/3

$ brew tap mongodb/brew

# 2/3

$ brew install mongodb-community@4.2

# 3/3

$ brew services start mongodb-community@4.2Run:
$ ps -ef | grep mongodRun:
$ brew tap heroku/brew && brew install heroku$ heroku -v
# Example Output
heroku/7.34.2 darwin-x64 node-v12.13.0Run:
# 1/2

$ brew install libpq

# 2/2

$ brew cask install postman spectacle

# If you do not already have Chrome and/or Slack

$ brew cask install google-chrome slack$ brew leaves
# this will list all of the applications installed via HomebrewYou can use Spotlight to open the apps installed with brew cask by entering
CMD + Space anywhere.
Run:
$ npm install -g npx nodemon prettier surge trash-cli$ npm list -g --depth=0Run:
# 1/5

# Replace <YOUR FULL NAME> with the name you would like to use, keep the double quotes

$ git config --global user.name "<YOUR_FULL_NAME>"

# 2/5

# Replace <THE_EMAIL...></THE_EMAIL...> with your email, , keep the double quotes

$ git config --global user.email "<THE_EMAIL_YOU_USE_FOR_GITHUB@EMAIL.COM>"

# 3/5

# Copy/paste everything between the parenthesis and hit Enter

$ (git config --global push.default simple
git config --global color.ui always
git config --global color.branch.current 'green reverse'
git config --global color.branch.local green
git config --global color.branch.remote yellow
git config --global color.status.added green
git config --global color.status.changed yellow
git config --global color.status.untracked red
git config --global core.editor 'subl --wait'
git config --global alias.lg "log --color --graph --pretty=format:'%Cred%h%Creset -%C(yellow)%d%Creset %s %Cgreen(%cr) %C(bold blue)<%an>%Creset' --abbrev-commit"
)
$ git config --list --global

# Example Output

user.name=General Assembly
user.email=ga@ga.co
push.default=simple
color.ui=always
color.branch.current=green reverse
color.branch.local=greenq
color.branch.remote=yellow
color.status.added=green
color.status.changed=yellow
color.status.untracked=red
core.editor=subl --wait
core.excludesfile=/Users/<your_user_REPLACE_THIS>/.gitignore-global
alias.lg=log --color --graph --pretty=format:'%Cred%h%Creset -%C(yellow)%d%Creset %s %Cgreen(%cr) %C(bold blue)<%an>%Creset' --abbrev-commitIf you don't have a GitHub account, go to https://github.com and create an account.
Make sure you update your profile with:
- Your Name
- A recognizable profile picture
- An e-mail address
Follow these instructions to add GitHub SSH keys to your local machine!
You have installed the basic applications to use as a developer, and you are ready for SEI. We are looking forward to working with you in the next weeks!