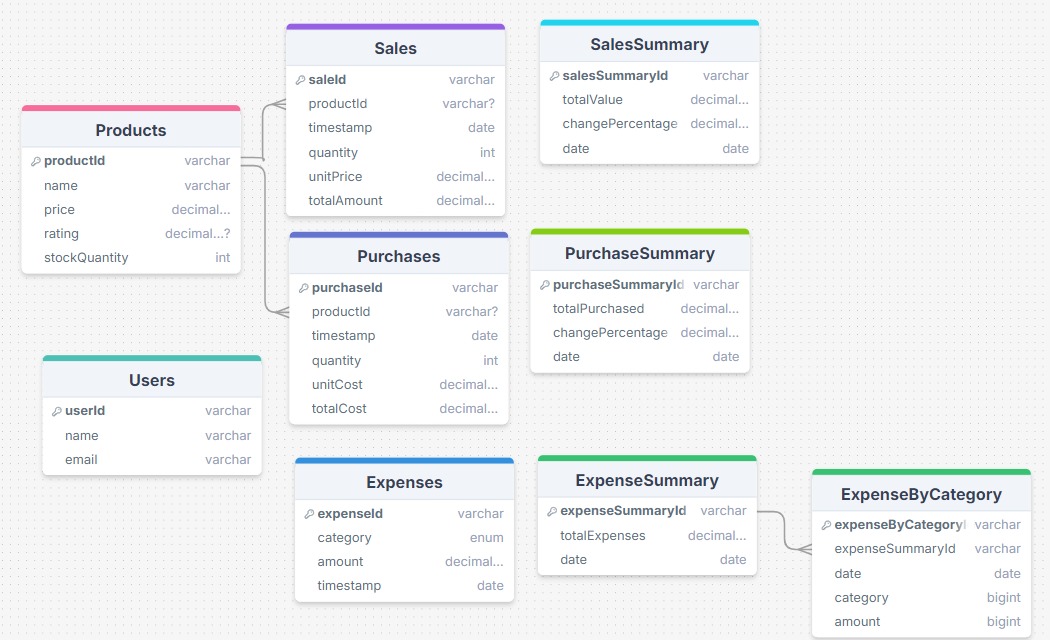
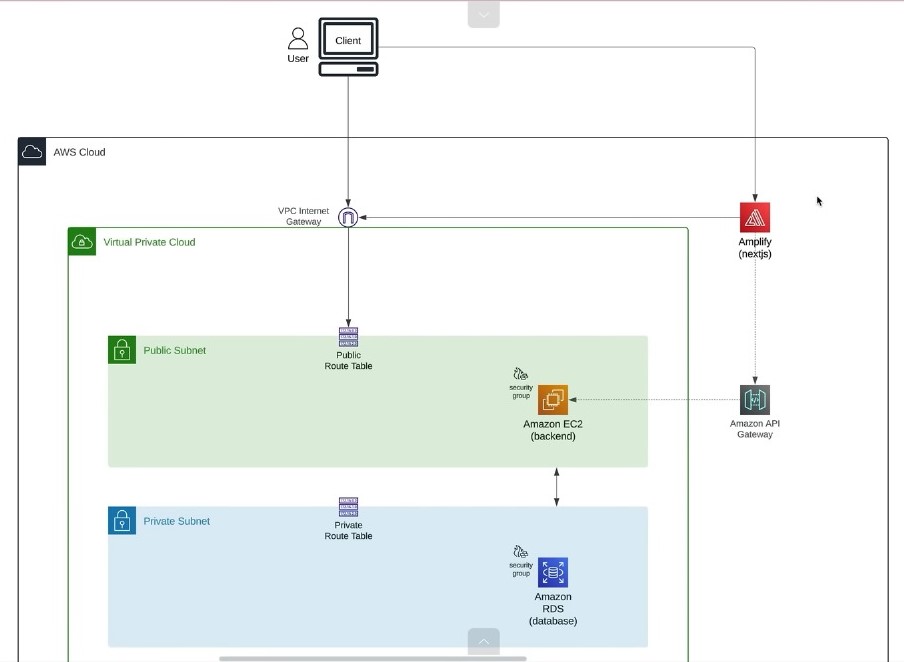
A full-stack inventory management system that allows users to track products, manage stock, and generate reports. The project consists of a client built with Next.js and a server using Node.js and Prisma.
- Product management
- Stock tracking
- Automated reporting
- User authentication
- Client: Next.js, React, TailwindCSS
- Server: Node.js, Prisma, PostgreSQL
- Database: PostgreSQL
- Production : AWS, EC2, S3, RDS ,Amplify
-
Clone the repository:
git clone [git-url] cd inventory-management -
Install dependencies for both client and server:
# Client setup
cd client
npm i
cd ..

# Server setup
cd server
npm i
-
Set up the database:
npx prisma generate
npx prisma migrate dev --name init
npm run seed
-
Configure environment variables:
- For server settings, configure the
.envfile:PORT=your-port DATABASE_URL=your-database-url - For client settings, configure the
.env.localfile:NEXT_PUBLIC_API_BASE_URL=your-api-base-url
- For server settings, configure the
-
Run the project:
npm run dev
-
Connect to EC2 Instance:
- Use EC2 Instance Connect from your AWS Console to access your instance.
-
Install Node Version Manager (nvm) and Node.js:
- Switch to superuser:
sudo su -
- Install nvm:
curl -o- https://raw.githubusercontent.com/nvm-sh/nvm/v0.39.7/install.sh | bash - Activate nvm:
. ~/.nvm/nvm.sh
- Install the latest version of Node.js:
nvm install node
- Verify installation:
node -v
npm -v
- Switch to superuser:
-
Install Git:
- Update system and install Git:
sudo yum update -y
sudo yum install git -y
- Check Git version:
git --version
- Clone your repository:
git clone [your-github-link]
cd inventory-management
npm i
- Update system and install Git:
-
Create Env File and Start the Application:
- Set the server to use port 80:
echo "PORT=80" > .env
- Start the application:
npm start
- Set the server to use port 80:
-
Install pm2 (Production Process Manager for Node.js):
- Install pm2 globally:
npm i pm2 -g
- Create a pm2 ecosystem configuration file (inside the server directory):
module.exports = {
  apps: [{
    name: 'inventory-management',
    script: 'npm',
    args: 'run dev',
    env: {
      NODE_ENV: 'development',
      ENV_VAR1: 'environment-variable',
    }
  }],
};
- Modify the ecosystem file if necessary:
nano ecosystem.config.js
- Set pm2 to restart on reboot:
sudo env PATH=$PATH:$(which node) $(which pm2) startup systemd -u $USER --hp $(eval echo ~$USER)
- Start the application with pm2:
pm2 start ecosystem.config.js
- Install pm2 globally:
-
Stop all processes:
pm2 stop all
-
Delete all processes:
pm2 delete all
-
status of processes:
pm2 status
-
Monitor processes:
pm2 monit
To connect to your RDS PostgreSQL database, you will need to set up a connection string in your environment variables. The connection string format is as follows:
DATABASE_URL="postgresql://<username>:<password>@<hostname>:<port>/<database_name>?schema=<schema>"
remember to set the password only in alphanumeric format otherwise exceptions may occur
To allow public read access to the objects in your S3 bucket, you can use the following bucket policy:
{
    "Version": "2012-10-17",
    "Statement": [
        {
            "Sid": "PublicReadGetObject",
            "Effect": "Allow",
            "Principal": "*",
            "Action": "s3:GetObject",
            "Resource": "[bucket-arn]/*"
        }
    ]
}
