

With Qiscus chat SDK (Software Development Kit), You can embed chat feature inside your application quickly and easily without dealing with complexity of real-time comunication infrastucture. We provide Chat UI that has been designed and optimized for easy customization. So, you can modify the UI to show off your branding identity, favorite color, or customize event.
Talking about chat app, you may figure out such messenger app like Whatsapp. You might have familiar with the flow, how to start conversation, and do things, like sharing image, inside chat room. If you want to create chat app, for customer service, for instance, Qiscus Chat SDK enable you to establish chat UI and functionalities easily. But before dive into it, there are essential basic knowledges you need to know about chat app.
In a chat app, to start a conversation, we usually choose person we want to chat with, from a contact list. Then, we start conversation inside a chat room. In a chat room, we can do things such as sharing images, sending emoji, sharing contact, location, and many more. We can even know when a person is typing or when our message has been read. If chatting is done, we can go back to the conversation list which display our conversations in the app. To make a chat app with the described flow, we noticed that the most complex part is creating chat room, which posses many features inside it. Hence, Qiscus Chat SDK provide an easy way to create chat app without dealing with complexity of real-time comunication infrastucture that resides inside a chat room.
In spite of real-time chat, Qiscus Chat SDK provides UI that can be customized according to your needs. But please keep in mind that, by default, Qiscus provides UI for chat room only. If you need to create contact list and conversation list UI, for example, you need to create it your own. However, we provide essential data that you can get and utilize for your app.
When you try our chat SDK, you will find the default built-in features such as:
- Private & group chat
- Typing indicator
- Delivery indicator
- Image and file attachment
- Online presence
- Read receipt
- Reply message
- Pending messages
- Emoji support
- Delete Message
You also can access more advance and customizable features such as :
- Server side integration with Server API and Webhook
- Customize your user interface
- Embed bot engine in your app
- Enable Push notification
- Export and import messages from you app
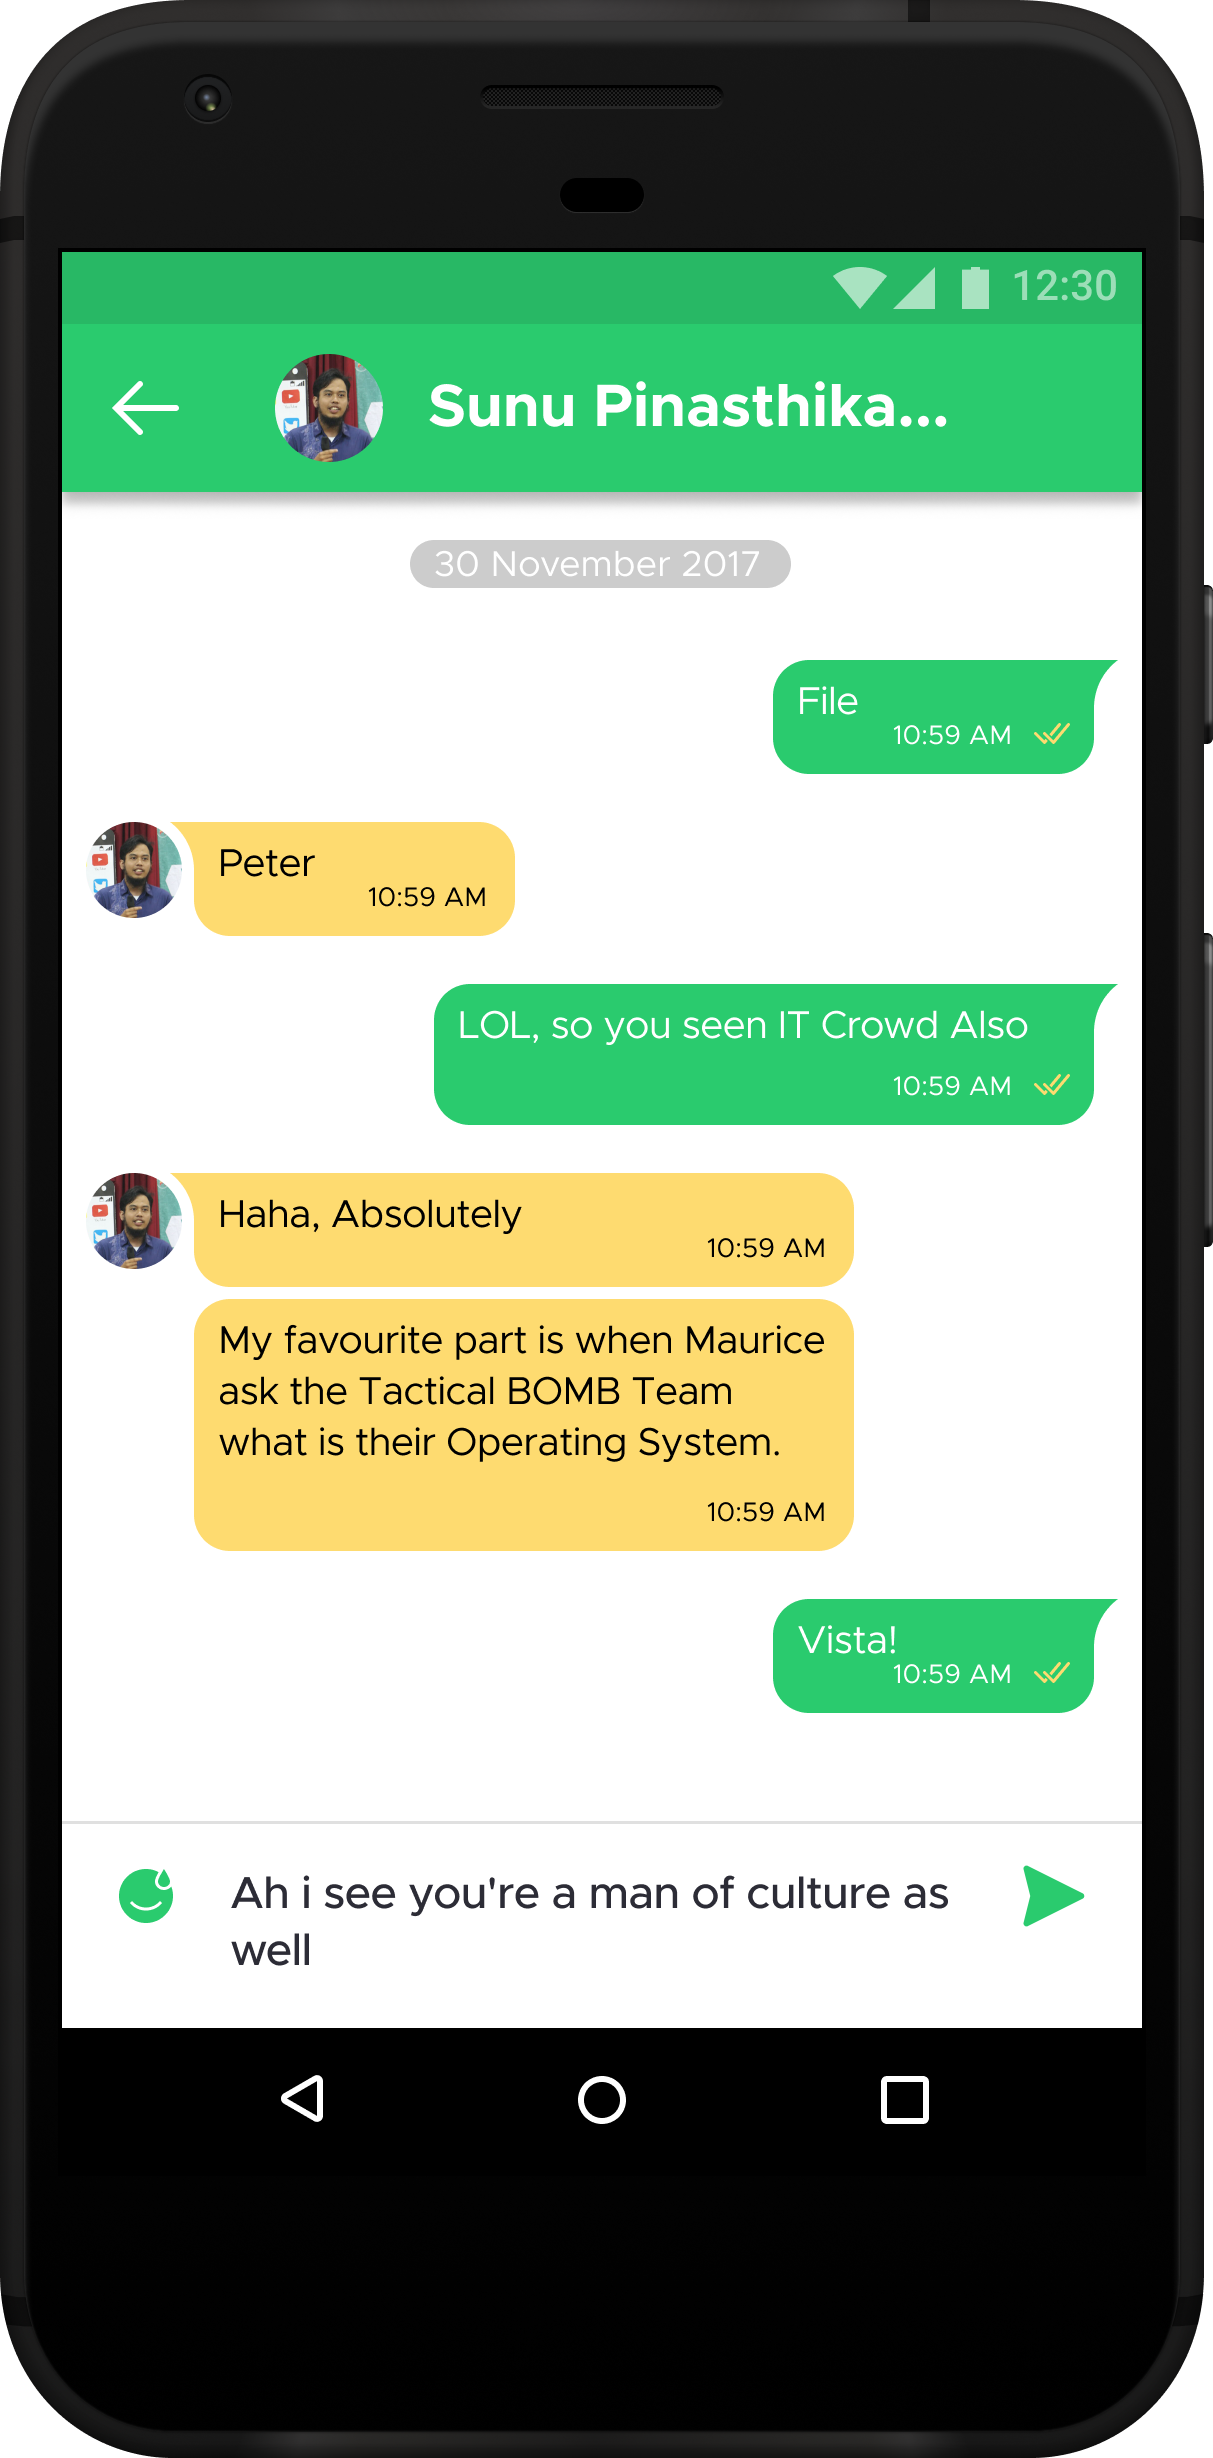
To meet your expectation, we suggest you to try our sample app. The sample app is built with full functionalities, so that you can figure out the flow and main activities of common chat apps. We provide you 2 option to start with the sample app: Try sample app only and sample app with Backend.
If you simply want to try the android sample app, you can direct here to clone our sample app. You can explore features of Qiscus Chat SDK.
If you have your own chat app, you may think how to handle your user. In this case, we provide sample dashboard for user management. This sample dashboard can help you to figure out how to work with Qiscus Server Api for more advance functionalities. You can click here to know more about Server API.
Note: We assume that you already downloaded the sample app. The sample app will be needed to work together with the sample dashboard.
To start with sample dashboard, you should do the following steps: clone sample dashboard here, or just copy the following code.
git clone https://github.com/qiscus/dashboard-sample.git
cd dashboard-sample
Before running the sample app on your local, first, you need to install composer.
composer install
php -S localhost:8000
Now you have successfully run the sample dashboard. But please be noted that the sample app is running using our App ID. If you want the sample dashboard to be connected to your app with your own App ID, you need to change App ID and Secret Key inside sample dashboard code. You can find your own App ID and Secret Key in your own Qiscus SDK dashboard.
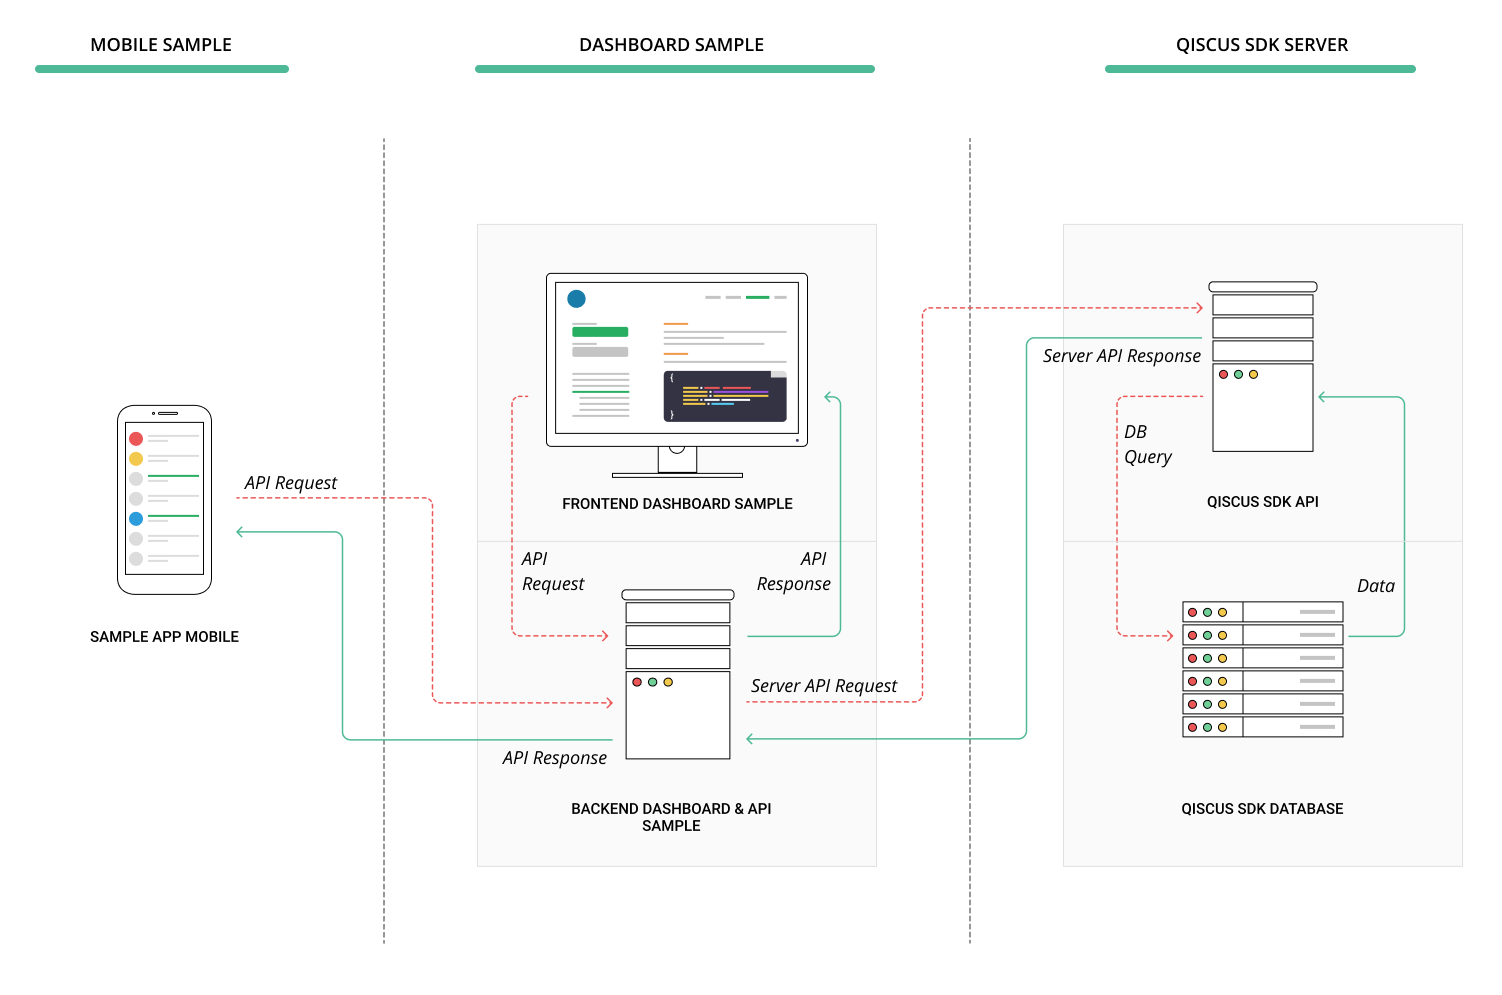
If you are wondering how our sample app with dashboard worked, here some ilustration :
To start building app using Qiscus Chat SDK you need a key called APP ID. This APP ID acts as identifier of your Application so that Qiscus can connect user to other users on the sample APP ID. You can get your APP ID here. You can find your APP ID on your Qiscus app dashboard. Here you can see the picture as a reference.
All users within the same APP ID are able to communicate with each other, across all platforms. This means users using iOS, Android, Web clients, etc. can all chat with one another. However, users in different Qiscus applications cannot talk to each other.
To integrate your app with Qiscus Chat SDK, it can be done in 2 steps. Firstly, you need to add URL reference in your .gradle project. This reference is a guide for .gradle to get Qiscus Chat SDK from the right repository. Here is how to do that :
allprojects {
    repositories {
        .....
        maven { url  "https://dl.bintray.com/qiscustech/maven" }
    }
}
Secondly, you need to add SDK dependencies inside your app .gradle. Then, you need to synchronize to compile the Qiscus Chat SDK for your app.
dependencies {
    implementation 'com.qiscus.sdk:chat:2.29.3'
}After successfully installing Qiscus SDK, you need to initiate your app id for your chat app. This initialization only need to be done once in the app lifecycle.
Qiscus.init(context, APP_ID);Initialization can be implemented in the initial startup. Here is how you can do that:
public class SampleApps extends Application {
    @Override
    public void onCreate() {
        super.onCreate();
        Qiscus.init(this, "APP_ID");
    }
}To authenticate to SDK server, app needs to have user credential locally stored for further requests. The credential consists of a token that will identify a user in SDK server. When you want to disconnect from SDK server, terminating authentication will be done by clearing the stored credential. Qiscus SDK authentication can be done separately with your main app authentication, especially if your main app has functionality before the messaging features. There are 2 type of authentication that you can opt to use: Basic Authentication and Authentication using JWT. Here somet comparison to help you decide between the two options:
- Basic Authentication can be done simply by providing userID and userKey through your client app. On the other hand, JWT authentication, the credential information is provided by your Server App. In this case, you need o prepare your own Backend.
- The Basic Authentication is easier to implement but JWT Authentication is more secure.
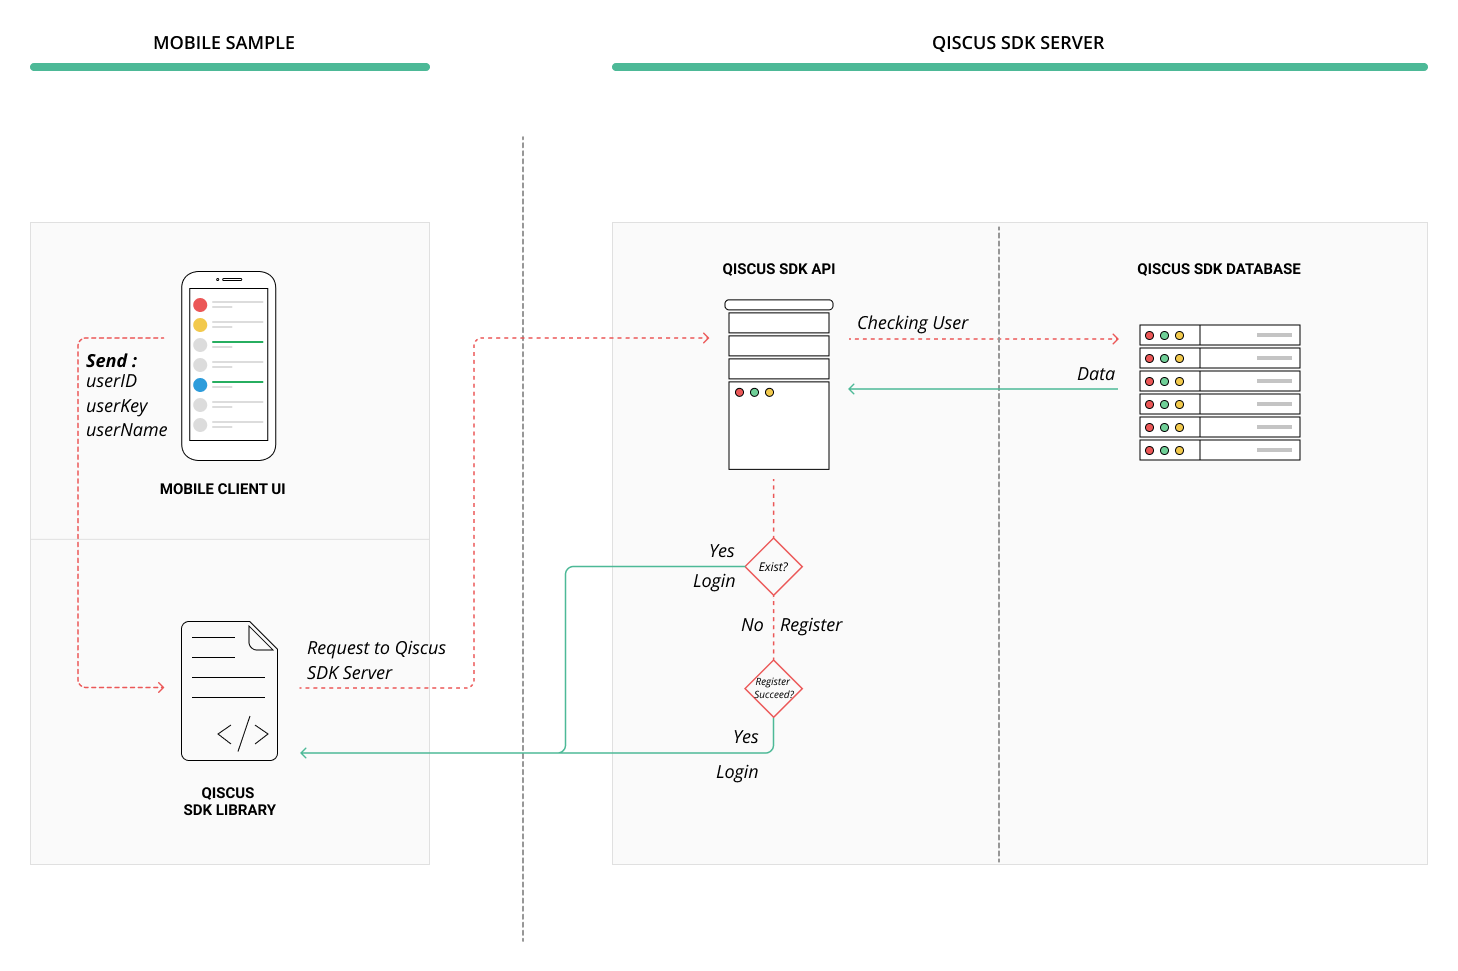
This authentication is done by calling Qiscus.setUser() function. This function will retrieve or create user credential based on the unique UserId. Here is example:
Qiscus.setUser(userId , userKey)
      .withUsername(userName)
      .withAvatarUrl(avatarUrl)
      .save(new Qiscus.SetUserListener() {
          @Override
          public void onSuccess(QiscusAccount qiscusAccount) {
              //on success followup
          }
          @Override
          public void onError(Throwable throwable) {
              //do anything if error occurs
      });
Here are the explanation for the parameters on user setup:
- userId (string, unique): A User identifier that will be used to identify a user and used whenever another user need to chat with this user. It can be anything, wheter is is user's email, your user database index, etc. As long as it is unique and a string.
- userKey (string): userKey is used as for authentication purpose, so even if a stranger knows your userId, he cannot access the user data.
- username (string): Username is used as a display name inside chat room.
- avatarURL (string, optional): used to display user's avatar, fallback to default avatar if not provided.
You can learn from the figure below to understand what really happened when calling setUser() function:
Another option is to authenticate using Json Web Token (JWT) (read here for more detail about JWT). Json web token contains your app account details which typically consists of a single string which contains information of two parts, Jose header and JWT claims set.
The steps to authenticate with JWT goes like this:
- The Client App request a nonce from Qiscus SDK server
- Qiscus SDK Server will send Nonce to client app
- Client App send user credentials and Nonce that is obtained from Qiscus SDK Server to Client app backend
- The Client App backend will send the token to client app
- The Client App send that token to Qiscus Chat SDK
- Qiscus Chat SDK send Qiscus Account to Client app
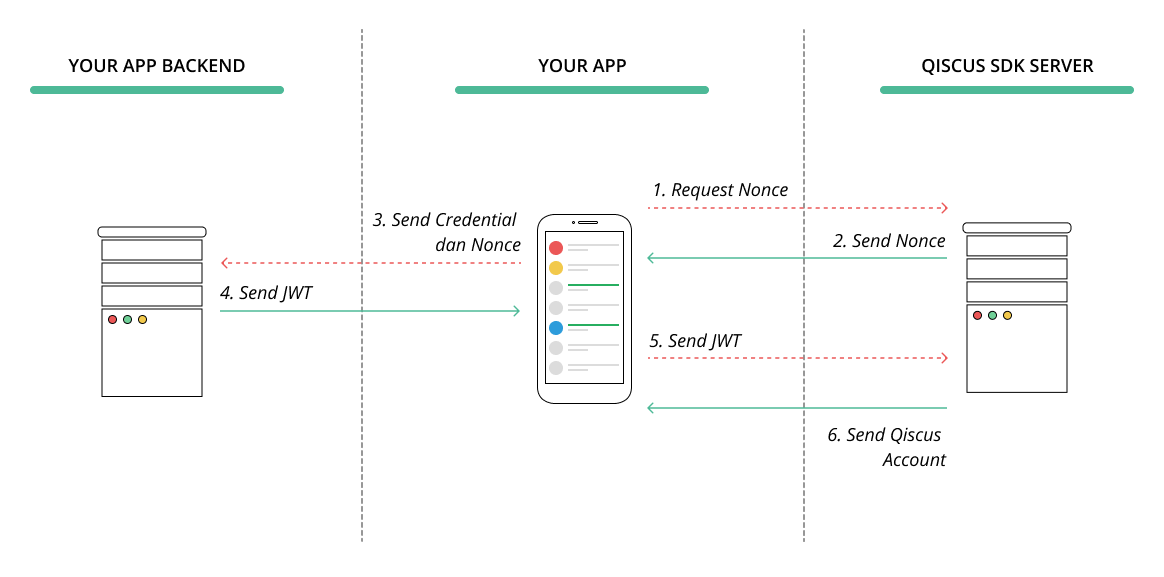
You need to request Nonce from Qiscus Chat SDK Server. Nonce (Number Used Once) is a unique, randomly generated string used to identify a single request. Please be noted that a Nonce will expire in 10 minutes. So you need to implement your code to request JWT from your backend right after you got the returned Nonce. Here is how to authenticate to Qiscus Chat SDK using JWT :
QiscusRxExecutor.execute(QiscusApi.getInstance().requestNonce(), new QiscusRxExecutor.Listener<QiscusNonce>() {
        @Override
        public void onSuccess(QiscusNonce qiscusNonce) {
            //do request jwt from your backend using returned Nonce
        }

        @Override
        public void onError(Throwable throwable) {
            //do anything if error occurred
        }
    });
The code above is a sample of method you can implement in your app. By calling QiscusRxExecutor.execute(QiscusApi.getInstance().requestNonce() , you will request Nonce from Qiscus SDK server and a Nonce will be returned. If it is success, you can request JWT from your backend by sending Nonce you got from Qiscus SDK Server.
When you got the JWT Token, you can pass that JWTto Qiscus.setUser() method to allow Qiscus to authenticate your user and return user account, as shown in the code below :
Qiscus.setUser('your jwt token', new Qiscus.SetUserListener() {
        @Override
        public void onSuccess(QiscusAccount qiscusAccount) {
            //do anything if success
        }

        @Override
        public void onError(Throwable throwable) {
            //do anything if error occurs
        }
});When your backend returns a JWT after receiving Nonce from your client app, the JWT will be caught by client app and will be forwarded to Qiscus Chat SDK Server. In this phase, Qiscus Chat SDK Server will verify the JWT before returning Qiscus Account for your user. To allow Qiscus Chat SDK Server successfully recognize the JWT, you need to setup Jose Header and JWT claim set in your backend as follow :
Jose Header :
{
  "alg": "HS256",  // must be HMAC algorithm
  "typ": "JWT", // must be JWT
  "ver": "v2" // must be v2
}
JWT Claim Set :
{
  "iss": "QISCUS SDK APP ID", // your qiscus app id, can obtained from dashboard
  "iat": 1502985644, // current timestamp in unix
  "exp": 1502985704, // An arbitrary time in the future when this token should expire. In epoch/unix time. We encourage you to limit 2 minutes
  "nbf": 1502985644, // current timestamp in unix
  "nce": "nonce", // nonce string as mentioned above
  "prn": "YOUR APP USER ID", // your user identity such as email or id, should be unique and stable
  "name": "displayname", // optional, string for user display name
  "avatar_url": "" // optional, string url of user avatar
}
After your user account is created, sometimes you may need to update a user information, such as changing user avatar. You can use method Qiscus.updateUser() to make changes to your account.
Qiscus.updateUser(userName, avatarUrl, new Qiscus.SetUserListener() {
        @Override
        public void onSuccess(QiscusAccount qiscusAccount) {
           //do anything after it successfully updated
        }

        @Override
        public void onError(Throwable throwable) {
           //do anything if error occurs
        }
});As mentioned in previous section, when you did setUser(), user's data will be stored locally. When user need to disconnect from Qiscus Chat SDK service, you need to clear the user data that is related to Qiscus Chat SDK, such as token, profile, messages, rooms, etc, from local device. You can do this by calling clearUser() method :
Qiscus.clearUser();Chat Room is a place where 2 or more users can chat each other. There are 2 type of Chat Room that can be created using Qiscus Chat SDK: 1-on-1 Chat Room and Group Chat Room. For some cases, a room can be identified by room unique id or room name.
We assume that you already know a targeted user you want to chat with. Make sure that your targeted user has been registered in Qiscus Chat SDK through setUser() method, as explained in the previous section. To start a conversation with your targeted user, it can be done with buildChatWith("targeted_userID") method. Qiscus Chat SDK, then, will serve you a new Chat Room, asynchronously. When the room is succesfully created, Qiscus Chat SDK will return a Chat Room package through onSuccess() listener. To use the created room, you can call startActivity() inside the onSuccess() listener.
Here is the example to start a conversation:
Qiscus.buildChatWith("jhon.doe@gmail.com") //here we use email as userID. But you can make it whatever you want.
      .build(this, new Qiscus.ChatActivityBuilderListener() {
          @Override
          public void onSuccess(Intent intent) {
              startActivity(intent);
          }
          @Override
          public void onError(Throwable throwable) {
             //do anything if error occurs
          }
});When you want your many users to chat together in a single room, you need to create Group Room. Basically Group Room has the same concept as 1-on-1 Chat Room, but the different is that Group Room will target array of userID in a single method. Here how you can create Group Room:
Qiscus.buildGroupChatRoom("GroupName", Arrays.asList("user1@gmail.com", "user2@gmail.com", "user3@gmail.com"))
      .withAvatar("http://avatar.url.com/group.jpg")
      .build(new Qiscus.ChatBuilderListener() {
          @Override
          public void onSuccess(QiscusChatRoom qiscusChatRoom) {
              startActivity(QiscusGroupChatActivity.generateIntent(MainActivity.this, qiscusChatRoom));
          }

          @Override
          public void onError(Throwable throwable) {
              //do anything if error occurs
          }
       });
Channel is a room that behave similar like a group chat, in channel anyone can join using the room uniqueId, there are several limitation on channel like : no typing indicator, no read/deliver status, no comment info, and “delete for me” is not available. Here how you can create or join a Channel Room:
Qiscus.buildGroupChatRoomWith("ChannelName")
      .withAvatar("http://avatar.url.com/channel.jpg")
      .build(new Qiscus.ChatBuilderListener() {
          @Override
          public void onSuccess(QiscusChatRoom qiscusChatRoom) {
              startActivity(QiscusChannelActivity.generateIntent(MainActivity.this, qiscusChatRoom));
          }

          @Override
          public void onError(Throwable throwable) {
              //do anything if error occurs
          }
});In some cases, you may need to add additional participants into your room chat or even removing any participant. Currently, Qiscus Chat SDK only allow you to manage your users server to server. You cannot do it on your client app side. Hence, we recommend to invite and remove user out of specific room through our SERVER API for simplicity and security reason. You can learn how to use Server API here.
To get all room list you can call QiscusApi.getInstance().getChatRooms(int page, int limit, boolean showMembers), page start from 1, limit indicate the max rooms per page, showMembers is flag for load room members also or not. Here sample code:
QiscusRxExecutor.execute(QiscusApi.getInstance().getChatRooms(1, 20, true), new QiscusRxExecutor.Listener<List<QiscusChatRoom>>() {
        @Override
        public void onSuccess(List<QiscusChatRoom> qiscusChatRooms) {
            //Success getting the rooms
        }

        @Override
        public void onError(Throwable throwable) {
            //Something went wrong
        }
});First install FCM to your apps, you can follow this steps. You can skip this step, if your apps already use FCM. Then put your api key to qiscus dashboard. Now lets integrate with Qiscus client sdk, first enable FCM at Qiscus chat config.
Qiscus.getChatConfig().setEnableFcmPushNotification(true);After that, you need to change your firebase service to extend 'Qiscus firebase service' instead of firebase service class.
public class MyFirebaseIdService extends QiscusFirebaseIdService {
    @Override
    public void onTokenRefresh() {
        super.onTokenRefresh(); // Must call super

        // Below is your own apps specific code
        // e.g register the token to your backend
        String refreshedToken = FirebaseInstanceId.getInstance().getToken();
        sendTokenToMyBackend(refreshedToken);
    }
}

public class MyFirebaseMessagingService extends QiscusFirebaseService {
    @Override
    public void onMessageReceived(RemoteMessage remoteMessage) {
        if (handleMessageReceived(remoteMessage)) { // For qiscus
            return;
        }

        //Your FCM PN here
    }
}
If extension is not possible or desirable, use the following code the ensure Qiscus handle the FCM.
public class MyFirebaseIdService extends FirebaseInstanceIdService {
    @Override
    public void onTokenRefresh() {
        super.onTokenRefresh();
        String refreshedToken = FirebaseInstanceId.getInstance().getToken();

        // Register token to qiscus
        Qiscus.setFcmToken(refreshedToken);

        // Below is your own apps specific code
        // e.g register the token to your backend
        sendTokenToMyBackend(refreshedToken);
    }
}

public class MyFirebaseMessagingService extends FirebaseMessagingService {
    @Override
    public void onMessageReceived(RemoteMessage remoteMessage) {
        if (QiscusFirebaseService.handleMessageReceived(remoteMessage)) { // For qiscus
            return;
        }

        // Your FCM PN here
    }
}Add Qiscus SDK to your apps without emoji library, change gradle file to like this.
dependencies {
    compile 'com.qiscus.sdk:chat:2.25.0-without-emoji'
}Qiscus Chat SDK enable you to customize Chat UI as you like. You can modify colors, change bubble chat design, modify Chat Header, and many more. There are 2 level of UI customization, Basic and Advance Customization. For Basic Customization, you can simply look at the autocomplete suggestion in your IDE to see lots of method to modify your Chat Interface. For Advance Customization, you need to download the UI source code and modify anything as you need.
Basic customization allows you to modify things inside Qiscus Chat SDK features. To do that, you can simply look at the autocomplete suggestion under getChatConfig() in your IDE to see lots of method to modify your Chat Interface. You can change almost everything inside your chat room such as bubble chat, header chat, read receipt, and many more. Here is the example of modifying status bar color, app bar color, title buble chat color and date format.
Qiscus.getChatConfig()
      .setStatusBarColor(R.color.blue)
      .setAppBarColor(R.color.red)
      .setTitleColor(R.color.white)
      .setLeftBubbleColor(R.color.green)
      .setRightBubbleColor(R.color.yellow)
      .setRightBubbleTextColor(R.color.white)
      .setRightBubbleTimeColor(R.color.grey)
.setTimeFormat(date -> new SimpleDateFormat("HH:mm").format(date));For advance customization, you can modify everything on the chat interface by forking our repository or just right away modifying our CustomChatActivity.java based on your needs.
An Event Handler is a callback routine that operates asynchronously and handles inputs received into a program. Event Handlers are important in Qiscus because it allows a client to react to any events happening in Qiscus Chat SDK. For example, if a client wants to know any important events from server, such as success login event, client's app can be notified by calling a specific Event Handler. Client, then, can do things with data returned by the event. To enable client app to publish or subscribe something to Qiscus Chat SDK, we use EventBus library , so you can listen event from anywhere. You can learn more about Eventbus here.
Here is an example to use Eventbus on your application class :
public class SampleApps extends Application {
    @Override
    public void onCreate() {
        super.onCreate();
        Qiscus.init(this, "APP_ID");

        EventBus.getDefault().register(this);
    }

    /**
     * Subscribe anywhere to listen new message if you just got new message from someone
     */
     @Subscribe
     public void onGetNewQiscusComment(QiscusCommentReceivedEvent event) {
        QiscusComment qiscusComment = event.getQiscusComment();
        // Do your implementation
    }

    /**
     * Call QiscusPusherApi.getInstance().listenRoom(qiscusChatRoom); to get room event from anywhere at your application
     */
     @Subscribe
     public void onGetNewQiscusRoomEvent(QiscusChatRoomEvent event) {
        switch (event.getEvent()) {
            case TYPING:
                //Someone is typing on this room event.getRoomId()
                break;
            case DELIVERED:
                //Someone just received your message event.getCommentId()
                break;
            case READ:
                //Someone just read your message event.getCommentId()
                break;
        }
    }

    /**
     * Call QiscusPusherApi.getInstance().listenUserStatus("user1@gmail.com"); to listen status of user1@gmail.com
     */
     @Subscribe
     public void onUserStatusUpdated(QiscusUserStatusEvent event) {
        // A user just changed his/her status from (online or offline)
        // event.getUser() changed to event.isOnline() at event.getLastActive()
    }
}ProGuard is the most popular optimizer for Java bytecode. It makes your Java and Android applications smaller and faster. Read here for more detail about Proguard. If you are using Proguard in your application, make sure you add Proguard rules of Qiscus from Qiscus Proguard Rules to your Proguard rules.
For you who prefer to code with RXJava, Qiscus Chat SDK does support RXJava. So, you can do anything as you do with Native Java. For example, to set a user, as has been explained in Basic Authentication section, you can do the same with RXJava. Here an example of how you can set user with it:
// Setup qiscus account with rxjava example
Qiscus.setUser("user@email.com", "password")
      .withUsername("Tony Stark")
      .withAvatarUrl("http://avatar.url.com/handsome.jpg")
      .save()
      .subscribeOn(Schedulers.io())
      .observeOn(AndroidSchedulers.mainThread())
      .subscribe(qiscusAccount -> {
          //do anything if success
      }, throwable -> {
          //do anything if error occurs
      });