- Clone this repository
- Install Heroku CLI
- Enable Heroku beta version
- Make any changes for your application
- Update Qualtrics survey design
- How to modify the setup
- Development
To get a working server deployed via Heroku, take the following steps:
git clone git@github.com:ddimmery/streaming-design.git
Read the Heroku documentation for full details. On a Mac, if you have Homebrew installed, run the command
brew tap heroku/brew && brew install heroku
Currently, to work with manifests in Heroku, it's necessary to use the beta version.
heroku update beta
heroku plugins:install @heroku-cli/plugin-manifest
heroku create <YOUR APP NAME> --manifest
In particular, it will be necessary to update the covariates.yml definition to spell out how covariates should be encoded.
Commit your changes and push the code to Heroku.
git add .
git commit -m "An informative commit message!"
git push heroku main
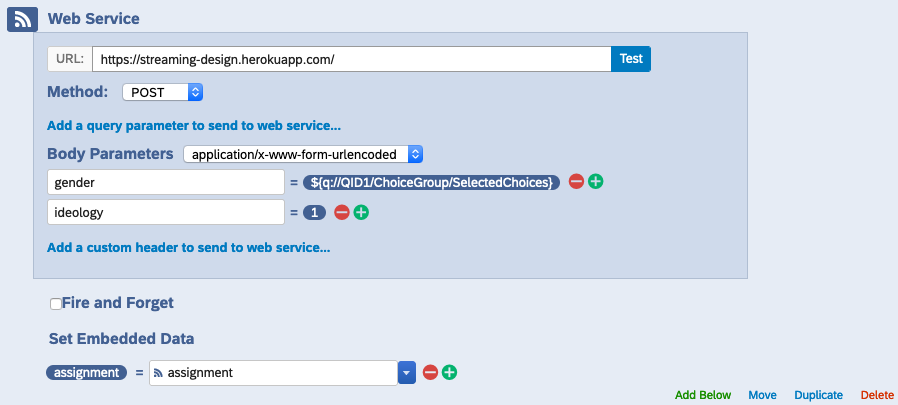
To use your app in Qualtrics to implement streaming experimental design, you will need to go into the "Survey Flow" mode and add an element corresponding to a Web Service. It should be set up like the following:
Make sure that this element is added after you have collected all the covariates you wish to balance on and before you implement the "treatment" of your survey experiment. Retrieving an assignment should take around 30ms or less, so it shouldn't need to be much before you implement the treatment, but to be safe (sometimes if Heroku has been inactive for a while it will "pause" the app, which will then require a little bit more time to re-load), you should try to have at least one page between the web service request and your treatment implementation.
You want to put the appropriate web address of your application in the first box, then select the POST method and add each of your covariates as a body parameter. These should be set to be sent as application/x-www-form-urlencoded. To add a covariate, type the name of the covariate as defined in your covariates.yml file and then select that the value should be filled using Insert Piped Text > Survey Question > <NAME OF SURVEY QUESTION> > Selected Choices Recode.
If you have a covariate that should be mapped to a continuous parameter, make sure that you set up the recoding to map responses to the desired numeric value.
There are a few places where you may want to modify settings to your liking.
To set how to process your data and which streaming design you want to use, you'll need to modify the lines in the Dockerfile which set the following two environment variables:
ENV DESIGN_NAME=bwd
ENV PROCESSOR_NAME=config
There are currently two options for design simple for simple randomization and bwd for an algorithm which seeks linear balance on covariates.
There is only one option available for processors, config. This requires handwriting a YAML file with a description of your covariates.
This file defines the levels and types of your covariates. An example using only two covariates is provided:
gender:
  - Male
  - Female
  - Non-binary
  - Other
ideology: float
The variable gender is a discretely valued covariate which will be one-hot encoded with four levels. Note the indentation and the dash to indicate a list.
The variable ideology is taken to be defined as a float, which means that it should be provided as a numeric value.
With the default processor, missing values are not supported, and unexpected input may cause the app to crash.
For local development, you may need to modify the .env file defining how the local version of the app should be loaded.
For local development, (after cloning this repo) you'll want to first create a .env file in the base directory. Mine looks like the following:
MODE='dev'
FLASK_APP='design_app'
FLASK_ENV='env_design_${MODE}'
DESIGN_NAME=bwd
PROCESSOR_NAME=config
DATABASE_URL='postgresql://design:design@db:5432/design_db'
If you don't want to bother with PostgreSQL, you can replace the URL with sqlite:///test.db to just use SQLite for testing.
Commit to the git repository as usual and test locally by building the docker container:
docker-compose -f docker-compose.yml up --build
When you are satisfied with your changes, test in Heroku by creating an app and pushing:
heroku create streaming-design --manifest
As you make changes, update the code on Heroku by committing and then pushing with:
git push heroku main
If you make changes to the setup section in heroku.yml, note that you will need to re-provision the app in order for the changes to manifest, i.e.:
heroku apps:destroy

heroku create <YOUR APP NAME> --manifest
