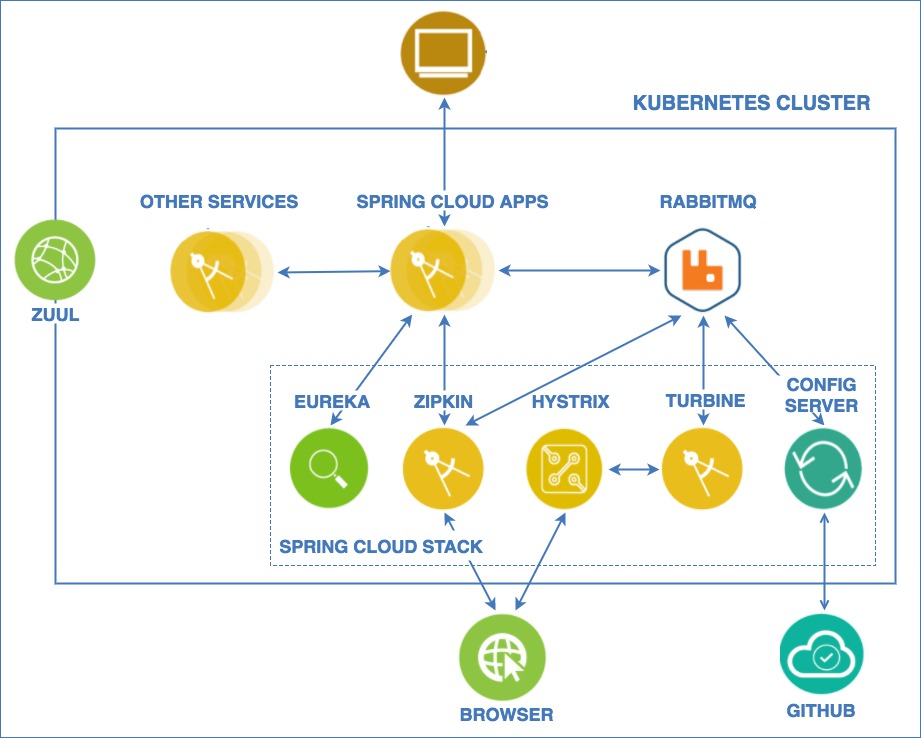
- Introduction
- Spring Stack Overview
- Project Repositories
- Pre-Requisites
- Deploy the Spring Stack
- Delete the Spring Stack and RabbitMQ
- Optional Deployments
Run existing Spring Cloud applications in Kubernetes cluster
This project organized itself like a microservice project, as such each component in the architecture has its own Git Repository and tutorial listed below.
- refarch-cloudnative-spring - The root repository (Current repository)
- refarch-cloudnative-netflix-eureka - This repository contains a basic Netflix Eureka application.
- refarch-cloudnative-netflix-zuul - This repository contains a basic Netflix Zuul proxy application.
- refarch-cloudnative-spring-config - This repository contains a packaged Spring Config config server for use in a Netflix OSS-based microservices architecture.
- refarch-cloudnative-netflix-hystrix - This repository contains a basic Netflix Hystrix Dashboard application, configured to use messaging for inter-component communication.
- refarch-cloudnative-netflix-turbine - This repository contains a basic Netflix Turbine Server application, configured to use messaging for inter-component communication.
- refarch-cloudnative-zipkin - This repository contains Zipkin, a distributed tracing system.
To run the Spring Stack you will need to configure your environment for the Kubernetes and Microservices runtimes.
To deploy the Sprint Stack, you require the following tools:
- kubectl (Kubernetes CLI) - Follow the instructions here to install it on your platform.
- helm (Kubernetes package manager) - Follow the instructions here to install it on your platform.
The following clusters have been tested with this sample application:
- minikube - Create a single node virtual cluster on your workstation
- IBM Cloud Container Service - Create a Kubernetes cluster in IBM Cloud. The application runs in the Lite cluster, which is free of charge. Follow the instructions here.
- IBM Cloud private - Create a Kubernetes cluster in an on-premise datacenter. The community edition (IBM Cloud private-ce) is free of charge. Follow the instructions here to install IBM Cloud private-ce.
We have packaged all the application components as Kubernetes Charts. To deploy the Spring Stack, follow the instructions to configure kubectl for access to the Kubernetes cluster.
RabbitMQ is used as a message bus between the Spring Stack components and needs to be installed first. Use the following to install RabbitMQ.
$ git clone https://github.com/ibm-cloud-architecture/refarch-cloudnative-spring.git
$ cd refarch-cloudnative-spring
$ cd rabbitmq
The PVC (Persistent Volume Claim) is needed by RabbitMQ to retain its data. Use the following to create the PVC.
$ kubectl create -f rabbitmq-pvc.yaml
Note that the PVC usually takes a few minutes to be ready. To check the PVC provisioning status, use the following.
$ kubectl get persistentvolumeclaims rabbitmq-data
NAME            STATUS    VOLUME                                     CAPACITY   ACCESS MODES   STORAGECLASS   AGE
rabbitmq-data   Bound     pvc-bb7f0615-b35d-11e7-ad06-aee2d2458315   20Gi       RWO            default        22h
Use the command above until you see a STATUS of Bound, which means that the PVC is bound to the cluster and ready to use.
The deployment creates and deploys the RabbitMQ container. Create the deployment as follows.
$ kubectl create -f rabbitmq-deployment.yaml
Note that the deployment creates the following RabbitMQ credentials:
Username:guestPassword:guest
The above credentials will be used when deploying the Spring Stack chart.
In order to expose RabbitMQ to other applications/services, a service needs to be created. Create the service as follows.
$ kubectl create -f rabbitmq-service.yaml
You have successfully deployed RabbitMQ in your cluster!
$ helm init
This initializes the helm client as well as the server side component called tiller.
$ helm repo add ibmcase-spring https://raw.githubusercontent.com/ibm-cloud-architecture/refarch-cloudnative-spring/master/docs/charts/
$ helm install --name spring-stack ibmcase-spring/spring-stack \
--set global.rabbitmq.host=rabbitmq \
--set global.rabbitmq.username=guest \
--set global.rabbitmq.password=guest \
--set spring-config-server.spring.cloud.config.server.git.uri=https://github.com/ibm-cloud-architecture/fortune-teller \
--set spring-config-server.spring.cloud.config.server.git.searchPaths=configuration \
--set spring-eureka-server.service.type=NodePort
After around 5 minutes minutes the containers will be deployed to the cluster and ready to use. The command above does the following:
- Installs all of the individual components' charts:
- Eureka
- Hystrix
- Turbine
- Zuul
- Zipkin
- Config Server
- Sets the installed RabbitMQ service as its message bus
- Sets the YAMLs at https://github.com/ibm-cloud-architecture/fortune-teller/tree/master/configuration as the Spring Config Server source of truth
- Exposes both the Eureka and Hystrix dashboards to the internet via a cluster
NodePort.
You have succesfully deployed the Spring Stack to your cluster! In the following section, we will validate the Spring Stack deployment
In order to validate a successful Spring Stack installation, we need to open the Eureka dashboard on a web browser and see if all of the Spring components show up in the dashboard. Showing on the dashboard means that all of the services booted up successfully and were able to retrieve Eureka dashboard URL from the Spring Config server and, therefore, register themselves against Eureka.
Since we exposed the Eureka service through NodePort, we are going to need to retrieve the following:
- Public IP of any of the cluster's worker nodes
- The port number, or
NodePort, that was randomly assigned toEureka serviceupon deployment.
The approach to get the public IP of any of your worker nodes will vary based on you cluster setup, but the most common way of doing so is as follows:
$ kubectl get nodes
NAME            STATUS    ROLES     AGE       VERSION
167.51.31.123   Ready     <none>    132d      v1.5.6-4+abe34653415733
167.51.31.124   Ready     <none>    132d      v1.5.6-4+abe34653415733
167.51.31.125   Ready     <none>    132d      v1.5.6-4+abe34653415733
The NAME column on the left lists the public IPs of all of your worker nodes. Any of the public IP's will work, so pick one.
If you've installed on minikube you can find the IP with the following.
$ minikube ip
If you've installed on a Kubernetes cluster from IBM Cloud Container Service, you can find the IP with the following
$ bx cs workers ${cluster_name}
To get the Eureka service NodePort, use the following.
$ kubectl get services spring-stack-spring-eureka-server
NAME                                TYPE       CLUSTER-IP     EXTERNAL-IP   PORT(S)          AGE
spring-stack-spring-eureka-server   NodePort   10.10.10.252   <none>        8761:31476/TCP   29m
The NodePort is listed under the PORT(S) column between 8761: and /TCP. In this case, the NodePort is 31476. Just keep in mind that this port number gets assigned randomly and can change if Eureka service was deleted and recreated.
Now that you have the Node IP and the NodePort, open a new browser window and enter the following:
http://${node_ip}:${node_port}
Where,
${node_ip}is theNode IP.${node_port}is theNodePort.
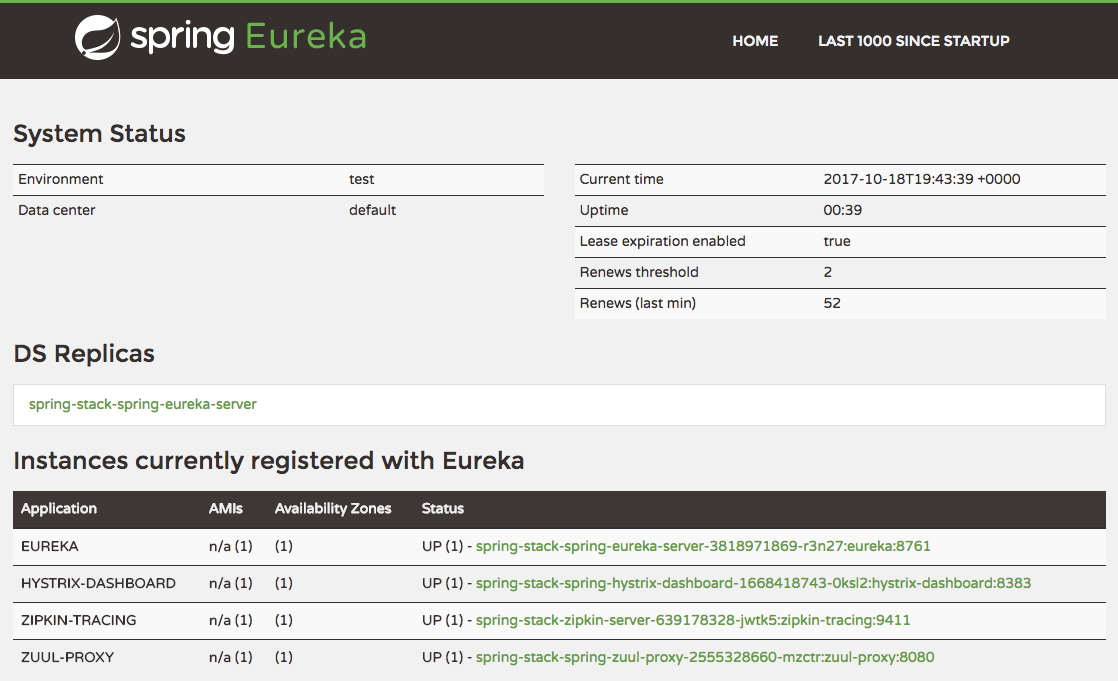
You should see Dashboard similar to the following:
If you can see EUREKA, HYSTRIX-DASHBOARD, ZIPKIN-TRACING, and ZUUL-PROXY listed in the Instances currently registered with Eureka table, that means all of the components are booted up and ready to go!
To delete the Spring Stack and RabbitMQ from your cluster, run the following:
$ helm delete spring-stack --purge
$ kubectl delete services rabbitmq
$ kubectl delete deployments rabbitmq
$ kubectl delete persistentvolumeclaims rabbitmq-data
IBM Cloud Private (ICP) contains integration with Helm that allows you to install the application without the need to go to a command line.
- Click on the three bars in the top left corner, and go to
Catalog. - Search for
RabbitMQ, then click on the first result. - Click
Configurebutton at bottom right. - Enter
rabbitmqforRelease nameand leaveTarget Namespaceasdefault. - Click
Install. - Get the RabbitMQ password as follows:
$ kubectl get secrets rabbitmq-rabbitmq -o=jsonpath='{.data.rabbitmq-password}' | base64 --decode; echo
You will need this password when installing spring-stack chart.
-
Click on the three bars in the top left corner, and go to Admin.
-
Click on the
Repositoriestab -
Click on
Add repository. Use the following values:- Repository Name: ibmcase-spring
- URL: https://raw.githubusercontent.com/ibm-cloud-architecture/refarch-cloudnative-spring/master/docs/charts/
Click
Addto add the repository.
- Click on the three bars in the top left corner, and go to
Catalog. - Search for
spring-stack, then click on the first result. - Click
Configurebutton at bottom right. - Enter
spring-stackforRelease nameand leaveTarget Namespaceasdefault. - Enter the following values for the following fields:
- global.rabbitmq.host:
rabbitmq-rabbitmq - global.rabbitmq.user:
user - global.rabbitmq.password: Password you retrieved after installing
RabbitMQ. - spring-config-server.spring.cloud.config.server.git.uri:
https://github.com/ibm-cloud-architecture/fortune-teller - spring-config-server.spring.cloud.config.server.git.searchPaths:
configuration - spring-eureka-server.service.type:
NodePort
- global.rabbitmq.host:
- Click
Install.

