

The main aim of “GreenCity” project is to teach people in a playful and challenging way to have an eco-friendly lifestyle. A user can view on the map places that have some eco-initiatives or suggest discounts for being environmentally aware (for instance, coffee shops that give a discount if a customer comes with their own cup). А user can start doing an environment-friendly habit and track their progress with a habit tracker.
Here is the front-end part of our project: https://github.com/ita-social-projects/GreenCityClient.
dev branch of the back-end corresponds to dev branch on the front-end. The same thing with master branches.
You're encouraged to contribute to our project if you've found any issues or missing functionality that you would want to see. Here you can see the list of issues and here you can create a new issue.
Before sending any pull request, please discuss requirements/changes to be implemented using an existing issue or by creating a new one. All pull requests should be done into dev branch.
Though there are two GitHub projects (GreenCity for back-end part and GreenCityClient for front-end part) all of the issues are listed in the first one - GreenCity.
NOTE: make sure that your code passes checkstyle. Otherwise your pull request will be declined. See paragraph Setup Checkstyle.
- Java 11
- PostgreSQL 9.5 or higher
-
You should create environmental variables that are defined in
application-dev.properties. -
You should create database
greencity.
All these variables you can set in Intellij Idea. For instance,
spring.datasource.url=${DATASOURCE_URL}
spring.datasource.username=${DATASOURCE_USER}
spring.datasource.password=${DATASOURCE_PASSWORD}
spring.mail.username=${EMAIL_ADDRESS}
spring.mail.password=${EMAIL_PASSWORD}
cloud.name=${CLOUD_NAME}
api.key=${API_KEY}
api.secret=${API_SECRET}
- If you did everything correctly, you should be able access swagger by this URL: http://localhost:8080/swagger-ui.html#/
-
Run GreenCity project (look up paragraph How to run).
-
Use the following link to open Swagger UI: http://localhost:8080/swagger-ui.html#/
-
Use POST method with
/ownSecurity/signUpto create an account. If you set a valid email credentials, you should receive an email with verification link. Verify the registration by following that link. We highly recommend to use gmail, it's free of charge and easy to get going: how to allow email sending from gmail, Google client id. Alternatively you can drop a record inverify_emailtable on your local database. -
Use POST method with
/ownSecurity/signInto sign in. After entering the credentials you should receive access and refresh tokens. -
Copy the given access token and put it into Authentication Header. Press Authorize button.

Insert the given token into input field. The scheme should be like this
Bearer <given_token>. Press Authorize button.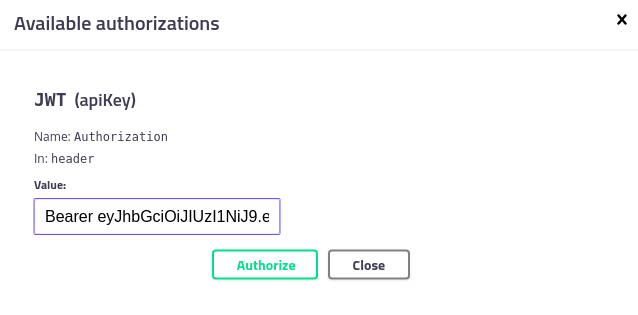
-
Now you can use swagger UI to test REST API. Some controllers require ADMIN role. By default, new registered users have role USER. To overcome this you need to update record that corresponds to your user in the local database. For example,
UPDATE users SET role = 1 WHERE id = <your_user_id>.


There is no special configurations required. Just clone GreenCityClient and run it. If you want to sign in with Google account, it's mandatory to set google.clientId. Read more about how to obtain Google client id, it's free.
Here you can read more about how to set up checkstyle;
Here you can read more about SonarQube Plugin for Intellij Idea;