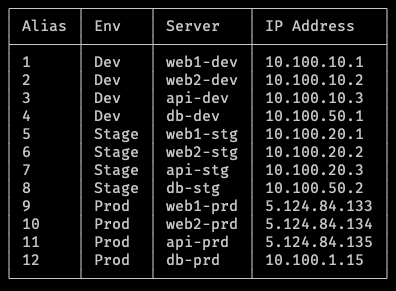
This is a simple shell server menu.
This script will display a server menu each time you open your shell and give you aliases to just type in a server number to connect to it. After disconnecting, it will display what server name you just disconnected from and re-display the server menu.
You can view the server menu anytime by running menu .
mkdir -p ~/bin/
cd ~/bin/
git clone git@bitbucket.org:dhouseholder-ia/server-menu.git
cd server-menugit submodule update --init display-boxesCopy the config-example.txt to example.txt
cp config-example.txt example.txtStep 4. Edit this new config.txt file and update your username, your computer name, server suffix, and list of servers.
vim config.txtFollow the comments and examples. The default format is:
ENV:SERVERHOSTNAME
If you need to use a different username for different servers, leave the username field blank and add the username before the servername using the following format:
ENV:USER@SERVERHOSTNAME
For example:
Prod:jimmy@app1-prod
source ~/bin/server-menu/server-menu.sh
set_title
menuClose your terminal and re-open it. You should immediately see the menu.
If you need to update any servers, just edit the config.txt file, and add/edit the servers in the servers array, then save the file. Finally, run generate_menu to update the server list, and run menu to see the updated menu.
