You need to backup profiles before upgrade, if you have a version lower than 0.4.6.
Some settings had been moved from profile.ini to setting.ini since version 0.5.0 (alpha).
V2Net is a network assistant tool for macOS.
It focuses on extendability, with all extensions working in a way of proxy chains.
Some popular network tools are integrated, with the ability of adding new extensions without programming:
- Proxy: gost glider v2ray ss-libev
- Bypass: gost glider privoxy
- Capture: whistle mitmproxy/mitmweb charles
This is an alpha version.
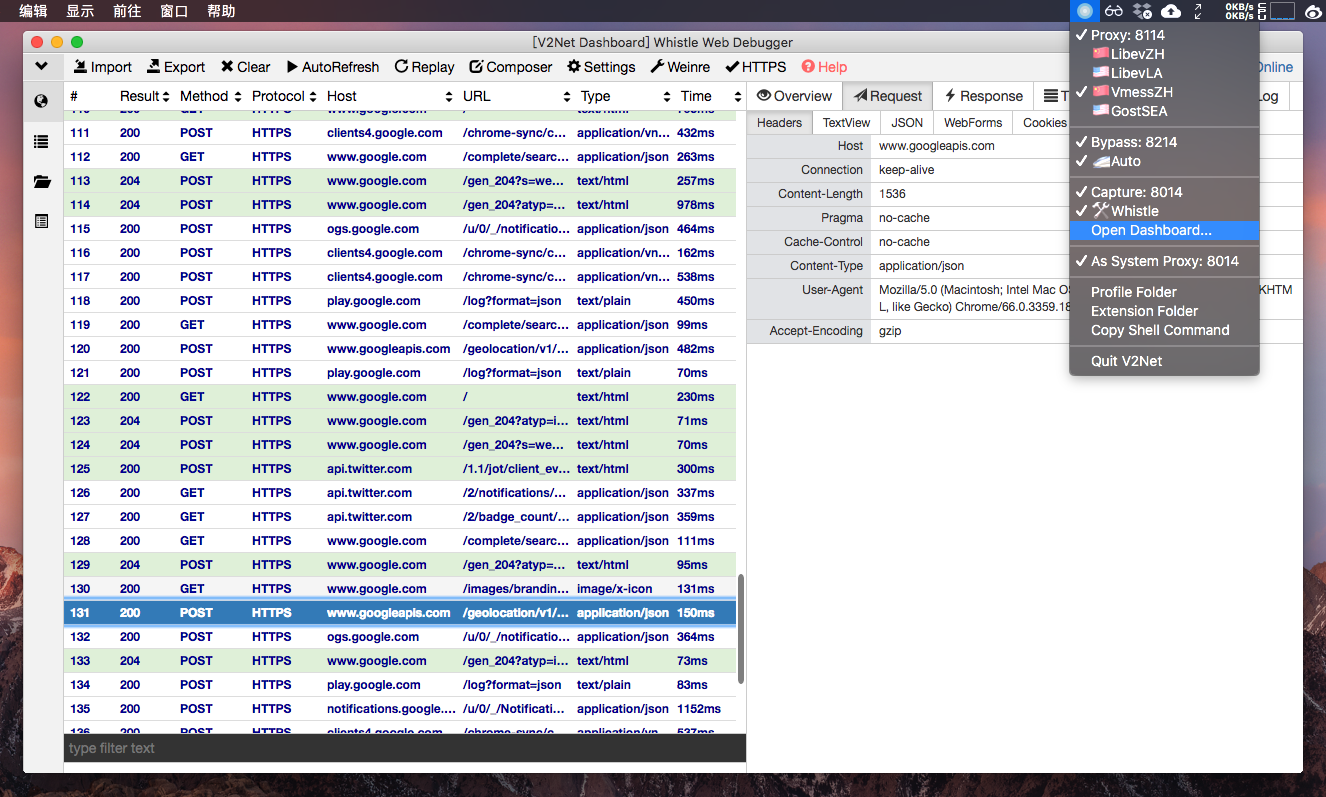
System tray menu:
Choose mitmproxy CLI tool:
Show whistle dashboard page in built-in browser (removed since 0.4.0, show in Safari instead):
Install prerequisites if only you need the related extension.
Node.js and whistle are needed.
Install with Homebrew:
brew install node
npm install -g whistleInstall with Homebrew:
brew install v2ray/v2ray/v2ray-coreCurrently only vmess+ws+tls support, but you can customize to support more. Or just use the glider extension instead, which is recommended.
Install with Homebrew:
brew install shadowsocks-libevOr just use the glider extension instead, which is recommended.
If you use non-AEAD encryption, gost extension is also a choice.
Install with Homebrew:
sudo mkdir /usr/local/sbin
sudo chown -R `whoami`:admin /usr/local/sbin
brew install privoxy
Or just use the gost or glider extension instead, which are recommended.
Python3 and mitmproxy are needed.
Install mitmproxy with Homebrew, which will automatically install/upgrade python3:
brew install mitmproxySince mitmproxy depends on python3, it will not work if you want to use an older version of python3 from Homebrew, like me. Then you need to download from official site, unpack and move/link binaries to /usr/local/bin.
Instead, install whistle which is recommended.
Buy and install charles.
Download latest release:
https://github.com/deepjia/v2net/releases
Unpack and drag V2Net.app to Application folder.
Go to 'System Preferences' - 'Users & Groups' - 'Login Items', add 'V2Net' so as to start at login.
Open Application folder, right click on V2Net.app, hold option key, click Open.
(Optional) Click Edit Setting File, set custom-path to store config files. In this way, your config can sync with iCloud Drive/Dropbox, etc.
Example of setting.ini:
[Global]
custom-path =
# PATH in env
env-path = /usr/local/bin:/usr/bin:/bin:/usr/sbin:/sbin
# proxy/bypass/capture: extensions selected last time, will be filled automatically
proxy =
bypass =
capture =
# system: whether V2Net is set as system proxy last time, will be filled automatically
system = false
# Port settings
port = 8014
port-proxy = 8114
port-bypass = 8214
Click Open Profile Folder, and edit your profiles.
Example of profile.ini:
[General]
loglevel = INFO
skip-proxy = 127.0.0.1, 192.168.0.0/16, 10.0.0.0/8, 172.16.0.0/12, 100.64.0.0/10, localhost, *.local, ::ffff:0:0:0:0/1, ::ffff:128:0:0:0/1

[Proxy]
# The order of values is defined in "keys" field of extension.json in extension folders
# name = extension_name, *values
# For gost and glider, you can combine proxy and bypass:
🇨🇳Eg.ProxyAndBypass(glider)(ss)ExampleProxy = glider, ss, AEAD_CHACHA20_POLY1305:password@server_ip, 12345, glider.txt
🇯🇵Eg.ProxyAndBypass(gost)(ss)ExampleProxy = gost, ss, chacha20:password@server_ip, 12345, gost.txt
🇨🇳Eg.ProxyAndBypass(glider)(vmess)ExampleProxy = glider, vmess, [security:]uuid@server_ip, 12345?alterID=num, glider.txt
# gost and glider support RFC protocols:
🇯🇵Eg.Proxy(gost)(socks5)ExampleProxy = gost, socks5, server_ip, 12345
🇺🇸Eg.Proxy(gost)(http)ExampleProxy = gost, http, server_ip, 8080
🇨🇳Eg.Proxy(gost)(https)ExampleProxy = gost, https, user:password@server_ip, 443
# for ss protocol, gost may have better stablity than glider, but do not support AEAD
# gost support:
#    aes-128-cfb, aes-192-cfb, aes-256-cfb, bf-cfb, cast5-cfb, des-cfb, rc4-md5, rc4-md5-6, chacha20, salsa20, rc4, table
# glider support:
#    AEAD_AES_128_GCM AEAD_AES_192_GCM AEAD_AES_256_GCM AEAD_CHACHA20_POLY1305 AES-128-CFB AES-128-CTR AES-192-CFB AES-192-CTR AES-256-CFB AES-256-CTR CHACHA20-IETF XCHACHA20 CHACHA20 RC4-MD5
🇯🇵Eg.Proxy(gost)(ss)ExampleProxy = gost, ss, chacha20:password@server_ip, 12345, gost.txt
🇨🇳Eg.Proxy(glider)(ss)ExampleProxy = glider, ss, AEAD_AES_256_GCM:password@server_ip, 12345
# Glider support muti-protocol:
🇨🇳Eg.ProxyAndBypass(glider)(vmess-tls-ws)ExampleProxy = glider, tls, example.com, 443, , ws://@/path, vmess://[security:]uuid@server_ip, 12345?alterID=num
# Other extensions need prerequisites:
🇨🇳️Eg.Proxy(ss-libev)(ss)ExampleProxy = ss-libev, server_ip, 12345, chacha20-ietf-poly1305, password
🇨🇳Eg.Proxy(v2ray)(vmess-tls-ws)ExampleProxy = v2ray, example.org, 443, /ws, ID, alterID

[Bypass]
# Same as proxy, gost and glider are preferred:
🚄Eg.Bypass(glider)(auto)GliderBypass = glider, , 127.0.0.1, , glider.txt
🚄Eg.Bypass(gost)(auto)GostBypass = gost, , 127.0.0.1, , gost.txt
🚄Eg.Bypass(privoxy)(auto)PrivoxyBypass = privoxy, , 127.0.0.1, , privoxy.txt

[Capture]
# Same as proxy, whistle recommended:
🛠️Eg.Capture(whistle)(auto)Whistle = whistle
🛠️Eg.Capture(mitmweb)(auto)mitmproxy = mitmproxy
🛠️Eg.Capture(mitmweb)(auto)mitmweb = mitmweb
🛠️Eg.Capture(whistle)(auto)WhistleCustomRule = whistle, whistle.txt
# You can also put global proxies here:
🛠️Eg.Capture(gost)(http)JMeter = gost, http, 127.0.0.1, 8888
🛠Eg.Capture(gost)(http)Charles = gost, http, 127.0.0.1, 8888
🛠️Eg.Capture(gost)(http)BurpSuite = gost, http, 127.0.0.1, 8080
-
Open
Extension Folder -
Enter/Create specific
Extension Directroy -
Modify/Create
extension.yaml(extension.jsonis okay too.)bin: Main binary of extensions.
pre: Preparation command.
args: Arguments for binary to start with.
exitargs: Arguments for binary to quit with.(If left blank, binary process will be stopped when stopping the extension)
url: Dashboard url for capture extension.
keys: Keys to render by jinja2, whose values are in
profile.inihttp: Whether the extension serve as a http proxy.
socks5: Whether the extension serve as a socks5 proxy
render: Render the template files in
Extension Directroydefault: Default vaules to render.
# json is also supported
bin: "{{ ExtensionDir }}/bin/mybinary"
args: "-p {{ ExtensionPort }} -c '{{ TempDir }}/myconfig.ini'"
exitargs: ""
url: "http://127.0.0.1:{{ ExtensionPort }}"
keys:
  - "ServerProtocol"
  - "ServerAddress"
  - "SeverPort"
  - "ServerPassword"
http: false
socks5: true
render:
  "{{ ExtensionDir }}/mytemplate.jinja": "{{ TempDir }}/myconfig.ini"
default:
  ServerAddress: "example.com"
jinja2 is used as render engine, which render {{ key }} as values from the
profile.inias well as from default values, which also supports logic causes like {% if %} {% endif %}.Specially:
- {{ ExtensionPort }} will always be rendered as the proper value depending on your settings in
profile.ini - {{ ExtensionDir }} and {{ TempDir }} are reserved.
- If an extension is running as a secondary proxy, {{ ServerPort }} and {{ ServerProtocol }} will be automatically rendered as
httporsocks5when left blank.
- {{ ExtensionPort }} will always be rendered as the proper value depending on your settings in
# PyInstaller & py2app do not support python 3.7
brew install https://raw.githubusercontent.com/Homebrew/homebrew-core/f2a764ef944b1080be64bd88dca9a1d80130c558/Formula/python.rb
brew switch brew switch python 3.6.5_1
git clone https://github.com/deepjia/v2net.git
cd v2net
python3 -m venv venv
source venv/bin/activate
pip install -r requirements.txt
pyinstaller v2net.spec
# You can also use py2app
# pip install py2app
# python setup.py py2app- Proxy group with connection test


