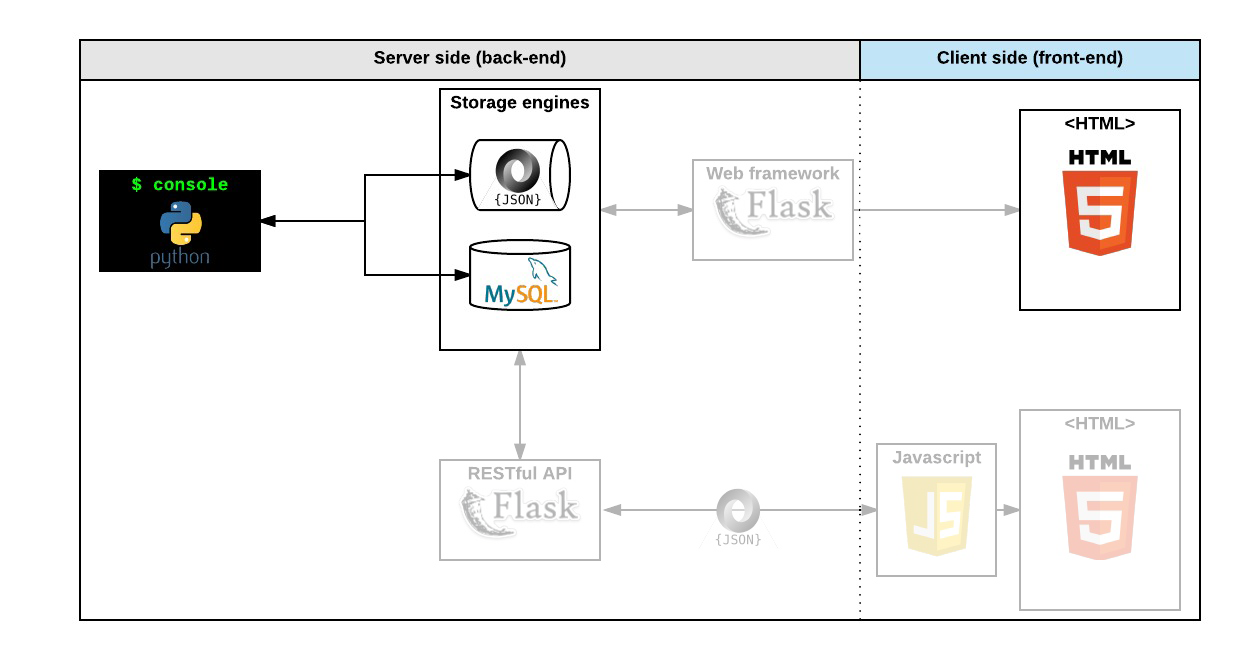
This repository is the initial stage of a Python implementation for an AirBnB clone, featuring a command-line interface (CLI) console, developed as part of a student project to replicate the functionality of the AirBnB website. The CLI console serves as the initial backend interface, facilitating user interaction and enabling CRUD (Create, Read, Update, Delete) operations on various data objects and user account management. It ensures data persistence through JSON serialization/deserialization between sessions, allowing users to manage program data effectively. This stage lays the groundwork for subsequent projects, including HTML/CSS templating, database storage, API development, and front-end integration, establishing core functionality and data management capabilities.
- CLI console for managing AirBnB objects.
- Facilitates CRUD operations and user account management.
- Ensures data persistence through JSON serialization/deserialization.
- Lays the groundwork for subsequent stages, including HTML/CSS templating, database storage, API development, and front-end integration.
Stage 1: Console Development
This initial stage involves the development of the command-line interpreter to manage AirBnB objects, serving as the foundation for the project.
Stage 2: Static Page Development
In the second stage, the project involves creating static pages essential for the AirBnB website to enhance the user interface and experience.
Future Stages:
Subsequent stages will focus on further enhancing functionality, integrating backend and frontend components, and achieving a fully functional AirBnB clone.
- Concepts
- Background Context
- Resources
- Learning Objectives
- Requirements
- GitHub
- More Info
- Outlined Project Tasks
- Structured Overview of Repository Contents
- 0. README, AUTHORS
- 1. Be pycodestyle compliant!
- 2. Unittests
- 3. BaseModel)
- 4. Create BaseModel from dictionary
- 5. Store first object
- 6. Console 0.0.1
- 7. Console 0.1
- 8. First User
- 9. More classes!
- 10. Console 1.0
- 11. All instances by class name
- 12. Count instances
- 13. Show
- 14. Destroy
- 15. Update
- 16. Update from dictionary
- 17. Unittests for the Console!
- Author
For this project, we expect you to look at these concepts:


AirBnB clone


 Step 1: The console
 Step 2: Web static
 Step 3: MySQL storage
 Step 4: Web framework - templating
 Step 5: RESTful API
 Step 6: Web dynamic


- Links from screenshot

Before starting, please read the AirBnB concept page.
First step: Write a command interpreter to manage your AirBnB objects. This is the first step towards building your first full web application: the AirBnB clone. This first step is very important because you will use what you build during this project with all other following projects: HTML/CSS templating, database storage, API, front-end integration…
Each task is linked and will help you to:
- put in place a parent class (called
BaseModel) to take care of the initialization, serialization and deserialization of your future instances - create a simple flow of serialization/deserialization: Instance <-> Dictionary <-> JSON string <-> file
- create all classes used for AirBnB (
User,State,City,Place…) that inherit fromBaseModel - create the first abstracted storage engine of the project: File storage.
- create all unittests to validate all our classes and storage engine
Do you remember the Shell? It’s exactly the same but limited to a specific use-case. In our case, we want to be able to manage the objects of our project:
- Create a new object (ex: a new User or a new Place)
- Retrieve an object from a file, a database etc…
- Do operations on objects (count, compute stats, etc…)
- Update attributes of an object
- Destroy an object
Read or watch:
- cmd module
- cmd module in depth
- packages concept page
- uuid module
- datetime
- unittest module
- args/kwargs
- Python test cheatsheet
- cmd module wiki page
- python unittest
At the end of this project, you are expected to be able to explain to anyone, without the help of Google:
- How to create a Python package
- How to create a command interpreter in Python using the
cmdmodule - What is Unit testing and how to implement it in a large project
- How to serialize and deserialize a Class
- How to write and read a JSON file
- How to manage
datetime - What is an
UUID - What is
*argsand how to use it - What is
**kwargsand how to use it - How to handle named arguments in a function
- Allowed editors:
vi,vim,emacs - All your files will be interpreted/compiled on Ubuntu 20.04 LTS using python3 (version 3.8.5)
- All your files should end with a new line
- The first line of all your files should be exactly
#!/usr/bin/python3 - A
README.mdfile, at the root of the folder of the project, is mandatory - Your code should use the pycodestyle (version
2.8.*) - All your files must be executable
- The length of your files will be tested using
wc - All your modules should have a documentation (
python3 -c 'print(__import__("my_module").__doc__)') - All your classes should have a documentation (
python3 -c 'print(__import__("my_module").MyClass.__doc__)') - All your functions (inside and outside a class) should have a documentation (
python3 -c 'print(__import__("my_module").my_function.__doc__)'andpython3 -c 'print(__import__("my_module").MyClass.my_function.__doc__)') - A documentation is not a simple word, it’s a real sentence explaining what’s the purpose of the module, class or method (the length of it will be verified)
- Allowed editors:
vi,vim,emacs - All your files should end with a new line
- All your test files should be inside a folder
tests - You have to use the unittest module
- All your test files should be python files (extension:
.py) - All your test files and folders should start by
test_ - Your file organization in the tests folder should be the same as your project
- e.g.,
For models/base_model.py, unit tests must be in:tests/test_models/test_base_model.py - e.g., For
models/user.py, unit tests must be in:tests/test_models/test_user.py - All your tests should be executed by using this command:
python3 -m unittest discover tests - You can also test file by file by using this command:
python3 -m unittest tests/test_models/test_base_model.py - All your modules should have a documentation (
python3 -c 'print(__import__("my_module").__doc__)') - All your classes should have a documentation (
python3 -c 'print(__import__("my_module").MyClass.__doc__)') - All your functions (inside and outside a class) should have a documentation (
python3 -c 'print(__import__("my_module").my_function.__doc__)'andpython3 -c 'print(__import__("my_module").MyClass.my_function.__doc__)') - We strongly encourage you to work together on test cases, so that you don’t miss any edge case
There should be one project repository per group. If you clone/fork/whatever a project repository with the same name before the second deadline, you risk a 0% score.
Your shell should work like this in interactive mode:
$ ./console.py
(hbnb) help

Documented commands (type help <topic>):
========================================
EOF  help  quit

(hbnb)
(hbnb)
(hbnb) quit
$
But also in non-interactive mode: (like the Shell project in C)
$ echo "help" | ./console.py
(hbnb)

Documented commands (type help <topic>):
========================================
EOF  help  quit
(hbnb)
$
$ cat test_help
help
$
$ cat test_help | ./console.py
(hbnb)

Documented commands (type help <topic>):
========================================
EOF  help  quit
(hbnb)
$
All tests should also pass in non-interactive mode: $ echo "python3 -m unittest discover tests" | bash


-
First, clone this repository to your local machine.
-
Once the repository is cloned, locate the "console.py" file and run it using the following command in your terminal:
/AirBnB_clone$ ./console.py
- After running the command, you should see the following prompt indicating that you're in the "HBnB" console:
(hbnb)
- Now, you can use a variety of commands available within the console program to create and manipulate objects.
* create - Creates an instance based on given class

* destroy - Destroys an object based on class and UUID

* show - Shows an object based on class and UUID

* all - Shows all objects the program has access to, or all objects of a given class

* update - Updates existing attributes an object based on class name and UUID

* quit - Exits the program (EOF will as well)
Users are able to issue a number of console command using an alternative syntax:
Usage: <class_name>.<command>([<id>[name_arg value_arg]|[kwargs]])
Advanced syntax is implemented for the following commands:
* all - Shows all objects the program has access to, or all objects of a given class

* count - Return number of object instances by class

* show - Shows an object based on class and UUID

* destroy - Destroys an object based on class and UUID

* update - Updates existing attributes an object based on class name and UUID
Usage: create <class_name>
(hbnb) create BaseModel
(hbnb) create BaseModel
3aa5babc-efb6-4041-bfe9-3cc9727588f8
(hbnb)
Usage: show <class_name> <_id>
(hbnb) show BaseModel 3aa5babc-efb6-4041-bfe9-3cc9727588f8
[BaseModel] (3aa5babc-efb6-4041-bfe9-3cc9727588f8) {'id': '3aa5babc-efb6-4041-bfe9-3cc9727588f8', 'created_at': datetime.datetime(2020, 2, 18, 14, 21, 12, 96959),
'updated_at': datetime.datetime(2020, 2, 18, 14, 21, 12, 96971)}
(hbnb)
Usage: destroy <class_name> <_id>
(hbnb) destroy BaseModel 3aa5babc-efb6-4041-bfe9-3cc9727588f8
(hbnb) show BaseModel 3aa5babc-efb6-4041-bfe9-3cc9727588f8
** no instance found **
(hbnb)
Usage: update <class_name> <_id>
(hbnb) update BaseModel b405fc64-9724-498f-b405-e4071c3d857f first_name "person"
(hbnb) show BaseModel b405fc64-9724-498f-b405-e4071c3d857f
[BaseModel] (b405fc64-9724-498f-b405-e4071c3d857f) {'id': 'b405fc64-9724-498f-b405-e4071c3d857f', 'created_at': datetime.datetime(2020, 2, 18, 14, 33, 45, 729889),
'updated_at': datetime.datetime(2020, 2, 18, 14, 33, 45, 729907), 'first_name': 'person'}
(hbnb)
Usage: <class_name>.all()
(hbnb) User.all()
["[User] (99f45908-1d17-46d1-9dd2-b7571128115b) {'updated_at': datetime.datetime(2020, 2, 19, 21, 47, 34, 92071), 'id': '99f45908-1d17-46d1-9dd2-b7571128115b', 'created_at': datetime.datetime(2020, 2, 19, 21, 47, 34, 92056)}", "[User] (98bea5de-9cb0-4d78-8a9d-c4de03521c30) {'updated_at': datetime.datetime(2020, 2, 19, 21, 47, 29, 134362), 'id': '98bea5de-9cb0-4d78-8a9d-c4de03521c30', 'created_at': datetime.datetime(2020, 2, 19, 21, 47, 29, 134343)}"]
Usage: <class_name>.destroy(<_id>)
(hbnb) User.destroy("99f45908-1d17-46d1-9dd2-b7571128115b")
(hbnb)
(hbnb) User.all()
(hbnb) ["[User] (98bea5de-9cb0-4d78-8a9d-c4de03521c30) {'updated_at': datetime.datetime(2020, 2, 19, 21, 47, 29, 134362), 'id': '98bea5de-9cb0-4d78-8a9d-c4de03521c30', 'created_at': datetime.datetime(2020, 2, 19, 21, 47, 29, 134343)}"]
Usage: <class_name>.update(<_id>, <attribute_name>, <attribute_value>)
(hbnb) User.update("98bea5de-9cb0-4d78-8a9d-c4de03521c30", name "Todd the Toad")
(hbnb)
(hbnb) User.all()
(hbnb) ["[User] (98bea5de-9cb0-4d78-8a9d-c4de03521c30) {'updated_at': datetime.datetime(2020, 2, 19, 21, 47, 29, 134362), 'id': '98bea5de-9cb0-4d78-8a9d-c4de03521c30', 'name': 'Todd the Toad', 'created_at': datetime.datetime(2020, 2, 19, 21, 47, 29, 134343)}"]
Usage: <class_name>.update(<_id>, )
(hbnb) User.update("98bea5de-9cb0-4d78-8a9d-c4de03521c30", {'name': 'Fred the Frog', 'age': 9})
(hbnb)
(hbnb) User.all()
(hbnb) ["[User] (98bea5de-9cb0-4d78-8a9d-c4de03521c30) {'updated_at': datetime.datetime(2020, 2, 19, 21, 47, 29, 134362), 'name': 'Fred the Frog', 'age': 9, 'id': '98bea5de-9cb0-4d78-8a9d-c4de03521c30', 'created_at': datetime.datetime(2020, 2, 19, 21, 47, 29, 134343)}"]
To generate the file.json file that stores serialized objects, follow these steps:
- Open the console by running the
console.pyscript in your terminal:
/AirBnB_clone$ ./console.py
-
Once the console is open, you can use the available commands to create, update, and manipulate instances of classes.
-
Use the
createcommand to instantiate objects. For example:
(hbnb) create User email="example@example.com" password="password123" first_name="John" last_name="Doe"
-
After creating, the
FileStorageclass, defined inmodels/engine/file_storage.py, automatically handles the serialization of objects to thefile.jsonfile. -
Once you have saved your changes to
file.json, you can exit the console by using thequitcommand:
(hbnb) quit
Now, the file.json file should contain the serialized information of the objects you created. Once you've created the objects you need, you can verify that they've been serialized to file.json by checking the contents of the file. The FileStorage class manages the serialization and deserialization of objects, ensuring that your data is saved and loaded correctly between console sessions.
For a list of contributors to this project, please refer to the AUTHORS file.