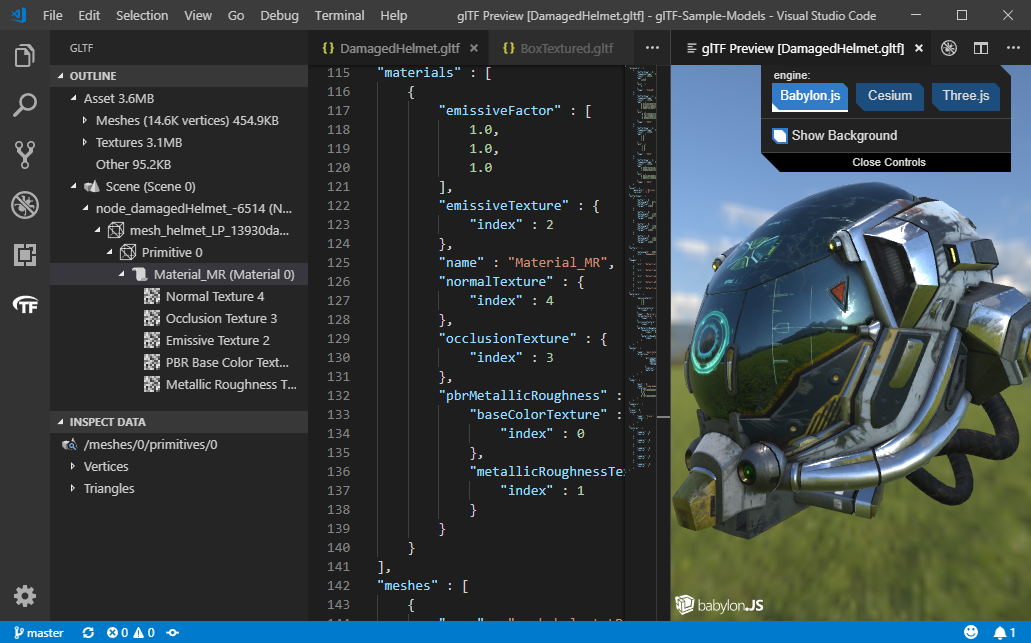
Command name: glTF: Preview 3D Model, default keybinding: ALT + G
The above model, other sample models, and associated licenses can be obtained from the glTF-Sample-Models repository.
You can preview glTF files in a number of different rendering engines: BabylonJS, Cesium, and ThreeJS. The ThreeJS engine will preview the saved model as opposed to the current content in your open VS Code tab. The Babylon and Cesium engines will first try to preview what is currently in your tab, and only if that fails will it fall back on displaying the version of the model saved on disk.
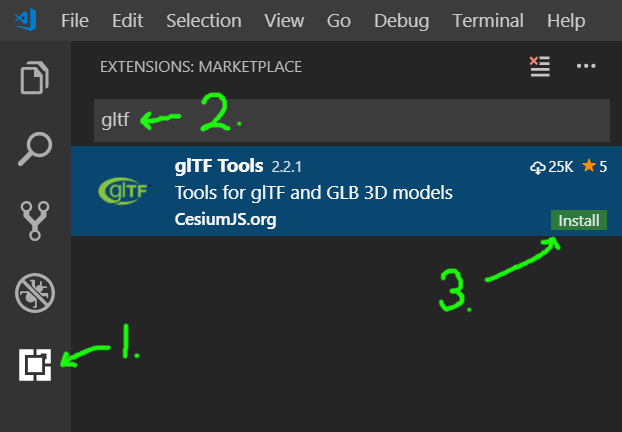
Once you have Visual Studio Code installed, the next steps are simple:
If you wish to build this from source code, see Developer Environment.
Command name: glTF: Export to GLB (Binary file)
The glTF 3D model format comes in two varieties: *.gltf is a JSON-based text file, easily editable with this VS Code extension, often with references to external files such as texturemaps and binary mesh data. *.glb is a binary version, typically smaller and self-contained, but not easily editable.
The glTF: Export to GLB (Binary file) command will export your text-based glTF from the editor to a binary .glb file. In the exported version, whitespace in the JSON is stripped out, external file references are read in and converted to GLB binary bufferViews, and the resulting file becomes a self-contained transportable file that can be easily shared.
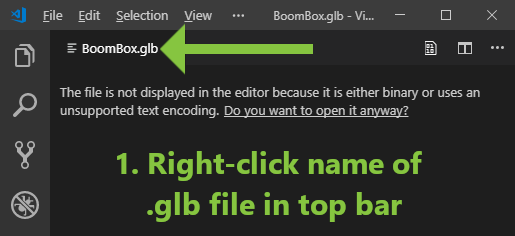
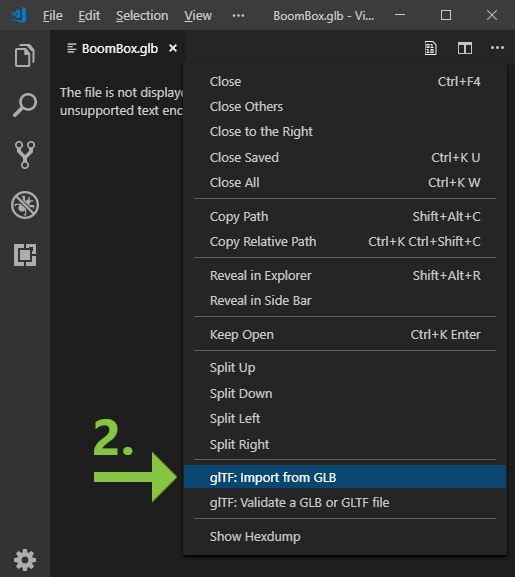
Command name: glTF: Import from GLB
The glTF: Import from GLB command will convert a binary .glb to JSON-based .gltf for editing, creating a separate file for the binary and additional files for each of the included images. Note that during import, some filenames are calculated based on the target filename of the output .gltf. For example, importing a sample file BoomBox.glb to .gltf may create the following files:
BoomBox.gltf- The JSON structure.BoomBox_data.bin- The binary mesh dataBoomBox_img0.png- Image file(s) extracted from the GLBBoomBox_img1.pngBoomBox_img2.pngBoomBox_img3.png
The user is given a "Save As..." dialog for the base .gltf output filename only. The other files are saved to the same folder with names calculated by appending to the user's selected base name, and any pre-existing files with the same name will be overwritten.
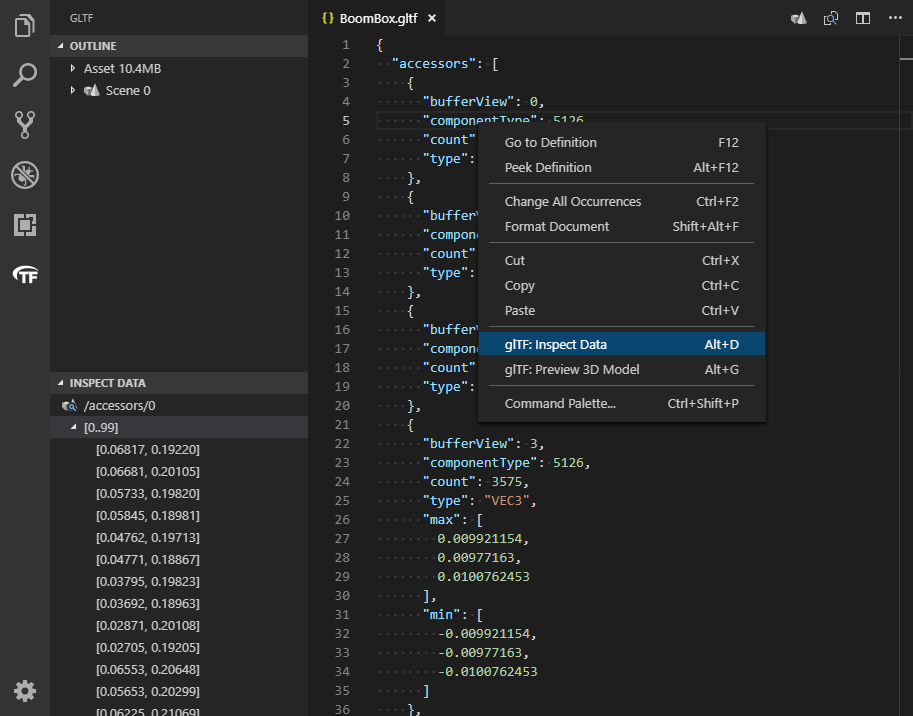
Command name: glTF: Inspect Data, default keybinding: ALT + D
Above, the user is inspecting the first accessor that is part of the BoomBox.gltf model from the official sample model repository. Place the document cursor on shaders, images, accessors, or mesh primitives then select the glTF: Inspect Data command to inspect the data. The command works for files or data-URIs.
If you plan to preview GLSL shader code, consider installing a 3rd-party syntax highlighter with support for the *.glsl extension, for example Shader Language Support for VSCode by slevesque, to enable syntax highlighting in shader previews.
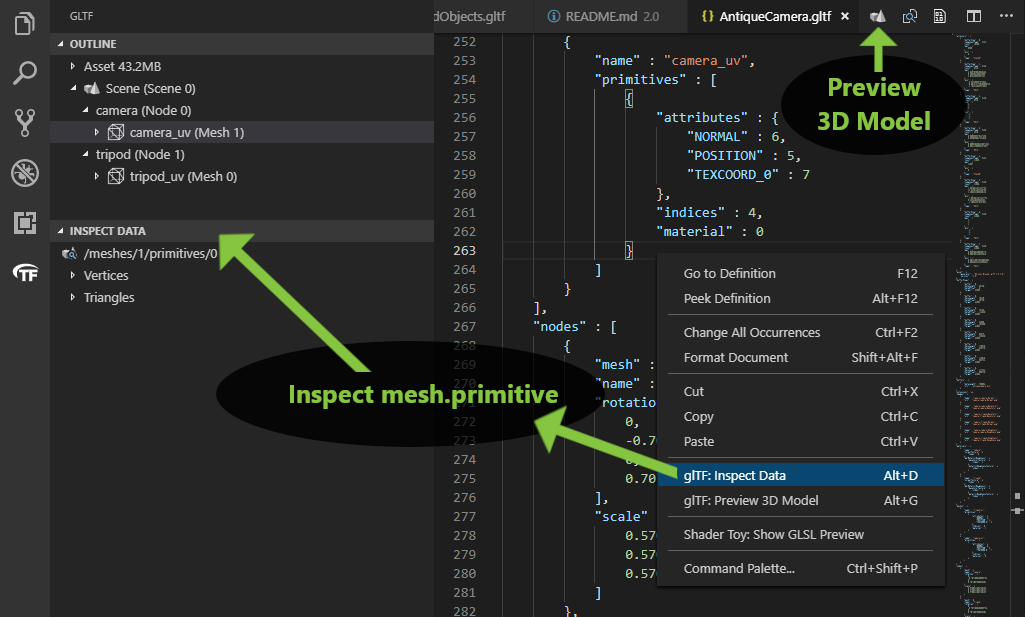
When editing a glTF file, an icon with the glTF logo is visible in the left bar. This outline view reveals the structure of the glTF file and its internal references. This is a different structure than the plain JSON outline that keeps objects grouped by type.
You can also inspect the vertex and triangle data from a selected mesh primitive.
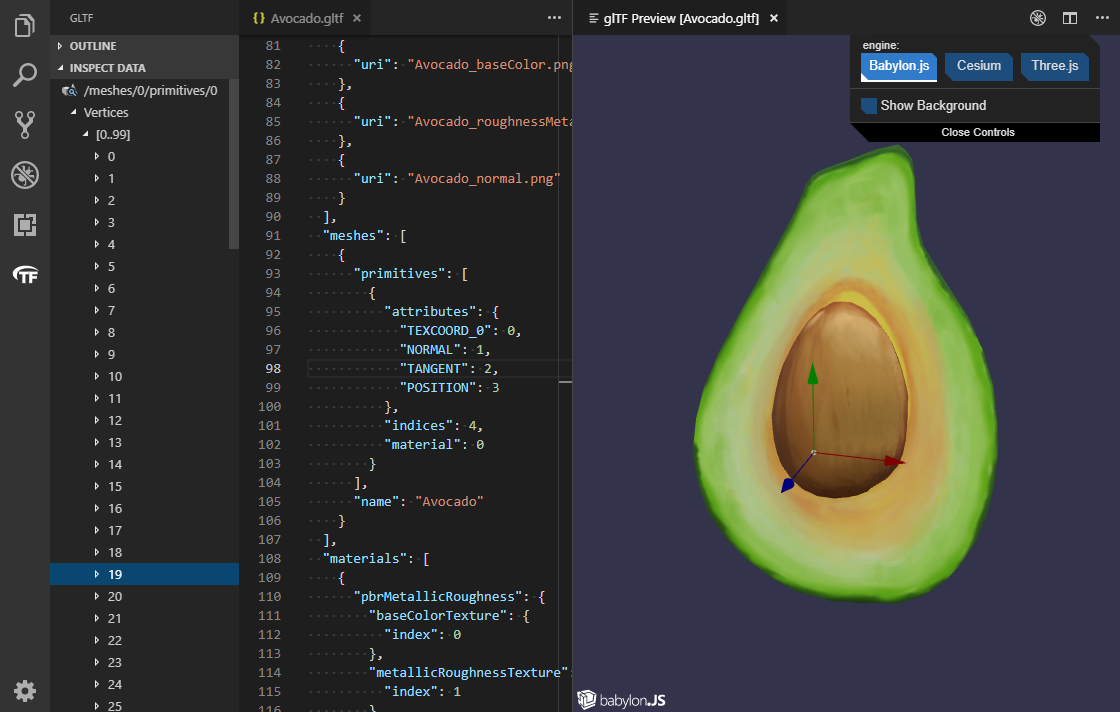
Debugging mesh primitive data can be achieved by opening the preview window at the same time as inspecting the mesh primitive data.
Note that this feature is currently only supported when Babylon.js is the rendering engine.
For example, selecting a vertex will show the axes for that vertex. If multiple vertices are selected, each vertex will show an axes.
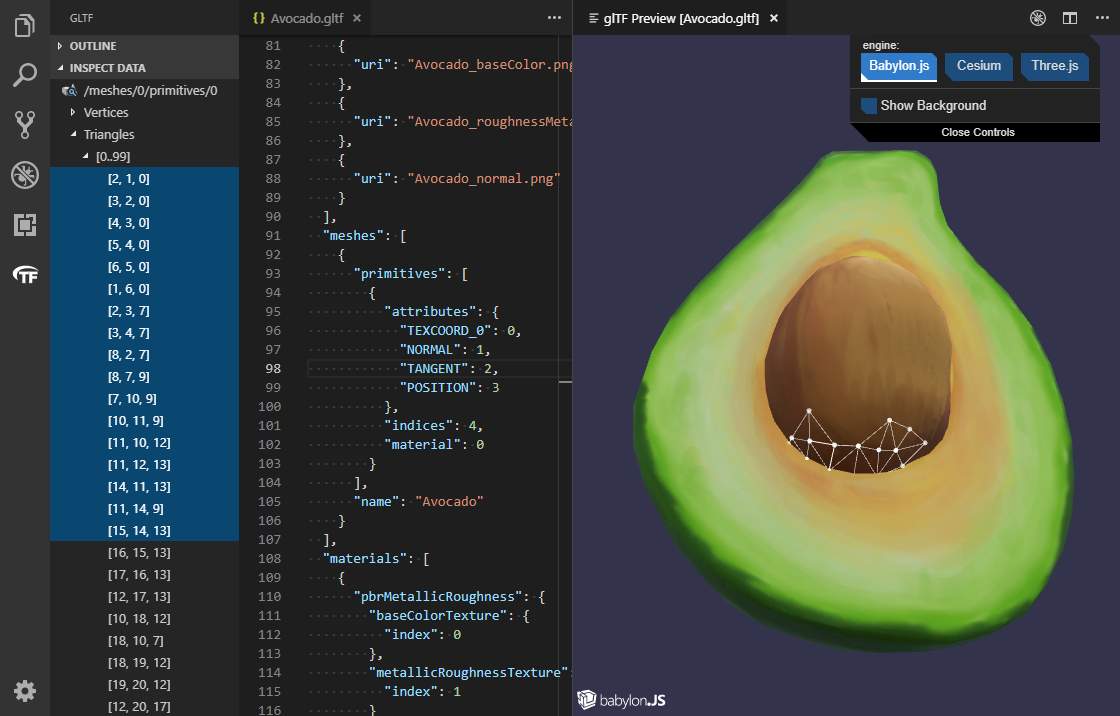
Here is an example of selecting triangles. Multi-select is available by holding down SHIFT and using the arrow keys.
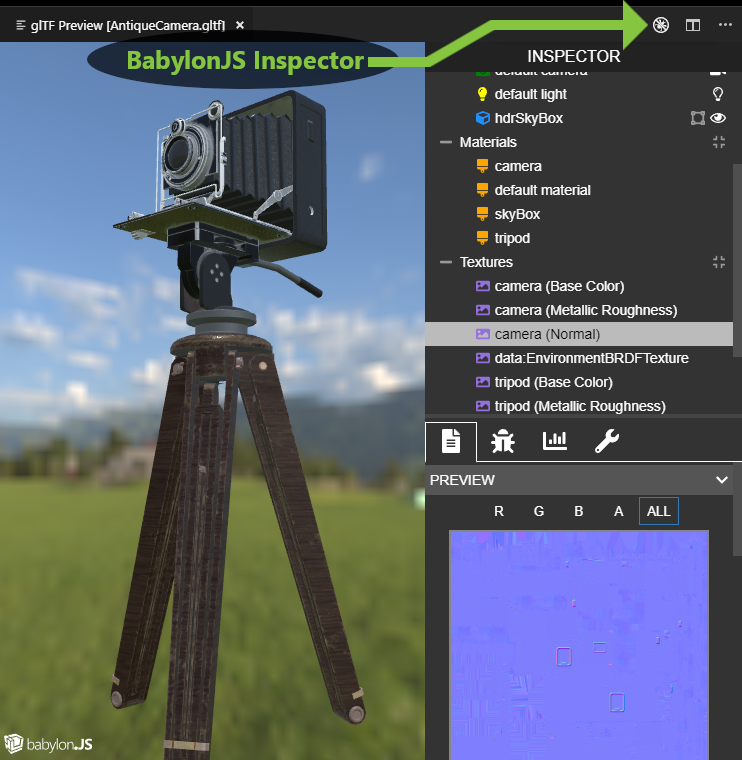
When previewing a model with the BabylonJS engine, click the little debug icon at the top to activate the Inspector. This inspector has been recently added, and not all of its tools are working inside of VSCode at this time. But, it can show model wireframes, point clouds, normal vectors, individual texture channels, and even allow temporary re-positioning of model nodes (although position changes are not copied back to the glTF document in this version).
See the Babylon Inspector Documentation for more information about this tool.
Files can be validated three different ways:
-
The official Khronos glTF Validator runs automatically on glTF 2.0 files, and reports any issues it finds to the document's "Problems" window. All such messages are marked with a
[glTF Validator]prefix. This goes far beyond simple JSON validation, as it reads in external data and image files, and looks at mesh data itself for errors such as non-normalized normal vectors and inaccurate bounding volumes. -
The same glTF Validator can also run as a manual process, by issuing the command
glTF: Validate a GLB or GLTF file. This can be done by right-clicking a file in the VSCode File Explorer sidebar, or just running the command stand-alone to open a file dialog. This is the only method in this extension to validate GLB files directly, without conversion. A summary of the validation report appears in a popup, along with an option to save the JSON report. -
The glTF JSON schema is registered with VSCode for
*.gltffiles, and VSCode will find schema violations using its own JSON schema validation, without help from the glTF Validator. This produces messages in the "Problems" window that are not marked[glTF Validator]. This is less thorough than full glTF validation, but is the only method available to glTF 1.0 files.
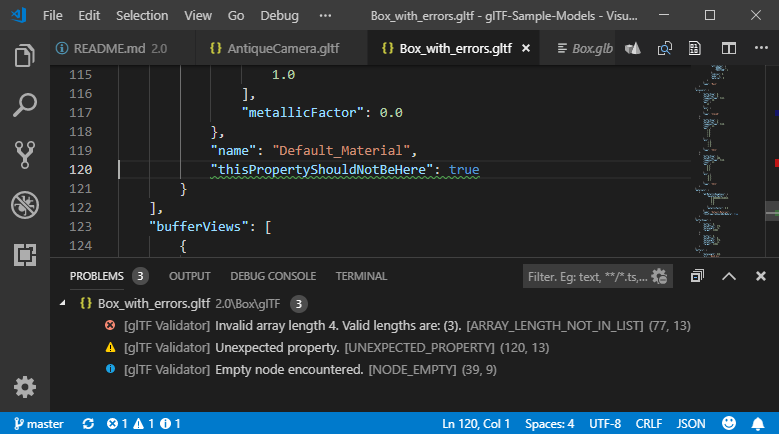
In the screenshot below, the Khronos glTF Validator is displaying one error, one warning, and one info. If you see these in your own files, you can click a line in the bottom window to scroll to the source of the message. In case of errors in binary data, the editor will scroll to the glTF accessor that references that data.
Even if the PROBLEMS window is not visible, some icons down in the bottom footer show a summary of the validation messages. Click these icons to reveal the PROBLEMS window.
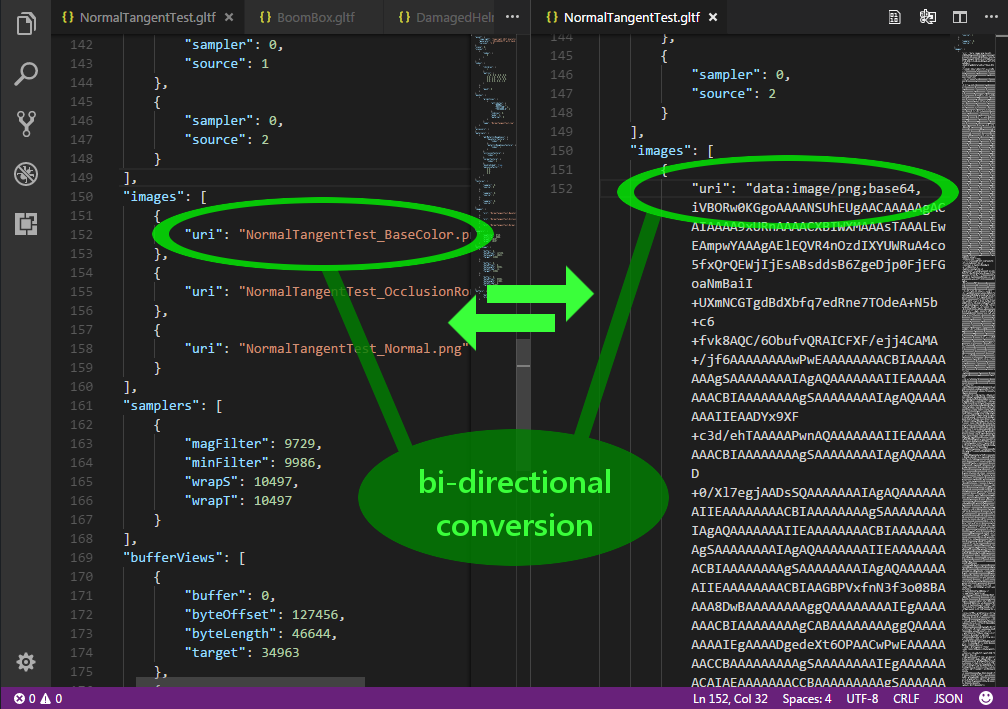
In the list of commands (CTRL + SHIFT + P), there are two commands named glTF: Import file as Data URI and glTF: Export a Data URI to a file. To use these, place the document cursor on a block that contains a "uri" field. If the value of this field is a valid filename, Import will load that file, encode it to base64, and replace the filename with the dataURI in your document. Export is the reverse of this process, but first it will ask you for a filename to save to. It will save the file in the same folder as the glTF file, so it does not need a path, just a name. It will try to select an appropriate file extension based on the MIME type of the dataURI. It will also warn you if you are about to overwrite an existing file. If the save is successful, the dataURI will be replaced by the name of the newly created file.
Place the cursor on the 3 in "POSITION": 3 and press F12 to navigate to the defining Accessor.
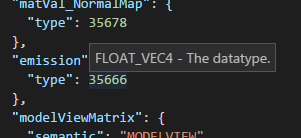
Hover the mouse over a numeric enum to see its meaning.
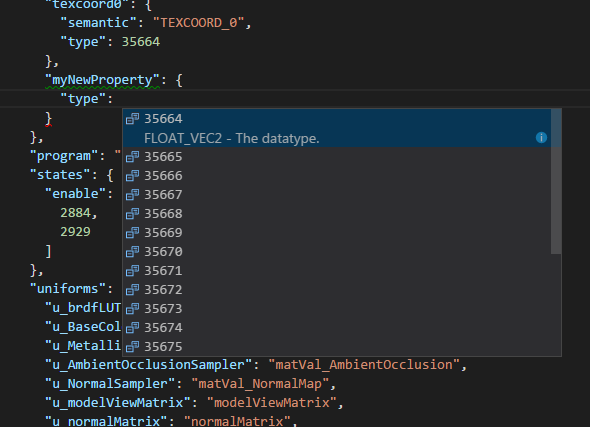
Press CTRL + SPACE on a blank field to pop up a list of suggested values. As you scroll through the list, the meaning of the selected value is revealed.
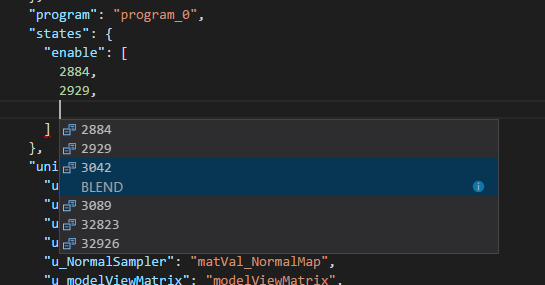
This works for arrays as well, for example the list of enabled render states. Here for example, a user is looking to enable a BLEND state.
Press ALT + i on an animation sampler to import values into the glTF JSON.
"samplers": [
{
    "input": 6,
    "interpolation": "LINEAR",
    "output": 7,
    "extras": {
    "vscode_gltf_input": [
        1.25,
        2.5
    ],
    "vscode_gltf_type": "VEC4",
    "vscode_gltf_output": [
        0,
        0,
        0,
        -1,
        1,
        0,
        0,
        4.4896593387466766e-11
    ]
},
Modify the vscode_gltf_input and vscode_gltf_output arrays for your needs and then press ALT + o to rewrite the glTF buffer and JSON with new values. This will use a Data URI for the buffer so the changes can be completely undone; glTF: Export a Data URI to a file is available if a binary file is required. Save the edited document and use glTF: Preview 3D Model to view your changes.
New samplers can be created as well simply use -1 for the accessor references and new accessors will be automatically created.
-
glTF.defaultV1Engine- Choose the default 3D engine that will render a glTF 1.0 model in the preview window. -
glTF.defaultV2Engine- Choose the default 3D engine that will render a glTF 2.0 model in the preview window.
-
glTF.Babylon.environment- Override the default reflection map for the BabylonJS glTF preview window. This specifies a local path to a Babylon ENV or DDS pre-filtered environment file, such as one created by following steps in Use a HDR environment, or a raw HDR file (which is slower to load due to runtime pre-filtering). -
glTF.Three.environment- Override the default reflection map for the ThreeJS glTF preview window. This should be the full path and filename of an*.hdrenvironment file, such as one from HDRI Haven. There's a legacy, non-HDR mode, when{face}appears in the filename, no longer recommended. When legacy mode is used, there are 6 cube faces, with face namesposx,negx,posy,negy,posz, andnegz. The rest of the path and filename should be identical for all 6 files. The path and filename are specified as a single string, using{face}in place of the face name. The legacy environment files must be in a format usable on the web, such as PNG or JPEG.
-
glTF.showToolbar3D- Show a button on the toolbar to activate the 3D Preview window. -
glTF.alwaysOverwriteDefaultFilename- Certain commands create new files, such as importing and exporting GLBs, exporting a DataURI, and creating a glTF Validation report. Whentruethese files will be saved with their default names, which saves the step of interacting with a file dialog each time, but does make it trivial to overwrite existing files. It's safer to leave this set tofalse. -
glTF.expandOutlineWithSelection- When the editor selection changes, the glTF outline will expand to include the current selection.
-
glTF.Validation.enable- When true, automatically run the glTF Validator and report any found issues to the document problems window. -
glTF.Validation.debounce- The number of milliseconds to wait for multiple automatic requests to re-validate a glTF document.
-
glTF.Validation.maxIssues- Controls the maximum number of issues reported by the Khronos glTF Validator (not counting any messages produced by VSCode's own JSON schema validation). -
glTF.Validation.ignoredIssues- Array of issue codes to ignore during validation. The issues should be listed in the array by issue code, such asACCESSOR_INDEX_TRIANGLE_DEGENERATEandNODE_EMPTY. See ISSUES.md for the full list, or run a manual glTF Validation of an existing file with messages reported to see their codes. For example, to completely disable reporting of empty nodes, one would use:[ "NODE_EMPTY" ] -
glTF.Validation.severityOverrides- This is a JSON object that maps issue codes (as keys) to severity codes (as values). The issue codes are the same as forglTF.Validation.ignoredIssuesabove. The severity codes are: 0 forerror, 1 forwarning, 2 forinformation, and 3 forhint. For example, to reduce the severity of empty nodes tohint, one would specify:{ "NODE_EMPTY" : 3 }
Certain glTF 2.0 extensions are supported by JSON schema validation in VSCode. This means that VSCode will provide hover tooltips, auto-complete (CTRL + space), and document problem indications for extension schema violations. This is separate from (and in addition to) any validation being performed by the official glTF Validator. The extension schemas shipping with this project currently are:
KHR_draco_mesh_compressionKHR_lights_punctualKHR_materials_clearcoatKHR_materials_transmissionKHR_materials_pbrSpecularGlossinessKHR_materials_sheenKHR_materials_unlitKHR_materials_variantsKHR_texture_transformEXT_lights_image_basedEXT_mesh_gpu_instancingEXT_meshopt_compressionEXT_texture_webpAGI_articulationsAGI_stk_metadata
Support for additional extensions can be requested by filing an issue or pull request to the GitHub repository.
on GitHub. See CONTRIBUTING.md.
This extension makes use of the following open source projects:
- Cesium - One of the 3D engines used in the preview window
- Babylon.js - One of the 3D engines used in the preview window
- Three.js - One of the 3D engines used in the preview window
- Knockout - Used to data-bind preview window's menu
Apache 2.0, see LICENSE.md.
See CHANGELOG.md.


