A RasPi home thermostat script for controlling slow underfloor heating
I moved into a new house in the the UK - think 1930s brick construction, gas-heated water central heating. No HVAC or cooling, climate that requires heating for 4-5 months of the year.
The house came with wet underfloor heating (that is, underfloor heating that uses a gas boiler to heat water which is pumped under the floor). Pretty soon I realised that the supplied Nest thermostat was ill-equipped to cope with this - there's about a two-hour lag between the heating being switched on and any impact being felt. The Nest would keep heating away until the target temperature was met and then wildly overshoot as the residual heat in the floor would keep heating the house for hours.
After a few months it was clear it wasn't going to "learn" to do any better, and the wild temperature swings made the house very uncomfortable.
With one eye on the heating bills and one on a fun project, I deciede to build a custom thermostat for the house.
Before going too far - note that this is not something I expect other people to be able to pick up and migrate to their own heating system. The code makes a lot of assumptions about the behavior of the heating here. Be inspired to make something better instead :-)
- Low-ish power usage - using a low-powered Pi and e-ink screen
- Fail-safe - this project interfaces with the existing Nest thermostat rather than being wired directly into the boiler. This means a) there's a fail-safe - the Nest will take over again should this system fail and b) no need to wire new relays etc into the boiler to control the zone valves.
- Optimising - Should use the minimum of heat to keep the house above the target temperature. Uses a simple algorithm to plan the next 12h heating, taking into account the natural heat-loss of the building and compensating for the outdoor temperature.
- Local-only - no need for remote control or an app - it takes hours to warm up the house, so better to design a system that keeps a temperature constant and comfortable
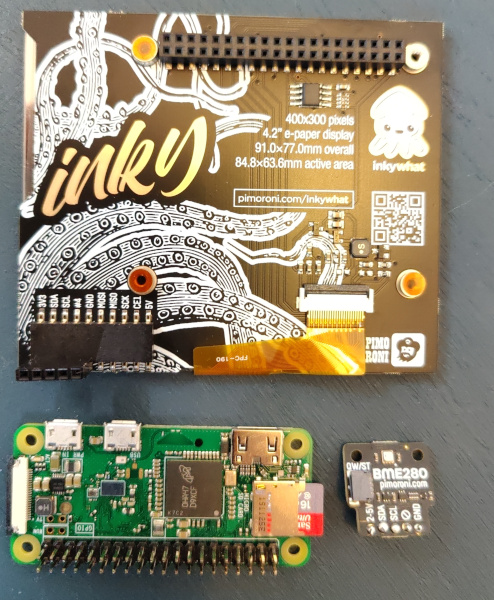
- Raspberry Pi Zero W - because I had a spare one from years ago
- InkyWHAT 4 inch e-ink sceen - a low-power display option to show information - black/white/red only, 400x300 resolution
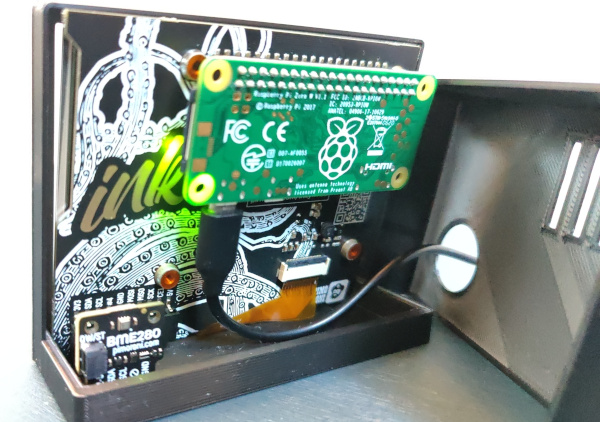
- BME280 temperature sensor - cheap and just about accurate enough - it attaches nicely into the breakout pins on the InkyWHAT
- 3d-printed case - to make sure it looks like a real thing and not a mess of PCBs and breadboards in the corner of the room
Low-quality code beware! Here be dragons, etc. This is my first attempt at Python, I accept that it doesn't look very "pythonic" - my coding style is a bit of a mix of Java and K&R C and Basic all mushed together.
- main.py - entry point. Designed to run as cron-job once every 15 minutes - collects all data, plans the next 12h of heating, switches on or off the boiler, then exits
- predictor.py - divides the day into 15 minute blocks, predicting the temperature drop for the next 12h. Assume a simple temperature-gradient, so heat loss will be proportional to the difference between inside and outside temp
- optimiser.py - algorithm to plan future heating - adds 15 min blocks of heating one-by one until the predicted target temperatures are met
- outputgen.py - ugliest bit of code here - lays out the status screen and chart which shows past temperature and predicted future temperature
- weather.py - wrapper for obtaining weather forecasts - in this case from OpenMeteo. We request hourly temperature data for the future
- mynest.py - wrapper around nest.py to simplify accessing Nest to override the old thermostat
- nest.conf - not included, contains API keys and bearer tokens for accessing the Google Smart Device management API
Time is split into 15 minute "blocks" - to represent the minimum amount of time it's sensible to run the boiler for.
Temperature gradient - (indoor temp at t1) = (outdoor temp at t0 - indoor temp at t0) / (heat loss factor) + indoor temp at t0
i.e, given no other inputs, temperature will trend towards the outside temperature
- Predict the next 12h of indoor temperature
- For each block where the predicted temperature is below the target temperature (a "cold block")
- For each block before the cold block (a "potential heating block")
- Measure the difference in predicted temperature if heating was applied
- Record the best heat increase
- If we've found a good candidate, add that potential heating block to the heating plan
- For each block before the cold block (a "potential heating block")
- Repeat until we've got all predicted temperatures above the target temperature or we've run out of possible heating to apply
- For each planned heating block
- Try removing the heating block from the plan
- Do all predicted temperatures remain above the target temperature?
- If so, remove this heating block
Config and magic numbers currently spread around a few files:
- nest.conf - the script expects to find this with details of the Nest API auth keys and bearer tokens
- heating.py - the heating being on causes a curve in heat output for the following three or so hours, so this attempts to encode that curve
- predictor.py - contains a heat-loss function, calibrated to my house
- main.py - contains target temperatures for each day
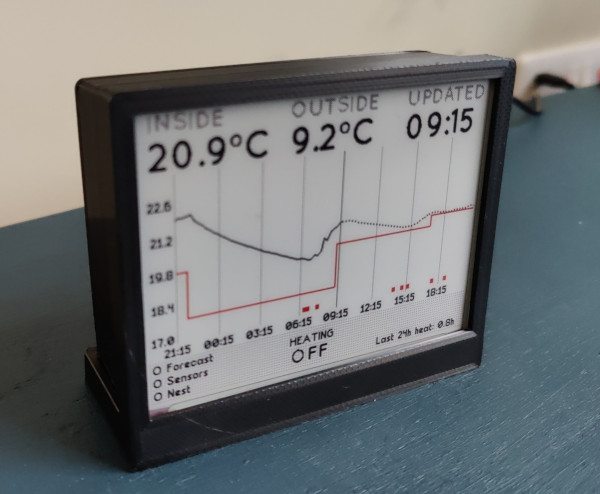
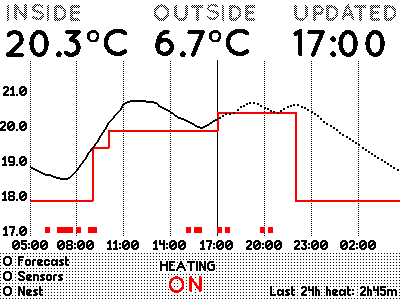
I wanted something functional yet elegant - spent a bit of time laying out the information on paper first to decide what goes where on the display. Had thoughts about including extra information - more detailed weather forecast? pull in the cost from the Smert Meter? Maybe later, but better to leave it relatively uncluttered for now. The display indicates:
- Current indoor temperature
- Current outdoor temperature
- Time the update last ran (because it's an e-ink display, this seemed to be the best way to check it was working!)
- Chart which shows
- Solid line in the past; detected temperature
- Dotted line in the futre; predicted temperature
- Red line; target temperature
- Red Bars - times when the heating is on
- Status area in the bottom left, which confirms successful link with the weather API, Nest API and Sensors.
- On/Off indicator bottom-middle, at-a-glance view of if the boiler is on or off at the moment
- Total heating time over the last 24h, so I can marvel in how efficient it is
- 3d printed in two parts from a design I found on THingiverse. Printed well first time, and as I have the Pi attached directly to the screen, I didn't need to make any adjustments to give space for the temperature sensor. There's also plenty of airflow to allow the sensor to get a good reading of the ambient air temp.
- Seems to be working well so far
- It updates once every fifteen minutes - updating the display and setting the heating either on or off.
- Might need a bit more config and calibration to get the heat-curves just right for heat-loss and input from the heating system. I wonder if accounting for solar gains and wind-chill will help too?
- API script from https://github.com/kwoodson/thermostat
- Help and advice from https://github.com/axlan/python-nest
- Design by DigitalUrban https://www.thingiverse.com/thing:4036382


