Important
This repository is a template to manage your Infrastructure as Code (IaC) using GitOps with k3s and Flux. This cluster also makes use of devcontainers to provide a consistent development environment. This repository assumes you have a working Proxmox server with ssh access and a registered domain name.
This repository is a template to manage your Infrastructure as Code (IaC) using GitOps with k3s and Flux. This repo uses several tools to manage the infrastructure, these are:
- Ansible: Ansible is used to manage the configuration of the cluster and the virtual machines on Proxmox.
- Terraform: Terraform is used to create the virtual machines on Proxmox and manage thier hardware configuration.
- k3s: k3s is a lightweight Kubernetes distribution that is used to manage the cluster.
- Flux/Gitops/Flagger/Scope: These tools are used to manage the cluster and the applications running on it.
- Sops/Age: These tools are used to manage the secrets in the repository.
This repository is designed to be used with Visual Studio Code and devcontainers to provide a consistent development environment.
Before you begin, ensure you have met the following requirements:
- You have installed Visual Studio Code.
- You have installed the Remote - Containers extension for Visual Studio Code.
- You have installed Docker.
Once you have installed Talos or Debian on your nodes, there are six stages to getting a Flux-managed cluster up and runnning.
Note
For all stages below the commands MUST be ran on your personal workstation within your repository directory
-
Create a new public repository by clicking the big green "Use this template" button at the top of this page.
-
Clone your new repo to you local workstation and
cdinto it. -
Continue on to 🌱 Stage 2
You have two different options for setting up your local workstation.
- First option is using a
devcontainerwhich requires you to have Docker and VSCode installed. This method is the fastest to get going because all the required CLI tools are provided for you in my devcontainer image. - The second option is setting up the CLI tools directly on your workstation.
-
Start Docker and open your repository in VSCode. There will be a pop-up asking you to use the
devcontainer, click the button to start using it. -
Continue on to 🔧 Stage 3
-
Create a new role in Proxmox
pveum role add terraform_role -privs "Datastore.AllocateSpace Datastore.Audit Pool.Allocate Sys.Audit Sys.Console Sys.Modify VM.Allocate VM.Audit VM.Clone VM.Config.CDROM VM.Config.Cloudinit VM.Config.CPU VM.Config.Disk VM.Config.HWType VM.Config.Memory VM.Config.Network VM.Config.Options VM.Migrate VM.Monitor VM.PowerMgmt" -
Create a new user in Proxmox
pveum user add terraform@pve --password <your_secret_password>
-
Assign the role to the user
pveum aclmod / -user terraform@pve -role terraform_role
-
Go to the Proxmox web interface and login with the root user.
-
go to the datacenter and go to permissions
-
click the Api Token tab and click add
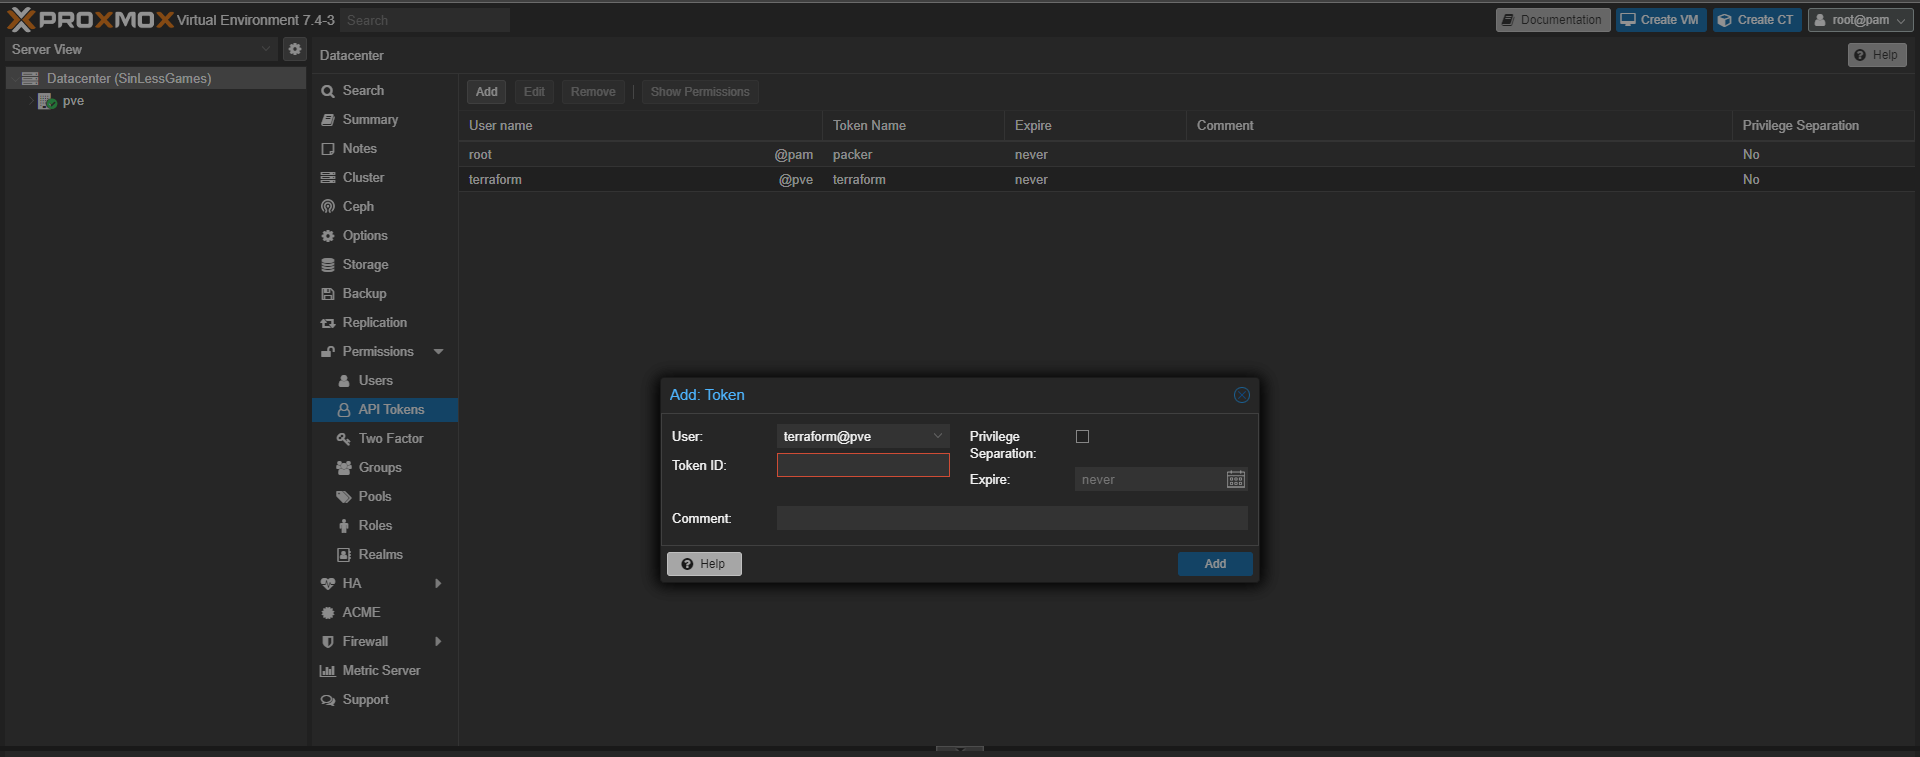
-
Fill out the form and click add
You will need to copy the
tokenandusernameto theconfig.yamlfile in the next stage. -
Continue on to ⚡ Stage 4

Note
The config.sample.yaml file contains config that is vital to the bootstrap process.
-
Generate the
config.yamlfrom the config.sample.yaml configuration file.task init
-
Fill out the
config.yamlconfiguration file using the comments in that file as a guide. -
Run the following command which will generate all the files needed to continue.
task configure
-
Push you changes to git
📍 Verify all the
./kubernetes/**/*.sops.*files are encrypted with SOPSgit add -A git commit -m "Initial commit :rocket:" git push -
Continue on to ⚡ Stage 5
-
SSH into your Proxmox server
ssh root@<proxmox-ip>
-
Install libguestfs-tools
[!WARNING] If you do not have a proxmox enterprise subscription you will need to not run
apt updateas this will throw an error.apt update && apt install -y libguestfs-tools -
Download debian cloud image
wget https://cloud.debian.org/images/cloud/buster/20210927-625/debian-11-generic-amd64-20210927-625.qcow2
-
Install qemu-guest-agent in the cloud image
virt-customize -a debian-11-generic-amd64-20210927-625.qcow2 --install qemu-guest-agent
-
Create VM Template
The
9001is the VM ID, you can change this to any number that is not already in use.qm create 9001 --name "debian-11-cloudinit-template" --memory 2048 --cores 2 --net0 virtio,bridge=vmbr0 qm importdisk 9003 debian-11-generic-amd64.qcow2 local-lvm qm set 9001 --scsihw virtio-scsi-pci --scsi0 local-lvm:vm-9003-disk-0 qm set 9001 --boot c --bootdisk scsi0 qm set 9001 --ide2 local-lvm:cloudinit qm set 9001 --serial0 socket --vga serial0 qm set 9001 --agent enabled=1 qm template 9001
-
Continue on to 🚀 Stage 6
[!INFO] This step will clone the template VM and create the VMs for the k3s cluster
-
Initialize the terraform state
task tf:init
-
Plan the terraform state
task tf:plan
-
Apply the terraform state
task tf:apply
-
Continue on to 🚀 Stage 7
📍 Here we will be running an Ansible playbook to prepare your nodes for running a Kubernetes cluster.
-
Ensure you are able to SSH into your nodes from your workstation using a private SSH key without a passphrase (for example using a SSH agent). This lets Ansible interact with your nodes.
-
Install the Ansible dependencies
task ansible:deps
-
Verify Ansible can view your config
task ansible:list
-
Verify Ansible can ping your nodes
task ansible:ping
-
Run the Ansible prepare playbook (nodes wil reboot when done)
task ansible:run playbook=cluster-prepare
-
Continue on to ⛵ Stage 8
-
Verify Ansible can view your config
task ansible:list
-
Verify Ansible can ping your nodes
task ansible:ping
-
Install Kubernetes depending on the distribution you chose
# Install k3s task ansible:run playbook=cluster-installation -
Continue on to 🚀 Stage 9
-
The
kubeconfigfor interacting with your cluster should have been created in the root of your repository. -
Verify the nodes are online
📍 If this command fails you likely haven't configured
direnvas mentioned previously in the guide.kubectl get nodes -o wide
example:
kubectl get nodes -o wide
# NAME           STATUS   ROLES                       AGE     VERSION
# k8s-0          Ready    control-plane,etcd,master   1h      v1.29.1
# k8s-1          Ready    worker                      1h      v1.29.1
-
Continue on to 🚀 Stage 10
-
Verify Flux can be installed
flux check --pre
# ► checking prerequisites
# ✔ kubectl 1.27.3 >=1.18.0-0
# ✔ Kubernetes 1.27.3+k3s1 >=1.16.0-0
# ✔ prerequisites checks passed
-
Install Flux and sync the cluster to the Git repository
📍 Run
task flux:github-deploy-keyfirst if using a private repositorytask flux:bootstrap # namespace/flux-system configured # customresourcedefinition.apiextensions.k8s.io/alerts.notification.toolkit.fluxcd.io created # ...
-
Verify Flux components are running in the cluster
kubectl -n flux-system get pods -o wide
# NAME                                       READY   STATUS    RESTARTS   AGE
# helm-controller-5bbd94c75-89sb4            1/1     Running   0          1h
# kustomize-controller-7b67b6b77d-nqc67      1/1     Running   0          1h
# notification-controller-7c46575844-k4bvr   1/1     Running   0          1h
# source-controller-7d6875bcb4-zqw9f         1/1     Running   0          1h
Mic check, 1, 2 - In a few moments applications should be lighting up like Christmas in July 🎄
-
Output all the common resources in your cluster.
📍 Feel free to use the provided kubernetes tasks for validation of cluster resources or continue to get familiar with the
kubectlandfluxCLI tools.task kubernetes:resources
-
⚠️ It might takecert-managerawhile to generate certificates, this is normal so be patient. -
🏆 Congratulations if all goes smooth you will have a Kubernetes cluster managed by Flux and your Git repository is driving the state of your cluster.
-
🧠 Now it's time to pause and go get some motel motor oil ☕ and admire you made it this far!### 🎤 Flux w/ Cloudflare verification Steps
The external-dns application created in the networking namespace will handle creating public DNS records. By default, echo-server-external and the flux-webhook are the only subdomains reachable from the public internet. In order to make additional applications public you must set set the correct ingress class name and ingress annotations like in the HelmRelease for echo-server.
k8s_gateway will provide DNS resolution to external Kubernetes resources (i.e. points of entry to the cluster) from any device that uses your home DNS server. For this to work, your home DNS server must be configured to forward DNS queries for ${bootstrap_cloudflare_domain} to ${bootstrap_k8s_gateway_addr} instead of the upstream DNS server(s) it normally uses. This is a form of split DNS (aka split-horizon DNS / conditional forwarding).
Tip
Below is how to configure a Pi-hole for split DNS. Other platforms should be similar.
-
Apply this file on the Pihole server while substituting the variables
# /etc/dnsmasq.d/99-k8s-gateway-forward.conf server=/${bootstrap_cloudflare_domain}/${bootstrap_k8s_gateway_addr} -
Restart dnsmasq on the server.
-
Query an internal-only subdomain from your workstation (any
internalclass ingresses):dig @${home-dns-server-ip} echo-server-internal.${bootstrap_cloudflare_domain}. It should resolve to${bootstrap_internal_ingress_addr}.
If you're having trouble with DNS be sure to check out these two GitHub discussions: Internal DNS and Pod DNS resolution broken.
... Nothing working? That is expected, this is DNS after all!
By default this template will deploy a wildcard certificate using the Let's Encrypt staging environment, which prevents you from getting rate-limited by the Let's Encrypt production servers if your cluster doesn't deploy properly (for example due to a misconfiguration). Once you are sure you will keep the cluster up for more than a few hours be sure to switch to the production servers as outlined in config.yaml.
📍 You will need a production certificate to reach internet-exposed applications through cloudflared.
By default Flux will periodically check your git repository for changes. In order to have Flux reconcile on git push you must configure Github to send push events to Flux.
Note
This will only work after you have switched over certificates to the Let's Encrypt Production servers.
-
Obtain the webhook path
📍 Hook id and path should look like
/hook/12ebd1e363c641dc3c2e430ecf3cee2b3c7a5ac9e1234506f6f5f3ce1230e123kubectl -n flux-system get receiver github-receiver -o jsonpath='{.status.webhookPath}' -
Piece together the full URL with the webhook path appended
https://flux-webhook.${bootstrap_cloudflare_domain}/hook/12ebd1e363c641dc3c2e430ecf3cee2b3c7a5ac9e1234506f6f5f3ce1230e123 -
Navigate to the settings of your repository on Github, under "Settings/Webhooks" press the "Add webhook" button. Fill in the webhook url and your
bootstrap_flux_github_webhook_tokensecret and save.
There might be a situation where you want to destroy your Kubernetes cluster. This will completely clean the OS of all traces of the Kubernetes distribution you chose and then reboot the nodes.
# Nuke k3s
task ansible:run playbook=cluster-nukeRenovate is a tool that automates dependency management. It is designed to scan your repository around the clock and open PRs for out-of-date dependencies it finds. Common dependencies it can discover are Helm charts, container images, GitHub Actions, Ansible roles... even Flux itself! Merging a PR will cause Flux to apply the update to your cluster.
To enable Renovate, click the 'Configure' button over at their Github app page and select your repository. Renovate creates a "Dependency Dashboard" as an issue in your repository, giving an overview of the status of all updates. The dashboard has interactive checkboxes that let you do things like advance scheduling or reattempt update PRs you closed without merging.
The base Renovate configuration in your repository can be viewed at .github/renovate.json5. By default it is scheduled to be active with PRs every weekend, but you can change the schedule to anything you want, or remove it if you want Renovate to open PRs right away.