🎻 electronics for Chris Swithinbank’s steel rosette, for small ensemble.
steel-rosette is a package for use with Cycling 74’s Max software. If you don’t own Max, you can download it from Cycling 74’s website for free. This package requires Max 8. Earlier versions of Max are not supported.
To install the steel-rosette package:
-
Move the folder containing this README file to your packages directory:
~/Documents/Max 8/Packages -
Restart or open Max.
A performance of steel rosette requires the following technical set-up:
- a computer running this
steel-rosettepackage - a MIDI pedal and USB interface for cue triggering (e.g. TEC’s controller)
- audio interface with 4 output channels
- 4 lightweight transducer speakers (placed on 4 snare drums)
n/a
- Snare drum 1
- Snare drum 2
- Snare drum 3
- Snare drum 4
-
Open Max.
-
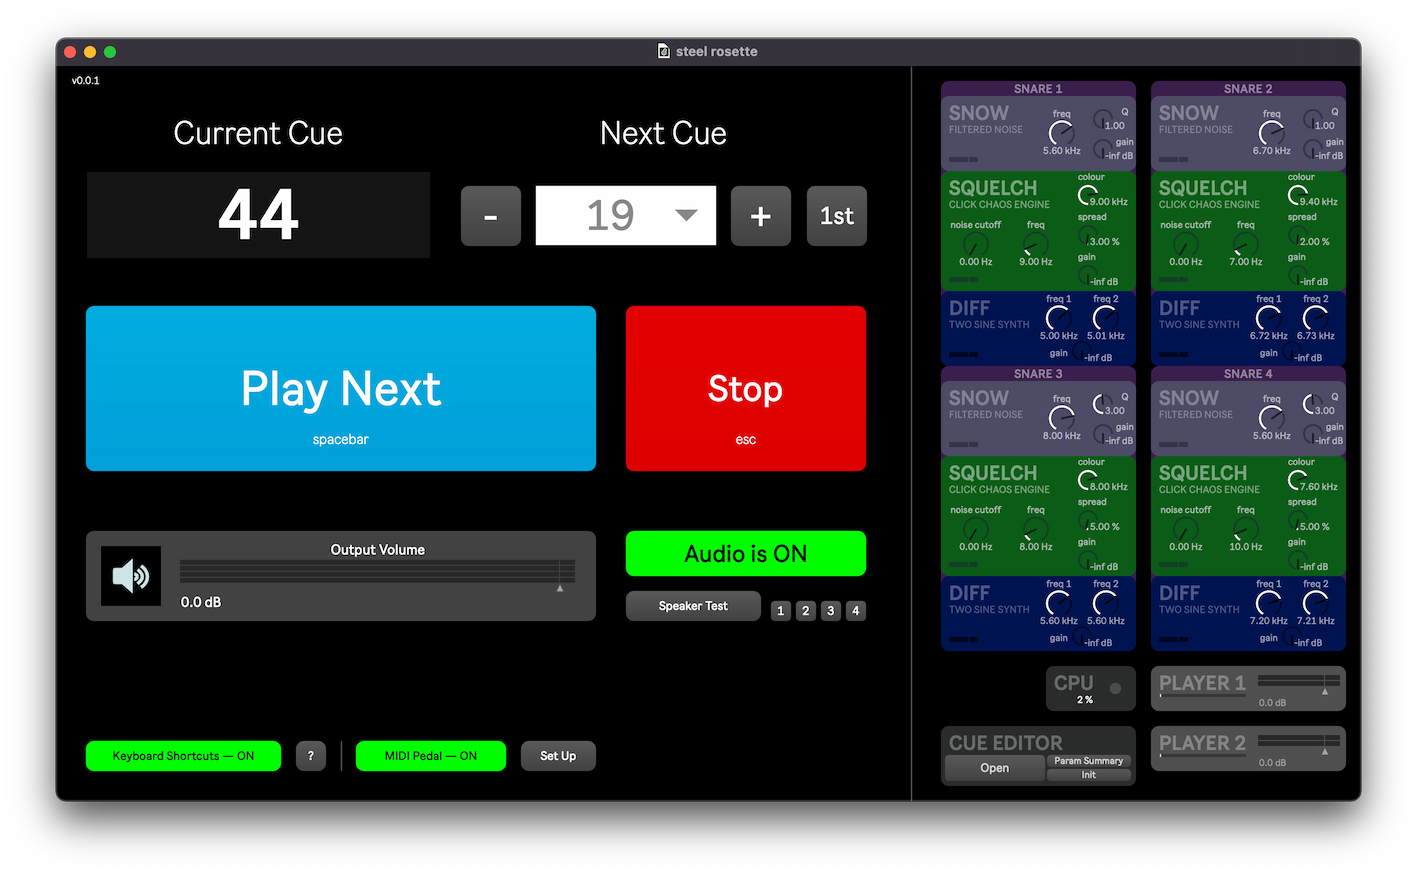
From the Extras menu, select steel rosette. This window should appear:
-
If the audio is off, turn it on, using the large red button that reads Audio is OFF. It will turn green and read Audio is ON.
-
If you need to test your audio output, you can use the Speaker Test button to send out short bursts of white noise. To test just one channel at a time, you can use the numbered buttons to test output channels 1, 2, 3 and 4 separately.
The patch window indicates the Current Cue at the top left, and the Next Cue that will be played at the top right.
Cue 1 initialises the patch, opening inputs into the reverb engine. All subsequent cues are numbered to match the bar numbers in which they occur.
During a performance, use the large blue Play Next button or the spacebar to trigger the next cue at the appropriate moment. (Or use a MIDI pedal, see below.)
By default, keyboard shortcuts are enabled and you can use the following shortcuts to control the patch:
| shortcut | |
|---|---|
| spacebar | play next cue |
| escape | stop playing |
| 1 | set next cue to be first cue |
| ▶ | increment next cue number |
| ◀ | decrement next cue number |
| ▲ | increase output volume by 1 dB |
| ▼ | decrease output volume by 1 dB |
-
To stop playback at any point during rehearsal, click the red Stop button, or hit the escape key.
-
Use the ◀ and ▶ arrow keys to set up the next cue, or use the 1 key to reset the next cue to the beginning. To select a specific cue, you can click on the Next Cue number and a menu will appear from which you can choose the cue you need.
If you prefer not to use the keyboard to trigger cues during a performance, you can use a MIDI pedal instead. Pressing the pedal will trigger the next event and is equivalent to using the spacebar or pressing the Play Next button.
-
Click on Set Up to open the MIDI pedal configuration window.
-
Select the correct MIDI device for your pedal.
-
Select whether the next event should be triggered on
127or0.
In the lower half of the Set Up window, you will be able to see the pedal input as it comes in to help while configuring your MIDI pedal.
