This workshop is important because:
- Local and cloud based version control are fundamental tools of every developer
- Git and Github are the most popular version control solution for open-source projects
- Proficient use of Git and Github allows collaboration on projects from small teams to hundreds or thousands of developers.
After this lesson, students will be able to:
- Explain basic git commands like init, add, commit, push, pull and clone
- Create a git repo
- Keep a local git repo in sync with a remote repo on GitHub
Before this lesson, students should already be able to:
- Use the command line
- Use a text editor
Question : What is the difference between Git and GitHub?
Git is the tool you and your colleagues use on your local machine to keep track of the project you're all working on. You can see the history of code edits, how two peoples' code merge into the same project, and many other wonderful things. Check out the revision history for this project, or "repo". Think project manager
Github is a cloud based git server and social network which uses Git under the hood for its version control system. Think Dropbox designed specially for Git projects.
Version control is a kind of software used to track changes to files so that a comprehensive history of the file content can be reviewed.
There are two main types of version control:
-
Centralized: All changes are kept on a single server
-
Distributed: Changes can be tracked on individual computers, and synched using the cloud
-
Git and GitHub together form a distributed version control system
There are also a lot of commands you can use in git. You can take a look at a list of the available commands by running:
$ git help -aEven though there are lots of commands, in this course we will really only need about 10.
First, create a directory on your Desktop:
$ cd ~/Desktop
$ mkdir hello-world
Go into this directory. Hint: how do you "change directory"?
You can place this directory under Git revision control using the command:
$ git initGit will reply:
Initialized empty Git repository in <location>You've now initialized the working directory.
If we look at the contents of this empty folder using:
ls -AWe should see that there is now a hidden folder called .git this is where all of the information about your repository is stored. There is no need for you to make any changes to this folder. You can control all the git flow using git commands.
Let's create a new file:
$ touch file.txtIf we run git status we should get:
On branch master

Initial commit

Untracked files:
  (use "git add <file>..." to include in what will be committed)

	file.txt

nothing added to commit but untracked files present (use "git add" to track)
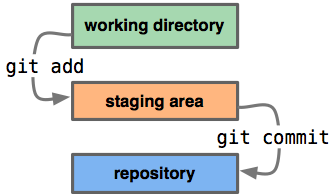
This means that there is a new untracked file. Next, tell Git to take a snapshot of the contents of all files under the current directory (note the .)
$ git add -AWhat is the difference?
This snapshot is now stored in a temporary staging area which Git calls the "index".
To permanently store the contents of the index in the repository, (commit these changes to the HEAD), you need to run:
$ git commit -m "Adds file.txt"You should now get:
[master (root-commit) b4faebd] Adds file.txt
 1 file changed, 0 insertions(+), 0 deletions(-)
create mode 100644 file.txtIf we want to view the commit history, we can run:
git logYou should see:
* b4faebd (HEAD, master) Adds file.txtIf you need to exit this view, you need to press:
qA good commit message is:
- in present tense
- describes what the commit contributes
| Good | Bad |
|---|---|
| "Adds signup and login" | "Added logout stuff" |
| "Creates upvote counter" | "Upvotes!" |
| "Fixes merge conflict" | "conflict" |
| "Fixes typo" | "stupid f***ing typos" |
| "Fixes issue #347" | commit logs from last night |
Maybe just take a break.
Now let's open file.txt in Sublime:
$ subl file.txtInside the file, write something.
Running git status again will show you that file.txt has been modified.
Let's now make a second commit.
$ git add -A
$ git commit -m "Adds content to file.txt"
Checking git log will show you 2 commits with different ids:
* 6e78569 (HEAD, master) Adds content to file.txt
* b4faebd Adds file.txt
You can return your repository back to the state of any commit using its specific commit id:
$ git checkout b4faebdThis changes your local repository files to the state of your first commit.
You can return to your newer commit by executing a checkout again:
$ git checkout 6e78569It is very tempting to try to "undo" changes in a repository, and many online resources will recommend you run the command below:
$ git reset --hard b4faebdThis is very dangerous, because it has the ability to completely delete work. Almost definitely do not use this.
- Go to your Github account
- In the top left, hit the + button and select
New repository - Name your repository
hello-world - Click the big green Create Repository button
We now need to connect our local Git repo with our remote repository on GitHub. We have to add a "remote" repository, an address where we can send our local files to be stored.
git remote add origin git@github.com:<github-name>/hello-world.gitIn order to send files from our local machine to our remote repository on Github, we need to use the command git push. However, you also need to add the name of the remote, in this case we called it origin and the name of the branch, in this case master.
git push origin masterAfter you run this command, refresh your GitHub repo page, and you should see file.txt!
Now we will add a README.md to our repo, a useful file that you should put in all of your repos.
Click the Create new file button.
Type README.md into the Name your file... box.
Enter some helpful text in the large Edit new file box.
Scroll down until you see the commit dialog. The default "Create README.md" message is probably helpful enough, so you can click Commit new file. Woo hoo, you committed on GitHub.
Note: You should commit locally whenever possible, not on GitHub.
Now we need to pull our README.md file to our local repository.
git pull origin masterOnce we have done this, you should see the README file on your computer. Congratulations, you are now:
Cloning allows you to get a local copy of a remote repository.
Navigate back to your Desktop and rename your hello-world repository:
cd ~/Desktop
mv hello-world hello-world-mine
Now ask the person sitting next to you for their github name and navigate to their repository on github:
https://www.github.com/<github-username>/hello-worldOn the right hand side you will see:
Ensure that you have SSH checked and copy this url.
To retrieve the contents of their repo, all you need to do is:
$ git clone git@github.com:alexpchin/hello-world.gitGit should reply:
Cloning into 'hello-world'...
remote: Counting objects: 3, done.
remote: Total 3 (delta 0), reused 3 (delta 0), pack-reused 0
Receiving objects: 100% (3/3), done.
Checking connectivity... done.
You now have cloned your first repository!
The fork & pull model lets anyone fork an existing repository and push changes to their personal fork without requiring access be granted to the source repository.
Most commonly, forks are used to either propose changes to someone else's project or to use someone else's project as a starting point for your own idea.
When you fork a repository, you make a new remote repository that is exactly the same as the original, except you are the owner. You can then clone your new fork and push and pull to it without needing any special permissions.
When you clone a repository, unless you have been added as a contributor, you will not be able to push your changes to the original remote repository.
When you want to propose a change to a repository (the original project) that you have forked, you can issue a pull request. This basically is you saying:
"I've made some changes to your repository, if you want to include them in your original one then you can pull them from my fork!"
Use what you've learned today to answer the following questions with a partner:
- How do I send changes to the staging area?
- How do I check what is going to be committed?
- How do I send the commits to Github?
All content is licensed under a CCBYNCSA 4.0 license. All software code is licensed under GNU GPLv3. For commercial use or alternative licensing, please contact legal@ga.co.


