#原生的iOS工程局部页面嵌入weex的view
weex SDK 集成到工程。在原生的现有的工程中,一个页面的页面的部分区域使用weex。看了原文介绍的用法,发现很多地方并没有交代清楚。看原文链接:[integrate to ios][2]
- �如果你没有iOS开发的基础。请,先安装iOS开发环境 及 CocoaPods。这里都是官方的安装方法。看不懂可以自行搜索。其实就是安装xcode(开发工具) 和 CocoaPods(第三方库管理工具)。
- 先将weex工程克隆到本地。
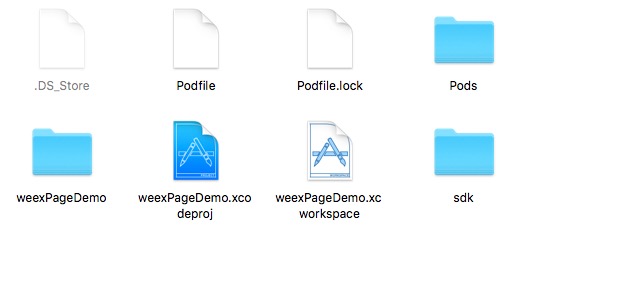
git clone https://github.com/alibaba/weex.git - 克隆完成后,找到weex的工程,应该是这样的目录结果,如下图
- 打开你的xcode。新建一个iOS工程,取名weexPageDemo。然后将刚刚克隆下来的weex工程下的sdk整个目录的所有东西都copy到当前目录下。然后在工程的根目录新建一个文件Podfile,Podfile内容为:

source 'https://github.com/CocoaPods/Specs.git'
target 'weexPageDemo' do
   platform :ios, '7.0'
   pod 'WeexSDK', :path=>'./sdk/'   #注释:表示当前目录下的sdk文件夹
end
然后执行 pod install --verbose --no-repo-update
5 用xcode打开weexPageDemo.xcworkspace。
6 打开AppDelegate.m文件,修改内容
#import "AppDelegate.h"
#import <WeexSDK/WeexSDK.h>
#import "WXEventModule.h"
#import "ViewController.h"

@interface AppDelegate ()

@end

@implementation AppDelegate

- (BOOL)application:(UIApplication *)application didFinishLaunchingWithOptions:(NSDictionary *)launchOptions {
    self.window = [[UIWindow alloc] initWithFrame:[UIScreen mainScreen].bounds];
    self.window.backgroundColor = [UIColor whiteColor];
    self.window.rootViewController = [[WXRootViewController alloc] initWithRootViewController:[ViewController new]];
    [self.window makeKeyAndVisible];

    [WXAppConfiguration setAppGroup:@"jwDemo"];
    [WXAppConfiguration setAppName:@"weexPageDemo"];
    [WXAppConfiguration setAppVersion:@"1.0.0"];

    //init sdk enviroment
    [WXSDKEngine initSDKEnviroment];
    //这一句代码很重要,如果没有,你点击weex的渲染的view中的按钮将找不到事件
    [WXSDKEngine registerModule:@"event" withClass:[WXEventModule class]];

    [WXLog setLogLevel: WXLogLevelAll];//输出日志
    return YES;
}
7 新增加一个类叫WXEventModule,看代码:
-------------------------.h头文件内容-------------------
#import <Foundation/Foundation.h>
#import <WeexSDK/WXEventModuleProtocol.h>
#import <WeexSDK/WXModuleProtocol.h>

@interface WXEventModule : NSObject <WXEventModuleProtocol, WXModuleProtocol>
@end
---------------------------------以下是.m文件内容----------
#import "WXEventModule.h"
#import "ViewController.h"
#import <WeexSDK/WXBaseViewController.h>

@implementation WXEventModule

@synthesize weexInstance;

WX_EXPORT_METHOD(@selector(openURL:))

- (void)openURL:(NSString *)url
{
    NSString *newURL = url;
    //注意。真机和模拟器的目录结构不同,所以替换的字符串就不同,这里自己简单的进行替换
    newURL = [newURL stringByReplacingOccurrencesOfString:@"//Users/examples/build/" withString:@"/bundlejs/"];//模拟器的目录结果
   // newURL = [newURL stringByReplacingOccurrencesOfString:@"//var/examples/build/" withString:@"/bundlejs/"]; //真机的目录结构

    newURL = [[[NSBundle mainBundle] bundlePath] stringByAppendingString:newURL];;
    UIViewController *controller = [[ViewController alloc] init];
    ((ViewController *)controller).url = newURL;

    [[weexInstance.viewController navigationController] pushViewController:controller animated:YES];
}

@end
8 在ViewController中的代码
---------------头文件
#import <UIKit/UIKit.h>

@interface ViewController : UIViewController

@property (nonatomic, copy) NSString *url;

@end

--------------.m文件
@interface ViewController ()

@property (nonatomic, readwrite, strong) WXSDKInstance *instance;
@property (nonatomic, weak) UIView *weexView;

@end

@implementation ViewController

- (void)viewDidLoad {
    [super viewDidLoad];
    [self.view setBackgroundColor:[UIColor whiteColor]];

    //在self.view上添加一个原生的按钮
    UIButton *testButton = [[UIButton alloc] initWithFrame:CGRectMake(0, 64, 200, 100)];
    [self.view addSubview:testButton];
    [testButton setTitle:@"原生的button" forState:UIControlStateNormal];
    [testButton setTitleColor:[UIColor redColor] forState:UIControlStateNormal];

    //默认加载的地址为本地路径的bundlejs/index.js
    if (!self.url) {
        self.url = [[NSBundle mainBundle] pathForResource:@"bundlejs/index" ofType:@"js"];
    }
    [self render];//weex将js渲染成weex页面。
}

- (void)render{
    NSURL *URL = [[NSURL alloc] initFileURLWithPath:self.url];

    CGFloat width = self.view.frame.size.width;
    [_instance destroyInstance];
    _instance = [[WXSDKInstance alloc] init];
    _instance.viewController = self;
    _instance.frame = CGRectMake(self.view.frame.size.width-width, 200, width, self.view.frame.size.height);

    __weak typeof(self) weakSelf = self;
    _instance.onCreate = ^(UIView *view) {
        [weakSelf.weexView removeFromSuperview];
        weakSelf.weexView = view;
        [weakSelf.view addSubview:weakSelf.weexView];
    };

    NSString *randomURL = [NSString stringWithFormat:@"%@?random=%d",URL.absoluteString,arc4random()];
    [_instance renderWithURL:[NSURL URLWithString:randomURL] options:@{@"bundleUrl":URL.absoluteString} data:nil];
}

- (void)dealloc{
    [_instance destroyInstance];
}
@end
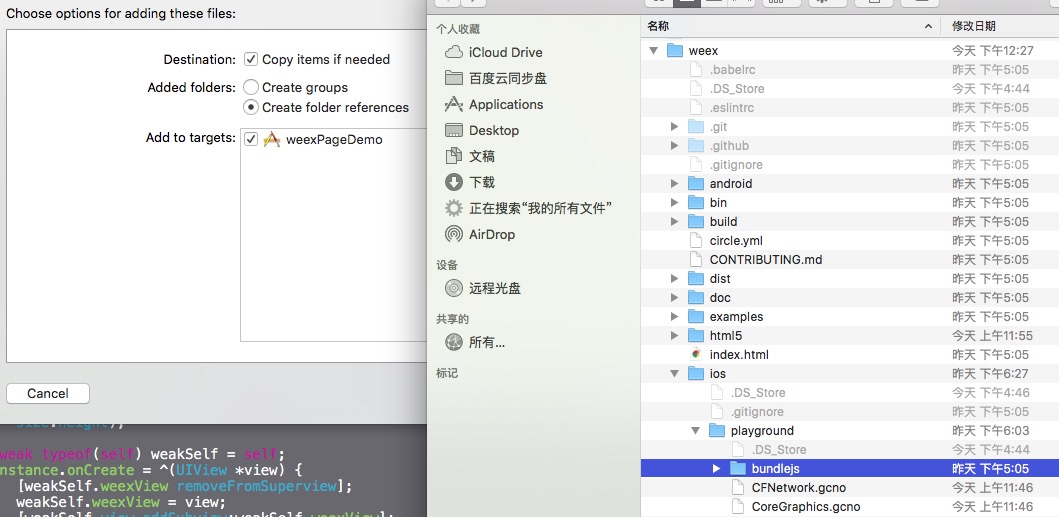
9 步骤8中用到了bundlejs/index.js,这个js是从weex/ios/playground/目录下拖拽过来的,playground目录下有一个bundlejs。playground文件夹是跟刚刚赋值的sdk文件夹同级,自己去找一下吧。拖拽到工程目录的时候选择create folder references。
最后commad+R运行。就可以了。
运行效果图

这样就实现了原生的工程,native页面为主,局部使用weex的功能了 [1]: https://alibaba.github.io/weex/ [2]: http://alibaba.github.io/weex/doc/advanced/integrate-to-ios.html