Arduino project for controlling an Yeelight bulb using an ESP8266 MCU and a push button.
The program aims to offer a rather complete user experience; this is why in the sketch there's a lot more code than what's needed just to talk to Yeelight. Notable features include:
- Use of local API, meaning nearly instantaneous light switching;
- Support for Yeelight devices discovery on the network;
- Support for multiple bulbs switching at once;
- Rich programmable timer capabilities, including support for sunrise / sunset;
- Visible user feedback using the ESP8266's built-in LED;
- Log of actions;
- Support for Wi-Fi network reconfiguration at run-time; no hard-coded network credentials;
- Web interface with mDNS support to configure the switch;
- Support for turning the bulb on or off via web interface (mobile-friendly), including a direct URL for on/off/toggle;
- Storing of the user-selected light device in EEPROM (survives power off and file system wipe out);
- No hardcoded or entered bulb IP-addresses;
- Detailed diagnostics sent over a serial interface;
- "about" web page showing various run-time information about controller.
Current known limitations:
- A bulb has to be online when the switch boots, otherwise the switch will start unlinked (issue #2);
- The switch is not intended to operate on battery; see issue #3 for more details;
- When working with multiple bulbs, they can act discordantly (issue #21).
- Review the configuration settings in MySystem.h; compile and flash your ESP8266;
- Boot, long press the button until the LED lights up, connect your computer to the Wi-Fi network
ybutton1, password42ybutto, go to the captive portal as offered (or try any site), enter and save your Wi-Fi network credentials; - Reconnect back to your Wi-Fi network, go to http://ybutton1.local, run the Yeelight scan (
config) and link the switch to the bulbs found; - Use the push button to control your bulbs manually;
- Access to http://ybutton1.local/?flip to toggle the bulbs from a script.
/?on,/?offwork similarly.
In the settings you will need to provide your time zone and geographical coordinates. This is needed to support pre-programmed actions (like turning the light on at sunset or at a given hour). The list of supported time zones is available in the ESP8266 Core's TZ.h. The location does not have to be precise; a few kilometer precision (one decimal digit after a comma) is good enough. The coordinates are processed locally in ESP8266 controller and are not being sent to any network resource. If you do not know your coordinates, go to Google Maps, right click on a location and copy a pair of numbers latitude, longitude.
If you change the hostname, the password of the bootstrap Wi-Fi network will change too; you can find how it is defined in System::getNetworkConfigPassword(). in LED response to the button:
- 1 blink — bulb flip OK;
- 1 + 2 blinks — one of the bulbs did not respond;
- 2 blinks — button not linked to a bulb;
- 1 long blink — Wi-Fi disconnected.
The LED is constantly lit during Wi-Fi reconfiguration process.
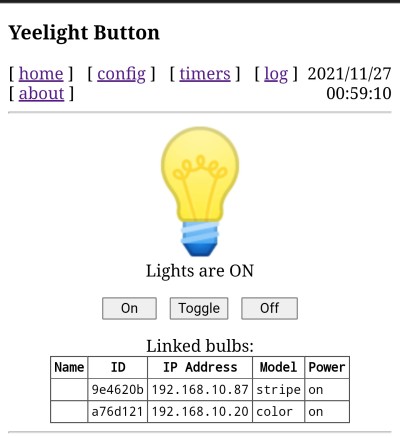
- Front page:
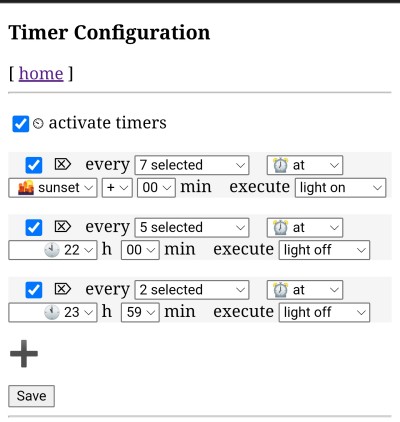
- Timer configuration example: turn the light on every day at sunset; turn off at 10pm on working days and at midnight on weekends:
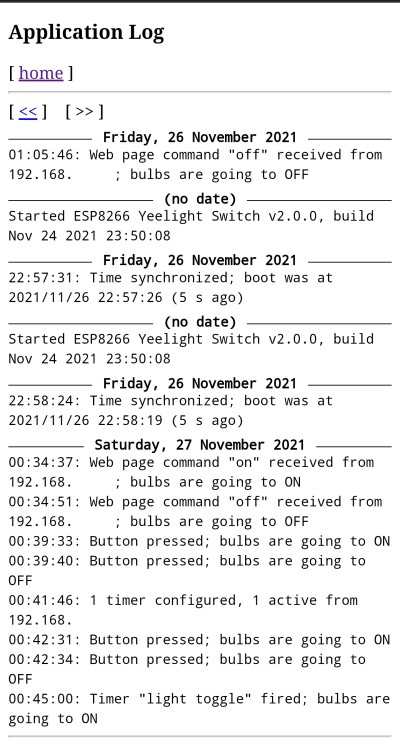
- Action log, showing bulb manipulations via a button, web page or timer event:
- Flip the lights with
curl:
$ curl -s ybutton1.local/?flip | grep Lights
Lights are ON
$
- Flip the lights with
wget:
$ wget -qO - ybutton1.local/?flip | grep Lights
Lights are ON
$
- Flip the lights with pure
bash:
$ ./flip.sh
Lights are ON
$ cat flip.sh
#!/bin/bash

exec {ybutton}<>/dev/tcp/ybutton1.local/80
echo -e "GET /?flip HTTP/1.0\r\n\r\n" >&$ybutton
while read -u $ybutton
do
  [[ $REPLY == Lights* ]] && echo $REPLY && break
done
exec {ybutton}>&-
$
Support for mDNS (*.local addresses) is usually enabled by default; if it is not the case, check your Linux distro docs on how to enable it.
- Hardware: ESP8266. Tested with:
- ESP-12E Witty Cloud, Arduino IDE board setting: "LOLIN(WEMOS) D1 R2 and mini";
- ESP-12E NodeMCU, Arduino IDE board setting: "NodeMCU 1.0 (ESP-12E Module)";
- ESP-01S with an external button, Arduino IDE board settings: "Generic ESP8266 Module"; Flash Size "1MB (FS:256KB)"; Builtin LED: 2
- Software:
- Arduino IDE, https://www.arduino.cc/en/main/software (version tested: 1.8.16);
- ESP8266 core for Arduino, https://github.com/esp8266/Arduino (version tested: 3.0.2);
- WiFiManager library, https://github.com/tzapu/WiFiManager (version tested: 0.16.0);
- JLed library, https://github.com/jandelgado/jled (version tested: 4.8.0);
- AceButton library, https://github.com/bxparks/AceButton (version tested: 1.9.1);
- Dusk2Dawn library, https://github.com/denis-stepanov/Dusk2Dawn (forked version 1.0.2 — the upstream project's last version 1.0.1 has compilation issues);
- ESP-DS-System library, https://github.com/denis-stepanov/esp-ds-system (version tested: 1.1.3 — included with this project in src/ folder — no need to install separately).
Default configuration assumes that the button is connected to GPIO0 (GPIO4 aka D2 for Witty Cloud) and is "pulled up" (i.e., the button's other contact is connected to GND). Boards supported out of the box are Witty Cloud, NodeMCU and a bare ESP-01S with a wired external button. If your button is connected to a different GPIO, define BUTTON_BUILTIN macro in MySystem.h accordingly.
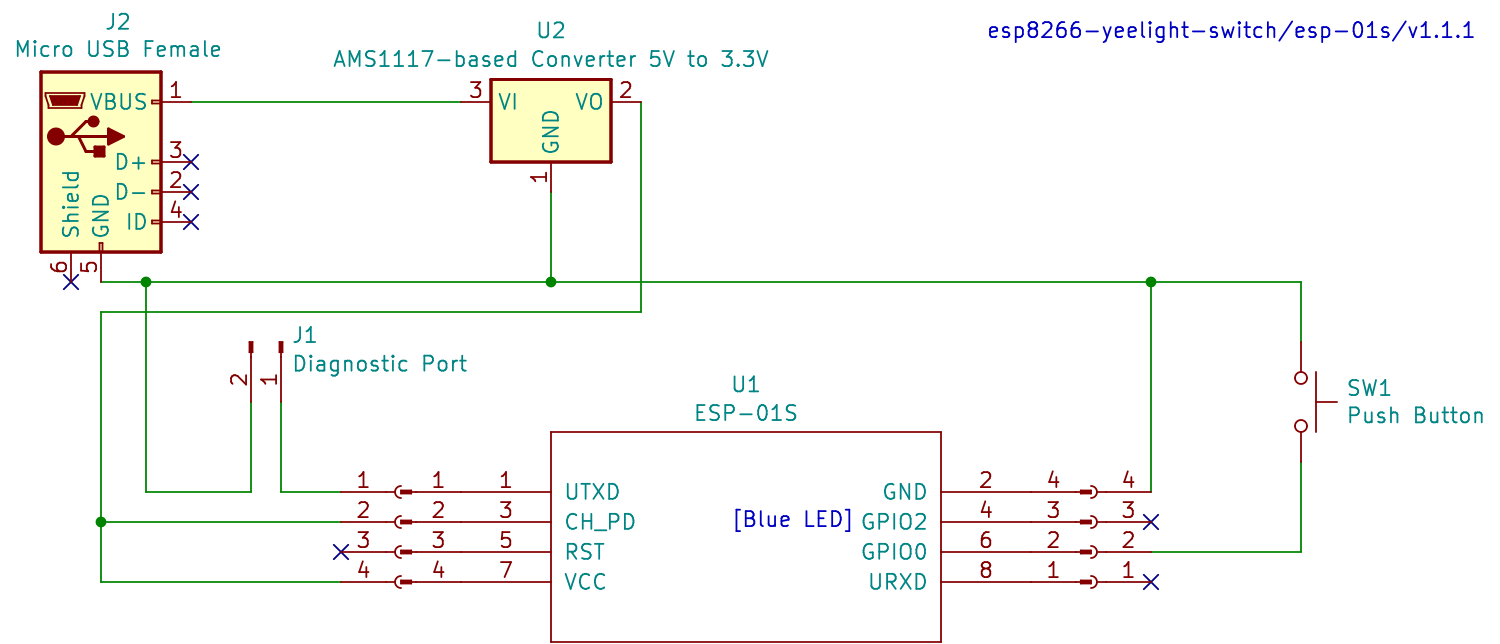
Example of connections for the ESP-01S board shown above:
Here 5V power is provided via micro-USB connector J2 and is stepped down to 3.3V using voltage converter U2. If you happened to have a 3.3V power supply, you can omit these elements. If you do not care about diagnostic output, you can drop its port J1 too.
Yeelight communication logic is isolated in two files YeelightDS.h, YeelightDS.cpp, which have no other dependencies. If you want to make your own sketch, you can copy these two files into a folder where your .ino is located. See the header for description of methods available. A simple "blink" sketch could look like this:
#include <ESP8266WiFi.h>
#include "YeelightDS.h"

using namespace ds;

YBulb *bulb = nullptr;

void setup() {

  // Connect to network
  WiFi.begin(/* wifi_ssid, wifi_pass */);
  while (!WiFi.isConnected()) delay(1000);

  // Run bulb discovery; get the first bulb found
  YDISCOVERY.send();
  bulb = YDISCOVERY.receive();
}

void loop() {

  // Flip state every 5 sec
  if (bulb)
    bulb->flip();

  delay(5000);
}
It will run Yeelight discovery and turn on / off the first found bulb every 5 seconds.
27 Nov 2021:
- version 2.0 ready;
- version 2.1 will include most wanted features (such as color / brightness control).


