OOMMFTools is a set of utilities designed to assist OOMMF postprocessing with an intuitive, graphical interface. It includes the following subcomponents:
-OOMMFDecode : Converts OOMMF vector files into numpy arrays and/or MATLAB data files
-OOMMFConvert: Converts OOMMF vector files into bitmaps and movies
-ODTChomp : Converts ODT files or subsets thereof into normally-delimited text files
OOMMFTools was original developed by Mark Mascaro. The version hosted here incorporates some additional code and compatability with recent libraries.
Bug reports and feature requests should logged on github.
Windows and OSX users can install with pip:
pip install oommftools
You can then load the oommftools main window with
python -m oommftools
OOMMFTools has a dependency on wxpython and packages for this are not (currently) available on PyPI.
Linux users need to install wxpython 4.x separately before running pip install. You may find a suitable wheel file for your version of linux here which can be installed with a command like:
pip install -U \
    -f https://extras.wxpython.org/wxPython4/extras/linux/gtk3/ubuntu-16.04 \
    wxPython
You can then install OOMMFTools with pip:
pip install oommftools
You can then load the oommftools main window with
python -m oommftools
Installing with the Anaconda Distribution should not depend on your platform.
Clone this repository to get the latest code:
git clone https://github.com/deparkes/OOMMFTools.git
The OOMMFTools repository contains an environment yaml file with the dependencies it needs.
cd OOMMFTools
conda env create -f environment.yml
cd oommftools
python oommftools
OOMMFTools has the following dependencies:
- Python 2.7/3.6
- wxPython 4.x
- numpy
- scipy
- FFmpeg - needed for OOMMFConvert
- OOMMF - needed for OOMMFConvert
- Tcl/Tk - needed for OOMMFConvert
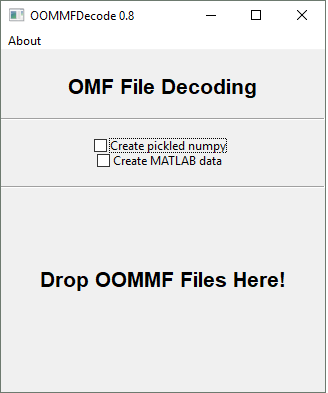
OOMMFDecode batch-processes vector files (omf, ovf, oef, ohf) into numpy arrays. These can then be pickled, for python users, or saved into MATLAB data files, for MATLAB users.
The GUI is very simple. Two checkboxes are offered - for making numpy data and for making MATLAB data. Simply check the options for the types of data you want to save and drag one or more OMF files onto the application. The data format (text, binary 4, binary 8) is automatically detected. When the import is finished, you'll be prompted to save the data for each format you selected.
Dropping a batch of OMF files is primarily designed to automate aggregation of data from various states of a single simulation. The program assumes all files you drop at a time are "similar" - that is, they have the same grid size and other header data. Please be mindful of this constraint, and if you wish to convert files from several disparate simulations do so in different drop operations.
Some files (such as energy densities) contain only a single value, not a vector. In OOMMF, these outputs are still vector files. The relevant quantity is stored in the X coordinate.
The output .MAT file contains several variables.
First, a 3-element vector GridSize, which contains the X, Y, and Z span of each cell. This is imported from the OMF file headers, specifically from the first file on the list of dropped files (again, it is assumed all files in one batch are similar).
Second, a vector SimTime, which contains the simulation time associated with each OMF file, if any. The input files are sorted based on SimTime if and only if times are available for all files.
Third and fourth, the vectors Iteration and Stage, which contain the iteration and stage number associated with each OMF file, if any. This is the total iteration number, not the stage iteration number.
The final variable is a 5-D matrix OOMMFData, which can be understood as follows.
OOMMFData(A,B,C,D,E):
A. The index of the OMF file, in simulation time order. If simtime data is not available, the files are in the same order as they were dropped on the program, which is generally the operating system sort order.
B. X coordinate in first-octant coordinates.
C. Y coordinate in first-octant coordinates.
D. Z coordinate in first-octant coordinates.
E. (1,2,3) are the x,y,z components of the vector.
Note that everything is indexed in the OOMMF (first-octant) coordinate system, but row-column matrix notation is fourth-quadrant. Depending on what you're trying to do, it may be necessary to transform the data accordingly. When in doubt, remember that indices into matrices generated by this program match OOMMF's own numbers!
The output .PNP file can be unpickled into a tuple containing two items: first, a 5-D matrix as documented above; second, a dictionary of header values extracted from the OMF file header data. This latter data is useful for looking up the scale of each cell or the simulation time of a particular file.
OOMMFConvert is meant to ease converting OOMMF simulation results into bitmaps and movies, especially for Windows users for whom the console is more unfamiliar or difficult. It uses the existing avf2ppm capability of OOMMF, along with the open-source utility FFmpeg for movie conversion.
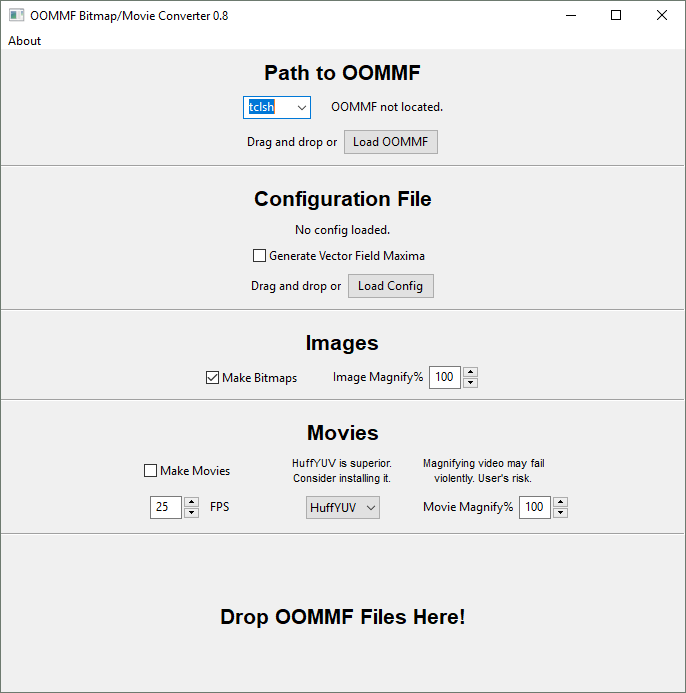
The GUI is divided into five sections as follows.
The left dropbox contains the call necessary to involve tcl. This defaults to and should almost always be left on the value "tclsh". However, some Windows installations of ActiveTcl/Tk use other commands, such as tclsh85 (which is provided as a dropdown option). If necessary, enter a new value here.
The static text field to the right shows the path to the oommf.tcl file in your OOMMF installation. This is the file that will be called to invoke avf2ppm. You can use the "Load OOMMF" button to locate it, or simply drag the oommf.tcl file anywhere over the program window. This path is recorded in the file oommf.path in the program directory, and this configuration step is only necessary once.
This section shows which mmDisp configuration file is going to be used in avf2ppm. You can save an mmDisp configuration file from an mmDisp view with the "Write config..." option in the File menu. You can select a configuration file with the "Load Config" button, or by dragging a file with the extension .conf, .config, or .cnf anywhere within the program window. The text shows the absolute path to the currently selected config file. This value is NOT saved between sessions, as it is typically sim-dependent and unique for different groups of OMF files. To clarify, it is saved between file drops, so you can easily use the same configuration file to convert multiple batches of OMF files without closing the program.
For the magnetization, the maximum value of the vector field is fixed (Ms). For other kinds of fields, such as demag, the maximum value of the vector field may fluctuate from file to file. This could result in clipping unless you happened to use the largest-values o?f file to produce your config file. If you're using a field where the maximum value fluctuates significant, check "generate vector field maxima". If this is checked, the program will decode the files to be converted and find the maximum vector magnitude among all files. This can add significantly to the runtime, but makes it easy to generate uniformly-scaled pictures for these sorts of fields without clipping.
This section controls the bitmap file output. If "Make Bitmaps" is unchecked, no images will be created. It defaults on. "Image Magnify%" overrides the parameters in the mmDisp configuration file to increase the output bitmap size. It employs a temporary copy of the configuration file, and the original is not overwritten. The value is in percent of the OOMMF default size, usually around 640x480.
This section controls the output of a movie file based on a collection of input OMF files. A movie will be made from each batch of OMF files if "Make Movies" is checked, but it defaults off.
The leftmost configuration on the bottom row is the FPS of the output movie. You may also consider it "simulation files per second." Since FFmpeg uses an awkward fixed-framerate form, frames will be duplicated to fill in time when the FPS is reduced. These temporary files are cleaned up automatically. This value can be between 1 and 25 FPS, and defaults to 25.
The middle combo box allows the choice of encoding from a number of codecs built into FFmpeg. The default is HuffYUV, which I find gives the best-quality output files for the common red-white-blue color scheme. MPEG4 has some difficulty with the black-on-blue arrows and gives a visibly worse encoding. The HuffYUV decoder does not come standard on most systems (Windows) but is freely available, and I highly suggest using this codec.
The rightmost control is the movie magnification, which functions similarly to the image magnification. However, many codecs are unstable for large input image sizes (above around 140% over the OOMMF default size) and may fail silently. This is a bug in the encoder and cannot be worked around. Therefore, increasing the movie magnification is done at the user's risk. The default codec HuffYUV is quite robust, and readily supports use of the movie magnification control.
Drag and drop configuration and vector field files here - or anywhere in the program window, but this section is a friendly reminder. Multiple files can be dropped at a time. OMF files are converted to bitmaps using the oommf command line utility avf2ppm and the supplied mmDisp configuration file. If a movie is being made, the batch of simultaneously dropped OMF files is converted to a single movie with the frames in filename order.
ODTChomp takes in ODT data tables, simplifies the name scheme to the extent it it possible, and outputs the desired columns into a text file with a given delimeter. The behavior is rather distict from odtcols, which is better at fixed-width rather than fixed-delimitation formatting.
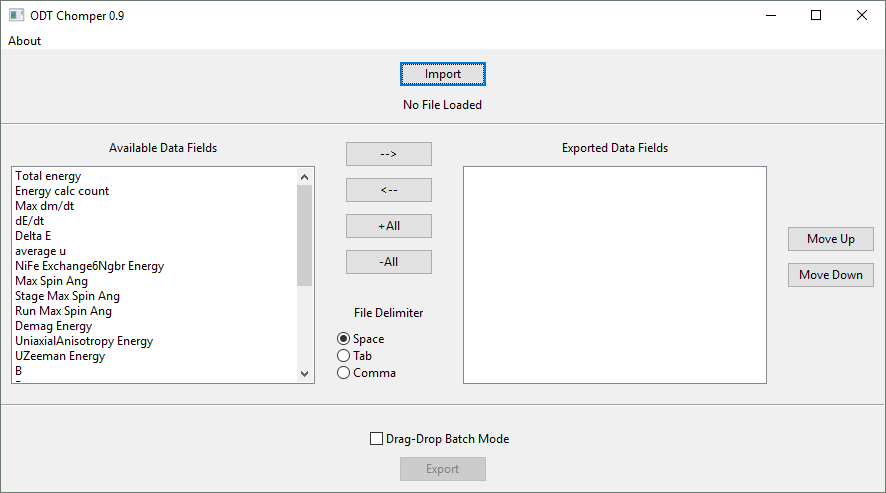
Begin by loading an ODT file. Drag-and-drop also works. The leftmost panel shows the columns found in the ODT file, using a simplified name scheme that uses the minimum number of uniquely identifying descriptors. The result is generally very human-readable unless the simulation file is extremely complex. The right panel shows which data fields will appear in the output file.
Double-clicking an entry in the left panel, or clicking an entry and then the "-->" button, will mark it for export. Double-clicking an entry in the right panel, or clicking an entry and then the "<--" button, will remove it from the export. The subsequent set of buttons can be used to add or remove all fields from the output file. The "Move Up" and "Move Down" buttons affect the item highlighted in the right panel, and are used to reorder the output columns.
The radio buttons between the two panels choose the delimiting symbol for the values in the output. For example, if you want the comma-separated values commonly used by Excel, choose comma. If you choose space as the delimited, spaces that appear in column names will be replaced by underscores in the output.
Finally, the export button writes the selected columns in the selected order to a plaintext file.
The checkbox just above the Export button enables Batch Mode. Batch Mode is designed to extract the same data fields from a large group of ODT files using drag-and-drop. Batch Mode can only be used once one file has already been loaded and export data has been selected. Even if Batch Mode is checked, if no file has previously been loaded, the first file drop will give non-batch behavior.
Once a file has been loaded and data fields have been chosen, any files dragged and dropped onto ODTChomp with Batch Mode enabled will have the specified fields extracted. The output will be placed in the same folder as the dropped file, with the same filename and the ".txt" extension. Currently, dropping directories is not supported and they will not be recursed.
$pytest - run all tests
$pytest tests/test_odtchomp.py - run test for one file
$pytest tests/test_odtchomp.py::Test_headers_prettify - run specific test
pylint --extension-pkg-whitelist=wx --output-format=colorized oommftools/oommftools.py


