This sample app is an open-source project, built with Next.js, the Descope React SDK, and Supabase. This is a simple todo-list application, that shows you how to use Supbase and RLS (Row-level Security) with Descope, natively in your application.
Note: Supabase also supports using external SAML providers, however this is only available to Supabase Pro tiers and up. If you're using the Free tier with Supabase, the approach used in this sample app is the recommended approach for you.
At a high level, this is what the sample app does:
- 1. Uses the Descope React SDK in the frontend to log the user in and create a Descope session JWT.
- 2. Creates a Supabase-approved JWT with
jsonwebtokenand the Supabase JWT Secret, with the Descope unique User ID as a claim in the JWT - 3. Supabase will retrieve this, decode the JWT, extract the
user_idclaim, and use it to identify the user.
The session will therefore be managed with Descope and the React SDK in the frontend, and the app will only create a Supabase JWT, if there is a valid active session between the app and Descope.
This project uses very high-level Authorization using Postgres' Role Level Security.
When you start a Postgres database on Supabase, it is populated with an auth schema, and some helper functions.
After following all of the steps above, you'll be able to use Descope-based user details to provide fine-grained control over what each user can and cannot do.
Create a new project in Supabase. Once your database has started, run the Todo List quickstart. Inside of your project, enter the SQL editor tab and scroll down until you see TODO LIST: Build a basic todo list with Row Level Security.
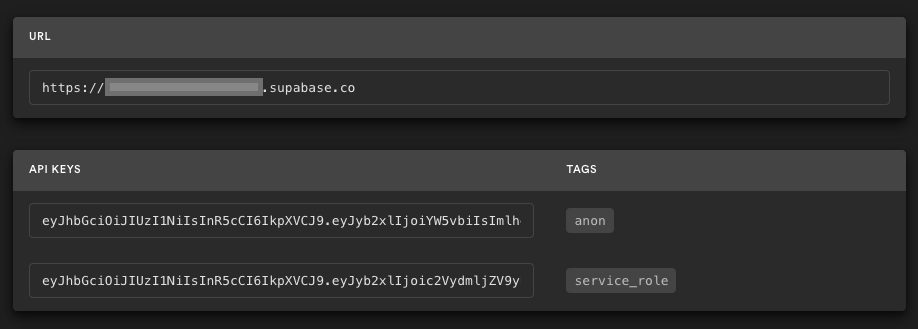
Go to the Project Settings, open the API tab, and find your API URL, anon key, and your JWT Secret as you'll need these in the next step.
The anon key is your client-side API key. It allows "anonymous access" to your database, until the user has logged in. Once they have logged in, the keys will switch to the user's own login token. This enables row level security for your data. Read more about this below.
The JWT Secret is the secret that this sample app will sign the JWTs that you send to Supabase with. This is required since Supabase doesn't natively support using Descope JWTs, with their own secret.
NOTE: The service_role key has full access to your data, bypassing any security policies. These keys have to be kept secret and are meant to be used in server environments and never on a client or browser.
You can use the .env.local.example file in the root directory of this repo for your environment variables. Change this to .env.local, and then also fetch your Descope Project ID from Project Settings.
Then paste the values from Step 2 and your Descope Project ID in for all of the environment variables:
NEXT_PUBLIC_SUPABASE_URL=<YOUR API URL>
NEXT_PUBLIC_SUPABASE_ANON_KEY=<Your Supabase ANON KEY>
SUPABASE_JWT_SECRET=<Your Supabase JWT Secret>

NEXT_PUBLIC_DESCOPE_PROJECT_ID=<Your Descope Project ID>
Once you've done this, your app should be ready to run.
However, in order to make sure that the users of this note app do not have access to any notes that are not assigned to their specific user_id, which is where the next step comes in.
In order to control access to specific row-entries in your database, by user_id you'll need to add make some changes to the database configuration:
- 1. First, you'll need to make sure that the
user_idcolumn is of typetextrather thanUUID. You can check this here:

If you need to change the type, you'll first have to delete the column and then add it again, with the type text:

Note: If you're
user_idcolumn is UUID, then Supabase will not allow Descope-based User IDs to be set in the column (this is ok, since all Descope User IDs are unique anyway).
- 2. Next, you'll need to run a SQL query, to be able to map
auth.user_id()to the claims that come from the JWT that will be sent to Supabase, via the SDK, in this sample app:
create or replace function auth.user_id() returns text as $$
  select nullif(current_setting('request.jwt.claims', true)::json->>'sub', '')::text;
$$ language sql stable;
You'll need to put this under the SQL Editor and run this:

- 3. Next, you'll need to add the RLS policy for
SELECT,INSERT, andDELETE. You can do this under Authentication -> Policies:
You will add the same policy, albeit with different Names and Allowed Operations, like this:

The value for USING expression should be:
(user_id = auth.user_id())
Once you've set all of the policies, your RLS Policies page should look like this:

Once you've completed all of the steps above, to start the application, run:
yarn devFor any issues or suggestions, feel free to open an issue in the GitHub repository.
This project is licensed under the MIT License - see the LICENSE file for details.
