Hello folks,
I have successfully installed MacOS Catalina 10.15.4 on my i9-10900k running on a Gigabyte Z490 Vision D.
You can find my EFI folder in this repository.
** Current SMBIOS: iMac19,1 **
** Current Bootkloader: OpenCore 0.5.8**
- Intel i9-10900k
- Gigabyte Z490 Vision D:
- Audio: Realtek ALC1220-VB
- 1Gbit Ethernet: Intel I219-V
- 2.5Gbit Ethernet: Intel I225-V
- Two USB-C/Thunderbolt 3 ports
- RAM: 32GB G.Skill Trident Z 3600Mhz CL15
- GPU: AMD Radeon VII
- Wifi/BT: MQUPIN fenvi T919 Wireless Card with BCM94360CD
- Wifi and Bluetooth (via BCM94360CD using a MQUPIN fenvi T919 Wireless Card)
- Audio: Realtek ALC1220-VB (AppleALC.kext, layout-id=7, device-id=0xA170, FakeID.kext, FakePCIID_Intel_HDMI_Audio.kext)
- USB, all ports except the USB 2.0 on the rear panel labeled "BIOS". Disabled this due to the 15 port limit.
- Thunderbolt 3 including Hot-plug
- 1Gbit Ethernet (Intel I219-V)
- 2.5Gbit Ethernet (Intel I225-V)
- Sleep/Wake
- Shutdown
- Restart
nothing so far :)
OC: 5.2Ghz All-Core@1.35V, no Power Limit
My Geekbench Profile: https://browser.geekbench.com/user/218488
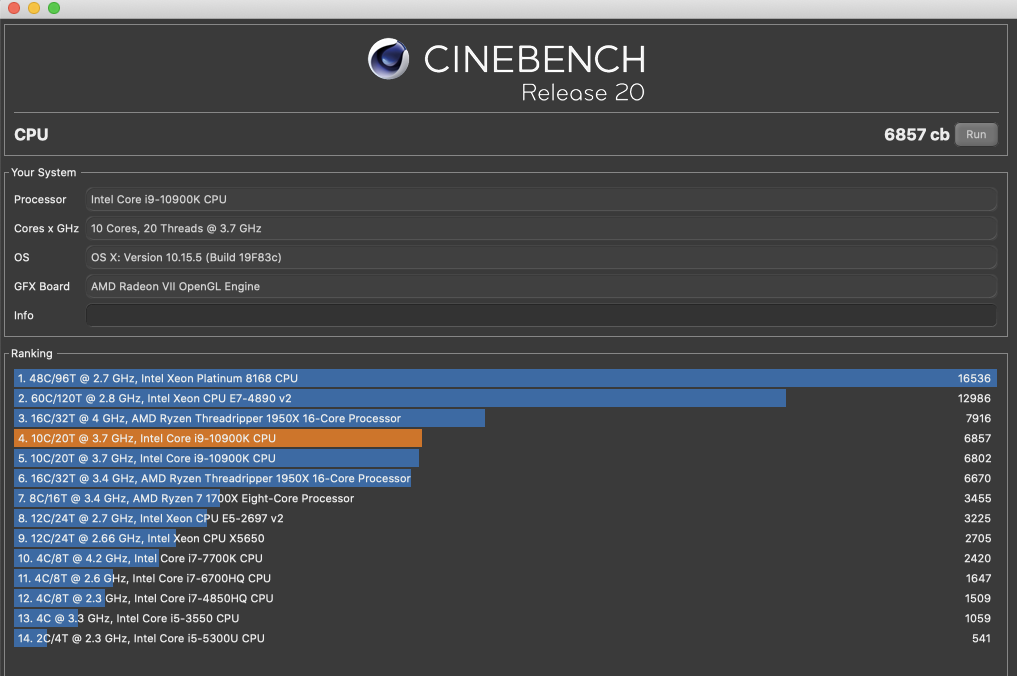
Cinebench R20 (with OC): 6857 points.
You can see my "old" Threadripper 1950x with OC to 4.0Ghz All-Core above(7916 points). The stock 1950x below (6670 points).
- Create an MacOS Catalina 10.15.4 Installation Stick (just google it)
- Mount the EFI partition of the Installation Disk (I use Hackintool to mount EFIs)
- Copy my EFI folder to the root of the EFI-partition
- Go to EFI/OC and open the config.plist with a plist Editor (I use "PLIST Editor" from the app store)
- Within the config.plist navigate to PlatformInfo/Generic and paste your serials for MLB, SystemSerialNumber and SystemUUID. You can generate them with the tool CloverConfigurator.
- Change BIOS-Settings. See My BIOS-settings for reference.
- Reboot from the installation media and install macOS. The installation needs Internet. So either install a supported WiFi-card or plugin Ethernet.
- If you get an error within the installation saying something like "this installation is damaged" you can try this workaround: Delete Installinfo.plist on the installer disk:
- Open the "Install macOS Catalina" Disk
- Right Click on the package "Install macOS Catalina"
- Click on "Package Contents"
- Then navigate to Contents > SharedSupport
- Delete the Installlnfo.plist
I needed this to get Audio working:
- AppleALC.kext
- FakeID.kext
- FakePCIID_Intel_HDMI_Audio.kext
- layout-id=7
- device-id=0xA170
The layout-id and the device-id is injected via the device properties.
The audio device has the PCI-Address PciRoot(0x0)/Pci(0x1F,0x3).
<key>DeviceProperties</key>
	<dict>
		<key>Add</key>
		<dict>
			<key>PciRoot(0x0)/Pci(0x1F,0x3)</key>
			<dict>
				<key>device-id</key>
				<data>cKEAAA==</data>
				<key>layout-id</key>
				<data>BwAAAA==</data>
			</dict>
		</dict>
	</dict>
In your BIOS set the following settings:
Settings/IO-ports/Thunderbolt Configuration Discrete Thunderbolt support: Enabled
then GPIO3 Force Pwr: Enabled Wait time in ms after applying Force Pwr: 200 GPIO filter: Enabled Enable CLK REQ: Enabled Enable ASPM: Disabled Enable LTR: Disabled Enable PTM: Disabled Enable TBT ASPM L1.1 & L1.2
You also need the SSDT-TB3.aml in EFI/OC/ACPI to enable Thunerbolt Hotplug support.
Simply add the newest IntelMausiEthernet.kext (mine is v2.5.1d1).
I use USBInjectAll.kext and created my own SSDT-EC-USBX.aml and SSDT-UIAC.aml using Hackintool 3.4.0.
All ports are enabled, except for the USB 2.0 port that is labeled "BIOS" and intended to be used to flash the BIOS. I had to disable this to stay within the 15 port USB limit. And I don't need this port as much as the faster ones. BIOS flashing will work anyways, because this is done prior the Bootloader config.
You need natively supported Wifi and Bluetooth to use Airdrop, Unlock with Apple Watch etc.
I used the MQUPIN fenvi T919 Wireless/Bluetooth Card. It has the natively supported WiFi and Bluetooth chip BCM94360CD.
No further kexts needed (no AirportBrcmFixup.kext, BrcmBluetoothInjector.kext, BrcmFirmwareData.kext, BrcmPatchRAM3.kext, BT4LEContiunityFixup.kext).
You also have to disable the onboard Intel Bluetooth.
In your USB-configuration this is the port HS14. Either add "uia_exclude=HS14" to your Boot-arguments or generate a USBPorts.kext with Hackintool and remove HS14.
If it is still not working, download Bluetooth Explorer from Apple Developser (it is inside "Additional_Tools_for_Xcode_11.4.dmg").
Then start Bluetooth Explorer App, select Tools/HCI Controller Selector. Then you should be able to see your Bluetooth adapter e.g. Apple BRCM. Select it and press "Activate". If it is marked as "Active" it is working.
The Radeonboost.kext improves the Graphics performance of AMD Radeon cards. I have a Radeon VII and it improved the OpenCL performance by 22% and in Metal by 38%. According to benchmarks with Geekbench 5.1.0.
Default Keyboard Layout/Language setting was changed to EN-US in v1.5.
If you want to change this, just edit this setting in the config.plist:
- NVRAM
	- Add
		- 7C436110-AB2A-4BBB-A880-FE41995C9F82
			- prev-lang:kbd | String | en-US:0
Valid Keyboard Values see here: AppleKeyboardLayouts.txt
The highest Voltage I feel comfortable with for 24/7 is 1.35V.
I unlocked the Power Limit and tried 5.2 and 5.3 Ghz All-Core.
5.3 Ghz crashed in Benchmarks. 5.2Ghz worked. So far everything is working and no further crashing with 5.2Ghz.
Temps on idle: 35°C.
Temps while running Cinebench e.g. : 75-80°C.
Cooling solution: I have Thermalgrizzly Conductonaut applied, so fluid metal. And I have a custom watercooling loop with 2x 360mm and 1x 480mm radiator. Fans are spinning on minimum RPM until the temps reach 60°C. They reach 100% at 80°C.
Thanks for your support :) Your help was crucial for my build.
- the german hackintosh-community at hackintosh-forum.de: Especially dsm2, CMMChris, brumbaer, JimSalabim
- https://github.com/daliansky/XiaoXinPro-13-hackintosh: This repository inspired my first config and gave me the CPU-FakeID. Thank you for that :)
- Dortania for this great OpenCore Desktop Guide
- headkaze for Hackintool and our productive conversations :)
- Acidanthera for too many things to mention each
- RehabMan for too many things to mention each
- OpenCore project for this great bootloader
Best, Chris aka SchmockLord


