About ◈ Design ◈ Implemented Coordicide modules ◈ Work-in-progress modules ◈ Installation ◈ Getting started ◈ Client-Library and HTTP API reference ◈ Supporting the project ◈ Joining the discussion
This repository is where the IOTA Foundation's Research Department runs simulations of the Coordicide modules to study and evaluate their performance.
The aim of this open repository is to give the community the opportunity to follow developments, take part in testing, and learn more about Coordicide.
Note: You can find details about future development plans in our roadmap.
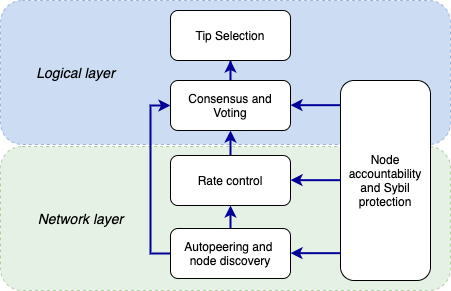
The code in GoShimmer is modular, where each module represents either one of the Coordicide components or a basic node function such as the gossip layer, ledger state, and API.
This approach allows us to develop each module in parallel and to test GoShimmer with one or more different versions.
Each module is defined in the packages directory and can be enabled, using the plugins directory.
Note: See the main.go file to see which plugins are currently supported.
The master branch is the stable version of the GoShimmer software, which includes a minimal set of modules to allow you to send and gossip zero-value transactions.
The master branch includes the following Coordicide modules:
The autopeering module is divided into two submodules:
-
Peer discovery: Responsible for operations such as discovering new peers and verifying their online status
-
Neighbor selection: Responsible for finding and managing neighbors
We also have a standalone autopeering simulator in this repository.
Work-in-progress modules are typically kept on a different branch such as mana, and are not compatible with the master branch. Therefore, nodes that run these branches cannot join the current network because the code either is still too experimental or it includes breaking changes.
The following Coordicide modules are a work in progress:
-
Mana: The
manabranch contains a first implementation of the mana module in thepackagesdirectory. -
Cellular Consensus: The
cabranch contains a first implementation of the Cellular Consensus module in thepackagesdirectory. -
Fast Probabilistic Consensus: The
fpcbranch contains a first implementation of the Fast Probabilistic Consensus module in thepackagesdirectory. We also have a standalone FPC simulator in this repository. -
Spam Protection: You can find the initial simulation source code of the rate control in this repository and the source code of the Adaptive Proof of Work simulator here.
As well as these modules, we are working on the following node functions:
-
Ledger State: The
ledger_statebranch implements a version of the parallel-reality-based ledger state (using the UTXO model).
You can use the Go client-library to interact with GoShimmer (located under github.com/iotaledger/goshimmer/client).
Alternatively, you can check out the API docs to implement your own client or inspect the available HTTP API endpoints.
For code generation, you might want to use the OAS/Swagger specification file directly.
You have two options to install and run GoShimmer:
- Use the precompiled executable file
- Compile the code from source
The release page includes downloadable files for Linux, macOS, and Windows.
To run the node, all you need to do is download and execute one of these files, depending on your operating system.
# Linux and macOS
./goshimmer
# Windows
goshimmer.exeIf you want to build your own executable file, you need to follow these steps.
To complete this guide, you need to have at least version 1.14 of Go installed on your device.
To check if you have Go installed, run the following command:
go versionIf Go is installed, you should see the version that's installed.
-
Clone the repository
git clone https://github.com/iotaledger/goshimmer.git
-
Change into the
goshimmerdirectory -
Copy and adjust
config.default.json# Linux and macOS cp config.default.json config.json # Windows copy config.default.json config.json
-
Use one of the following commands to build your executable file, depending on your operating system
# Linux and macOS
go build -o goshimmer
# Windows
go build -o  goshimmer.exe
Note: If you're using Windows PowerShell, enclose
goshimmer.exein single quotation marks. For example: go build -o 'goshimmer.exe'.
When you first run GoShimmer, the node starts running and tries to connects to neighbors, using the autopeering module.
To run other modules such as the spammer, you can configure GoShimmer to enable them through plugins.
Note: For a list of all the available configuration parameters, you can run the following command:
# Linux and macOS
./goshimmer -help
# Windows
goshimmer.exe -help
You can configure GoShimmer in the following ways:
- Use a configuration file called
config.json - Use command-line options
The repository includes a config.json file, which the executable file will find and use when you execute it.
To use the command line, execute the file with one of the following commands, depending on your operating system
# Linux and macOS
./goshimmer --node.enablePlugins "spammer"
# Windows
goshimmer.exe --node.enablePlugins "spammer"
Here, we use the command-line flags to enable the spammer plugin. This plugin allows you to send spam transactions to your node.
GoShimmer provides access to a SPA dashboard showing TPS, memory chart, neighbors and a Tangle explorer.
You can change its configuration (e.g, bind address, port) under the section dashboard of the config.json file, for example by changing the bind address to 0.0.0.0:8081 to enable the access from remote and/or by enabling the authentication.
To access the dashboard, you can use your browser (the default address is http://127.0.0.1:8081).
If you want to contribute to the code, consider posting a bug report, feature request or a pull request.
When creating a pull request, we recommend that you do the following:
- Clone the repository
- Create a new branch for your fix or feature. For example,
git checkout -b fix/my-fixorgit checkout -b feat/my-feature. - Run the
go fmtcommand to make sure your code is well formatted - Document any exported packages
- Target your pull request to be merged with
dev
If you want to get involved in the community, need help getting started, have any issues related to the repository or just want to discuss blockchain, distributed ledgers, and IoT with other people, feel free to join our Discord.


