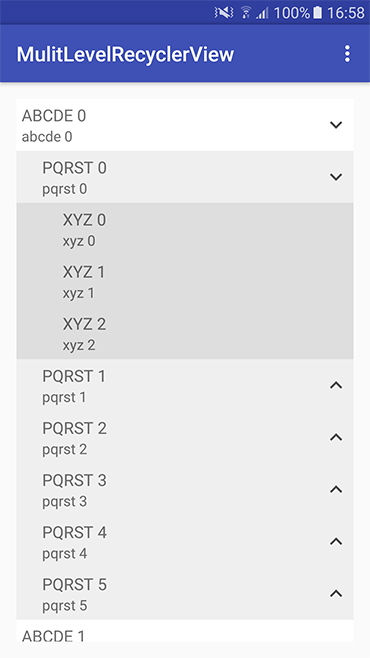
This library is an extension of the RecyclerView class and behaves like the ExpandableListView widget but with more than just 2-levels.
Add the following to your build.gradle file in your project folder:
allprojects {
    repositories {
        jcenter()
        maven {
            url 'https://dl.bintray.com/iammuditsen/maven/'
        }
    }
}
Note: Only add the maven { url 'https://dl.bintray.com/iammuditsen/maven/' } tag without the parent tags.
Then add the following dependency in your build.gradle file in your app folder:
dependencies {
    compile 'muditse.android:multilevelexpandview:1.1'
}
OR
include the multilevelview module into your project after downloading it.
Put the following snippet in your layout file:
<com.multilevelview.MultiLevelRecyclerView
        android:id="@+id/rv_list"
        android:layout_width="match_parent"
        android:layout_height="match_parent"/>
And declare your MultiLevelRecyclerView in your Activity's onCreate() (or your Fragment's onCreateView()) method like this:
@Override
protected void onCreate(Bundle savedInstanceState) {
    super.onCreate(savedInstanceState);
    setContentView(R.layout.activity_main);
    Toolbar toolbar = (Toolbar) findViewById(R.id.toolbar);
    setSupportActionBar(toolbar);

    MultiLevelRecyclerView multiLevelRecyclerView = (MultiLevelRecyclerView) findViewById(R.id.rv_list);
    multiLevelRecyclerView.setLayoutManager(new LinearLayoutManager(this));

    List<Item> itemList = (List<Item>) recursivePopulateFakeData(0, 12);

    MyAdapter myAdapter = new MyAdapter(this, itemList, multiLevelRecyclerView);

    multiLevelRecyclerView.setAdapter(myAdapter);
}

private List<?> recursivePopulateFakeData(int levelNumber, int depth) {
    List<RecyclerViewItem> itemList = new ArrayList<>();

    String title;
    switch (levelNumber){
        case 1:
            title = "PQRST %d";
            break;
        case 2:
            title = "XYZ %d";
            break;
        default:
            title = "ABCDE %d";
            break;
    }

    for (int i = 0; i < depth; i++) {
        Item item = new Item(levelNumber);
        item.setText(String.format(Locale.ENGLISH, title, i));
        item.setSecondText(String.format(Locale.ENGLISH, title.toLowerCase(), i));
        if(depth % 2 == 0){
            item.addChildren((List<RecyclerViewItem>) recursivePopulateFakeData(levelNumber + 1, depth/2));
        }
        itemList.add(item);
    }

    return itemList;
}
Your Adapter file must extend from the MultiLevelAdapter.java class in order to work properly:
public class MyAdapter extends MultiLevelAdapter { ... }The accordion feature can be enabled by adding the following line of code:
multiLevelRecyclerView.setAccordion(true);The recursivePopulateFakeData() method adds items to an ArrayList<>() which are passed to the adapter and then get populated in the MultiLevelRecyclerView. This is how the items look like:
Important: By default the MultiLevelRecyclerView sets a click listener on the whole item!
If you want different click events on one item e.g.: one click event on the item itself and one click event on the expand button then add the following line of code after declaring your MultiLevelRecyclerView:
multiLevelRecyclerView.removeItemClickListeners();This removes the click event on the whole item and then you're able to set different click events on your views in the ViewHolder class in your MyAdapter.java file like so:
private class Holder extends RecyclerView.ViewHolder {

    TextView mTitle, mSubtitle;
    ImageView mExpandIcon;
    Item mItem;
    LinearLayout mTextBox, mExpandButton;

    Holder(View itemView) {
        super(itemView);
        mTitle = (TextView) itemView.findViewById(R.id.title);
        mSubtitle = (TextView) itemView.findViewById(R.id.subtitle);
        mExpandIcon = (ImageView) itemView.findViewById(R.id.image_view);
        mTextBox = (LinearLayout) itemView.findViewById(R.id.text_box);
        mExpandButton = (LinearLayout) itemView.findViewById(R.id.expand_field);

        // The following code snippets are only necessary if you set multiLevelRecyclerView.removeItemClickListeners(); in MainActivity.java
        // this enables more than one click event on an item (e.g. Click Event on the item itself and click event on the expand button)
        itemView.setOnClickListener(new View.OnClickListener() {
            @Override
            public void onClick(View v) {
                //set click event on item here
                Toast.makeText(mContext, String.format(Locale.ENGLISH, "Item at position %d was clicked!", getAdapterPosition()), Toast.LENGTH_SHORT).show();
            }
        });

        //set click listener on LinearLayout because the click area is bigger than the ImageView
        mExpandButton.setOnClickListener(new View.OnClickListener() {
            @Override
            public void onClick(View v) {
                // set click event on expand button here
                mMultiLevelRecyclerView.onItemClick(v, mItem, getAdapterPosition());
                // rotate the icon based on the current state
                // but only here because otherwise we'd see the animation on expanded items too while scrolling
                mExpandIcon.animate().rotation(mItem.isExpanded() ? -180 : 0).start();

                Toast.makeText(mContext, String.format(Locale.ENGLISH, "Item at position %d is expanded: %s", getAdapterPosition(), mItem.isExpanded()), Toast.LENGTH_SHORT).show();
            }
        });

        // If you save the expand state in a database and you want to expand the list on every start
        // then you might need the following code to expand the items
        Runnable r = new Runnable() {
            @Override
            public void run() {
                if (mItem != null && mItem.isExpanded()) {
                    mMultiLevelRecyclerView.onItemClick(null, mItem, getAdapterPosition());
                    setExpandButton(mExpandIcon, mItem.isExpanded());
                }
            }
        };
        handler.post(r);
    }
}
Please clone or download the repository in order to see the sample code!
Copyright (C) 2015 Mudti Sen muditsen1234@gmail.com
Licensed under the Apache License, Version 2.0 (the "License"); you may not use this file except in compliance with the License. You may obtain a copy of the License at
http://www.apache.org/licenses/LICENSE-2.0
Unless required by applicable law or agreed to in writing, software distributed under the License is distributed on an "AS IS" BASIS, WITHOUT WARRANTIES OR CONDITIONS OF ANY KIND, either express or implied. See the License for the specific language governing permissions and limitations under the License.
