Home Server
This repository hosts the necessary configuration files for setting up a home server with multiple services routed through reverse proxying. Services are setup using Docker to isolate their respective dependencies from the host machine.
The repository contains the docker-compose files for each of the services that are hosted on the home server, as well as complete documentation on the system architecture, how to maintain it, and how to update it with additional services.
The server architecture
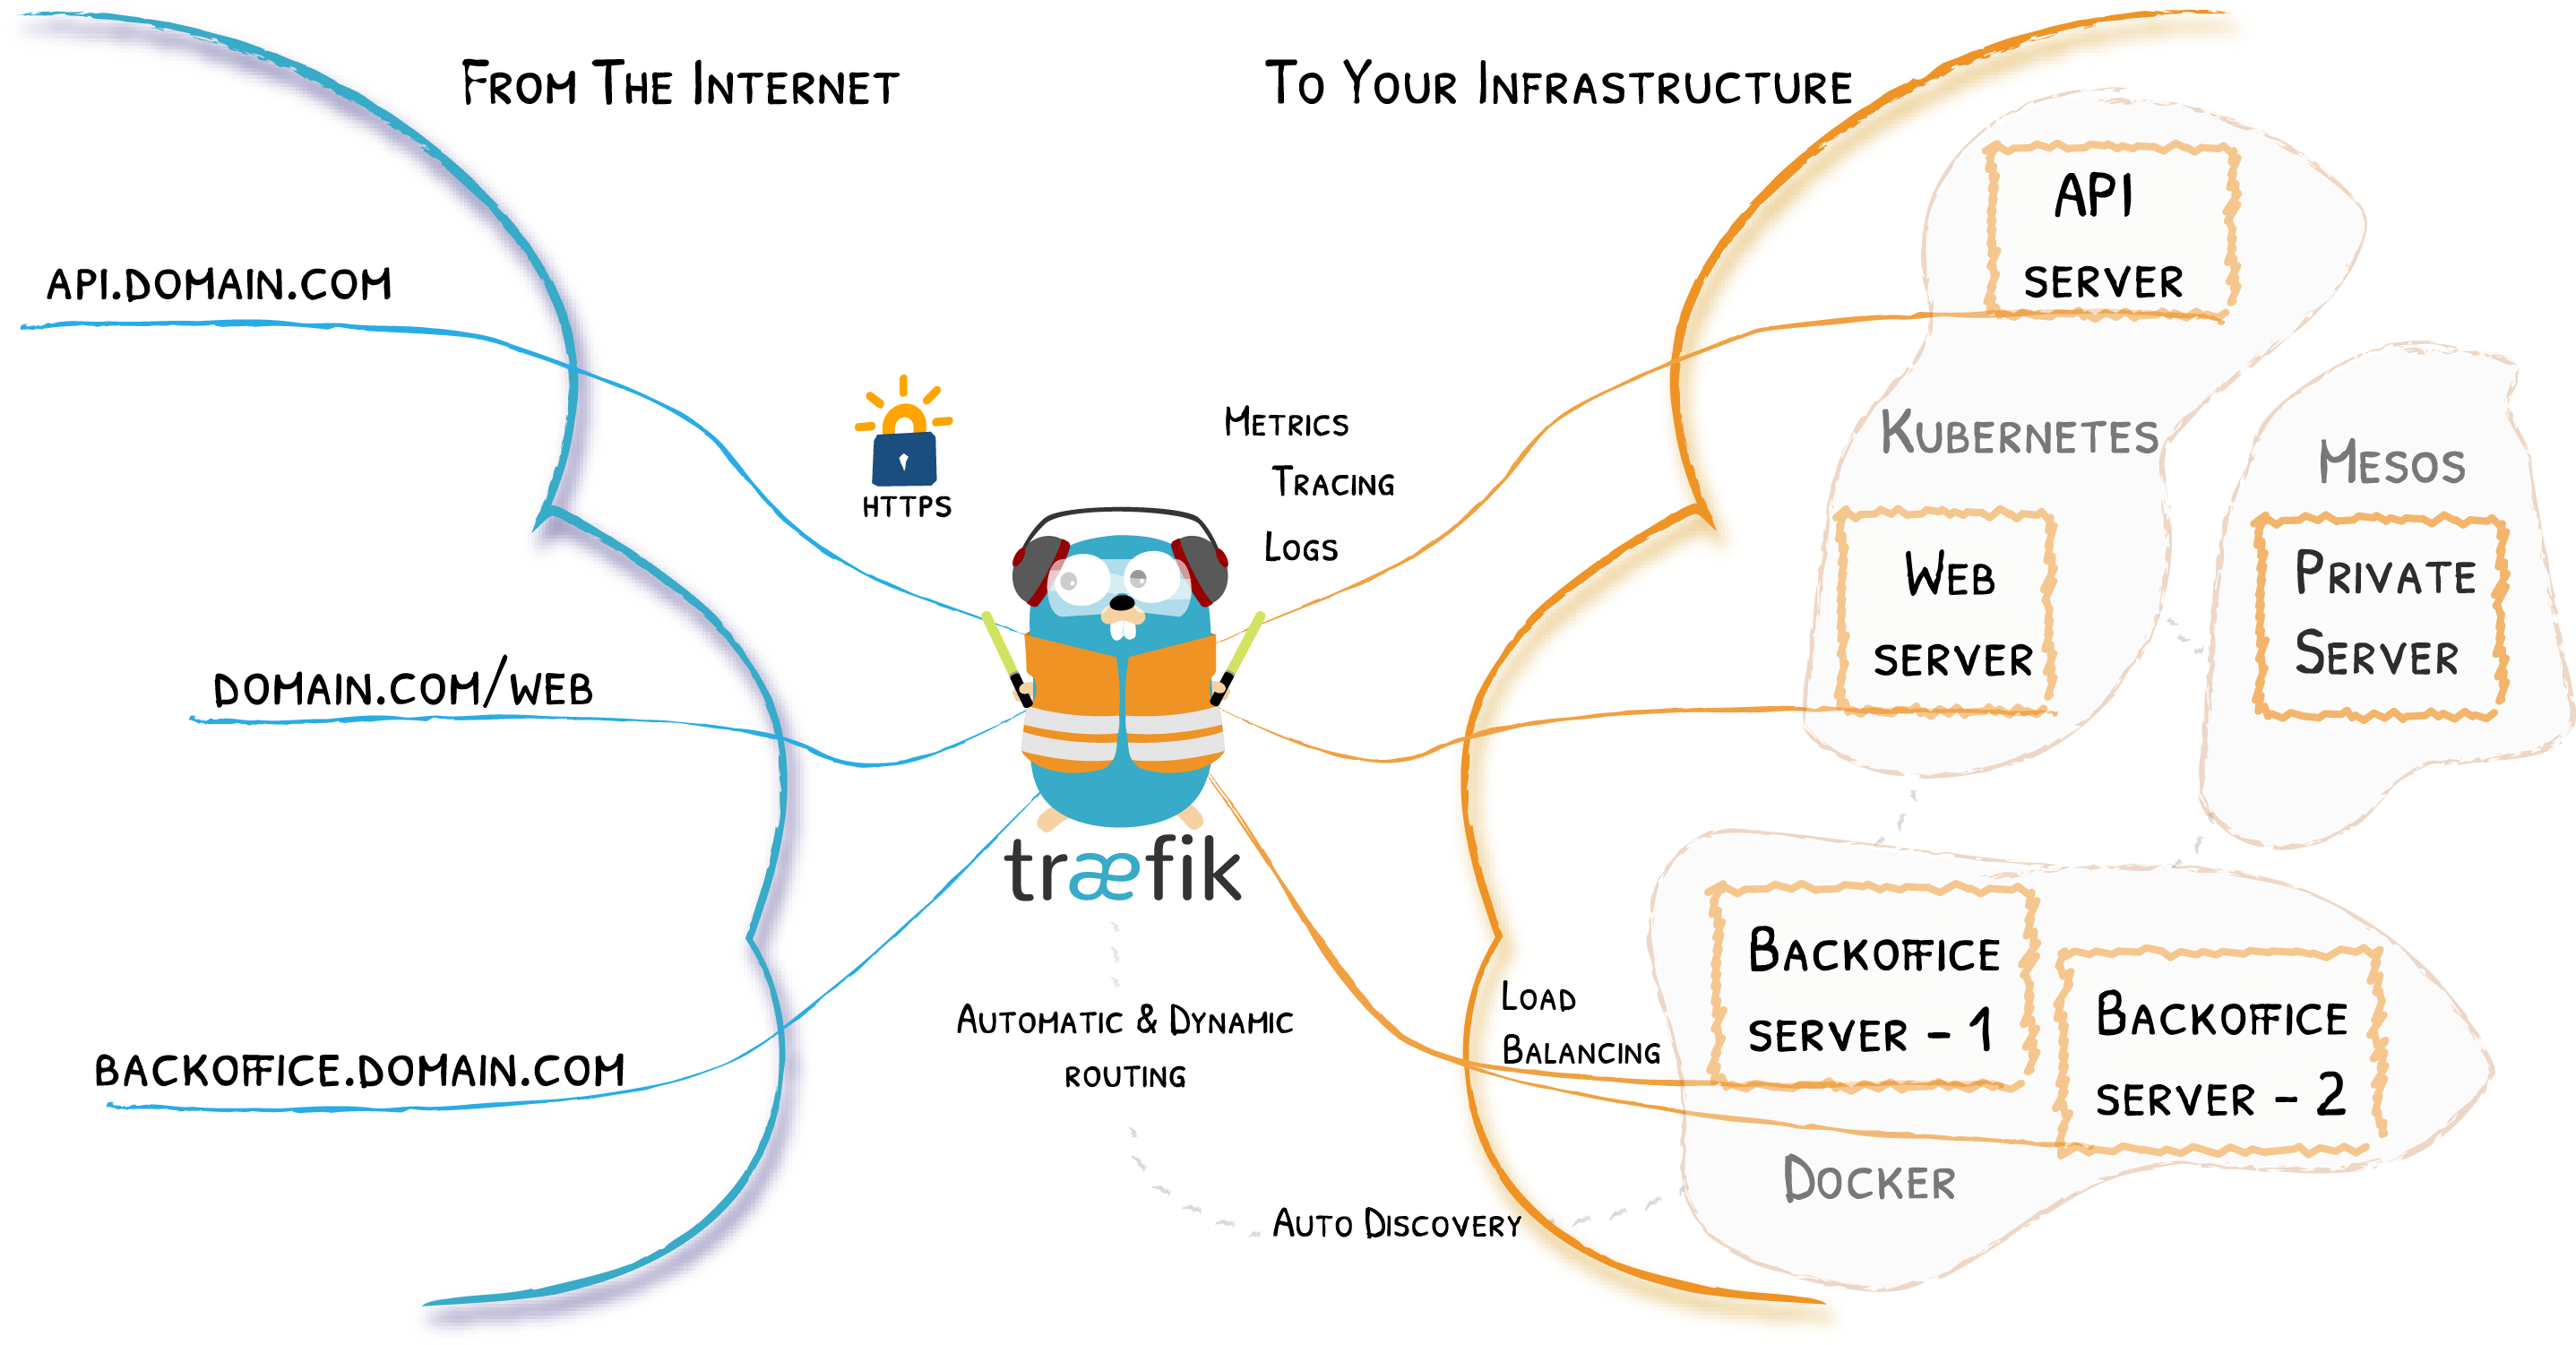
The server works by using Traefik to route requests to multiple services and their respective Docker containers. These services can then be accessible from the internet through a single secure entrypoint.
Traefik automatically discovers the right configuration for each service, making it easy to configure and maintain a multi-service system.
Service configuration is specified using Docker compose. Each service contains its own docker-compose file which is used to specify the service's necessary components and dependencies.
Below is an diagram of how Traefik works in a multi-service system accessible from the internet.
Access the server from the internet
This home server system assumes it is accessible from the internet and, for that reason, it requires some previous preparation:
- Access home router configurations and add port forwarding for port 80 and 443 to the host server.
- Get a domain name for which the server will be associated with. Use a registar like Epik.
- Connect your domain and server with DNS records.
- With a static IP address you can do this directly in the registar website.
- If you don't have a static IP address (more likely for home servers), use a dynamic DNS provider like Cloudflare. See section Set up dynamic DNS.
- Use Traefik as your gateway to forward requests to your services!
Update the system with new services
It is simple and easy to configure a new service in the system:
- Write the docker-compose file for the service.
- The application container should belong to the
home-servernetwork. See the Docker network section. - Traefik detects service-specific configurations through Docker labels. See the Traefik service configuration section.
- The application container should belong to the
- Traefik's container should be up and running. The container can be launched with
cd traefik && docker compose -f traefik-compose.yml up -d. - The new service should be up and running. Traefik will then setup the forwarding of the service to the defined subdomain automatically. You can check the current active routes in the Traefik dashboard.
Docker network
By creating a custom Docker network, the container ports are only available on this network and anywhere else, making it easy and secure for containers and services to communicate between them.
- Create the home-server network:
docker network create home-server. - Then add the following snippet to the docker-compose file for both Traefik and any running service:
# Service-level specification
...
networks:
  - frontend
  - backend  # Add ONLY if the service shouldn't be routed through Traefik or should communicate with a service that isn't

# Top-level specification
networks:
  frontend:
    external: true
    name: home-server
  backend:  # Add ONLY if the service should belong to backend network
Traefik service configuration
Service configuration, or Dynamic configuration, is important to let Traefik know how each service should be routed.
- Add the following snippet to the docker-compose file for each of the running services:
# Service-level specification
...
labels:
  - traefik.enable=true
  - traefik.http.routers.service.rule=Host(`service_subdomain`)
  - traefik.http.routers.service.entrypoints=websecure
  - traefik.http.routers.service.tls.certresolver=myresolver
For additional information on service-level configuration you can see the dedicated Traefik reference.
Set up dynamic DNS
This section describes how to set up dynamic DNS with Cloudflare and ddclient.
Requirements:
- Acquire a domain using a registar like Epik.
- Sign up to Cloudflare and follow the steps given for updating your domain name to point towards Cloudflare’s DNS (go to "Add a Site" on the "Websites tab").
- Install
ddclienton the server to update dynamic DNS entries for accounts on Dynamic DNS Network Service Provider:sudo apt update && sudo apt install ddclient. - Replace existing uncommented lines in
/etc/ddclient/ddclient.confmaking sure to replace the username, api-key, zone and the DNS record names with the ones you used to set up your Cloudflare account:
use=web, web=checkip.dyndns.com/, web-skip='IP Address'
ssl=yes
protocol=cloudflare
server=api.cloudflare.com/client/v4
login=your_email
password=your_cloudflare-global-api-key
zone=your_domain.com
dns-record-name-update-1,dns-record-name-update-2
- Restart
ddclientwithsudo /etc/init.d/ddclient restart.
To run ddclient as a daemon:
- Add
run_daemon="true"and setrun_dhclientandrun_ipuptofalsein the/etc/default/ddclientfile. - Start the
ddclientservice:sudo service ddclient start(ensure everything runs smoothly withsudo service ddclient status). - Force ddclient to update IP address once a week (required by some DDNS services): Create the
/etc/cron.weekly/ddclientfile and add the following lines:
#!/bin/sh
/usr/sbin/ddclient -force
- Make the script executable:
sudo chmod +x /etc/cron.weekly/ddclient - Check everything runs smoothly
sudo service ddclient status
Directory structure
Each hosted service contains a folder with its name in the repository.
Inside each folder is the corresponding service docker-compose file used to launch it, and a .gitignore file in case any files are passed to the container and should be kept out of version control. An optional README file can be kept in the subdirectory to give additional information to the service.