This repository contains the code for the front-end portal to the NICE (Network Insight Collaboration Environment) configuration of Veritable.
The Network Insight Collaboration Environment aims to demonstrate that an innovative approach, based on new and existing technology, will allow supply chains to share insights and data across multiple data platforms, enhancing the efficiency of the supply chain network. It forms part of Critical Minerals, one of the flagships of the Digital Supply Chain Hub run by Made Smarter Innovation.
- docker 19.03.0+
- docker-compose v2.23.0+
- npm 10.0.0+
- node 20.0.0+
To install all project requirements, use:
npm i
To run a full Peer agent stack, use:
npm run compose:up:agent
Once running, the agent frontend is available at http://localhost:3000 and the API is available at http://localhost:3000/api/docs
Configuration options are set using environment variables defined in a .env file in the project root.
To run more than one agent at a time, docker compose project names must be set, and configuration options for each agent defined through .env.${PROJECT_NAME} files at the project root.
As an example, configuration options have been defined in this repository for the following 3 agents:
nice-agent-alice: a Peer nodenice-agent-bob: a second Peer nodenice-agent-issuer: an Issuer node
These 3 agents can be run with the following command: npm run compose:up
With the default configurations defined in this repo's .env.* files, the portals will be available at:
- Peer 1 (Alice): http://localhost:3000
- Peer 2 (Bob): http://localhost:3001
- Issuer: http://localhost:3002
Note: Although many Peer nodes can be run simultaneously, only a single Issuer node can be run at a time.
To form out of band connections between personas, nice-agent-portal uses implicit invitations that resolve via public web DIDs. Each persona needs a separate public DID hosted somewhere on the internet. You will need to generate three DIDs, one for each persona.
The following assumes all personas are running in Docker using npm run compose:up:test
An example DID (Alice):
{
  "@context": [
    "https://www.w3.org/ns/did/v1",
    "https://w3id.org/security/suites/jws-2020/v1"
  ],
  "id": "did:web:YOUR_USERNAME.github.io:dids:test:alice",
  "verificationMethod": [
    {
      "id": "did:web:YOUR_USERNAME.github.io:dids:test:alice#owner",
      "type": "JsonWebKey2020",
      "controller": "did:web:YOUR_USERNAME.github.io:dids:test:alice",
      "publicKeyJwk": {
        "kty": "OKP",
        "crv": "Ed25519",
        "x": "PUBLIC_KEY"
      }
    }
  ],
  "authentication": ["did:web:YOUR_USERNAME.github.io:dids:test:alice#owner"],
  "assertionMethod": ["did:web:YOUR_USERNAME.github.io:dids:test:alice#owner"],
  "service": [
    {
      "id": "did:web:YOUR_USERNAME.github.io:dids:test:alice#did-communication",
      "type": "did-communication",
      "priority": 0,
      "recipientKeys": [
        "did:web:YOUR_USERNAME.github.io:dids:test:alice#owner"
      ],
      "routingKeys": [],
      "accept": ["didcomm/aip1"],
      "serviceEndpoint": "http://nice-agent-alice-veritable:5002"
    }
  ]
}
"serviceEndpoint": "http://nice-agent-alice-veritable:5002" matches the hostname of Alice's cloudagent container. The endpoint is used when resolving the DID.
The service endpoint for each persona is:
- http://nice-agent-alice-veritable:5002
- http://nice-agent-bob-veritable:5002
- http://nice-agent-issuer-veritable:5002
Use https://mkjwk.org/ with key type: OKP and curve: Ed25519 to generate a key-pair for each DID.
{
  "kty": "OKP",
  "d": "PRIVATE_KEY",
  "crv": "Ed25519",
  "x": "PUBLIC_KEY"
}
Use the x value for "x": "PUBLIC_KEY" in the DID. Save the private d value to be used later.
GitHub Pages can be used to host web DIDs for free:
- Create a public repo called
YOUR_USERNAME.github.io - In the repo, create your desired directory structure e.g.
dids/test/alice - Add a
did.jsonin the nested directory. - After pushing to GitHub, the DID can be viewed e.g. https://YOUR_USERNAME.github.io/dids/test/alice/did.json. Note the directory structure matches the did
did:web:YOUR_USERNAME.github.io:dids:test:alice.
The DID and PRIVATE_KEY of each persona is then set using env files at the root of this repo. For example:
.env.nice-agent-alice.local
DID=did:web:YOUR_USERNAME.github.io:dids:test:alice
PRIVATE_KEY=PRIVATE_KEY
.env.nice-agent-bob.local
DID=did:web:YOUR_USERNAME.github.io:dids:test:bob
PRIVATE_KEY=PRIVATE_KEY
.env.nice-agent-issuer.local
DID=did:web:YOUR_USERNAME.github.io:dids:test:charlie
PRIVATE_KEY=PRIVATE_KEY
Finally, before forming connections, each DID needs to be imported to its cloudagent using the dids/import endpoint. With containers up using npm run compose:up:test, run the following script, which automatically uses DIDs and private keys from the .local env files to import all three personas:
./scripts/import.shIndividual personas can also be imported:
./scripts/import.sh alice
./scripts/import.sh bob
./scripts/import.sh issuerTo build the agent, use the following command at the project root:
npm run build
To run the agent in development mode, first bring up dependencies with (choose one of alice bob or issuer, depending on which persona of noe you would like to run):
npm run compose:up:deps:dev:<alice|bob|issuer>
npm run dev:<alice|bob|issuer>
To run an agent in development mode against other agents, the steps are:
- If running the issuer in development mode, define its hostname and port as env vars
- Set up all non-development agents in production mode using
npm run compose:up:<agent-name> - Set up the dependencies of the agent to be run in development mode, loading the development environment variables using
npm run compose:up:deps:<agent-name> - Start the target agent in develpoment mode with the required environment variables loaded using
npm run dev:<agent-name>
For example, to work on the issuer node in development mode, run the following commands:
(export ISSUER_HOST=host.docker.internal ISSUER_PORT=3002 &&
 npm run compose:up:agent:alice &&
 npm run compose:up:agent:bob &&
 npm run compose:up:deps:dev:issuer &&
 npm run dev:issuer)
Or, for another example, to work on peer alice in development mode, run the following commands:
npm run compose:up:agent:bob
npm run compose:up:agent:issuer
npm run compose:up:deps:dev:alice
npm run dev:alice
Or, for another example, to work on peer bob in development mode, run the following commands:
npm run compose:up:agent:alice
npm run compose:up:agent:issuer
npm run compose:up:deps:dev:bob
npm run dev:bob
To bring down the entire cluster, use the command
npm run compose:down
And to reset the state of the cluster (warning: this will delete all data) use the command
npm run compose:down:clean
To run unit test suites use the command npm run test:unit
To run integration test suites, dependencies must be brought up in test mode using
npm run compose:up:deps:test
This will start the dependencies up in a clean ephemeral state. Now tests can be run for using
npm run test:integration
E2E tests require correctly configured DIDs for each persona. See here.
To run E2E tests a full cluster of 2 peers and an issuer must be set up in test mode using
npm run compose:up:test
This will start the cluster in a clean ephemeral state. Tests can now be run using
npm run test:e2e:wait4peers
(this script waits until the IPFS nodes have successfully formed a swarm before beginning tests).
Note: If successful, the E2E tests will clean up any resources they create. If the tests fail, howevere, the cluster could be left in a dirty state, and so npm run compose:up:test should be run again before tests are re-run.
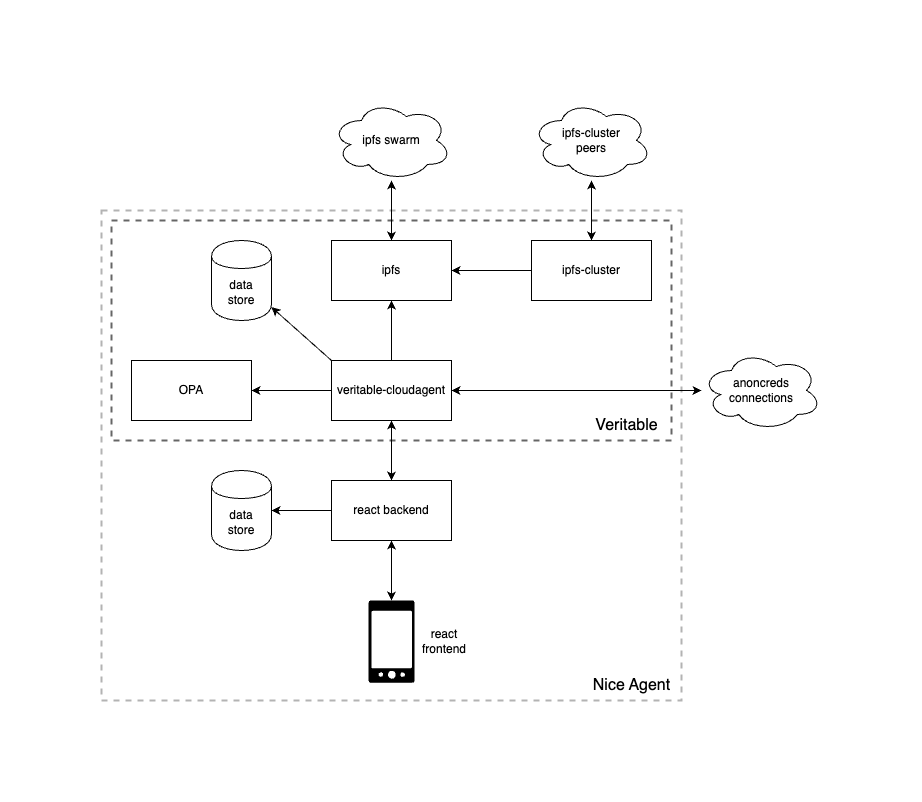
The NICE Agent is built on top of the Veritable agent, and this repo describes the portal that allows the Veritable agent to be utilized. The following diagram shows the entire architecture, although the NICE Agent will include different components depending on role (Issuer vs Peer).
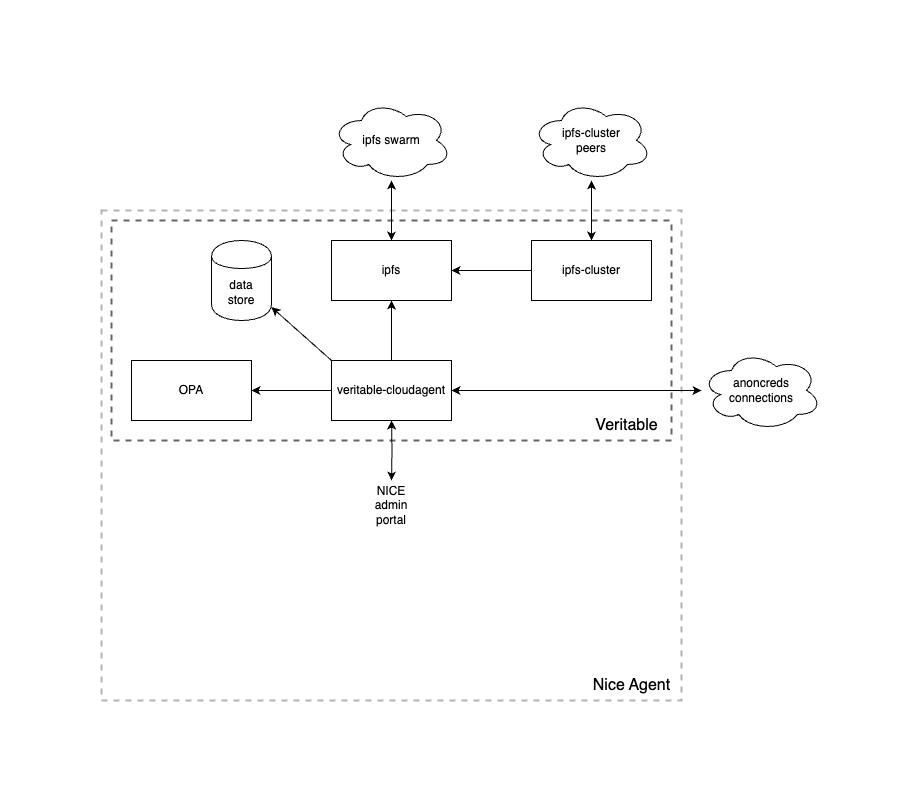
Below is the specific architecture for an Issuer node. Note that an Issuer node does not have a NICE frontend, it will be administered through a separate system. Also note that the ipfs-cluster component is included here - this allows for ensuring data stored to IPFS remains available should any particular node go down.
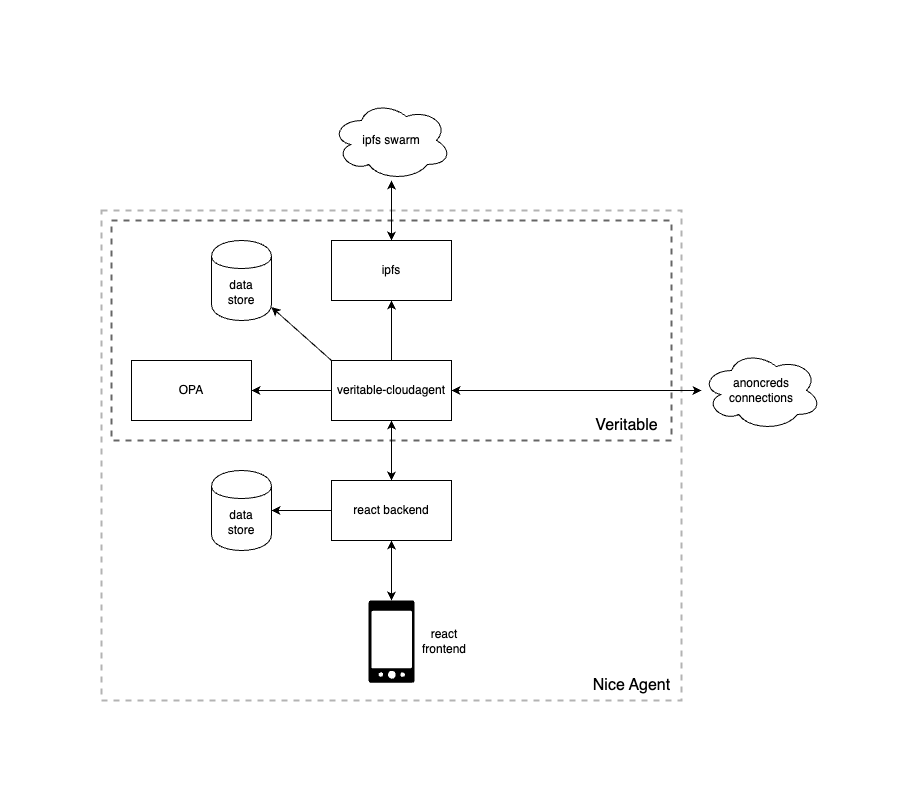
Below is the specific architecture for a Peer node (NICE participant, Supplier or Consumer). Note that nice-agent-portal (the react frontend and backend) acts as the gateway to the Veritable system. Also note that ipfs-cluster should not be required here, as each node is independently responsible for its own stored IPFS data being available.
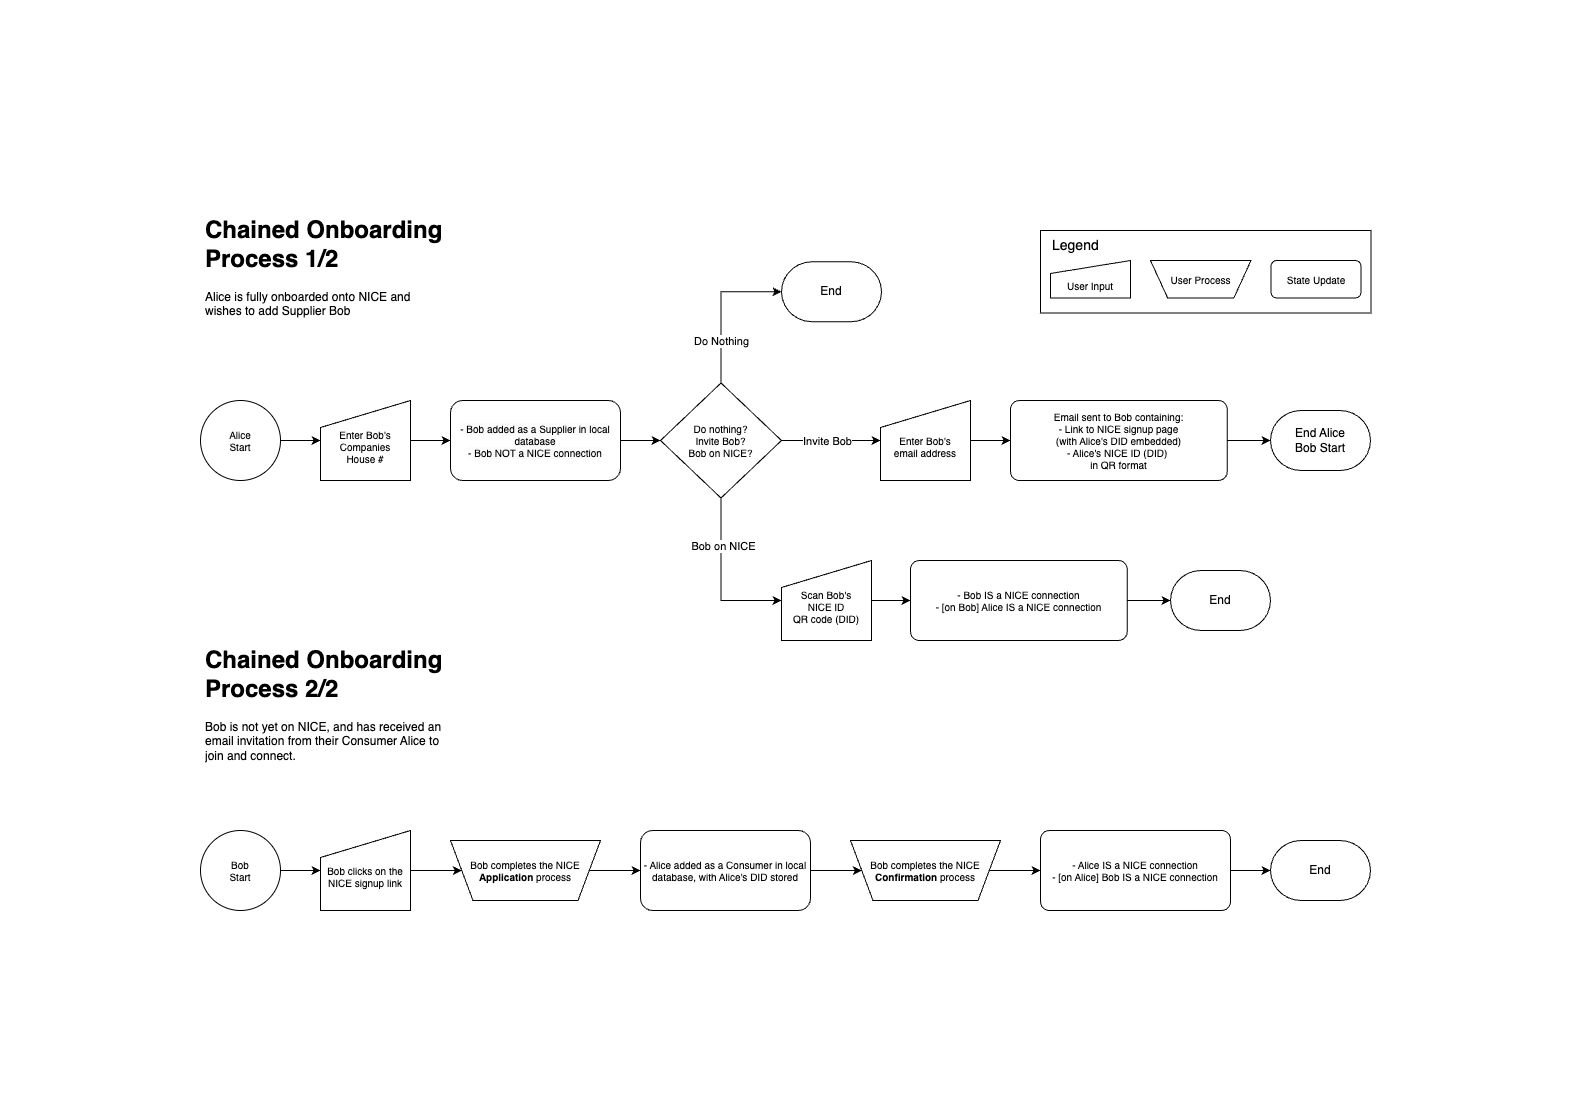
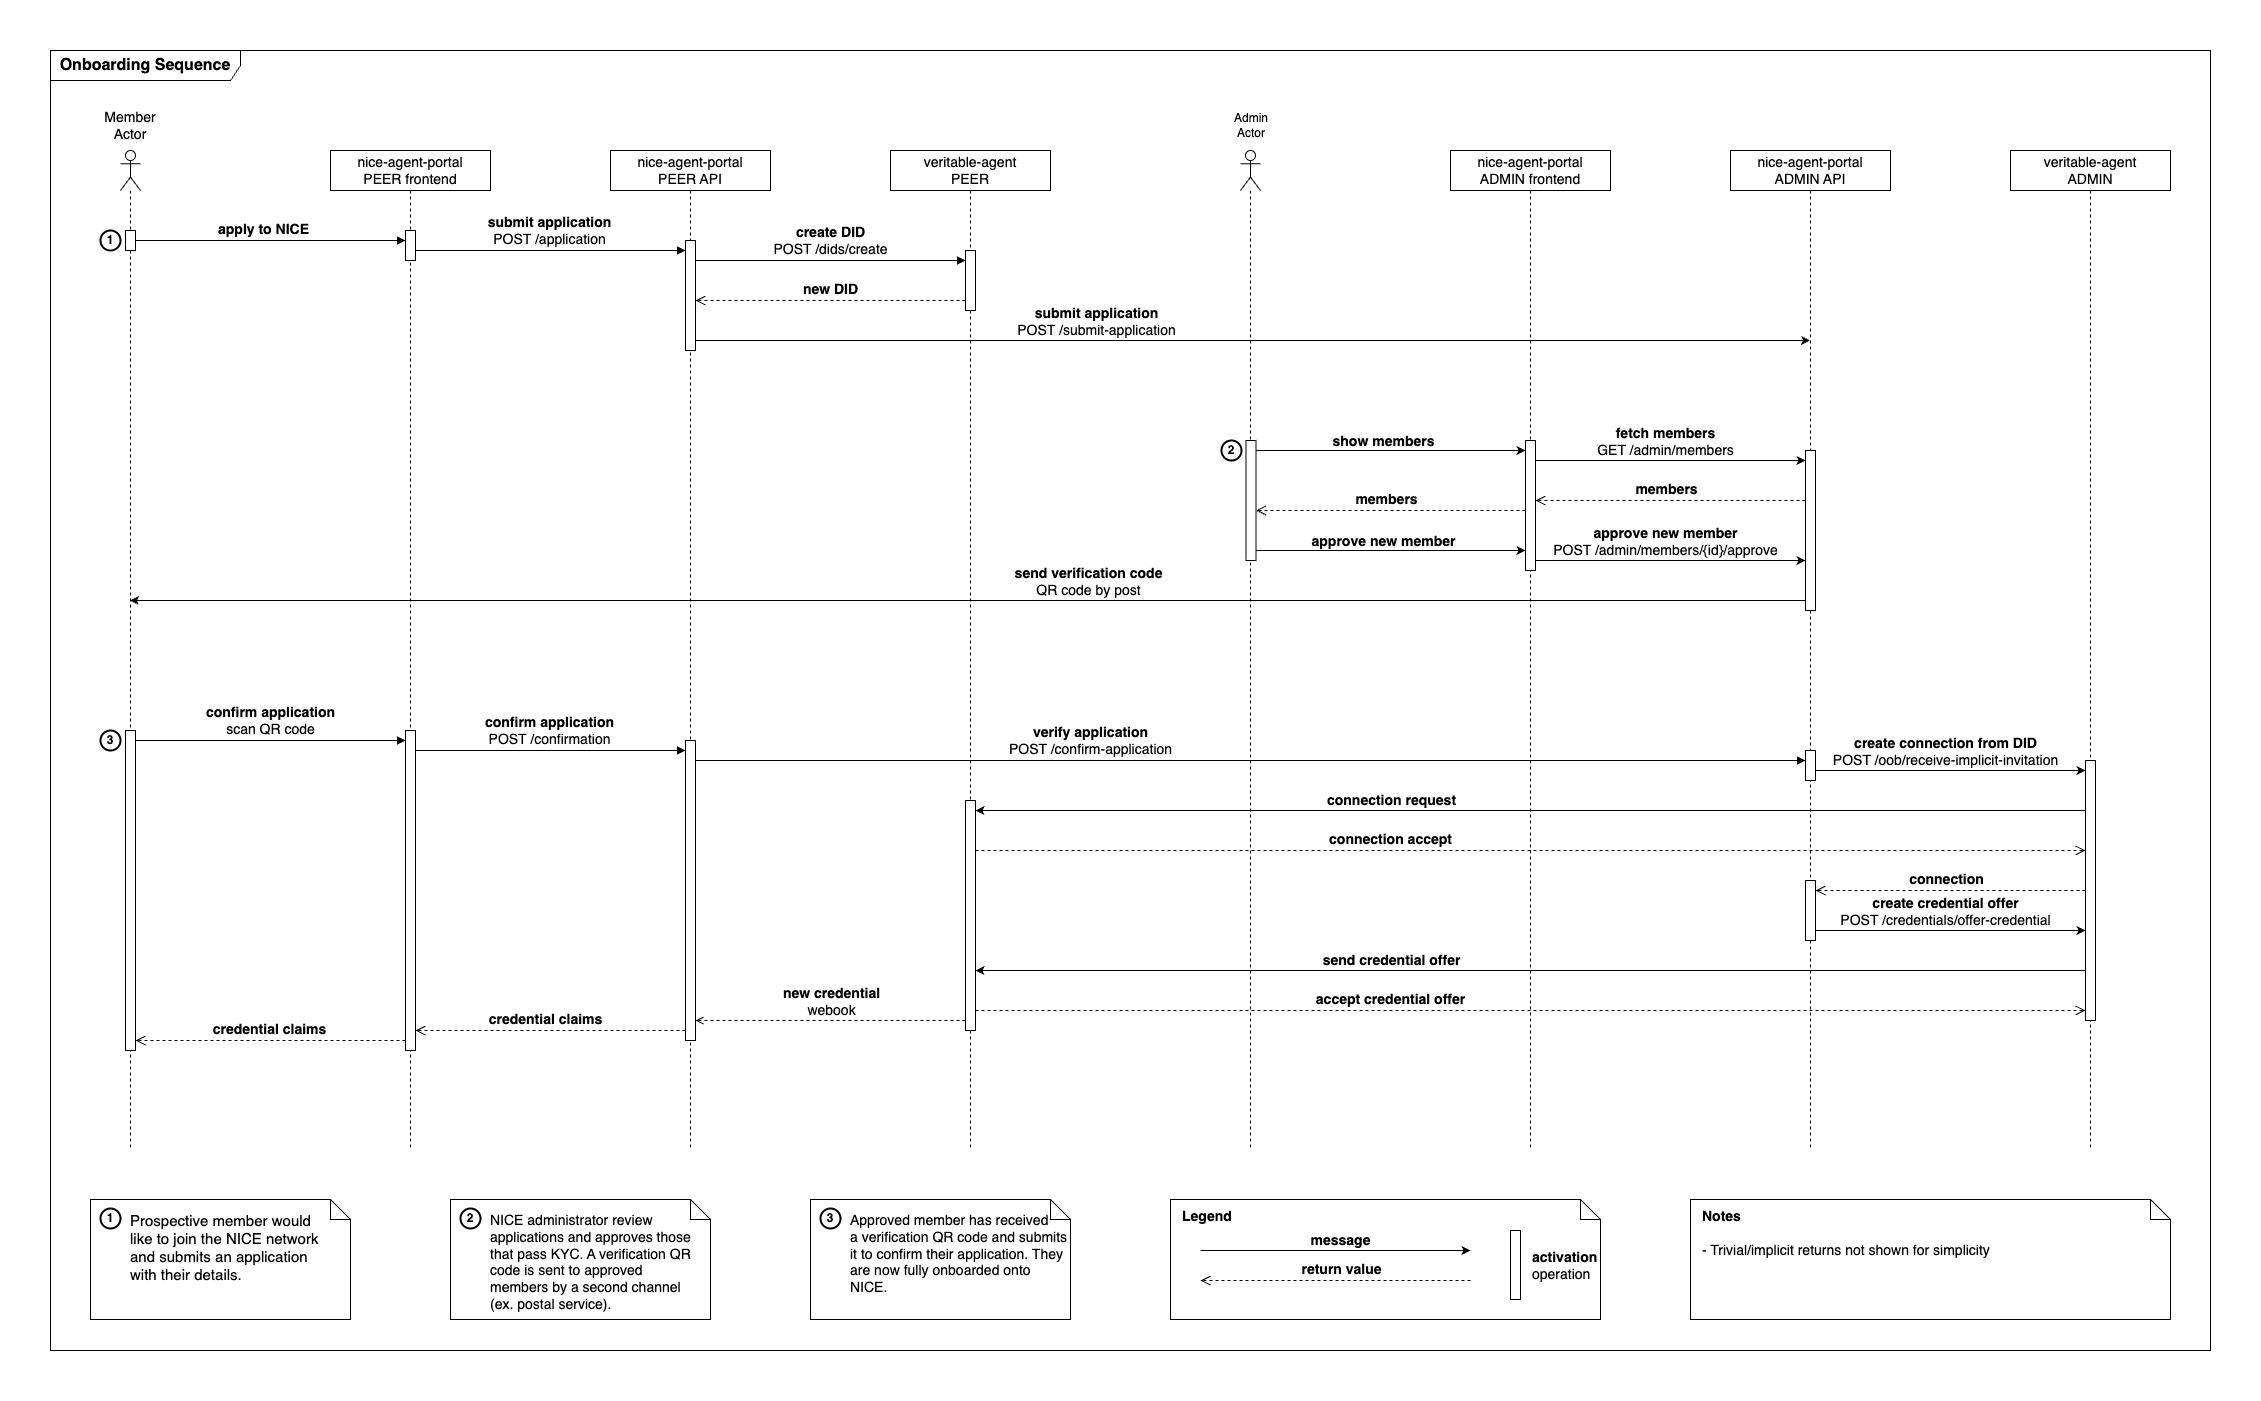
The onboarding process for NICE allows users to enroll as members, verify their credentials, and add elements of their supply chain. There are 4 processes documented:
-
Application: In this process, a prospective member has initialized their node through owned or shared infrastructure, and submits their identifying data to NICE for verification.

-
Confirmation: In this process, a prospective member's identity has been confirmed by NICE and they have been given the cryptograhic material required to create a credential through an Issuer node.

-
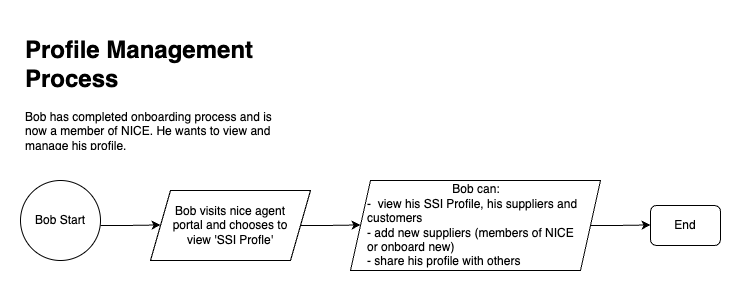
Profile Management: In this process, a fully-onboarded member is able to review their identity details, as well as adding elements to their immediate supply chain (consumers and/or suppliers).
-
Chained Onboarding: In this process, a fully-onboarded member is able to invite elements of their supply chain to NICE, and verify them once these participants are onboarded.
This repo contains a React frontend in the /frontend directory and a TSOA backend in the /backend directory.
This project is licensed under the Apache 2.0 license.
