This cucumber formatter works well with cucumber version 7.x. If you are still using cucumber 6.x refer to the version @restqa/cucumber-export@0.1.10
npm install @restqa/cucumber-exportconst { getFormatter } = require('@restqa/cucumber-export');The getFormatter object expose a function receving your exports options.
All The options are shared below.
Returns a cucumber formatter where the result will be pre-formatted and transferred to the selected destination.
Create a new file at the root of your project. (restqa-formatter.js)
# <root-dir>/restqa-formatter.js

const { getFormatter } = require('@restqa/cucumber-export')
const stream = require('stream')
const instance = new stream.Writable({
  write: (data, encoding, next) => {
    console.log(JSON.parse(data.toString('utf-8')))
    next()
  }
})


let envConfig = {
  uuid: 'xxx-yyy-zzz',
  name: 'local',
  env: 'uat',
  outputs: [
    {
      type: 'stream',
      enabled: true,
      config: {
        instance: instance
      }
    },
    {
      type: 'html',
      enabled: true,
      config: {
        path: 'my-report-folder', // (default: ./report)
        browserOpening: true // (default: true)
      }
    },
    {
      type: 'html-remote',
      enabled: true,
      config: {
        url: 'https://html-report.your-domain.dev' // (default : https://dashboard.restqa.io/reports)
      }
    },
    {
      type: 'webhook',
      enabled: true,
      config: {
        url: 'https://httpdump.io/lb8f7',
        method: 'POST',
        headers: {
          'x-apikey': 'xxx-yyy-zzz'
        }
      }
    },
    {
      type: 'elastic-search',
      enabled: true,
      config: {
        url: 'http://my-elastic-search.local:9200',
        index: 'bdd-e2e'
      }
    },
    {
      type: 'file',
      enabled: true,
      config: {
        path: 'my-report.json' // File to save
      }
    },
    {
      type: 'slack',
      enabled: true,
      config: {
        url: 'https://hooks.slack.com/service/xxx/yyy/zzz', // The slack webhook url
        onlyFailed: true, // Trigger the hook only for test failure  (default: false)
        showErrors: true,  // Show the error message within slack
        reportUrl: 'https://www.test.report/{uuid}' // The url to access to your detail test report if you have one
      }
    },
    {
      type: 'microsoft-teams',
      enabled: true,
      config: {
        url: 'https://outlook.office.com/webhook/xxx/IncomingWebhook/yyy/zzz', // The teams webhook url
        onlyFailed: true, // Trigger the hook only for test failure  (default: false)
        showErrors: true,  // Show the error message within teams
        reportUrl: 'https://www.test.report/{uuid}' // The url to access to your detail test report if you have one
      }
    },
    {
      type: 'line',
      enabled: true,
      config: {
        token: 'sEdkjfEr745aasd546saSDdjklawE74S', // The line notfication token
        onlyFailed: true, // Trigger the hook only for test failure  (default: false)
        reportUrl: 'https://www.test.report/{uuid}' // The url to access to your detail test report if you have one
      }
    },
    {
      type: 'discord',
      enabled: true,
      config: {
        url: 'https://discordapp.com/api/webhooks/xxx/yyy', // The discord webhook url
        onlyFailed: false, // Trigger the hook only for test failure  (default: false)
        showErrors: true,  // Show the error message within slack
        reportUrl: 'https://www.test.report/{uuid}', // The url to access to your detail test report if you have one,
        tts: false, // enable TTS for the message, false by default
        username: 'bot-name' //  alternative name for bot, uses the name it has in discord UI by default if nothing specified
      }
    },
    {
      type: 'mattermost',
      enabled: true,
      config: {
        url: 'https://your-mattermost-url/webhooks/xxx',
        onlyFailed: true, // Trigger the hook only for test failure  (default: false),
        showErrors: true, // Show the error message within Mattermost,
        reportUrl: 'https://www.test.report/{uuid}', // The url to access to your detail test report if you have one
        channel: 'town-square', // The channel to send messages to
        username: 'restqa-formatter', // Username to post as (only works if bot is allowed to change its name)
        iconUrl: '', // Link to bot profile picture (only works if bot is allowed to change image)
        iconEmoji: 'laughing',  // An emoji tag without the ':'s for bot profile picture (only works if bot is allowed to change image)
        displayedErrorsLimit: 25 // Limit the number of errors displayed in one message
      }
    },
    {
      type: 'custom-report-key',
      enabled: true,
      config: {
        key: 'value'
      }
    }
  ],
  customExporters: {
    'custom-report-key': function(config) {
      const { key } = config
      //console.log(result.success)
      return Promise.resolve('[CUSTOM REPORT][SUCCESS] - Your custom report is great!')
    }
  }
}

module.exports = getFormatter(envConfig)You can now run cucumber-js with the just created formatter
cucumber-js -f ./restqa-formatter.js:restqa.log
It's important to defined formatter export path to have access the logs, you can refer to the cucumber-js documentation (https://github.com/cucumber/cucumber-js/blob/master/docs/cli.md#formats)'
If you already have an JSON export file you can export the result using :
const { Export } = require('@restqa/cucumber-export')

async function main(result) {
  const options = {
    uuid: 'xxx-yyy-zzz',
    name: 'local',
    env: 'uat',
    outputs: [
      {
        type: 'html',
        enabled: true
      }
    ]
  }

  const exportResult = await Export(result, options)
  console.log(exportResult)
}

main(result)
IMPORTANT : The duration can't be defined if you use this method. (it will appear as 0 into your repart)
The Options are mandatory.
Represent the unique identifier of current test suit exported.
Default: autogenerated from uuid : v4
Represent the name of the current test suite (example: The backend api for the mobile application)
Represent a custom title that you want to show at the beginning of the export. (default: CUCUMBER EXPORT)
Represent a unique key of the current test suite (example: 2018–01–30T12:34:56+00:00)
Default: current datetime
Represent a unique key of the current test suite (example: backend-api)
Represent a environment of the current test suite (example: uat)
You can configure different output, see below the available output reporters.
Export the result to a Writable Stream
{
  type: 'stream',
  enabled: true,
  config: {
    instance: WritableStream // The writable stream instance
  }
}
Export the result to a JSON file
{
  type: 'file',
  enabled: true,
  config: {
    path: 'my-report.json' // File to save
  }
}
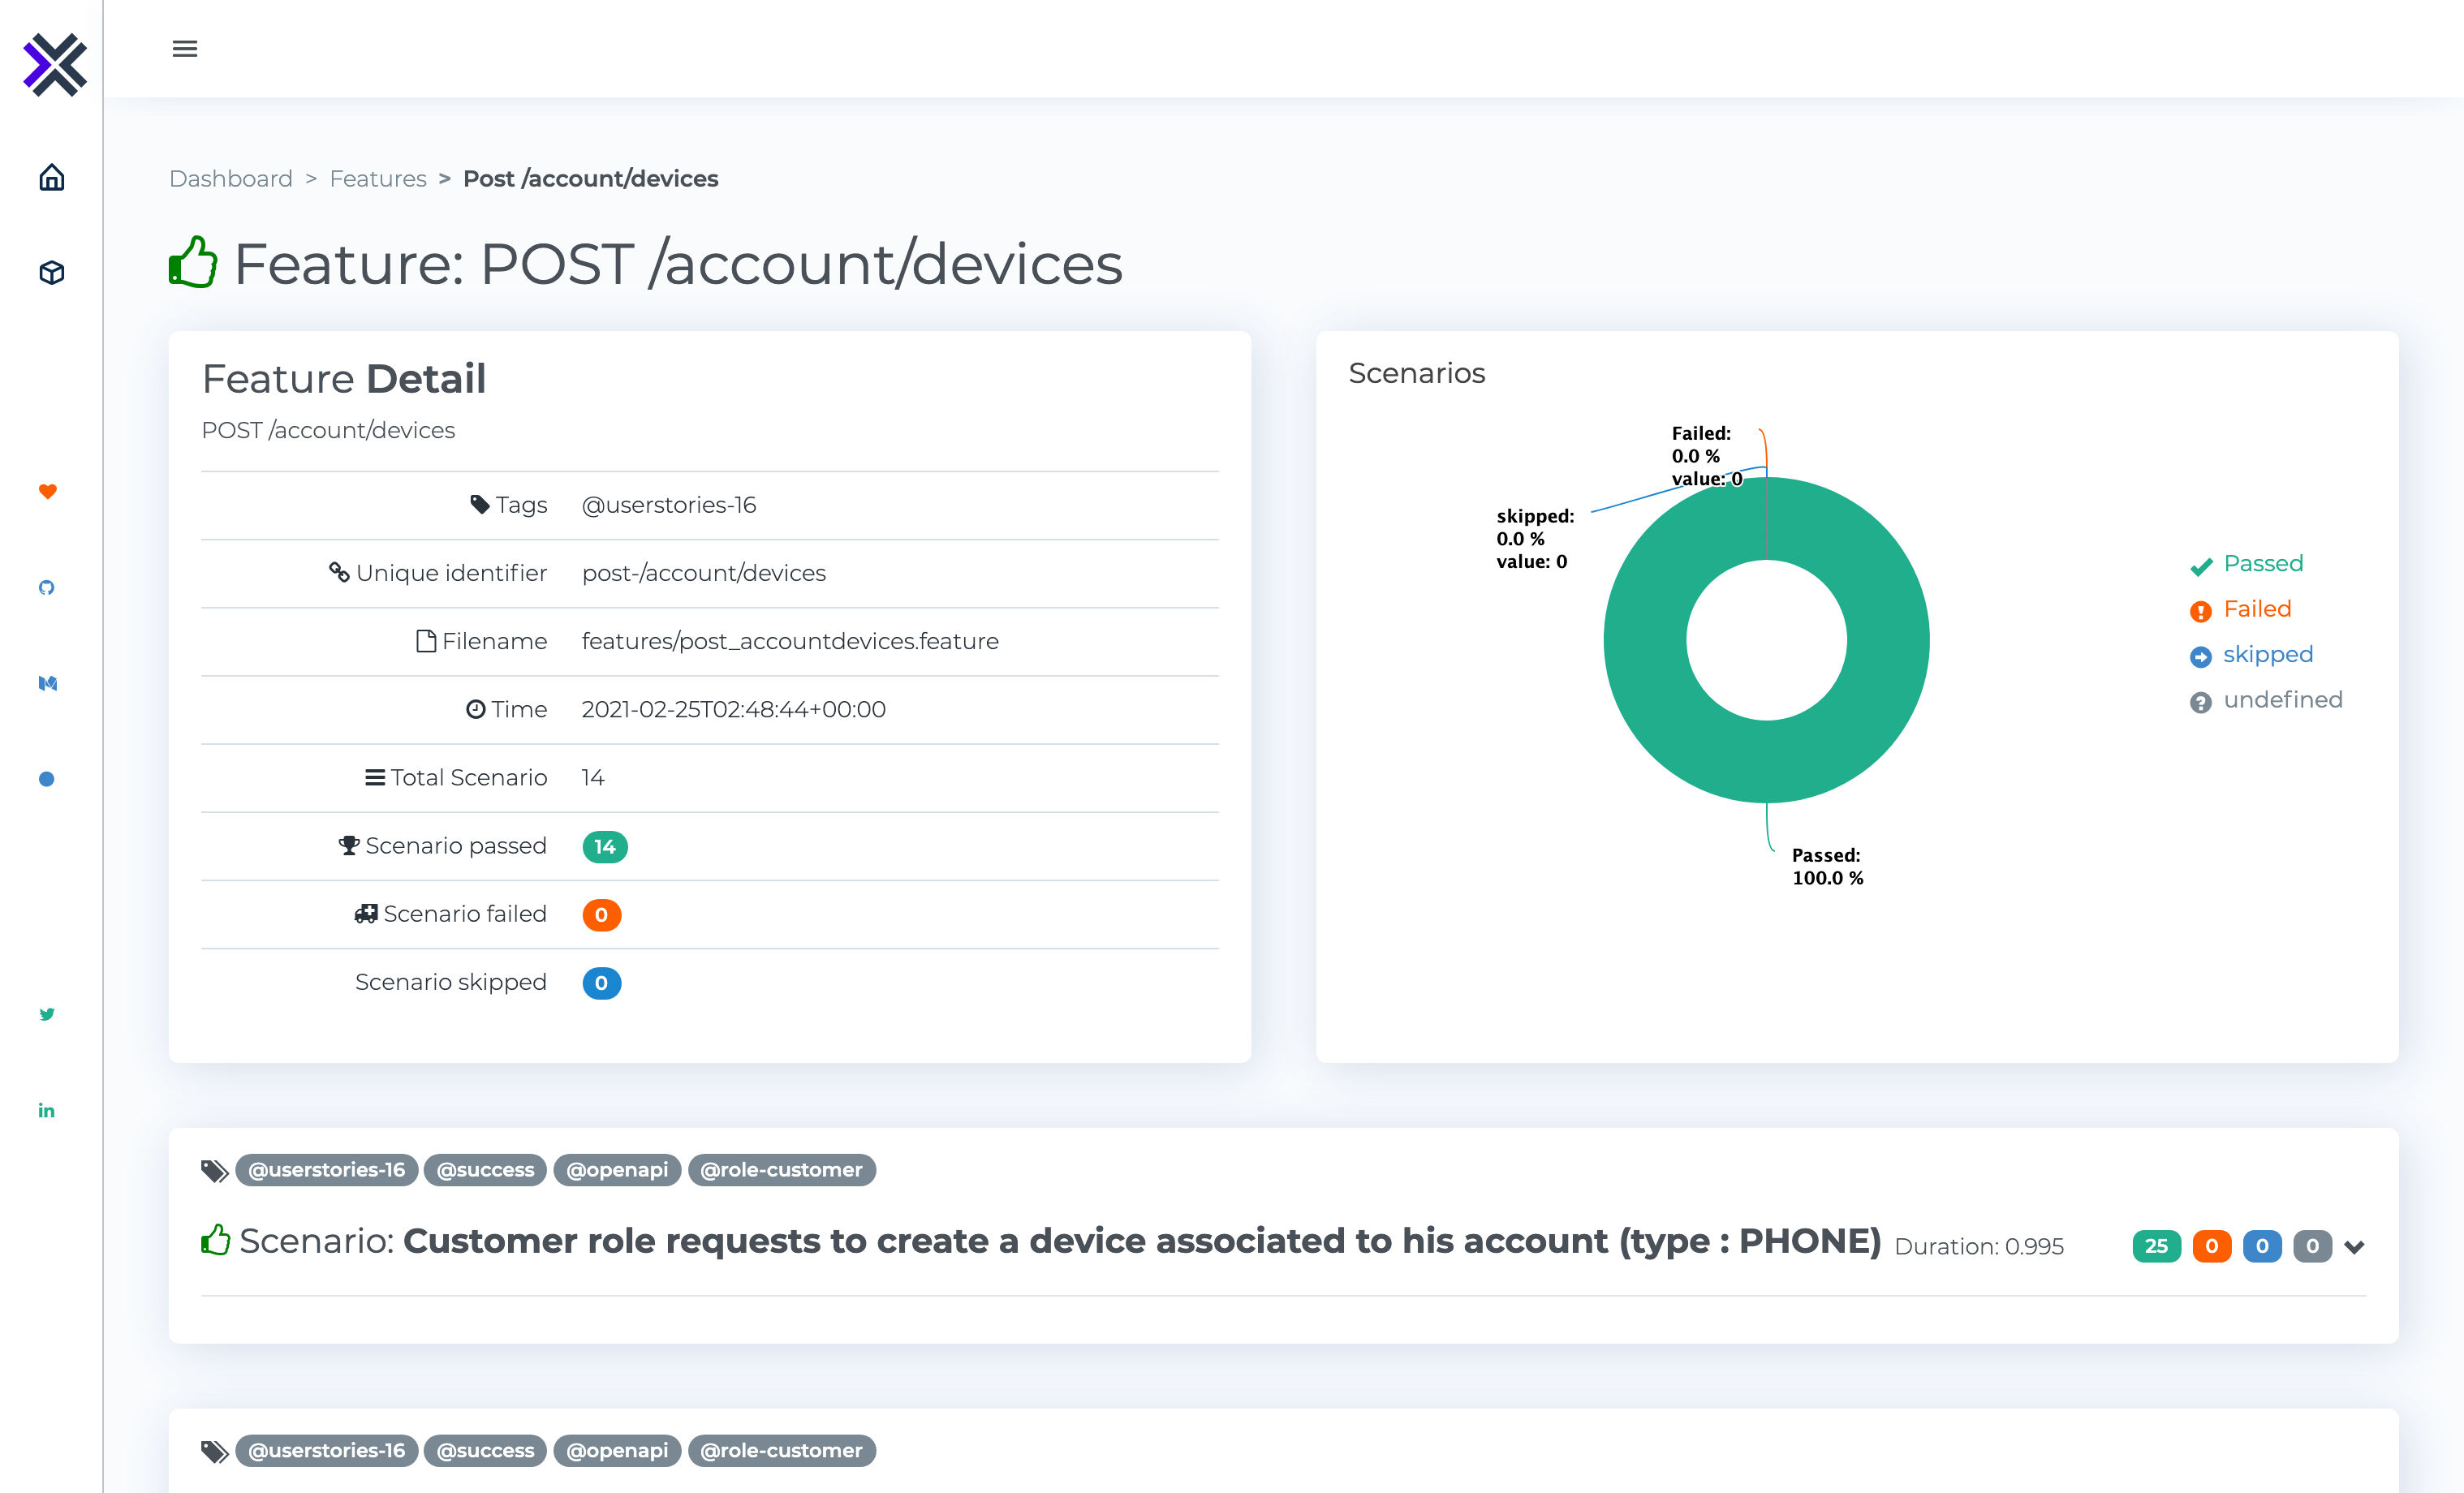
Export the result to a local file folder as HTML format
{
  type: 'html',
  enabled: true,
  config: {
    path: 'my-folder', // Folder to save the report
    browserOpening: true // Open the report on the default browser
  }
}
Example:
Export the result to a webhook
{
  type: 'webhook',
  enabled: true,
  config: {
    url: 'https://httpdump.io/rb6zi', // The http endpoint to send the result
    method: 'POST', // The http method to use
    headers: { // The request headers to use
      apikey: 'xxx-yyy-zzz'
    }
  }
}
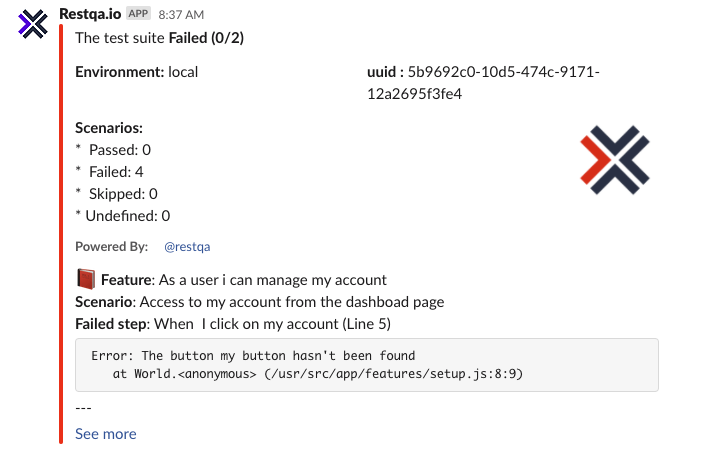
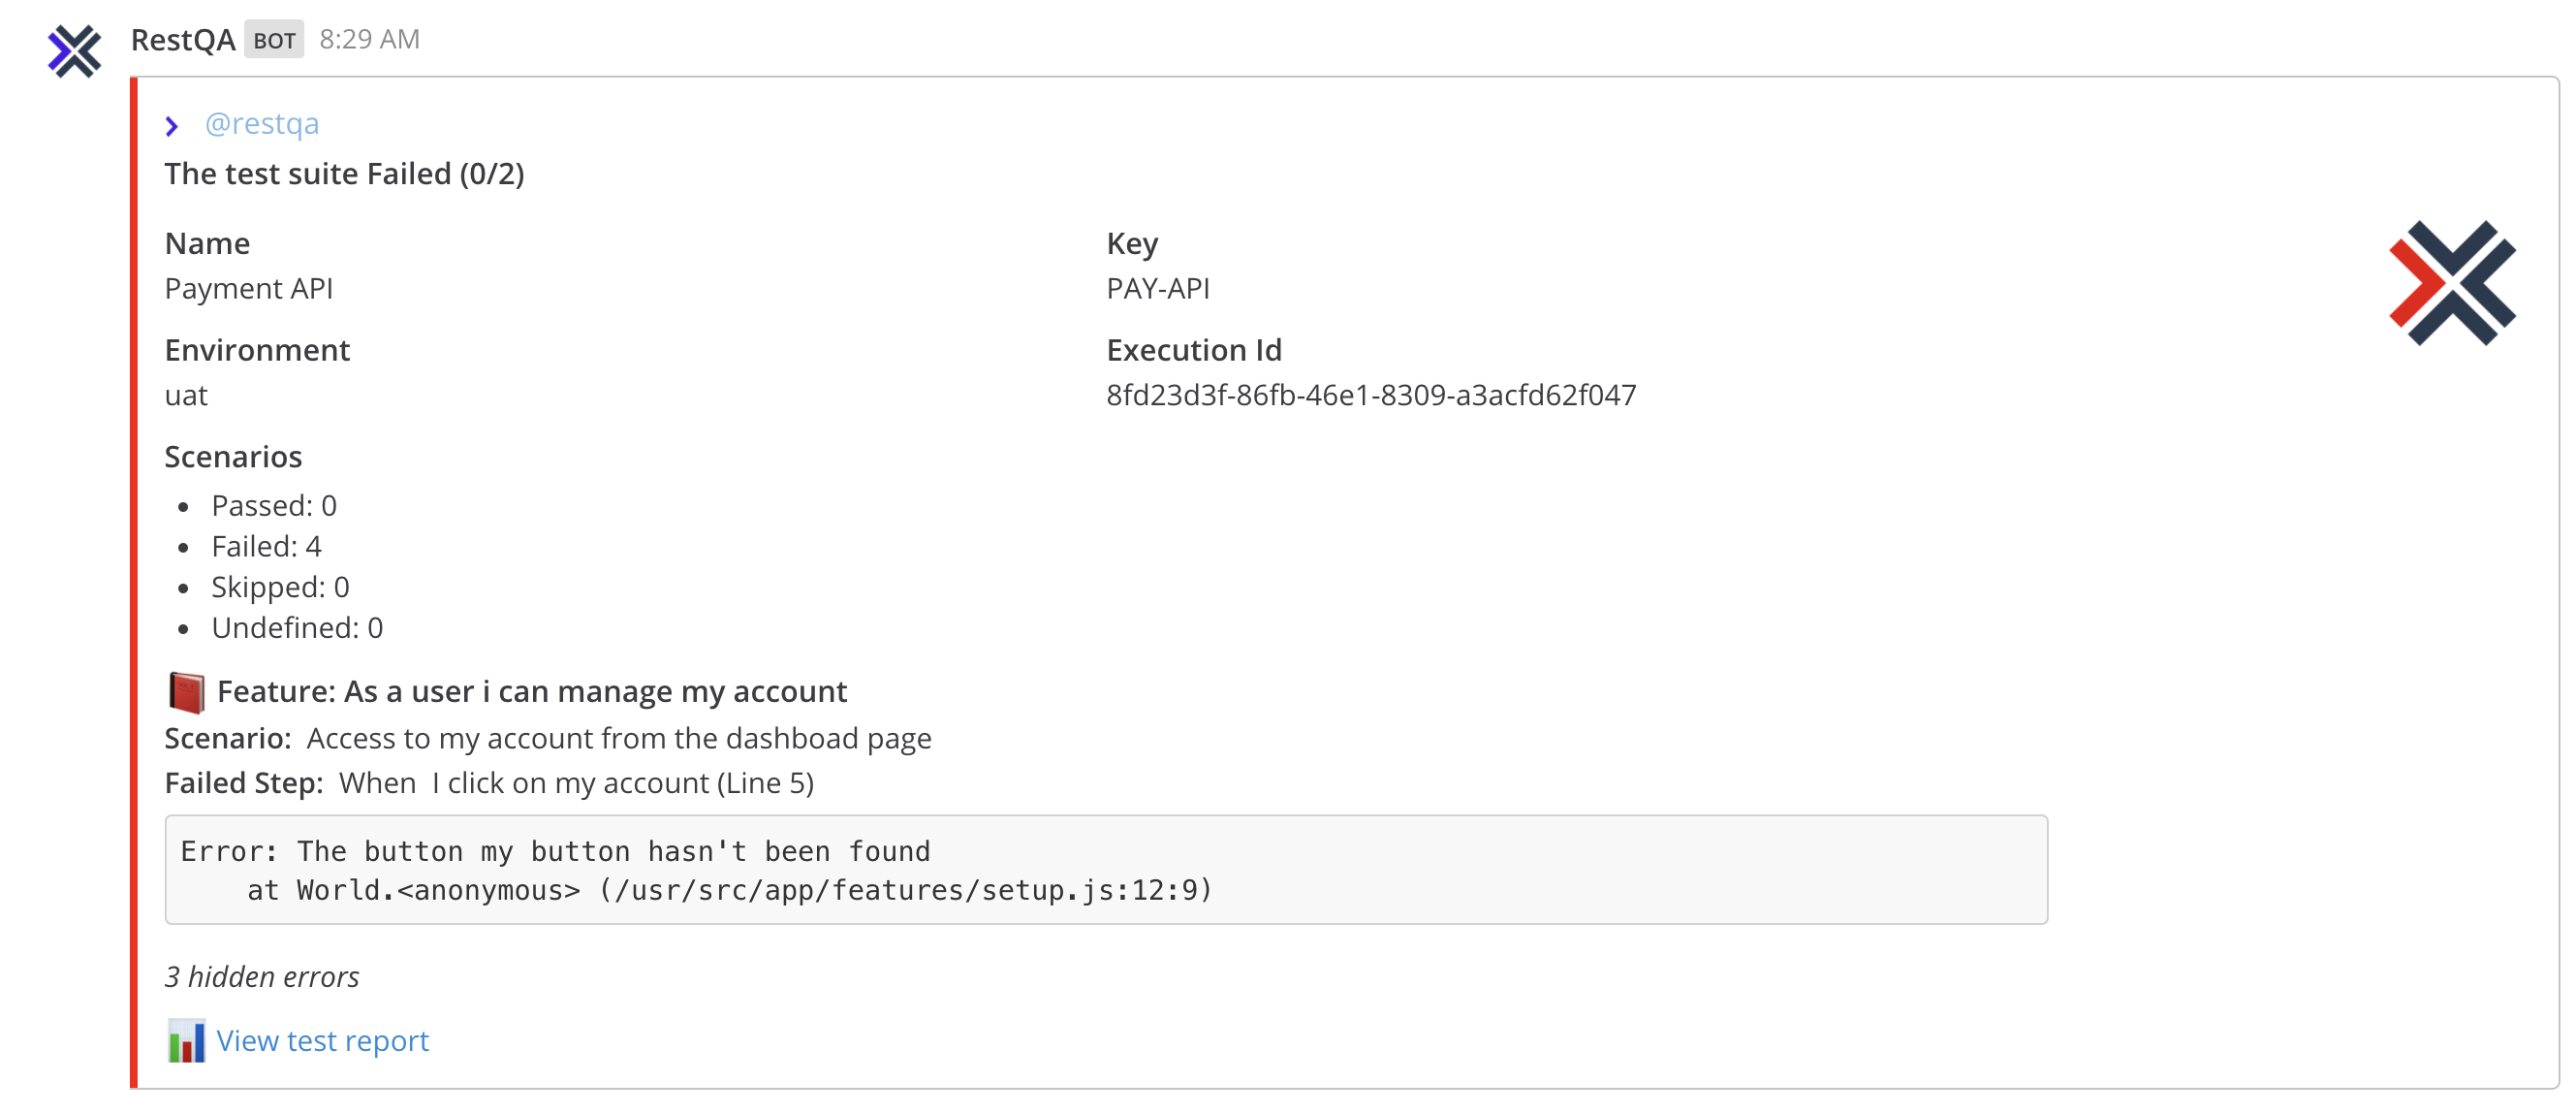
Receive a notification on slack about you test report
{
  type: 'slack',
  enabled: true,
  config: {
    url: 'https://hooks.slack.com/service/xxx/yyy/zzz', // The slack webhook url
    onlyFailed: true, // Trigger the hook only for test failure  (default: true)
    showErrors: true,  // Show the error message within slack
    reportUrl: 'https://www.test.report/{uuid}' // The url to access to your detail test report if you have one
  }
}
Example:
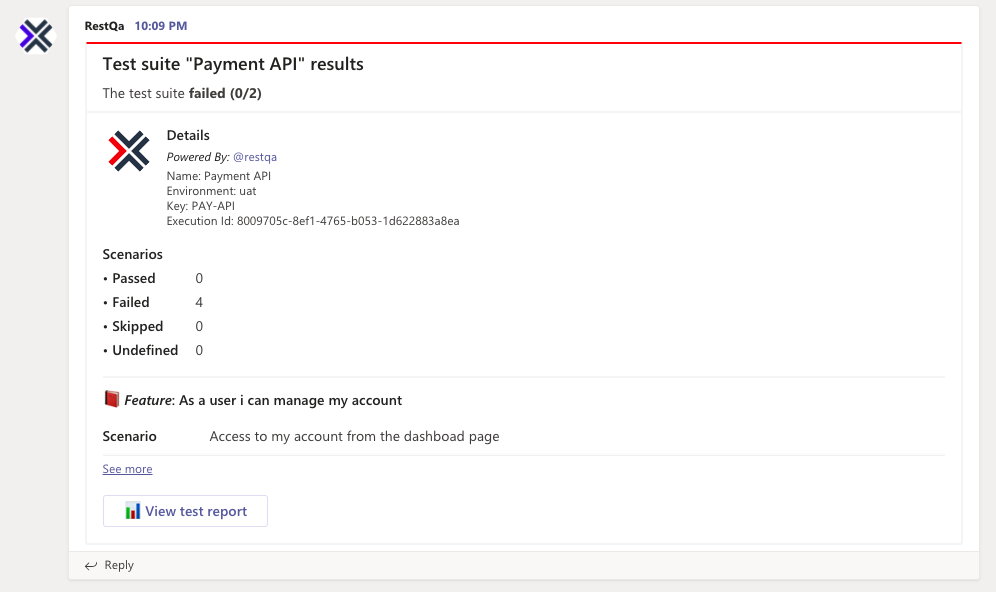
Receive a connector card in your Microsoft Teams channel when your test finishes
{
  type: 'microsoft-teams',
  enabled: true,
  config: {
    url: 'https://outlook.office.com/webhook/xxx/IncomingWebhook/yyy/zzz', // The teams webhook url (tutorial : https://docs.microsoft.com/en-us/learn/modules/msteams-webhooks-connectors/5-exercise-incoming-webhooks)
    onlyFailed: true, // Trigger the hook only for test failure  (default: true)
    showErrors: true,  // Show the error message within teams
  }
}
In order to get the url of the incoming webhook, take a look at : https://docs.microsoft.com/en-us/learn/modules/msteams-webhooks-connectors/5-exercise-incoming-webhooks
Example:
Receive a message in your Discord channel when your test finishes via webhook. See how to set up the webhook bot here:
{
  type: 'discord',
  enabled: true,
  config: {
    url: 'https://discordapp.com/api/webhooks/xxx/yyy', // The discord webhook url
    onlyFailed: false, // Trigger the hook only for test failure  (default: true)
    showErrors: true,  // Show the error message within slack
    reportUrl: 'https://www.test.report/{uuid}', // The url to access to your detail test report if you have one,
    tts: false, // enable TTS for the message, false by default
    username: 'bot-name' //  alternative name for bot, uses the name it has in discord UI by default if nothing specified
  }
}
Example:
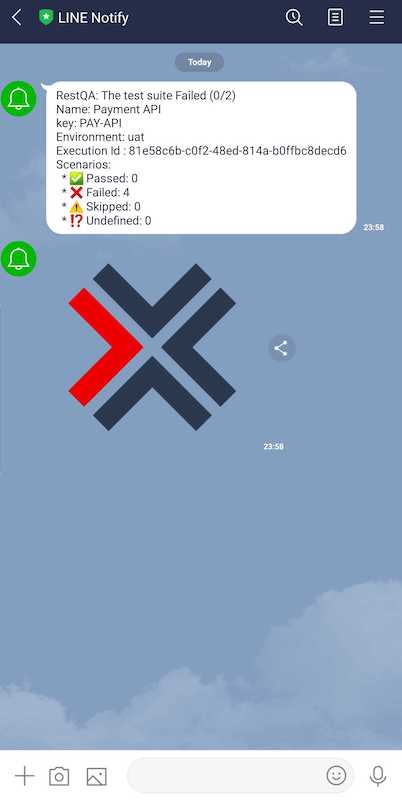
Receive a notification on line about you test report
{
  type: 'line',
  enabled: true,
  config: {
    token: 'sEdkjfEr745aasd546saSDdjklawE74S', // The line notfication token (get your token here : https://notify-bot.line.me/en/)
    onlyFailed: true, // Trigger the hook only for test failure  (default: true)
    reportUrl: 'https://www.test.report/{uuid}' // The url to access to your detail test report if you have one
  }
}
In order to get the token for the nofify line app, take a look at : https://notify-bot.line.me/en/
Example:
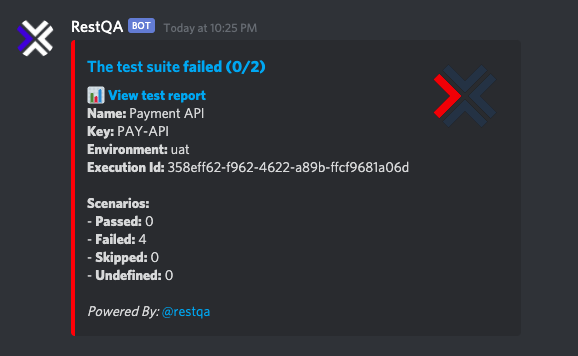
Receive a notification in your Mattermost channel when your test finishes
{
  type: 'mattermost',
  enabled: true,
  config: {
    url: 'https://your-mattermost-url/webhooks/xxx',
    onlyFailed: true // Trigger the hook only for test failure  (default: true),
    showErrors: true // Show the error message within Mattermost,
    reportUrl: 'https://www.test.report/{uuid}', // The url to access to your detail test report if you have one
    channel: 'town-square', // The channel to send messages to
    username: 'restqa-formatter', // Username to post as (only works if bot is allowed to change its name)
    iconUrl: '', // Link to bot profile picture (only works if bot is allowed to change image)
    iconEmoji: 'laughing',  // An emoji tag without the ':'s for bot profile picture (only works if bot is allowed to change image)
    displayedErrorsLimit: 25, // Limit the number of errors displayed in one message
  }
}
To personalise the bot, note the following from: https://docs.mattermost.com/developer/webhooks-incoming.html
Enable integrations to override usernames must be set to true in config.json to override usernames. Enable them from System Console > Integrations > Custom Integrations in prior versions or System Console > Integrations > Integration Management in versions after 5.12 or ask your System Administrator to do so. If not enabled, the username is set to webhook.
Similarly, Enable integrations to override profile picture icons must be set to true in config.json to override profile picture icons. Enable them from System Console > Integrations > Custom Integrations in prior versions or System Console > Integrations > Integration Management in versions after 5.12 or ask your System Administrator to do so. If not enabled, the icon of the creator of the webhook URL is used to post messages.
Example:
Export the result to an elastic search server (using rolling index)
{
  type: 'elastic-search',
  enabled: true,
  config: {
    url: 'http://my-elastic-search.local:9200', // The elastic search endpoint
    index: 'bdd-e2e'  // The elastic search index to use (default: restqa-e2e-result)
  }
}
The Elastic Search export allows you to create nice dashboard within Grafana or Kibana. And the good things is that we already prepared everything for you :

Access to the Grafana dashboard installation guide
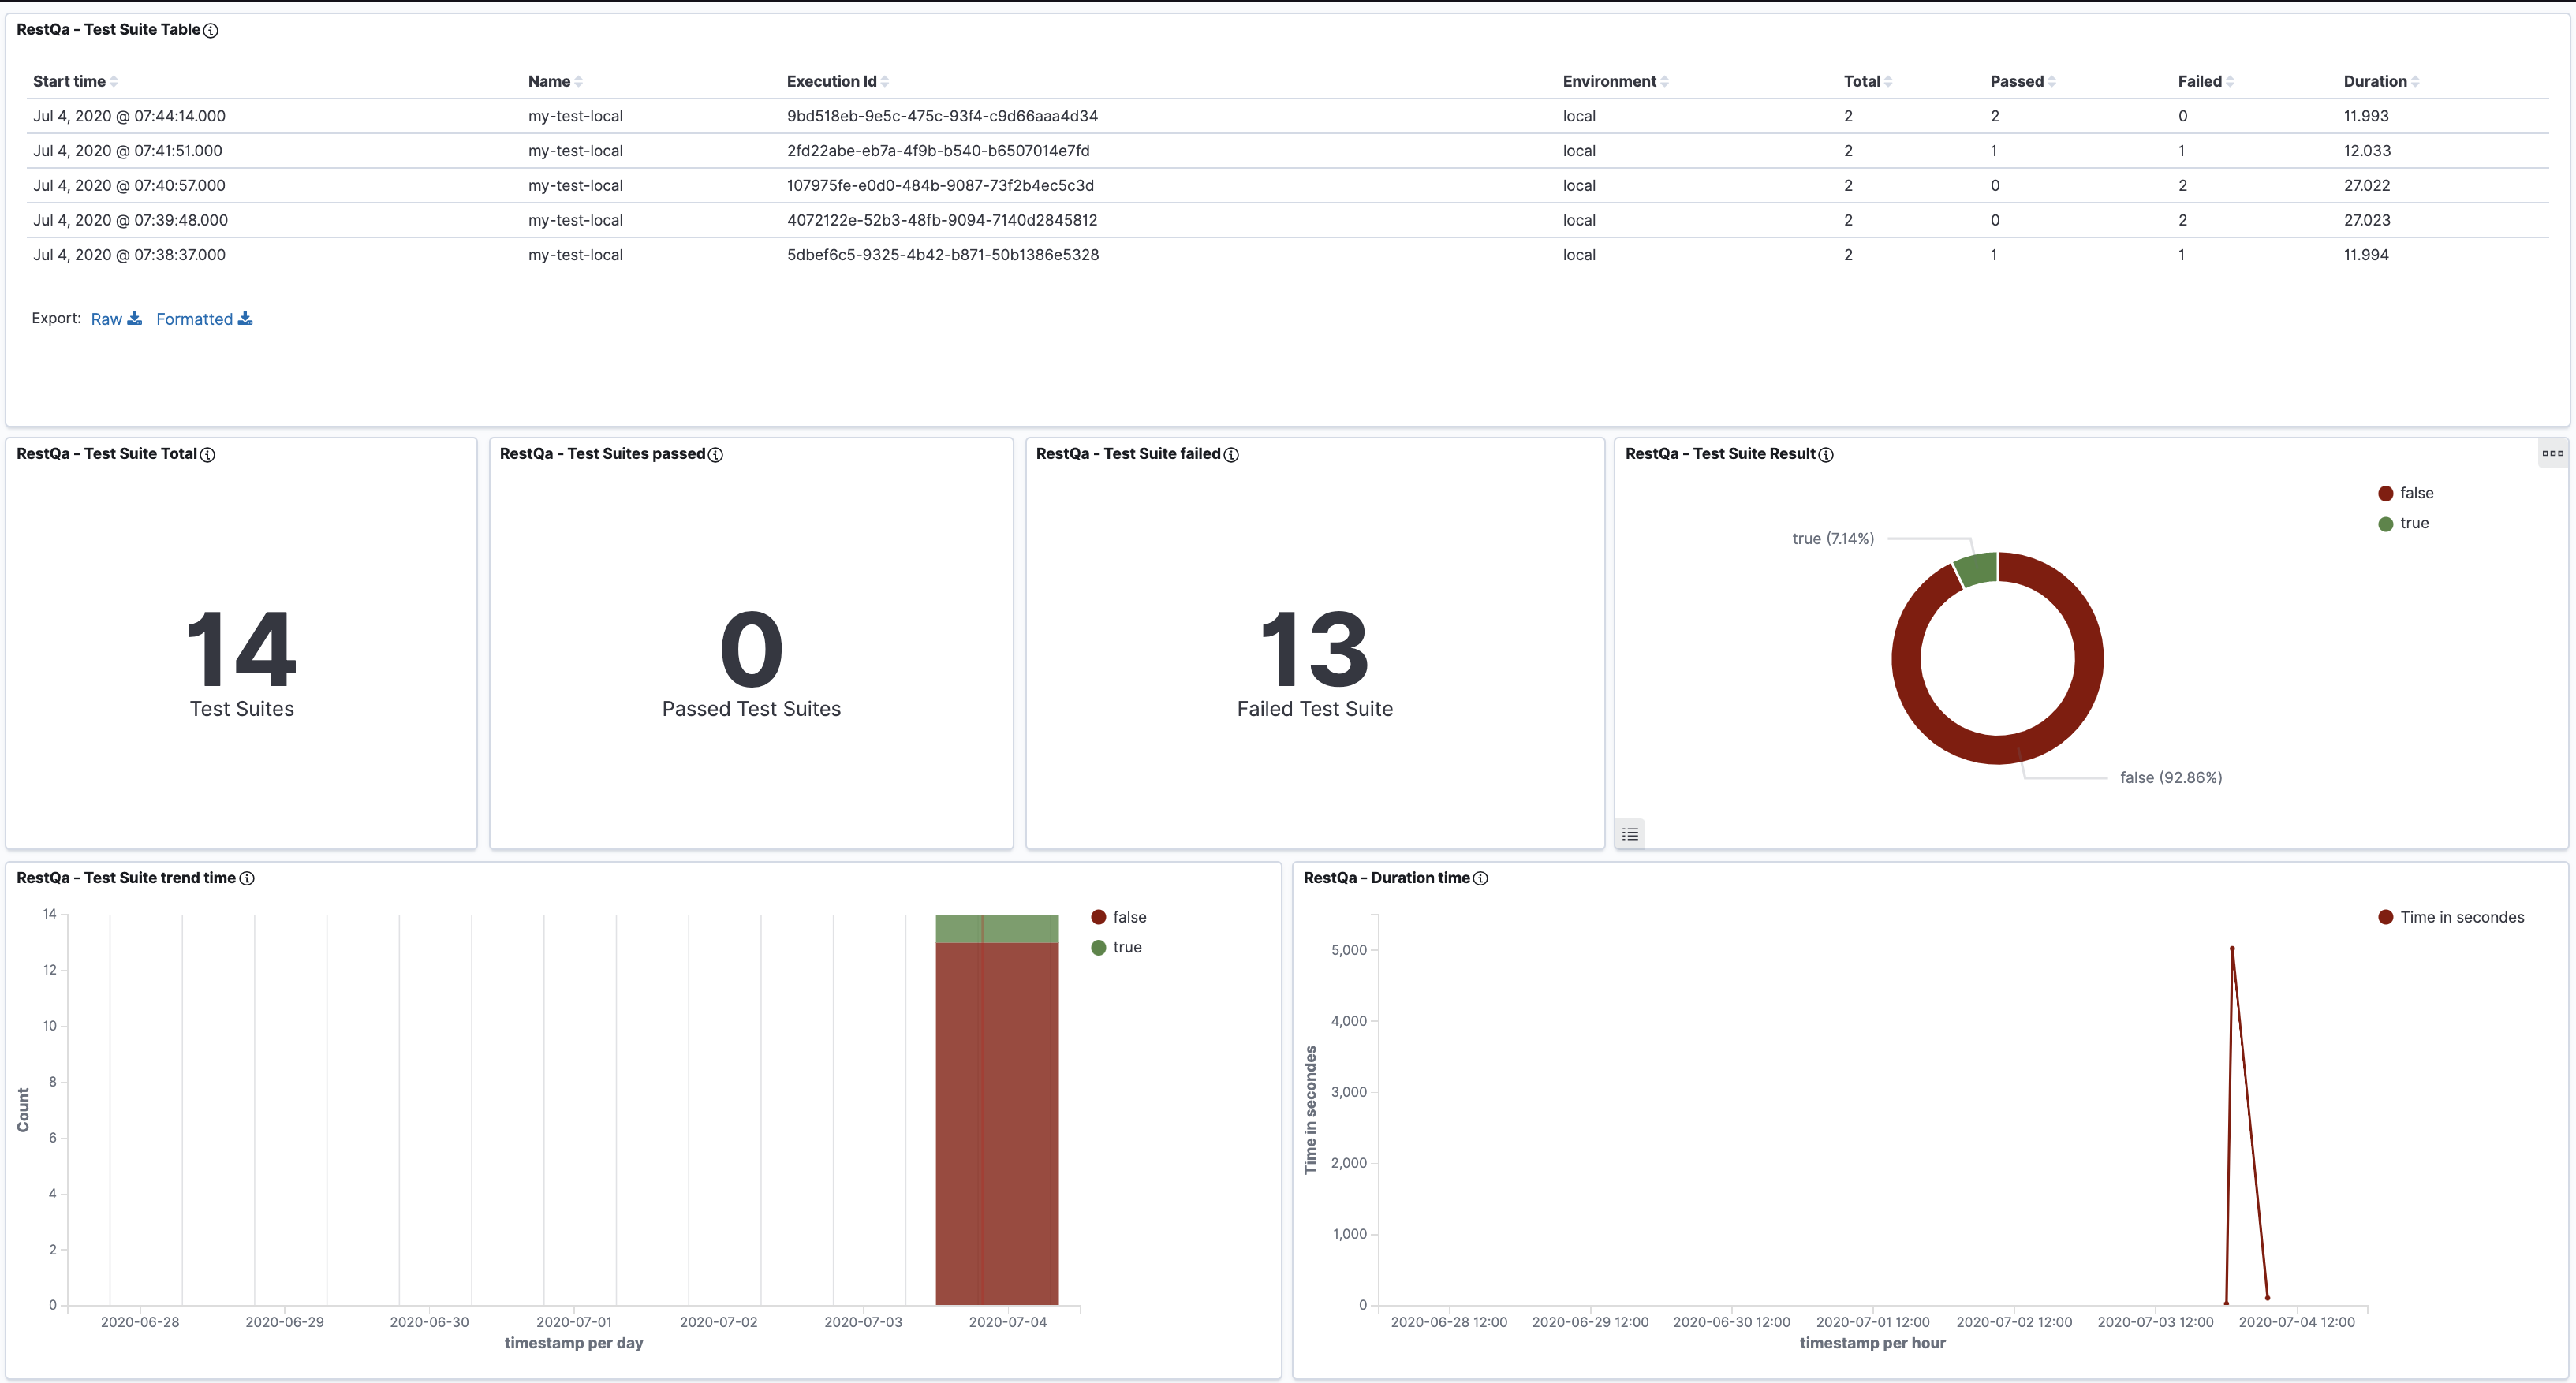
Access to the Kibana dashboard installation guide
Export the result to a remote endpoint in order to generate an html report.
For more information about the generation of the report you can look at the project :
- Use the SaaS version hosted on : dashboard.restqa.io (pro: ready, cons: data privacy, shared)
- Host your own, take a look at the documentation
{
  type: 'html-remote',
  enabled: true,
  config: {
    url: 'https://html-remote.your-domain.dev', // (default : https://dashboard.restqa.io/reports),
    auth: { // Authentication through basic auth
      username: 'john',
      password: 'secure123'
    }
  }
}
In case any of these exporter is matching your need you can build your own.
Your options object should look like:
let options = {
  uuid: 'xxx-yyy-zzz',
  name: 'local',
  env: 'uat',
  outputs: [
    {
      type: 'custom-report-key',
      enabled: true,
      config: {
        key: 'value'
      }
    }
  ],
  customExporters: {
    'custom-report-key': function(config) {
      const { key } = config
      //console.log(result.success)
      return Promise.resolve('[CUSTOM REPORT][SUCCESS] - Your custom report is great!')
    }
  }
}{
type: 'stream',
enabled: true,
config: {
instance: WritableStream // The writable stream instance
}
}
if you would like to contribute to the project you will simply need to :
- Install the packages :
npm i - Then you can use the example available on the ./example folder using the command :
npm run example
Create channels for :
- Rocket chat
- Google Hangouts
- Prometheus
- Grafana Loki
- influxdb
- statsd
- testrail
- teamcity
- confluence
- junit
- Github Alert