Please ensure you have prepared your machine well in advance of the workshop. Your time during the workshop is valuable, and we want to use it for learning, rather than setting up machines.
If you have any difficulty preparing your machine, or following this document, please raise an issue in this repository ASAP so that we can resolve the problem before the workshop begins.
- Preparing your machine for the workshop
- Running the exercise solutions
- Preparing your machine for the advanced exercises
- Demos
- FAQ
- Install the pre-requisites
- Get a copy of this repository
- Run the Particular Platform Installer
- Set up the databases
- Restore the NuGet packages
To complete the exercises, you require a Windows machine and Visual Studio. You must be using a Windows client edition, such as Windows 10, rather than a server edition, such as Windows Server 2016. The Particular Platfom Installer does not support server editions of Windows.
Please ensure you have followed these steps:
-
Install Visual Studio 2017 or Visual Studio 2015 Update 3 (the "Community" edition is enough).
-
Ensure you are able to build .NET Framework 4.6.1 projects in Visual Studio. This requires the .NET Framework 4.6.1 Developer Pack or a later version.
-
If you have a SQL Server instance installed (any edition, including SQL Server Express), you can choose to use that for the exercises. Otherwise, you will be using LocalDB. In the case of a clean machine with LocalDB only, please install:
NOTE: Do not install versions 13.1 of these components as they contain a bug that prevents the LocalDB instance from being accessible at configuration time.
-
Set the PowerShell execution policy to allow script execution. From an elevated PowerShell prompt, run the following:
Set-ExecutionPolicy Unrestricted
Clone or download this repo to your local machine.
If you're downloading a zip copy of the repo, please ensure the zip file is unblocked before decompressing it:
- Right-click on the downloaded copy
- Click "Properties"
- On the "General" properties page, check the "Unblock" checkbox
- Click "OK"
To ensure MSMQ and the DTC are correctly installed, please run the Particular Platform Installer.
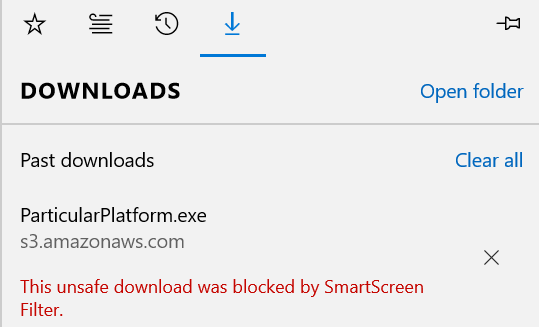
NOTE: If you are using Microsoft Edge, see the FAQ.
In the installation screen, select a minimum of:
- "Configure MSDTC for NServiceBus"
- "Configure Microsoft Message Queuing"
All other components are optional.
The simplest way to manage the databases is to use the PowerShell scripts located in exercises/scripts.
These scripts must be run from an elevated PowerShell prompt.
- Run
Setup-Databases.ps1to create a LocalDB instance named(localdb)\microservices-workshop, containing all the required databases.
When you have finished the workshop, you may optionally run Teardown-Databases.ps1 to drop all the databases and delete the LocalDB instance.
NOTE: If you receive errors regarding "Microsoft ODBC Driver", you can work around these by connecting to the (localdb)\microservices-workshop database using, for example, Visual Studio or SQL Managerment Studio, and running the SQL contained in the .sql file (Setup-Databases.sql or Teardown-Databases.sql) corresponding to the .ps1 file which raised the error.
NOTE: If the setup script fails with a "sqllocaldb command not found" error, your machine may be missing some files related to LocalDB. To fix this, try installing the LocalDB standalone package and then re-run the script.
Connect to the instance and run exercises\scripts\Setup-Databases.sql.
When you have finished the workshop, you may optionally run Teardown-Databases.sql to drop all the databases.
NOTE: If you are using a SQL Server instance, you will need to change the connection strings in all the exercises. Change all instances of Data Source=(localdb)\microservices-workshop to point to the SQL Server intsance.
The exercises are contained in eight Visual Studio solutions under exercises. All the solutions require NuGet package restoration before building. This may be possible at the workshop venue (you can verify with the workshop organizers if internet access is available at the venue) but to ensure you can build the solutions during the workshop, we recommend you run NuGet package restore before the workshop. The simplest way to do this is to open each of the solutions and build them, which will automatically restore the NuGet packages.
- Before you run a given exercise solution, configure the startup projects listed in the instructions for that exercise:
- In Visual Studio, right click the solution in the Solution Explorer
- Click "Properties"
- Ensure that, in the left hand pane, "Common Properties", "Start Project" is selected.
- Select the "Multiple startup projects" radio button
- Set the "Action" for each project listed in the instructions for the exercise to "Start".
- Press F5 in Visual Studio. The exercise solution will now be running and be fully functional.
The solutions contain single page applications (SPAs) and use IIS Express. To prevent caching issues, before switching to another exercise:
- Ensure that
IIS Expressis shut down - Clear the browser cache (or disable it entirely). Alternatively, the cache can cleared by refreshing the page using Shift+F5 or Ctrl+Shift+R in some browsers.
- When running a solution, the wrong page is sometimes displayed in the browser. Either:
- Ensure all HTML template files are closed when the application is run, or:
- Manually change the browser address to the root URL.
If you completed all the standard exercises, first of all, well done!
You can now attempt the advanced exercises. Don't worry if you don't manage to start or complete the advanced exercises during the workshop. You can also attempt them after the workshop is finished. If you have questions, you can ask them during the workshop or in our community discussion forum.
It is likely that you will have to read documentation for the Particular Service Platform to finish the advanced exercises. Links to documentation will be provided.
To complete the advanced exercises, you first need to install the rest of the Particular Service Platform:
- ServicePulse: a web app which monitors your endpoints.
- ServiceInsight: a desktop app which visualises the flow of messages within and between endpoints in detail.
- ServiceControl: a Windows service which collects the data that drives ServicePulse and ServiceInsight.
Run the Particular Platform Installer again, selecting ServiceControl, ServiceInsight, and ServicePulse.
When installation has completed, click "Start ServiceControl Management".
You may now close the Particular Service Platform Installation window.
In the ServiceControl Management window, click "Add new instance".
In the settings for the new instance, there are two choices you must make:
- "Transport": choose "MSMQ".
- "Audit forwarding": choose "Off".
All other settings should be left with their default values.
Click "Add".
After the instance has been added, make a note of the name of the instance. This will usually be "Particular.ServiceControl".
You may now close the ServiceControl Management window.
You're now ready to attempt the advanced exercises!
The demos folder contains demos used during the workshop by your trainer.
The asp-net-mvc solution demonstrates the use of ASP.NET MVC 5 to compose a UI with data from several microservices.
If the answer to your question is not listed here, consult your on-site trainer.
The simplest method is to reset all the databases (see below). Bear in mind that this will reset all the databases for all the exercises.
Alternatively, if you want to clear the orders list for a specific exercise, connect to the SQL Server instance, and either pick out and run the drop and create statements for that exercise from the scripts, or manually delete, or truncate, the tables that need to be cleared.
To reset all the databases:
Using an elevated PowerShell prompt, run Teardown-Databases.ps1 followed by Setup-Databases.ps1, both located in the exercises/scripts folder.
Connect to the instance and run Teardown-Databases.sql followed by Setup-Databases.sql, both located in the exercises/scripts folder.
When you attempt to download the installer, you will be presented with this message:
Click on "View Downloads" to show the "Downloads" window:
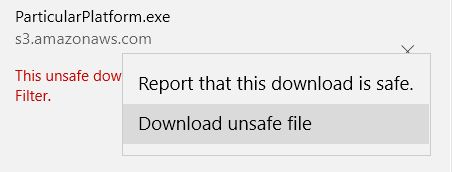
Right-click the red text "This unsafe download was blocked by SmartScreen Filter." to show the context menu:
Click "Download unsafe file".


