
Media Controls with gesture control and a multitude of features.
More Info »
Report Bugs & Request Features
Table of Contents
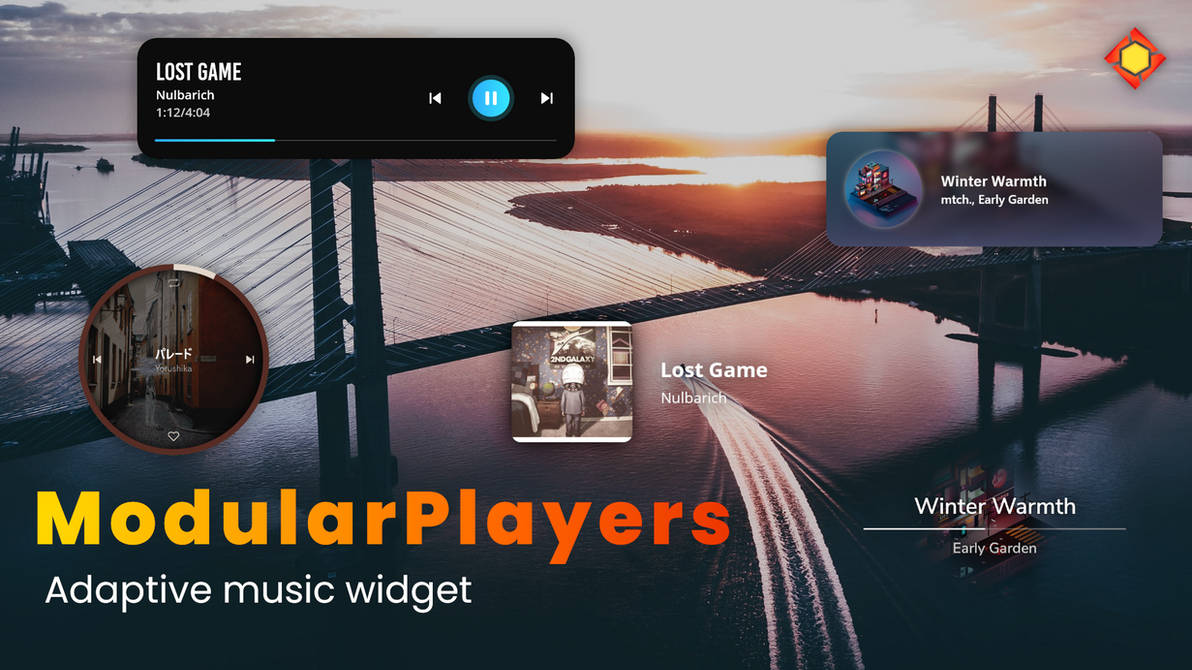
ModularPlayers is a Rainmeter skin that includes a gallery of hand-crafted media controllers, a preview option, and an efficient settings menu.
- 10 Player Presets
- Animated Styles
- Gesture Driven Media Controls
- Rainmeter v4.5 or newer. Rainmeter can be installed by downloading the
.exefile from Rainmeter's official website. - JaxCore v40005 or newer. JaxCore can be installed by downloading the
.rmskinfile from JaxCore's official website.
Assuming you successfully downloaded and installed Rainmeter as well as JaxCore, you can now proceed to install ModularPlayers by following the steps below.
- Download and run the
.rmskinfile for ModularPlayers from the official JaxCore site to install ModularPlayers. - Leave the installation settings at their defaults and click Install.
- When the installation is finished, a startup pop-up should appear. Follow through the pop-up to finish installing ModularPlayers.
- Note: If you find that the JaxCore option is red on the startup pop-up, please press the red button and Core will be installed automatically. Perchance this fails, you can manually install Core by downloading the
.rmskinfile from JaxCore's official website.
To use the custom player styles, you must first install and configure ImageMagick as well as Spicetify. If you already have ImageMagick and Spicetify setup, you can skip to choosing the presets; if not, follow the instructions below to setup ImageMagick and Spicetify.
- Open this link. This link will take you to another site where you must locate and download the appropriate installer.
- Find a suitable release under Windows Binary Release that corresponds to your requirements and download it. The
ImageMagick-7.1.0-19-Q16-HDRI-x64-dll.exeexecutable will be used to install for this guide. - After the download is complete, run the installer, which in this case is
ImageMagick-7.1.0-19-Q16-HDRI-x64-dll.exe. - Leave the installation settings at their defaults and follow through the installation. You can tinker around with the settings ONLY if you know what they do.
- Open this link and dowload the latest release of the MagickMeter skin. The
magickmeter_0.7.3.rmskinRainmeter skin file will be used to install for this guide. - Leave the installation settings at their defaults and click Install.
- Restart Rainmeter and your plugin will be activated.
And that is how you setup ImageMagick. You can now proceed to configure the player Presets.
- Note: An alternate approach for Step 5 and Step 6 is:
- Download the plugin DLLs
- Copy the version that corresponds to your system from the zip file (x86 or x64)
- Open Run(
Win + R), type%appdata%\Rainmeter\Plugins\and press OK. - Manually paste DLL you copied in the second step.
- Finally, restart Rainmeter and your plugin will be activated.
- Open Powershell (Windows 10) or Windows Terminal (Windows 11) and run the commands that follow:
If you only want to install
Invoke-WebRequest -UseBasicParsing "https://raw.githubusercontent.com/khanhas/spicetify-cli/master/install.ps1" | Invoke-Expression spicetify spicetify config extensions webnowplaying.jswebnowplaying.jswithout the custom themes, use the following command:spicetify config inject_css 0 replace_colors 0 - And finally, run the following command to save and apply all your changes:
spicetify backup apply
You can now proceed to choosing the presets.
Follow the steps outlined below to setup custom player presets:
- Open Core and head over to the Desktop section.
- Select ModularPlayers from the list and proceed to the Appearance tab.
- Under Player Style choose a preset that you like.
- The player style will be changed if you refresh ModularPlayers by deactivating and activating the toggle on the bottom left.
- Note: The General and Appearance tabs allow you to further customize each preset as required.
- MagickMeter and ImageMagick plugins along with Spicetify by khanhas
- Join the Core Community Discord Server for more help.