PicoNtrol is a Bluetooth Adapter powered by a Raspberry Pi Pico W that plugs straight into the native controller port of supported retro consoles. PicoNtrol is a WIP hobbyist project in it's very early days designed for enthusiasts who are familiar with electronics and retro gaming hardware.
-
Potential Console Damage: Incorrect wiring or installation may damage your console. Ensure that you follow the instructions carefully, and double-check all connections before powering on your console. Check the list of supported hardware below. Anything not included is no man's land and has not been tried before, by me at least.
-
User Responsibility: By using PicoNtrol, you acknowledge and accept the risks associated with modifying your console. Any damage caused to your console or Pico W during the creation, installation or use of PicoNtrol is solely your responsibility.
To create a PicoNtrol adapter you'll need the following:
- Raspberry Pi Pico W
- A controller cable for your console (either aftermarket or scrapped from a controller)
- Soldering equipment
- The
picontrol-<console>.uf2file to flash onto the Pico W. You can find it in theReleasestab.
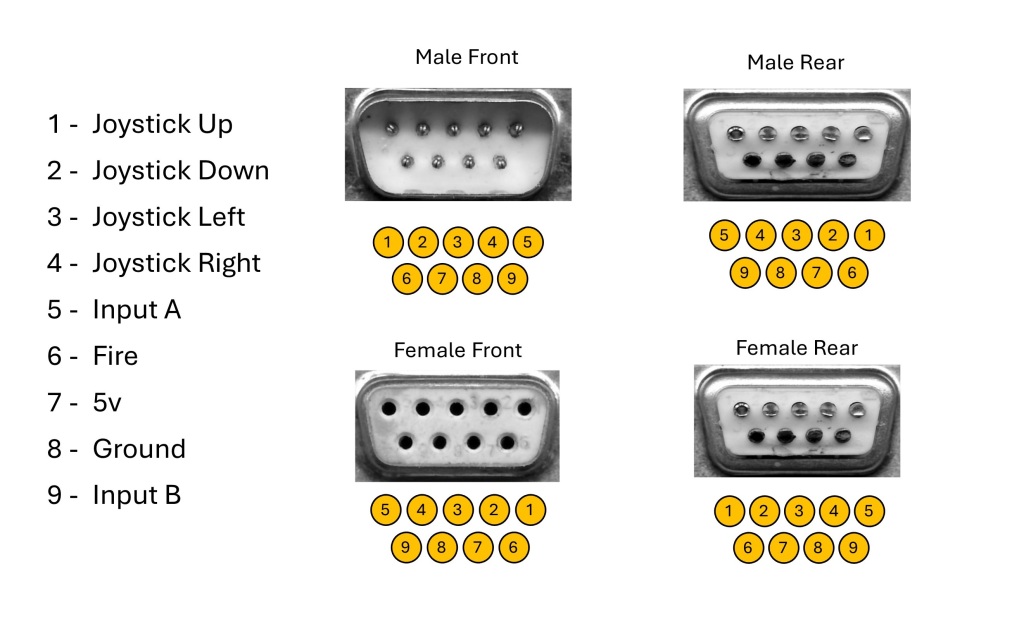
If you're using a different or aftermarket cable, make sure you connect the correct wireto the correct pin. I have used this 9 Pin Mega Drive cable from AliExpress. If you use the same, make sure to check the mapping at the bottom of this post. This cable is recommended as it has a 5V wire. For now, we've reprogrammed the pico to support following actions:
| PICO PIN | ACTION | CX40 COLOR |
|---|---|---|
| 0 | UP | White |
| 1 | DOWN | Blue |
| 2 | GROUND | Black |
| 3 | LEFT | Green |
| 4 | RIGHT | Brown |
| 5 | BUTTON | Orange |
Note: You can use any GND pin on the Pico W.
Keep in mind that, as far as I know, the official CX40 cable does not have a +5V wire. In this case you must power the Pico with a 5V battery or USB, just re-route the GND accordingly.
The colors in this image match the ones of an official, original Atari CX40 Joystick and the extra +5V wire.
In case of need, here is the CX40 pinout. The controller cable plug is picture bottom left.

Download the picontrol-<console>.uf2 file from the Release tab.
Plug your Pico W into your PC while holding down the BOOTSEL button, and drag the file on the root of the Pico W's storage. Once done the Pico W should disconnect from the PC.
You can now unplug your Pico W.
If you're sure you wired everything correctly, you may now plug the cable into the console's controller port.
If you used the recommended cable, the Pico W should boot up as soon as you turn on your console.
| Console | Status |
|---|---|
| Atari 2600 | ✅ OK |
| NES | 🚧 In developement |
| Controller | Atari 2600 | NES |
|---|---|---|
| Xbox Series X | ✅ | ❌ |
| Switch Pro | 🔜 | ❌ |
| DualShock 4 | ✅ | ❌ |
Note: After Pairing the DualShock 4, it usually doesn't need to be paired again, unless it has been paired with another device in the meantime.
I'll leave the AliExpress cable layout here, mostly for myself so I don't need to remember it:
| ACTION | COLOR |
|---|---|
| UP | RED |
| DOWN | BLACK |
| LEFT | GRAY |
| RIGHT | ORANGE |
| BUTTON | GREEN |
| +5V | WHITE |
| GND | BLUE |
| YELLOW | INPUT B |
| BROWN | INPUT A |
Thanks to project Bluepad32 for their Pico W bluetooth library. Bluepad32 is used to establish the connection with the controller, they did the hard part.
