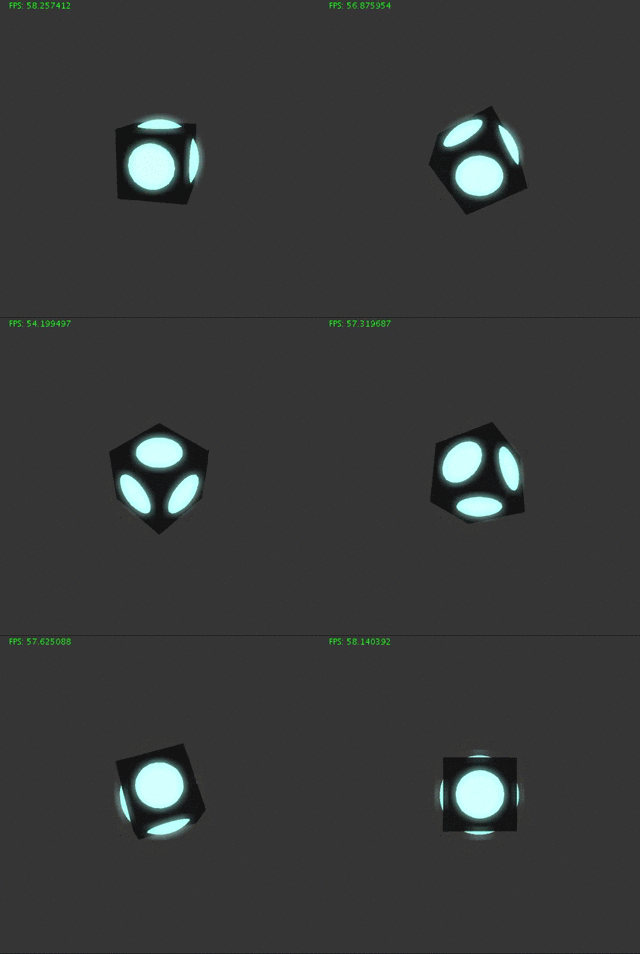
An example of a bloom filter as post FX in processing3.
Post-processing filters are great tools to give a rendered (and realistic) scene more utterance. For example the bloom filter helps to simulate the light diffusion to be more realistic.
There are a lot of tutorials which help you to implement a bloom filter in OpenGL (e.g. Learn OpenGL - Bloom). But for processing I could not find one that is as performant as I needed it in my P3D renderings. There are some which are implemented directly on the CPU and rely on loadPixel to copy the buffer onto the CPU and back to the GPU.
So I tried to find a way between implementing it directly in OpenGL (with processing) and the CPU approach. Because the direct implementation in OpenGL could break the processing version independence of my sketches.
Keep in mind that this is not the fastest impelmentation, but one that is working with P3D and I still try to improve it.
For a better usage I have implemented a post fx library:
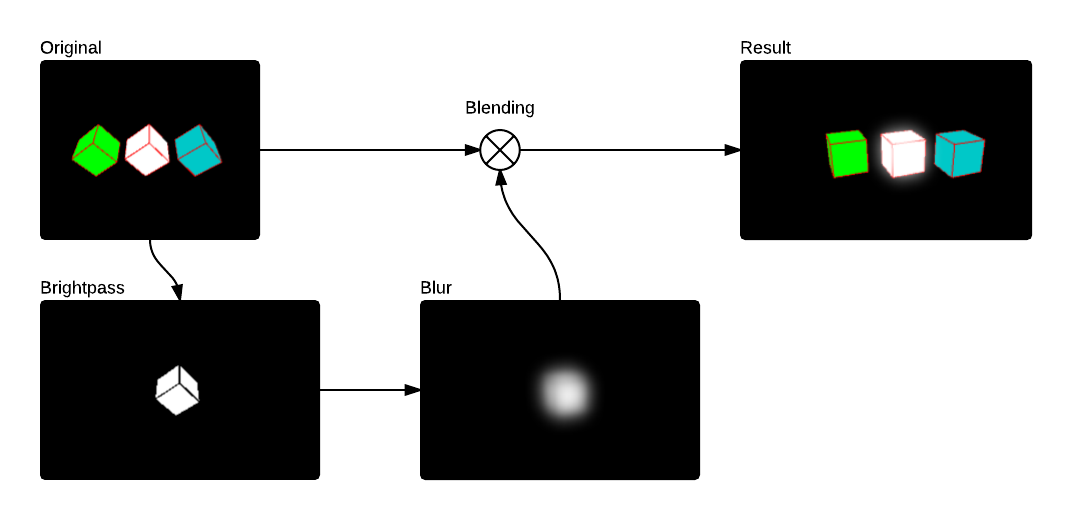
To implement a bloom you should first understand how the effect is created:
- Draw you
originalimage - Create a
bright passimage of theoriginal - Blur the
bright passimage (horizontal & vertical) - Screen-blend it over the
originalimage
Sound's easy, right?
Now how to implement that in processing?
In the idea chapter I was talking about images but in P3D there is no performant PImage implementation. So the idea is to use PTexture for the images and render them onto the main context after the process.
To make it as performant as possible you should use GLSL Shaders. For the bloom filter you need one GLSL Shader for the brightpass and one for the blur filter. We take a look at them later in the shader chapter.
To store the results of our shaders I used PGraphics objects. The canvas is the original image and the brightPass stores the bright pass result.
PGraphics canvas = createGraphics(surfaceWidth, surfaceHeight, P3D);

PGraphics brightPass = createGraphics(surfaceWidth, surfaceHeight, P2D);
PGraphics horizontalBlurPass = createGraphics(surfaceWidth, surfaceHeight, P2D);
PGraphics verticalBlurPass = createGraphics(surfaceWidth, surfaceHeight, P2D);
In every draw call you have first to render your content onto the canvas, then copy it onto the brightpass graphics and let the shader do the filter work.
// render content onto canvas
canvas.beginDraw();
render(canvas);
canvas.endDraw();

// copy canvas onto bright pass
brightPass.beginDraw();
brightPass.background(0, 0);
brightPass.image(canvas, 0, 0);

brightPass.endDraw();
After the copy process you can blur the image with the filter shader. First horizontal and then vertical.
// blur horizontal pass
horizontalBlurPass.beginDraw();
blurFilter.set("horizontalPass", 1);
horizontalBlurPass.shader(blurFilter);
horizontalBlurPass.image(brightPass, 0, 0);
horizontalBlurPass.endDraw();

// blur vertical pass
verticalBlurPass.beginDraw();
blurFilter.set("horizontalPass", 0);
verticalBlurPass.shader(blurFilter);
verticalBlurPass.image(horizontalBlurPass, 0, 0);
verticalBlurPass.endDraw();
Now you just have to draw the original canvas first and then the verticalBlurPass texture graphics onto it. You have to change the blendMode to SCREEN. Otherwise the image will be black except for your blurred bright spots.
blendMode(BLEND);
image(canvas, 0, 0);

blendMode(SCREEN);
image(verticalBlurPass, 0, 0);
In my example sketch you see the process visualised in four steps:
To make the filtering faster you have to use GLSL Shaders. Because you are working with PTexture it is important to use texture shaders and not normal color shaders.
The vertex shader is just a basic texture shader which passes the color and position to the renderer.
#define PROCESSING_TEXTURE_SHADER

uniform mat4 transform;
uniform mat4 texMatrix;

attribute vec4 vertex;
attribute vec4 color;
attribute vec2 texCoord;

varying vec4 vertColor;
varying vec4 vertTexCoord;

void main() {
  gl_Position = transform * vertex;

  vertColor = color;
  vertTexCoord = texMatrix * vec4(texCoord, 1.0, 1.0);
}
Bloom Vertex Shader
The fragment shader is for the brightpass filter. It filters every color out which has a luminence less then the brightPassThreshold. The luminanceVector contains the values to get the relative luminance of a rgb color value.
uniform sampler2D texture;

varying vec4 vertColor;
varying vec4 vertTexCoord;

uniform float brightPassThreshold;

void main() {
	vec3 luminanceVector = vec3(0.2125, 0.7154, 0.0721);
    vec4 c = texture2D(texture, vertTexCoord.st) * vertColor;

    float luminance = dot(luminanceVector, c.xyz);
    luminance = max(0.0, luminance - brightPassThreshold);
    c.xyz *= sign(luminance);
    c.a = 1.0;

    gl_FragColor = c;
}
Bloom Fragment Shader
The blur shader is very configurable. You can change the sigma and the blur size.
uniform sampler2D texture;

// The inverse of the texture dimensions along X and Y
uniform vec2 texOffset;

varying vec4 vertColor;
varying vec4 vertTexCoord;

uniform int blurSize;
uniform int horizontalPass; // 0 or 1 to indicate vertical or horizontal pass
uniform float sigma;        // The sigma value for the gaussian function: higher value means more blur
                            // A good value for 9x9 is around 3 to 5
                            // A good value for 7x7 is around 2.5 to 4
                            // A good value for 5x5 is around 2 to 3.5
                            // ... play around with this based on what you need <span class="Emoticon Emoticon1"><span>:)</span></span>

const float pi = 3.14159265;

void main() {
  float numBlurPixelsPerSide = float(blurSize / 2);

  vec2 blurMultiplyVec = 0 < horizontalPass ? vec2(1.0, 0.0) : vec2(0.0, 1.0);

  // Incremental Gaussian Coefficent Calculation (See GPU Gems 3 pp. 877 - 889)
  vec3 incrementalGaussian;
  incrementalGaussian.x = 1.0 / (sqrt(2.0 * pi) * sigma);
  incrementalGaussian.y = exp(-0.5 / (sigma * sigma));
  incrementalGaussian.z = incrementalGaussian.y * incrementalGaussian.y;

  vec4 avgValue = vec4(0.0, 0.0, 0.0, 0.0);
  float coefficientSum = 0.0;

  // Take the central sample first...
  avgValue += texture2D(texture, vertTexCoord.st) * incrementalGaussian.x;
  coefficientSum += incrementalGaussian.x;
  incrementalGaussian.xy *= incrementalGaussian.yz;

  // Go through the remaining 8 vertical samples (4 on each side of the center)
  for (float i = 1.0; i <= numBlurPixelsPerSide; i++) {
    avgValue += texture2D(texture, vertTexCoord.st - i * texOffset *
                          blurMultiplyVec) * incrementalGaussian.x;
    avgValue += texture2D(texture, vertTexCoord.st + i * texOffset *
                          blurMultiplyVec) * incrementalGaussian.x;
    coefficientSum += 2.0 * incrementalGaussian.x;
    incrementalGaussian.xy *= incrementalGaussian.yz;
  }

  gl_FragColor = avgValue / coefficientSum;
}
Blur Vertex Filter (by clankill3r)
Developed by Florian Bruggisser in 2016 with


