-
Setup tools and create accounts
-
We will use this for future workshops and POCs
-
Use dotnet CLI to create new projects
-
Creating a health-check endpoint
Endpoint to make sure our service is up and running
-
Creating and running docker image, publishing to docker hub
-
Define a Kubernetes serice and deployment
Run configuration using minikube to validate configuration
-
Deploying on Azure Kubernetes Service
Use azure CLI to create resources on Azure
Apply Kubernetes config to AKS cluster using kubectl
-
Create a CI pipeline using pre-defined boilerplate for Kubernetes
-
Commit to your repo and check if code is auto deployed to AKS
It would be awesome if you can setup following tools on your personal machines and create accounts using non-Saxo ID.
If you do not find time, do not worry. We can do it as part of the workshop itself.
Checklist :
- Azure account : http://portal.azure.com/
- Azure devops account : http://dev.azure.com/
- Azure CLI - https://docs.microsoft.com/en-us/cli/azure/install-azure-cli
- DotNet core (3.1 or 5-preview) : https://dotnet.microsoft.com/download/dotnet-core
- Docker Desktop : https://www.docker.com/products/docker-desktop
- install kubectl: https://kubernetes.io/docs/tasks/tools/install-kubectl/
- Setup Minikube: https://minikube.sigs.k8s.io/docs/start/ or Kind : https://kind.sigs.k8s.io/docs/user/quick-start/
- IDE of choice (Rider/VS Code/Visual Studio)
- Git bash if using windows [Optional] : https://git-scm.com/download/win
-
Learn very basic know-how of .NET Core, Docker, Kubernetes, Azure Kubernetes Service, Azure Devops
-
Create a playground where we can build,deploy and experiment without needing any permissions
-
We can try out things that would be risky/impossible to try on Saxo's kuberntes cluster
-
To create a sample project with continuous deployment to AKS which we can use in future workshops, presentations
-
In future we can incrementaly add demos for gRPC, SignalR, NATS, Azure AD e.t.c. in the same project.
Dotnet Core comes with some cool boiler-plate generator
Type dotnet new -h to view some of the boiler plates available:
e.g. :
| dotnet new cosnole | Console Application |
| dotnet new webapi | Creat a Web API |
| dotnet new react | Creates app with React.js |
| dotnet new grpc | Creates a gRPC Service |
dotnet new webapi -o OAPI.ServiceNow run the app
cd OAPI.Service
dotnet run
# info: Microsoft.Hosting.Lifetime[0]
#       Now listening on: https://localhost:5001
# info: Microsoft.Hosting.Lifetime[0]
#       Now listening on: http://localhost:5000
# info: Microsoft.Hosting.Lifetime[0]
#       Application started. Press Ctrl+C to shut down.
# info: Microsoft.Hosting.Lifetime[0]
#       Hosting environment: Development
# info: Microsoft.Hosting.Lifetime[0]
#       Content root path: ./OAPI.Service
Open url https://localhost:5001/weatherforecast, you should get a response like :
[
  {
    "date": "2020-10-18T14:59:15.157908+05:30",
    "temperatureC": 10,
    "temperatureF": 49,
    "summary": "Warm"
  },
  {
    "date": "2020-10-19T14:59:15.158209+05:30",
    "temperatureC": -12,
    "temperatureF": 11,
    "summary": "Balmy"
  },
  {
    "date": "2020-10-20T14:59:15.158214+05:30",
    "temperatureC": -2,
    "temperatureF": 29,
    "summary": "Sweltering"
  },
  {
    "date": "2020-10-21T14:59:15.158214+05:30",
    "temperatureC": -6,
    "temperatureF": 22,
    "summary": "Cool"
  },
  {
    "date": "2020-10-22T14:59:15.158215+05:30",
    "temperatureC": 0,
    "temperatureF": 32,
    "summary": "Balmy"
  }
]
Now lets generate a .gitignore before we can commit and push our project.
cd ..
dotnet new gitignore
git add --all
git commit -m "Create a web api"
git remote add origin <your-repository>
git push origin master-
Lets not think about why we need a health check API for now. Lets take this as a practice to add a new endpoint to our Web API.
-
Create a file
OAPI.Service/Controllers/HealthCheckController.cs:using System.Collections.Generic; using Microsoft.AspNetCore.Mvc; namespace OAPI.Service.Controllers { [ApiController] [Route("")] public class HealthCheckController : ControllerBase { [HttpGet] public IDictionary<string, object> Get() { return new Dictionary<string, object>() { ["version"] = "1.0", ["healthy"] = true, ["message"] = "Up and running", }; } } }
-
Now run the project
dotnet run -
In browser, open url: https://localhost:5001/
{
  "version": "1.0",
  "healthy": true,
  "message": "Up and running"
}
-
Create a
.dockerignorein project root. It works just like.gitignorefor docker. It tells docker what files to ignore in our project.# Directories **/bin/ **/obj/ **/out/ # IDEs **/.idea **/.vscode # Files Dockerfile* README.md
-
Create a
Dockerfilein our project root and we will use it to compile our project# Stage 1: Use an image with SDK (so that we can compile and build app) FROM mcr.microsoft.com/dotnet/core/sdk:3.1 AS build WORKDIR /source # Run dotnet restore COPY OAPI.Service/*.csproj . RUN dotnet restore # Copy rest of project and publish app int /app directory COPY ./OAPI.Service . RUN dotnet publish -c release -o /app --no-restore
-
Now lets build and check our docker configuration to compile project
docker build -t oapi-service .

# Sending build context to Docker daemon  188.4kB
# Step 1/6 : FROM mcr.microsoft.com/dotnet/core/sdk:3.1 AS build
#  ---> c4155a9104a8
# Step 2/6 : WORKDIR /source
#  ---> Using cache
#  ---> e3c14feb38e6
# Step 3/6 : COPY OAPI.Service/*.csproj .
#  ---> Using cache
#  ---> a0c5001dbcd5
# Step 4/6 : RUN dotnet restore
#  ---> Using cache
#  ---> df30f3657cbc
# Step 5/6 : COPY ./OAPI.Service .
#  ---> Using cache
#  ---> 86d437cabddd
# Step 6/6 : RUN dotnet publish -c release -o /app --no-restore
#  ---> Using cache
#  ---> 2b0e6f7d8866
# Successfully built 2b0e6f7d8866
# Successfully tagged oapi-service:latest
-
Right now our docker image only compiles the project using .net sdk.
-
Now, lets make the docker image runt the app. Add following to end of
Dockerfile:# Stage 2: We do not need the sdk at runtime (smaller efficient image) FROM mcr.microsoft.com/dotnet/core/aspnet:3.1 WORKDIR /app # Copy files form previous stage COPY --from=build /app . EXPOSE 80 ENTRYPOINT ["dotnet", "OAPI.Service.dll"]
-
Lets build and run the docker image now :
docker build -t oapi-service .

# Run our docker image as a container
# Map our machines port 5001 to container's port 80
docker run -p 5001:80 oapi-service
-
Now open url http://localhost:5001/, it should return our health check as expected :
{ "version": "1.0", "healthy": true, "message": "Up and running" } -
Lets push our app to dockerhub now :
# replace "nishants" with your own user name docker tag oapi-service nishants/oapi-service:v1.0 docker login docker push nishants/oapi-service:v1.0 -
Now go to dockerhub and make sure the image is public.
-
Now lets see if we understand docker, lets try to answer :
-
Why did we copy
.csprojfile before restoring project and then copied the rest of files ?# Stage 1: Use an image with SDK (so that we can compile and build app) FROM mcr.microsoft.com/dotnet/core/sdk:3.1 AS build WORKDIR /source # Run dotnet restore COPY OAPI.Service/*.csproj . RUN dotnet restore # Copy rest of project and publish app int /app directory COPY ./OAPI.Service . RUN dotnet publish -c release -o /app --no-restore #....
Learn about layers in Docker images
-
Why did we use two different images in the same
Dockerfile?# Stage 1: Use an image with SDK (so that we can compile and build app) FROM mcr.microsoft.com/dotnet/core/sdk:3.1 AS build WORKDIR /source # ... # Stage 2: We do not need the sdk at runtime (smaller efficient image) FROM mcr.microsoft.com/dotnet/core/aspnet:3.1 WORKDIR /app #...
> Learn about multistage docker builds
-
-
How K8s works ?
- It uses declarative style (in
yamlfiles ) - i.e. we tell what is the desired state for a cluster using YAML declaration
- and run the
kubectl apply - Kubernetes automactically makes changes to the cluster based on our desired state.
Every release is basically a new configuration, using new docker images
- It uses declarative style (in
-
Our desired state of cluster would be
- Running severale instances of app as a docker container
- Load balancer to receive traffic from internet (from outside the cluster)
-
In Kubernetes language what we need is
What we need ? In Kuberntes language Running severale instances of app as a docker container Deployment resource for app's docker image Load balancer to receive traffic from internet (outside the cluster) Service of type load balancer -
Create a file
k8/oapi-deployment.ymlin project as :# This part creates a pod that runs our docker image apiVersion: apps/v1 kind: Deployment metadata: name: oapi-app-deployment spec: replicas: 2 # Alwasy run two isntances of app selector: matchLabels: app: oapi-app template: metadata: labels: app: oapi-app spec: containers: - name: oapi-app image: nishants/oapi-service:v1.0 # Dockerhub image ports: - containerPort: 80 # Port that our app listens to imagePullPolicy: Always # To keep simple for now
-
Create another file
k8/oapi-service.ymlin project as :# This part creates a load balancer pod that receives traffic from # internet and load-balances to our pods apiVersion: v1 kind: Service metadata: name: oapi-service spec: selector: app: oapi-app # This makes load balancer point to oapi-app ports: - port: 80 targetPort: 80 # The port our container(in pods) listens to type: LoadBalancer
-
Test k8s configuration locally using Kind:
kind create cluster --name oapi-cluster
# Creating cluster "oapi-cluster" ...
#  ✓ Ensuring node image (kindest/node:v1.19.1) 🖼
#  ✓ Preparing nodes 📦
#  ✓ Writing configuration 📜
#  ✓ Starting control-plane 🕹️
#  ✓ Installing CNI 🔌
#  ✓ Installing StorageClass 💾

kubectl apply -f k8
# deployment.apps/oapi-app-deployment created
# service/oapi-service created
With Kind, it is not possible (or I don't understand) how to access the load balancer on local machine. Though it is straight forward with minikube as shown in next step or if using ingress controller.
-
With minikube
minikube start --vm-driver=virtualbox # Start with VirtualBox
kubectl apply -f k8
minikube service oapi-service
-
Login with Azure CLI
azure login
This will open a window in browser for authentication.
-
Ceate azure resources from command line :
RESOURCE_GROUP=oapi-service-resource
CLUSTER_NAME=oapi-service
REGION=westeurope
REGISTRY_NAME=saxolab

# Create resource
az group create --name $RESOURCE_GROUP --location $REGION

# Create cluster on AKS with 1 node
az aks create --resource-group $RESOURCE_GROUP \
--name $CLUSTER_NAME \
--node-count 1 \
--enable-addons monitoring \
--generate-ssh-keys

# Allow kubectl to connect and manage our AKS clustuer
az aks get-credentials \
--resource-group $RESOURCE_GROUP \
--name $CLUSTER_NAME

kubectl get nodes
# NAME                                STATUS   ROLES   AGE     VERSION
# aks-nodepool1-36600731-vmss000000   Ready    agent   2m58s   v1.16.10

# deploy our app on AKS

kubectl apply -f k8
# deployment.apps/oapi-app-deployment created
# service/oapi-service created
-
Get the public address of our load balancer created on Azure
kubectl get service/oapi-service
# NAME           TYPE           CLUSTER-IP     EXTERNAL-IP    PORT(S)
# oapi-service   LoadBalancer   10.0.237.105   20.54.227.54   80:30694/TCP
-
Now access the EXTERNAL-IP as http : http://external_ip_of_service
-
Create a docker registry with Azure Container Registry (ACR):
# Create azure container registry
az acr create \
--resource-group $RESOURCE_GROUP \
--name $REGISTRY_NAME \
--sku Standard \
--location $REGION
-
Remember to delete the cluster after you are done with the workshop.
az group delete --name $RESOURCE_GROUP --yes --no-wait-
Go to https://dev.azure.com
-
Create an organization if you don't already have one
-
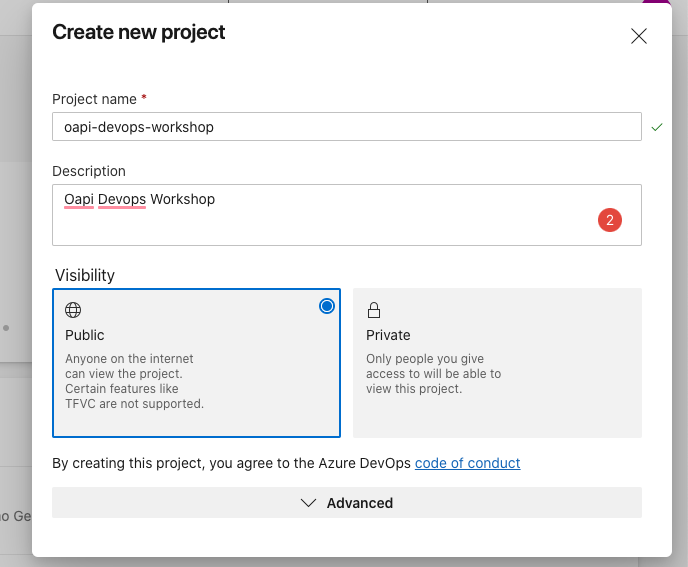
Create a project in the organization :
-
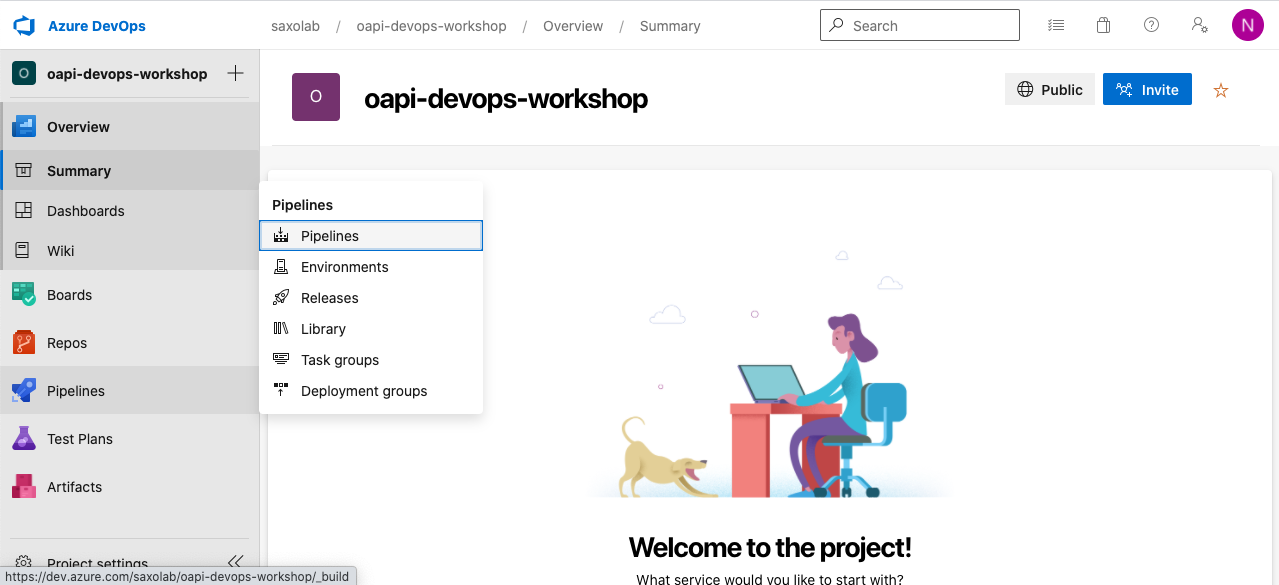
Go to pipelines
-
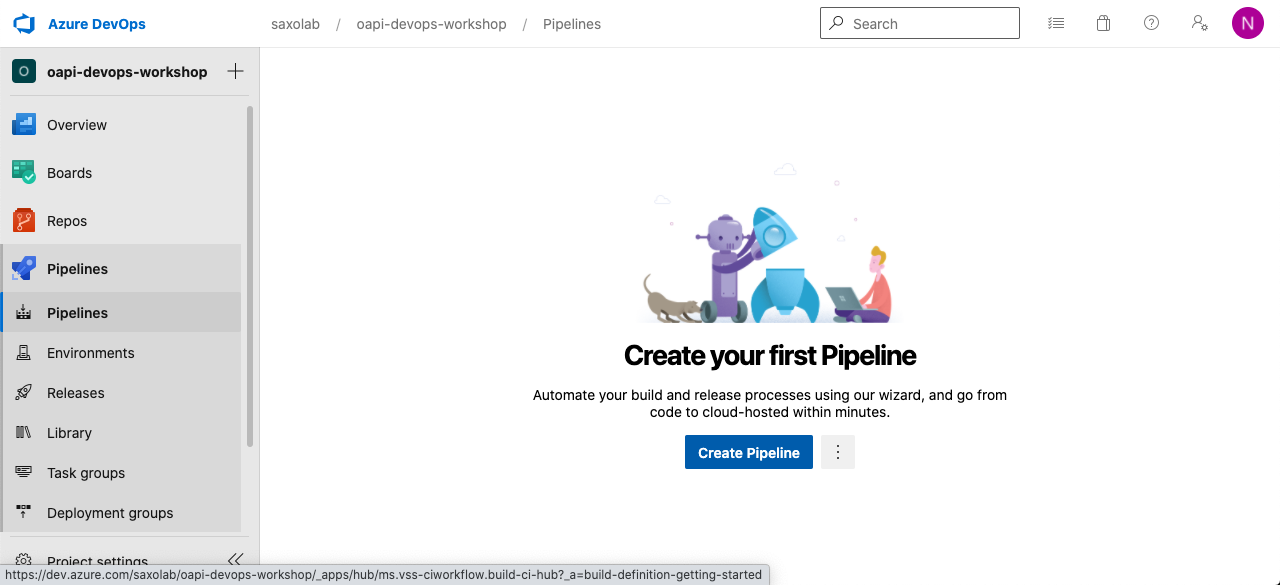
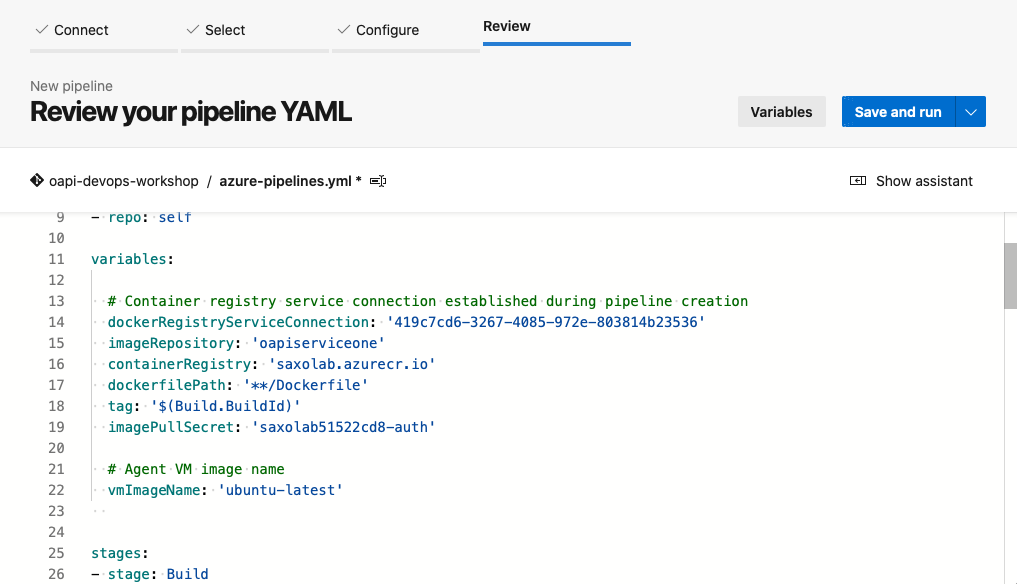
Click on create pipeling button
-
Select repository and choose
Depoloy to Kubernetes Servicein options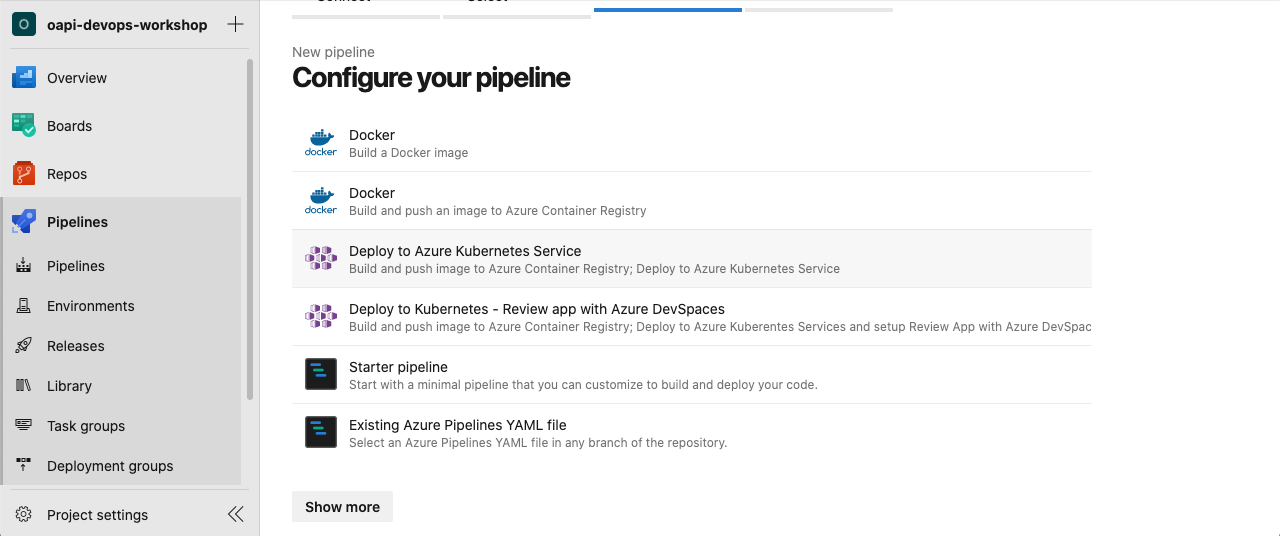
-
Choose subcription

-
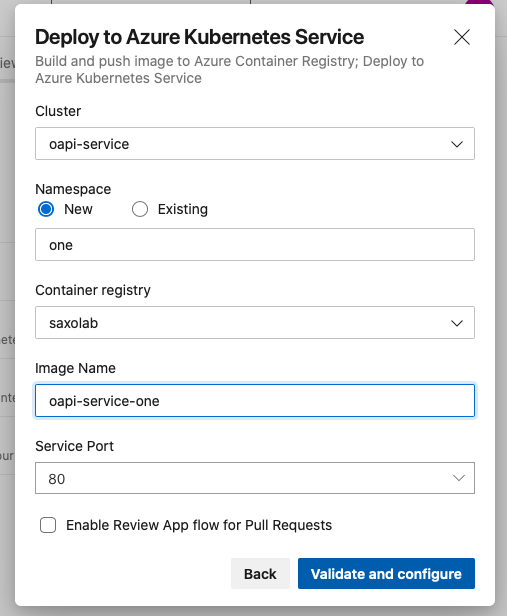
Choose cluster, k8, contaienr registry, image name
-
Save and run pipeline


-
Lets update response of health check API in
OAPI.Service/Controllers/HealthCheckController.csas[HttpGet] public IDictionary<string, object> Get() { return new Dictionary<string, object>() { ["version"] = "1.0", ["healthy"] = true, - ["message"] = "Up and running", + ["message"] = "Up and running! with auto release.", }; } -
Now commit and push.
-
Once build is finished, hit the external-ip service to check response. It should be
{
  "version": "1.0",
  "healthy": true,
  "message": "Up and running! with auto release."
}