This a guide to make it as easy as possible to use your RP2 with the Pegasus Frontend, in my opinion one of the best Frontend Emulators out there.
The bad thing about Pegasus is that you need to make a lot of preconfiguration, I'm trying to make this pack as plug & play as possible.
This pack contains metadata configuration for the following systems and emulators, some of them comes preloaded with the RP2, some of them don't and you need to download them from the Play Store.
| System | Emulator | Bundled |
|---|---|---|
| Atari 2600 | Retroarch 1.8 stella core | Yes |
| Doom | Retroarch 1.8 PrBoom core | Yes |
| GameBoy | Retroarch 1.8 gambatte core | Yes |
| GameBoy Color | Retroarch 1.8 gambatte core | Yes |
| GameBoy Advance | Retroarch 1.5 gpsp core | Yes |
| Dreamcast | Reicast | No ( Free ) |
| Dos | Retroarch 1.8 DOSBox core | Yes |
| Final Burn Alpha | Retroarch 1.8 fba 2020 core | Yes |
| Final Burn Neo | Retroarch 1.8 fbn core | Yes |
| Mame 2010 ( 0.139 ) | MAME4droid | Yes |
| Master System | Retroarch 1.8 genesis plus gx core | Yes |
| Neo Geo | Retroarch 1.8 fba 2020 Neo Geo core | Yes |
| Neo Geo CD | Retroarch 1.8 fbn core | Yes |
| Neo Geo Pocket & Color | Retroarch 1.8 Mednafen NPG core | Yes |
| Nintendo DS | Drastic | No ( Paid ) |
| Nintendo NES | Retroarch 1.8 fceumm core | Yes |
| Nintendo 64 | Mupen64plus FZ | Yes |
| PC engine | Retroarch 1.8 mednafen pce fast core | Yes |
| Playstation | Retroarch 1.8 PCSX Rearmed core | Yes |
| Pokemon Mini | Retroarch 1.8 PokeMini core | Yes |
| PSP | PPSP | Yes |
| ScummVM | Retroarch 1.8 scummvm core | Yes |
| Sega 32X | Retroarch 1.8 genesis plus gx core | Yes |
| Sega CD | Retroarch 1.8 genesis plus gx core | Yes |
| Sega Game Gear | Retroarch 1.8 genesis plus gx core | Yes |
| Sega Genesis / Mega Drive | Retroarch 1.8 genesis plus gx core | Yes |
| Super Nintendo | Retroarch 1.8 snes9x 2002 core | Yes |
| Wonderswan & Color | Retroarch 1.8 Mednafen wswan core | Yes |
Remember to manually download the core you'll need in your RP2 Retroarch App!
| System | Emulator | Bundled |
|---|---|---|
| Playstation | ePSXe | No (paid) |
| Super Nintendo | SNEX9EX ex+ | No (paid) |
| GameBoy Advance | MyBoy! | No (paid) |
I've added support for some other emulators but since they're not bundled and not free they are optional and need some work from you to make them work, basically you need to rename the metadata file for each of this systems
- Activating ePSXe
You go to playstation folder and you'll see:
metadata.pegasus.txt -> Main emulator metadata.pegasus.epsxe.txt -> Alternative emulator
You just need to rename metadata.pegasus.txt to metadata.pegasus.original.txt and metadata.pegasus.epsxe.txt to metadata.pegasus.txt, if you want to switch emulators just rename them back to the original names.
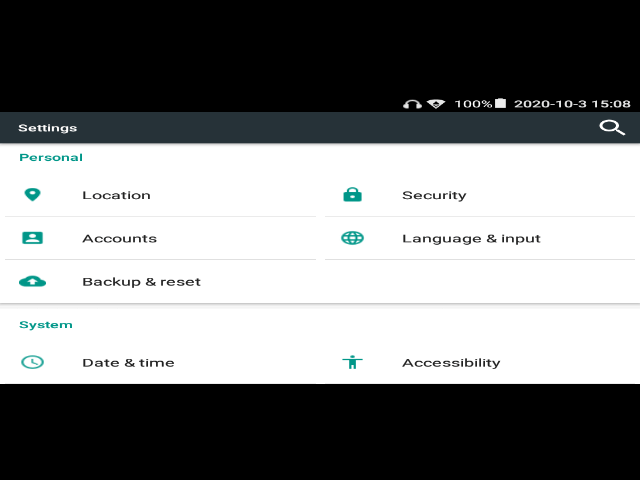
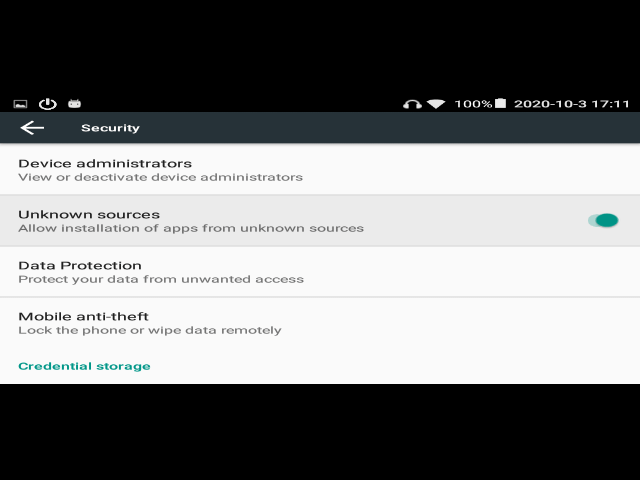
We need to allow the RP2 to use apps downloaded from outside the Play Store. In your RP2 go to Settings and enable Installation from unknown sources:
2 Download the latest version of Pegasus from android
3 Download my latest Pegasus Frontend metadata Pack
Unzip it in your computer, the folder you want is the roms folder, ignore everything else. This folder should look like this:
roms
  /atari2600
  /dreamcast
  /gameboy
  /gba
  /genesis
  /mame
  /mastersystem
  /n64
  /nds
  /nes
  /pcengine
  /playstation
  /psp
  /scumm
  /sega32x
  /segacd
  /snes
Copy the downloaded .apk inside the roms folder. It's not necessary but it makes the process a little bit easier later.
There are multiple RP2 themes, for this guide I'll be using one of my own as it's simple and works fine in the RP2.
Download RP-Switch
Now you should have a RP-Switch-main.zip folder in your computer, unzip it and rename the folder to RP-Switch
You can do this two different ways. Connecting your RP2 to the computer or just using a card reader directly. If you choose to format your SD Card as Internal you can only copy files connecting the RP2 directly to your computer or using a FTP program
No matter the method we use, we are going to copy the roms folder to the RP2 and the RP-Switch folder.
Just copy the roms folder in the SD Card and go to the next step.
If you are Using a Mac you need to download Android File Transfer app, Windows users don't need anything special, you can just use Windows File Explorer
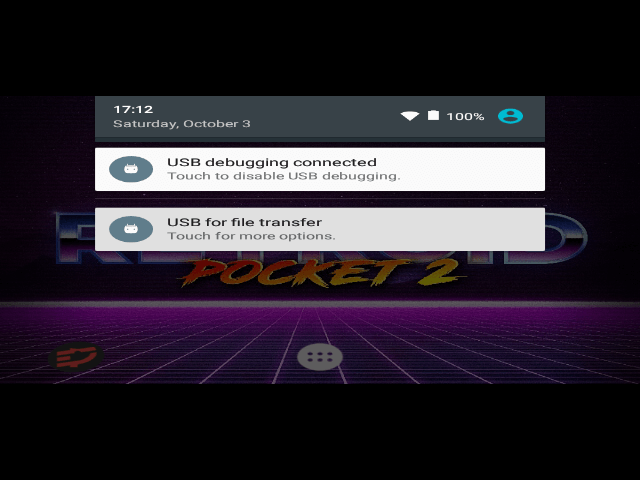
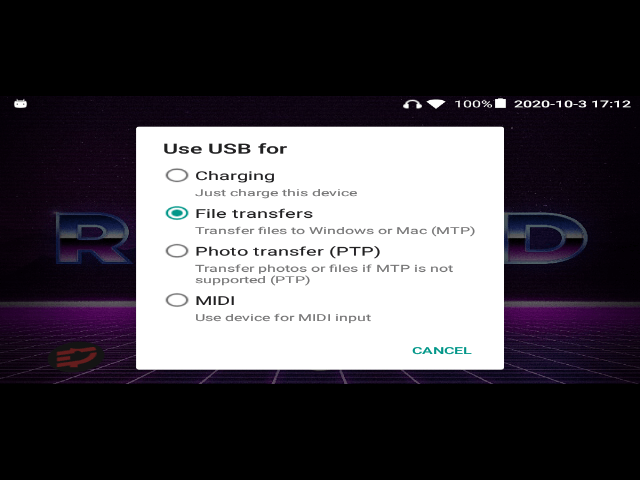
As soon as you plug the RP2 you have to put it in mouse mode by pressing the menu button for 2 seconds, move your left analog to the top, press and hold A and "drag" the cursor from top to bottom to open the notification drawer. Click on and Select File transfer
Now you should be connected and browsing the RP2 file system.
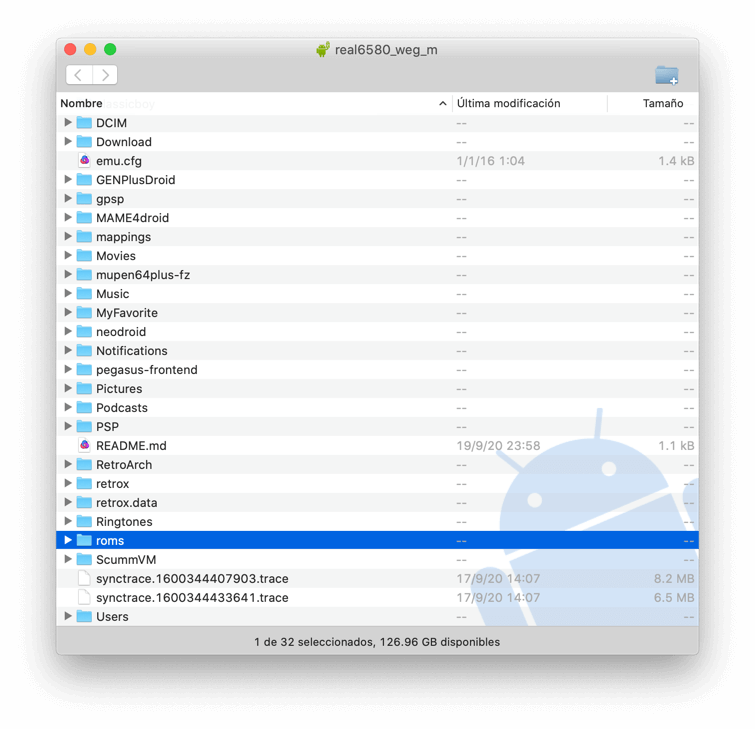
Drag and drop the roms folder to the root folder.
Drag and drop the RP-Switch folder inside of the pegasus-frontend/themes/ folder
For me this is the fastest way as I don't need to plug the RP2 every time and the USB connection is spotty while using the Android File Transfer mode Steps:
- Install FTP Server in your RP2 like this
- Install a FTP Client in your computer Filezilla for your Operating System
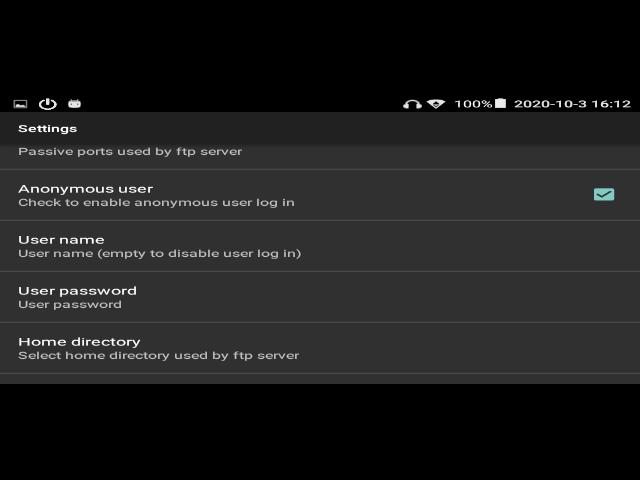
Open in your RP2 the FTP Server app, go to Settings, and change the username and user password
Exit the settings page and take a second to look at the details in the screen:
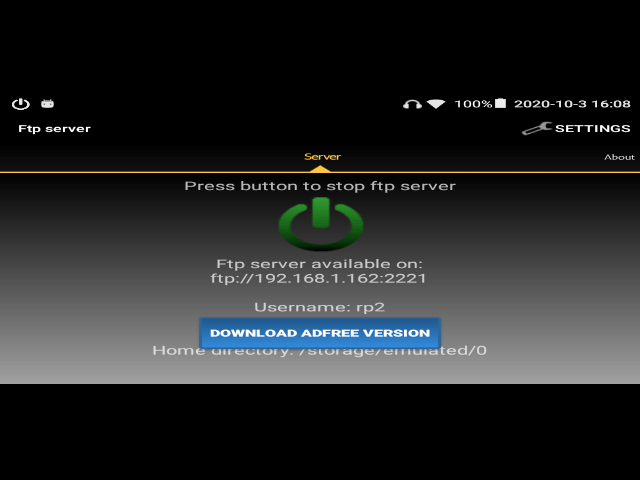
In there you can see an IP address, something like 192.168.x.xxx:2221
Now open filezilla and use the IP address to connect using filezilla, lets use 192.168.1.162:2221 for the sake of the example, but remember this number will be different for you!!
Fill in the inputs at the top of the window with your IP address and the username and password you previously saved in your RP2.

Filezilla will ask you some questions, do you want to save passwords, just go with OK with both. Now you are seeing the contents of your RP2:
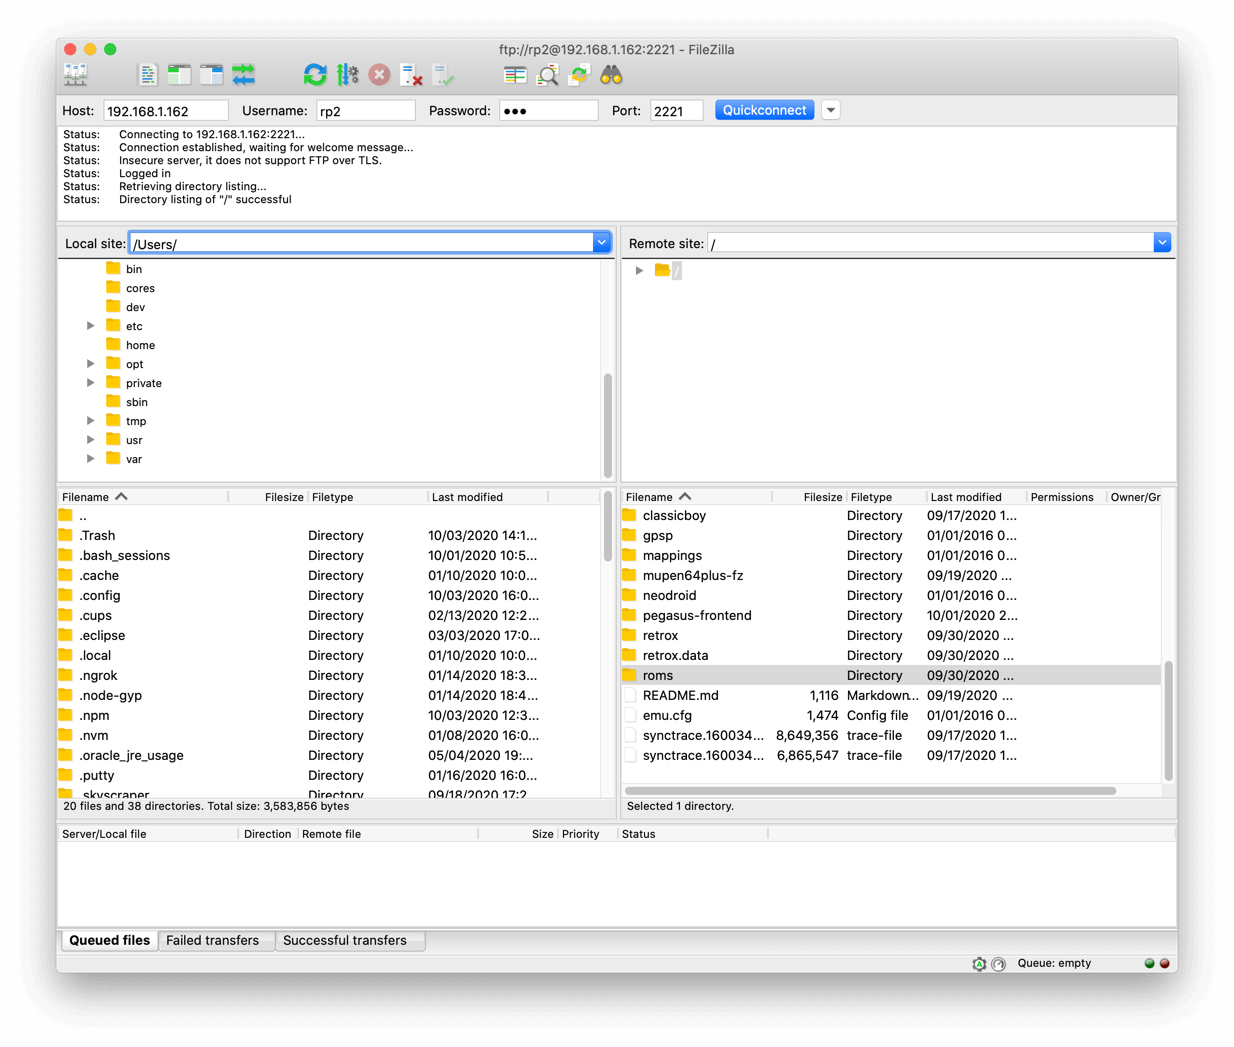
In the right lower screen you can see the file system of your RP2,
Drag and drop the roms folder to the root folder.
Drag and drop the RP-Switch theme inside of the pegasus-frontend
Now that you have both the Theme and the Metadata pack in your RP2 lets copy some games, just drag and drop the rom files in every system folder ( you can use zip files for your roms except for CD Games )
Example: I want to transfer Super Mario World.zip for Super Nes, just drag and drop the file to roms/snes/
This is a somewhat long process, but don't worry, it's really simple.
Open Pegasus Frontend with Mouse mode off, press B, go to Settings
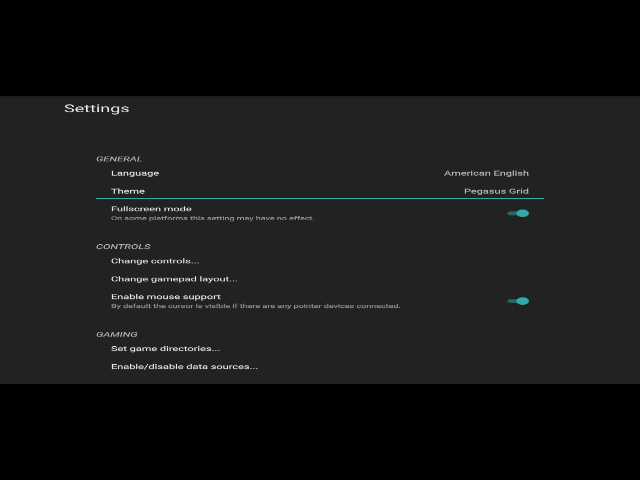
Go to General - Theme and select the theme you want, you should see in there switchOS, select with A button
Go down to Gaming -> Set game directories
Pres Y and browse until you get to your roms folder using the D-pad, go to the system ( snes, gba, etc) folder and select the metadata.pegasus.txt inside using the button A.
You have to do this with every system you want to add, it's a little bit tedious but you only have to do it once.

Once you've added all the systems you want to press B again and go back to settings
Pegasus will crash if you use it to launch Android Apps, go down To Gaming -> Enable/Disable data sources and make sure Android apps is disabled.
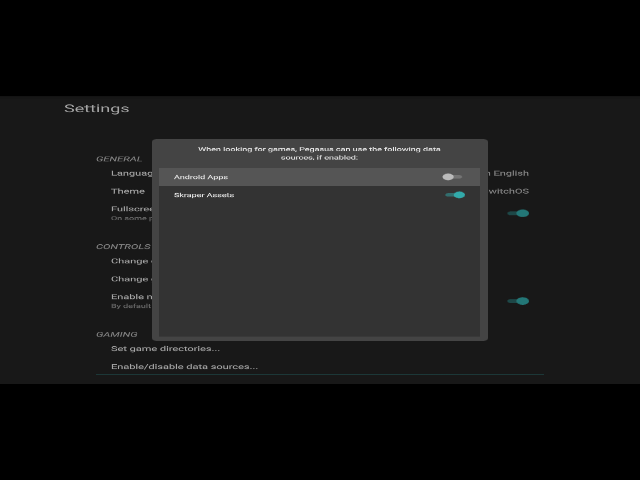
Press B to go back to Settings and B Again to see All the systems added!
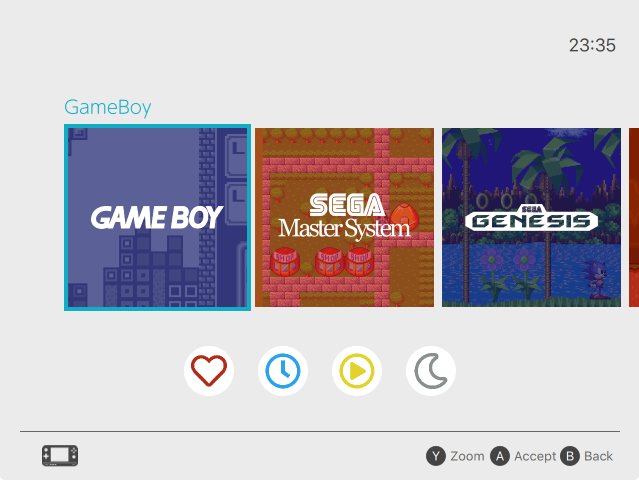
Just go inside a system with A, press A again to launch the game!
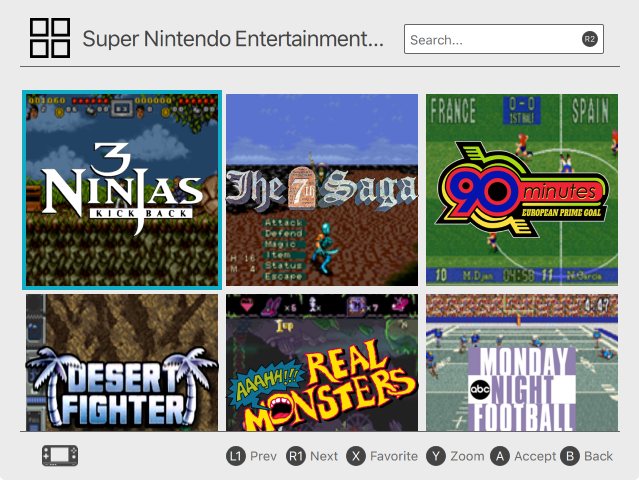
Now with the hard part, downloading all the media so the game lists look like this:
You can also download some pre scraped assets from here: https://bit.ly/2Ie0p21
Keep in mind these assets may not work with your rom collection. These assets have been scrapped from a collection where there the rom file only has the game name and nothing else, ie: Super Mario World.zip and not Super Mario World (JP).zip. If you want to use this set you need to remove all the extra info from the rom filename. You can rename your collection in Bulk using this app for Windows or using Automator in a Mac.
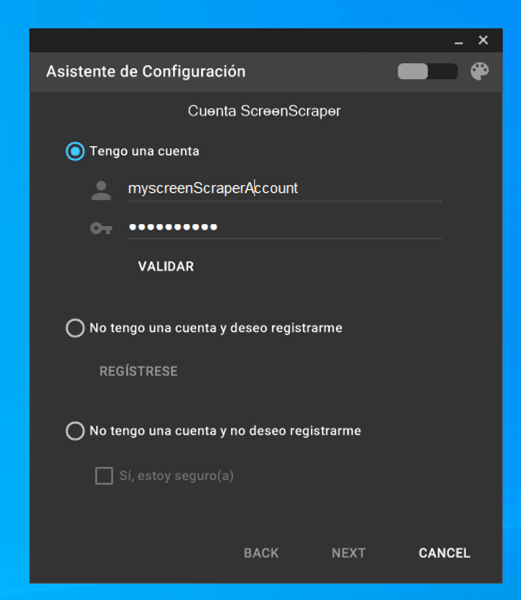
If the previous assets doesn't meet your needs, you need to scrap your own, for that we are going to be using Skraper, for that you need to register yourself in Screen Scrapper
Note to Mac users
Skraper is not available for Mac as of yet, I promise I will try to update this guide ASAP with alternatives for you guys.
I assume you have installed the application with no problem, after several minutes a wizard will appear:
In there complete your screen scrapper login data, click in VALIDATE and click NEXT.
In the next screen choose "Generic Emulation" and click NEXT
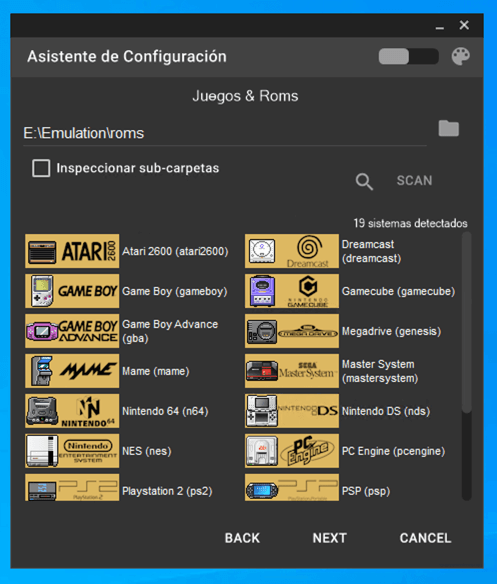
Now chose the path to your rom folder with all the systems in it, remember the roms folder we downloaded before, if you put your roms in there it will make the process easier.
You should see a screen like this:
Click NEXT until you see this screen:
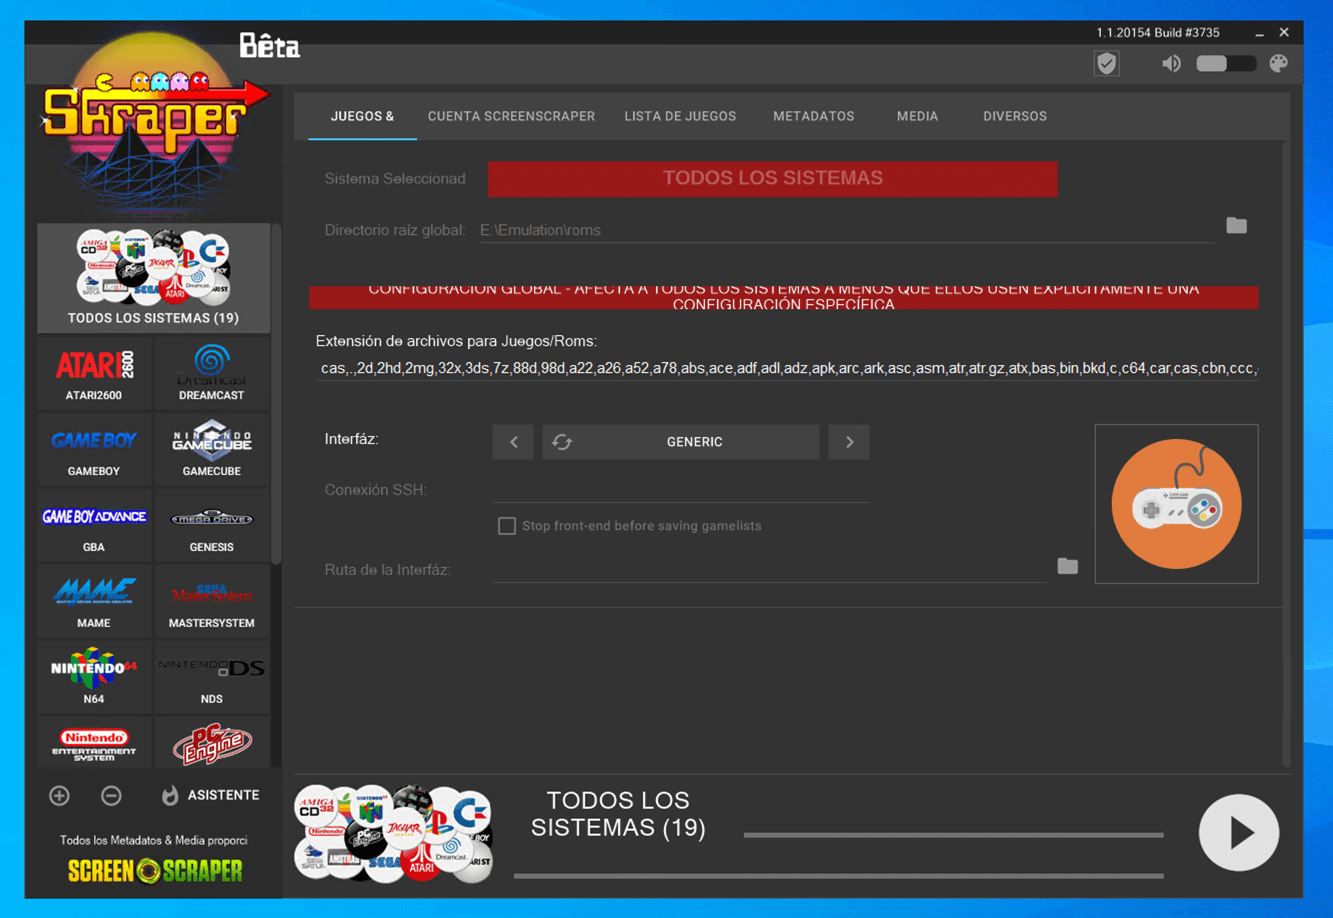
Go to the Media tab, we're going to tell Skrapper what images we need. Hit the - button until there is nothing selected
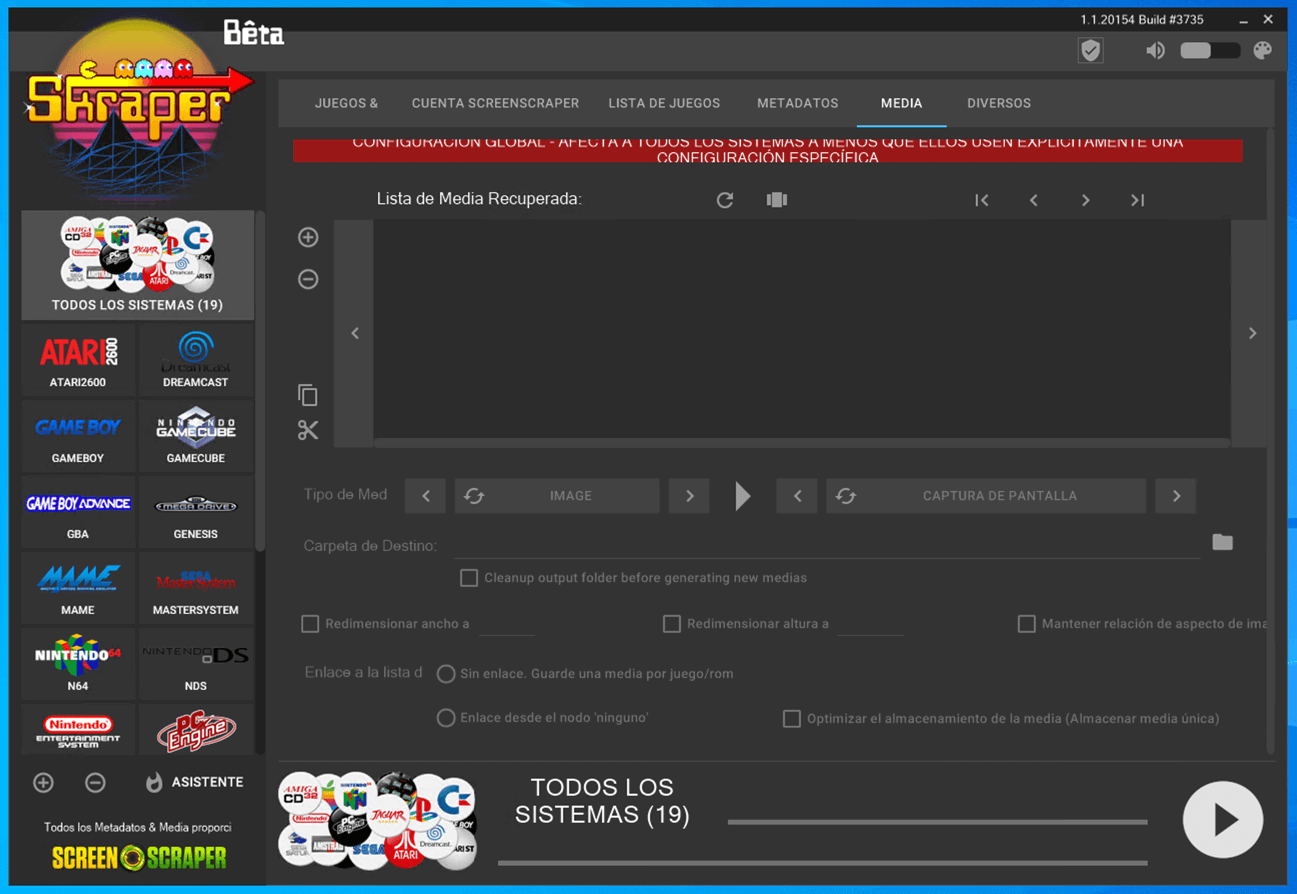
Click on the + button, then in media type click the left arrow until we get "Image - Screenshot"
Then mark "Resize width", put 160px in the input box an also check "mantain aspect ratio"
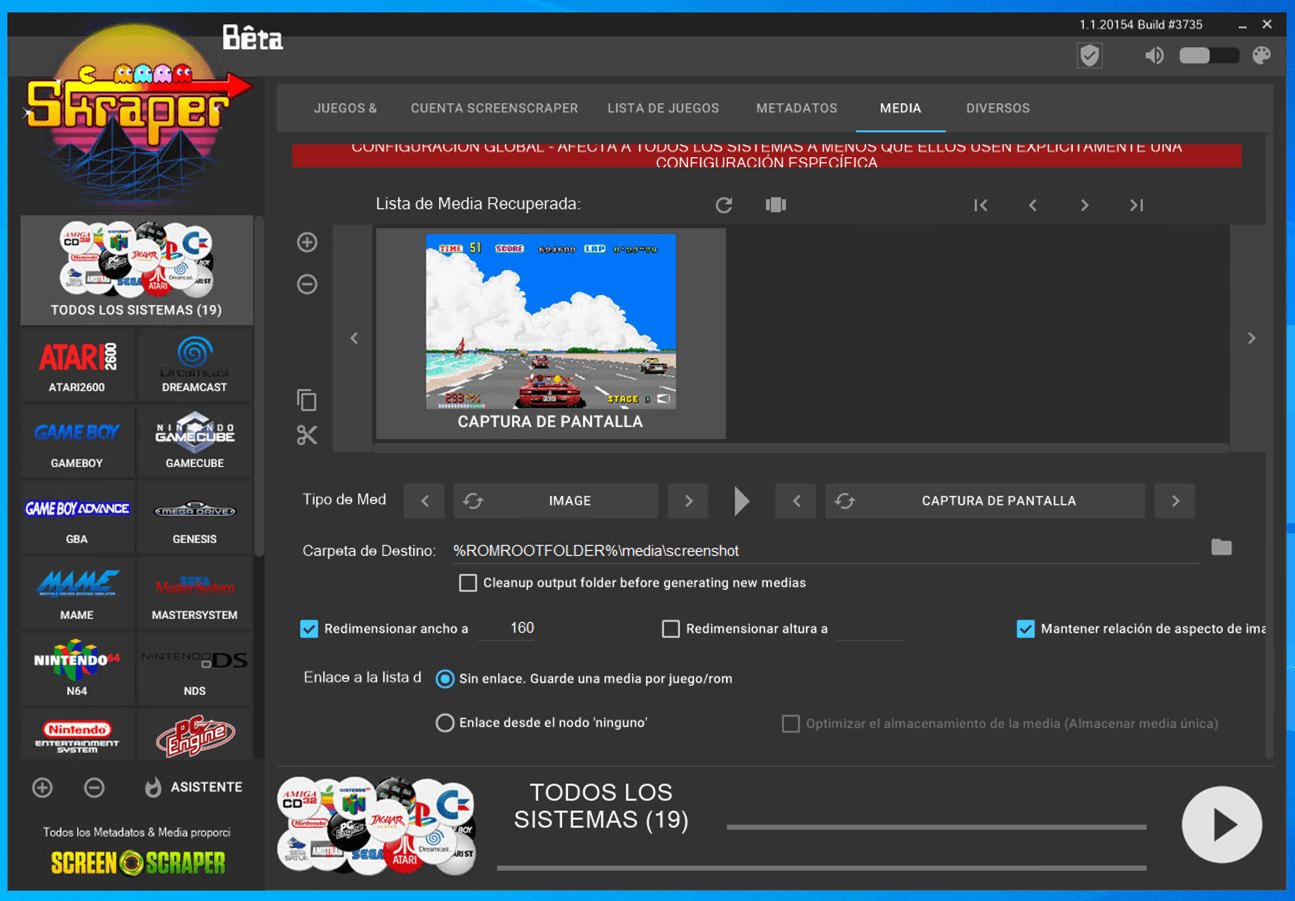
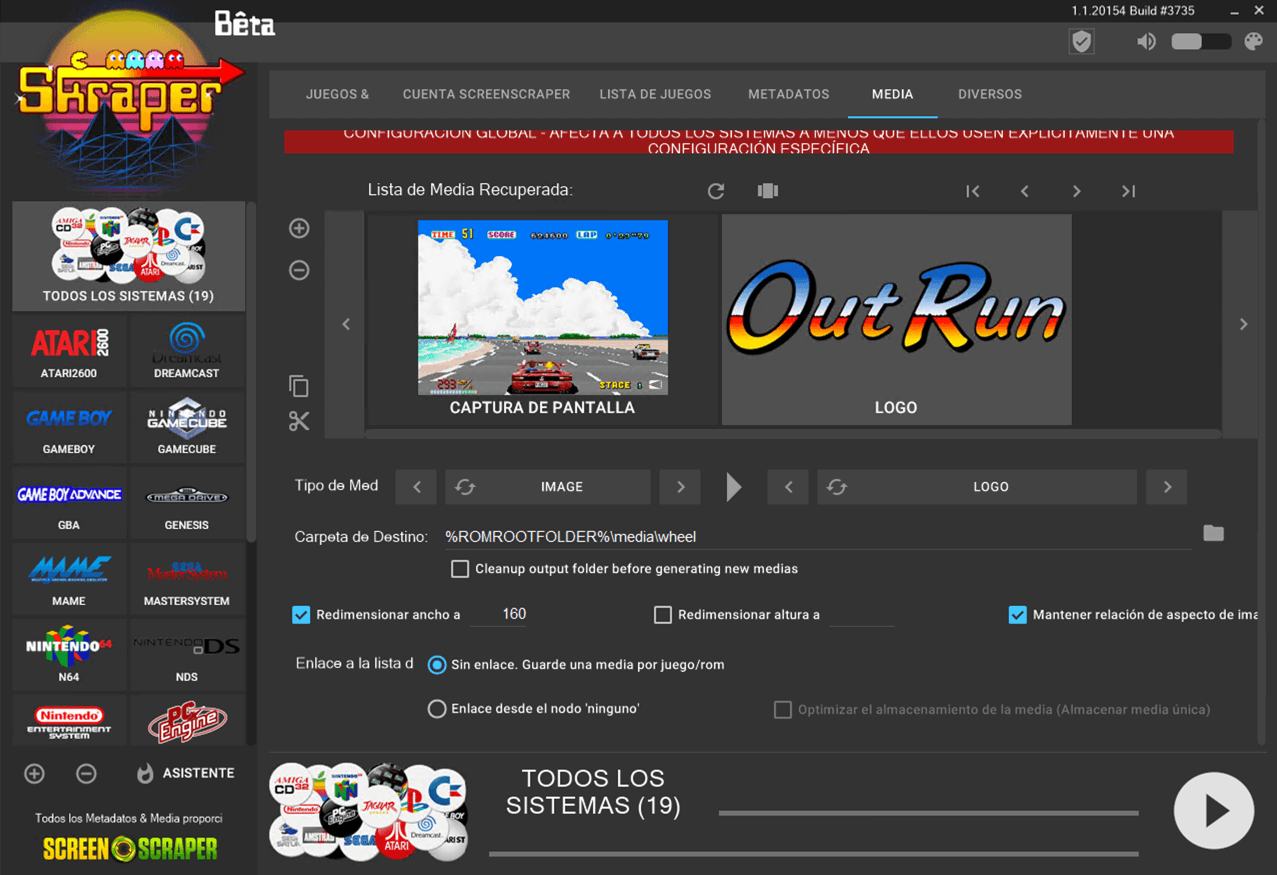
Click once more in the + button and repeat but now we need media type : "Image - Logo" depending of your computer language this could be called "Image - Wheel", then again mark "Resize width", put 160px in the input box an also check "mantain aspect ratio"
Hit the play button and wait, depending of the number of roms this could take from minutes from hours.
If you are using a MAME full romset pack, I recommend using this trick to thin the ROMs you will transfer to the RP2, the more files you put in the RP2, the slower Pegasus behaves
When it's finished you will have a media folder inside of every of your rom systems. Copy this media folder to your RP2 using the methods described before and you my friend, are finally done!
Example: The path the media folder in your RP2 for Super Nintendo should be:
roms/snes/media