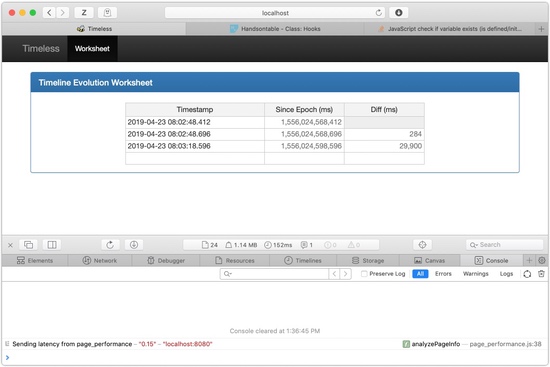
Log files are great, but they don't always make determining the elapsed time betwwn events all that easy to calculate. This service and app, is all about making the calculation of those time intervals very easy.
There are several RESTful endpoints of this service that the application makes use of - and are free to be used by any caller.
Given a timestamp string, ts:
GET /v1/epochize/ts
will do it's best to return the milliseconds since epoch of the argument as a JSON object of the form:
{
  "epochMsec": 123456789
}
this can then be used in any way the caller desires.
Frontend developers can drop HTML, CSS, JavaScript, etc. in resources/public/.
We're using Bootstrap and jQuery. No fancy pre-processors or crazy frameworks (yet).
Homebrew - all of the following tools can be installed with Homebrew. If it's not already installed on your laptop, it's easy enough to go to the website, run the command to install it, and then continue to the next step. If you are on linux, expect to be installing some scripts and RPMs, but everything is available there as well - just not as convenient.
JDK 1.8 - it is possible to get JDK 1.8 from Oracle, but it's just as easy to get the JDK 1.8 from AdoptOpenJDK, and not have to worry about Oracle's licensing. Simply:
$ brew tap AdoptOpenJDK/openjdk
$ brew cask install adoptopenjdk8
Leiningen - it is the Swiss army knife of Clojure development - library version control, build, test, run, deploy tool all in one with the ability to create extensions. On the Mac, this is installed easily with:
$ brew install leiningenand on linux you can download the lein script to somewhere in your $PATH, and make it executable. Then:
$ leinand it'll download everything it needs to run.
Heroku - there is no simpler place to host a solid service/app than Heroku - and these are the tools necessary to deploy to your own dyno on their service. They are installed easily with:
$ brew install heroku/brew/herokuand if you follow along on the Heroku Getting Started with Clojure page, you'll be ready to go in no time.
Once the repo is down and the necessary tools are installed, you can run the clojure REPL, this allows you to run and work with the code in an interactive shell. Simply:
$ cd timeless
$ lein repl
nREPL server started on port 53731 on host 127.0.0.1 - nrepl://127.0.0.1:53731
REPL-y 0.3.7, nREPL 0.2.12
Clojure 1.8.0
Java HotSpot(TM) 64-Bit Server VM 1.8.0_71-b15
    Docs: (doc function-name-here)
          (find-doc "part-of-name-here")
  Source: (source function-name-here)
 Javadoc: (javadoc java-object-or-class-here)
    Exit: Control+D or (exit) or (quit)
 Results: Stored in vars *1, *2, *3, an exception in *e

timeless.main=>
at this point, you are live with the code and can run the functions as you wish.
Leiningen also controls the tests. These are in the directory structure:
  timeless
   |-- test
       |-- timeless
           |-- test
               |-- core.clj
         ...
and you can run all of them with the simple command:
$ lein testThere are, of course, lots of options and testing capabilities, but if the tests are written right, then this will result in something like:
Testing timeless.test.core

Ran 1 tests containing 3 assertions.
0 failures, 0 errors.
If there are errors, they will be listed, with the expected vs. actual also provided to assist in debugging the problem with the tests.
The current code has a RESTful service to accept workflow events as well as respond to simple queries. To run the service on your local machine, against the currently defined postgres instance simply:
$ lein run weband then you can monitor the log:
$ tail -f log/timeless.logAt this point, point a browser to https://localhost:8443/info and you should see the basic data about the service. Point it to https://localhost:8443/ and you'll see the opening page.
Each deployment will require a new version number, and the rules are very simple:
- if all changes are Bug Fixes, then increment the smallest value in the version.
- if any change made breaks the external API, then increment the largest value in the version.
- if it's anything else - increment the middle number in the version.
These are simple rules. If you did more than Bug Fixes, but broke no external APIs, then it's a middle version number fix. If you broke existing APIs, then it's a large number change - even if you added other features and fixed bugs.
The version number must change, and the release notes should be updated as well. But there is no room for discussion on what should change - the rules are very clear.
There is a CHANGELOG.md file at the root of this repo, and there should always
be at least a record of the release, including a list of what's been fixed and
added - or changed - so that no one has to go looking in the git commits to get
the basics on what is in this release.
The format is already established in the file, so it's easy to just copy the last entry, change the information and save. Simple. But very important.
Once you have updated the version in the project.clj file, and written the release notes, you need to check everything in and tag the git repo with the version. This is simple:
$ git tag -a v1.2.1and supply a concise, reasonable, sentence for this version tag. Please note the v
on the front of the tag. This will make things more uniform for all version tags.
You can then push the tag with:
$ git push --tags

