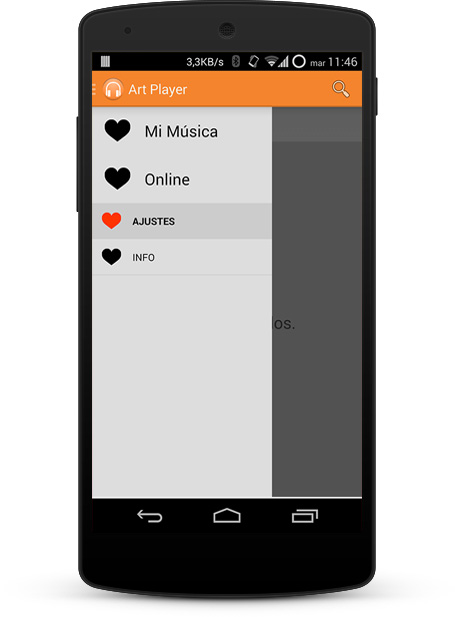
This project aims to let you use a ListView menu similar to the one in the new Google Apps (Keep, Play Music...) without having to do any extra effort. Sorry for the long name, though.
With GoogleNavigationDrawerMenu you can:
- Set a GoogleApp-styled DrawerLayout menu and only have to specify the main content for your app, you no longer have set the ListView and its styles. Everything is handled by the GoogleNavigationDrawer class.
- Set main and secondary sections to the menu.
- Set a list of icons for those sections (optional).
- Both text and icons remain selected when you click on them.
- Set an OnNavigationSectionSelected listener so you can handle section selection events.
- Change the background of the list items.
- Set a header and footer to the inner ListView.
###1. Include the library:
Manually (Option A):
Download the source code and import GoogleNavigationDrawerMenuLibrary folder as a Library Module in Android Studio or as a Project in Eclipse (still not tested).
Manually (Option B):
-
Download the AAR.
-
Put it in the
aarsfolder of your Android Studio project. -
Add a File Dependency or add it to the
build.gradleof your main Module, like this:repositories { mavenCentral() flatDir { dirs 'aars' } }
Notice the flatDir local maven repository created. Now you will have to add the aar file to the dependencies list, as if you were adding it from Maven Central Repository:
compile 'com.arasthel:gnavdrawer-library:1.0.+'
Automatic (Gradle):
Add it to your Application Module's build.gradle:
Declare it into your build.gradle
dependencies{
    compile 'com.arasthel:gnavdrawer-library:1.0.+'
}
###2. Use class in XML or code:
####Example of how to use it on an XML code:
<org.arasthel.googlenavdrawermenu.views.GoogleNavigationDrawer
xmlns:android="http://schemas.android.com/apk/res/android"
xmlns:app="http://schemas.android.com/apk/res-auto"
android:id="@+id/navigation_drawer_container"
android:layout_width="match_parent"
android:layout_height="match_parent"
app:list_paddingTop="?android:actionBarSize"
app:drawer_gravity="start"
app:list_mainSectionsEntries="@array/navigation_main_sections"
app:list_secondarySectionsEntries="@array/navigation_secondary_sections"
app:list_mainSectionsDrawables="@array/drawable_ids"
app:list_secondarySectionsDrawables="@array/drawable_ids">

  <FrameLayout
      android:id="@+id/content_layout"
      android:layout_width="match_parent"
      android:layout_height="match_parent"/>

</org.arasthel.googlenavdrawermenu.views.GoogleNavigationDrawer>
You may think 'Ok, so where's the menu?'. Well, the GoogleNavigationDrawer class itself contains it and handles it so you don't have to manually modify it. You can customize it, though, you can find that info in Customizing Section.
All the app:* attributes are optional, but if you don't provide any entries you will have to do it later in code with drawer.setListViewSections(...).
####Using GoogleNavigationDrawer in Java Code:
ViewGroup container = (ViewGroup) findViewById(R.id.container);
GoogleNavigationDrawer drawer = new GoogleNavigationDrawer(context);
// Here we are providing data to the adapter of the ListView
drawer.setListViewSections(new String[]{"Section A", "Section B"}, // Main sections
        new String[]{"Settings"}, // Secondary sections
        new int[]{R.drawable.ic_launcher}, // Main sections icon ids
        null); // Secondary sections icon ids
// To work correctly, a DrawerLayout must be the only View in a ViewGroup
container.removeAllViews();
container.addView(drawer);
// Now we add the content to the drawer since the menu is already there.
// Also, DrawerLayout forces the contentView to be the first item. Otherwise, you can't click on the menu.
drawer.addView(contentView, 0);
GoogleNavigationDrawer extends DrawerLayout. This means you can use DrawerLayout methods and set a DrawerListener to it.
###3. Handling selection, opening and closing of the menu:
As you cannot access the inner ListView to ensure encapsulation, additional methods have been provided so you can do it by code. This methods are:
public boolean isDrawerMenuOpen();

public void openDrawerMenu();

public void closeDrawerMenu();
Also, to handle section selections, a listener has been provided:
public void setOnNavigationSectionSelected(OnNavigationSectionSelected listener);###4. Customizing the inner ListView:
Finally, customization. The main XML attributes of the class are the following:
app:list_padding[Top, Bottom, Left, Right]="dimen"
app:drawer_gravity="start"
app:list_mainSectionsEntries="array"
app:list_secondarySectionsEntries="array"
app:list_mainSectionsDrawables="array"
app:list_secondarySectionsDrawables="array"
app:list_headerView="layout"
app:list_footerView="layout"
app:list_headerClickable="boolean" (default is true)
app:list_footerClickable="boolean" (default is true)
app:list_mainSectionsBackground="drawable"
app:list_secondarySectionsBackground="drawable"
Example of arrays in arrays.xml:
<?xml version="1.0" encoding="utf-8"?>
<resources>

    <string-array name="navigation_main_sections">
        <item>Home</item>
        <item>Some Other</item>
    </string-array>

    <string-array name="navigation_secondary_sections">
        <item>Settings</item>
        <item>Info</item>
    </string-array>

    <array name="drawable_ids">
        <item>@drawable/ic_home</item>
        <item>@drawable/ic_other</item>
    </array>

</resources>
Also, both icon drawables and backgrounds should have checked states to keep them consistent with the rest of the library:
<?xml version="1.0" encoding="utf-8"?>

<selector xmlns:android="http://schemas.android.com/apk/res/android">
    <item android:state_checked="true" android:drawable="@drawable/ic_on"></item>
    <item android:drawable="@drawable/ic_off"></item>
</selector>
All these attributes can also be set by code.
This library is licensed under Apachev2:
Licensed under the Apache License, Version 2.0 (the "License"); you may not use this file except in compliance with the License. You may obtain a copy of the License at
Unless required by applicable law or agreed to in writing, software distributed under the License is distributed on an "AS IS" BASIS, WITHOUT WARRANTIES OR CONDITIONS OF ANY KIND, either express or implied. See the License for the specific language governing permissions and limitations under the License.
This means you can use the library in whatever way you want and also I take no responsibility of what it could do (thermo-nuclear explosions and such).
Anyway, it would be really nice of you if you could give this library a line in some "About" section in your app.
