Creating your own UI with the Smooch iOS SDK
This guide shows you how to create your own UI for the Smooch iOS SDK.
The Smooch iOS SDK comes with a rich prebuilt user interface with the option to configure the interface using the Smooch dashboard or the REST API.
If needed you can completely replace Smooch's default UI with your own interface.
Although you can replace the default UI, note that this means rewriting support for all the Smooch message types, that you want to support in your custom UI.
Overview
The iOS SDK can be initialized without displaying it's default UI. You can then make use of the SDK's messaging APIs to send messages, and it's conversation delegate methods to receive messages.
This guide is separated into two parts:
- Part One for setting up a generic messaging UI in iOS
- Part Two for integrating Smooch methods in to add the messaging functionality.
It will help to have the SDK documentation on hand while following this guide.
The complete code for this guide is included in this repository.
Part One: setting up the UI
In part one we'll set up the UI that we'll be integration Smooch with in part two.
1. Create a new project
Create a new single view app project  and select Swift as the language.
2. Add UI elements
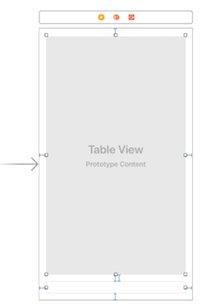
In the Main.storyboard file add a Text Field and a Table View. The Text Field will be our message input. The Table View will contain the conversation history.
3. Connect UI elements to the view controller
Using the assistant editor, ctrl drag both UI elements from Main.storyboard into ViewController.swift to connect them to referencing outlets.
Name the Text View messageInput and the Table View conversationHistory.
Your ViewController.swift file should now look like this:
class ViewController: UIViewController {
    @IBOutlet weak var messageInput: UITextField!
    @IBOutlet weak var conversationHistory: UITableView!

    override func viewDidLoad() {...}
}
4. Handle input from the Text View
Now we're going to handle the user hitting the enter key while typing so that we can treat their input as a message.
First we'll create a function called endOfInput in the ViewController class in ViewController.swift to handle the event:
@objc func endOfInput(){
    messageInput.resignFirstResponder()
    let text = messageInput.text!.trimmingCharacters(in: .whitespacesAndNewlines)
    if text.count > 0 {
        print("Message: \(text)")
    }
    messageInput.text = ""
}
The endOfInput function is logging the text to the console and resetting the Text View to an empty state. When we implement the Smooch pieces, this is where we'll place our code to call smooch instead of logging text.
In our viewDidLoad method, we'll add this line to attach our endOfInput function to the UI element:
messageInput.addTarget(self, action: #selector(endOfInput), for: .editingDidEndOnExit)5. Attach a data source to the Table View
We're now going to connect a data source to the Table View to represent message history in the conversation.
We'll start by extending our viewController, with UITableViewDataSource to double as a data source. In ViewController.swift, add UITableViewDataSource to the ViewController class like so:
class ViewController: UIViewController, UITableViewDataSource {...}Now we'll add methods to compute the number of rows in the table and fill them with content. Add numberOfRowsInSection and cellForRowAt methods to ViewController, also add an items list to ViewController to act as a store of messages. The new properties and methods should look like this:
class ViewController: UIViewController, UITableViewDataSource {
  var items: [Any] = []

  func tableView(_ tableView: UITableView, numberOfRowsInSection section: Int) -> Int {
    return items.count
  }

  func tableView(_ tableView: UITableView, cellForRowAt indexPath: IndexPath) -> UITableViewCell {
      let cell = tableView.dequeueReusableCell(withIdentifier: "MessageCell", for: indexPath)
      cell.textLabel!.text = "Item"
      return cell
  }
  ...
}
We'll modify the cellForRowAt code to transform Smooch messages into table cells in the next part of this guide.
Finally, we'll connect the Table View to the data source and render it in the viewDidLoad delegate method in ViewController.swift. Add these three lines of code to viewDidLoad
override func viewDidLoad() {
    ...
    conversationHistory.tableFooterView = UIView()
    conversationHistory.dataSource = self
    conversationHistory.register(UITableViewCell.self, forCellReuseIdentifier: "MessageCell")
}
That concludes the first part of this guide. At this point your ViewController.swift file should look like this:
import UIKit

class ViewController: UIViewController, UITableViewDataSource {
    @IBOutlet weak var conversationHistory: UITableView!
    @IBOutlet weak var messageInput: UITextField!

    @objc func endOfInput(){
        messageInput.resignFirstResponder()
        let text = messageInput.text!.trimmingCharacters(in: .whitespacesAndNewlines)
        if text.count > 0 {
            print("Message: \(text)")
        }
        messageInput.text = ""
    }

    override func viewDidLoad() {
        super.viewDidLoad()
        messageInput.addTarget(self, action: #selector(endOfInput), for: .editingDidEndOnExit)
        conversationHistory.tableFooterView = UIView()
        conversationHistory.dataSource = self
        conversationHistory.register(UITableViewCell.self, forCellReuseIdentifier: "MessageCell")
    }

    var items: [Any] = []

    func tableView(_ tableView: UITableView, numberOfRowsInSection section: Int) -> Int {
        return items.count
    }

    func tableView(_ tableView: UITableView, cellForRowAt indexPath: IndexPath) -> UITableViewCell {
        let cell = tableView.dequeueReusableCell(withIdentifier: "MessageCell", for: indexPath)
        cell.textLabel!.text = "Item"
        return cell
    }
}
And your Main.storyboard should look like this:
Part Two: adding messaging to the app
Now that we've defined the UI for our messaging application, we can call Smooch's core messaging methods to add functionality.
1. Integrate Smooch
See this guide for adding the Smooch framework to your app. We've included a quick start here. We'll assume you have Cocoapods. In the terminal:
- run
pod init - add
pod 'Smooch'to the Podfile - run
pod install - follow the instructions in the terminal for re-opening the project in Xcode.
Now in AppDelegate.swift AND ViewController.swift, import Smooch:
import SmoochAnd, in didFinishLaunchingWithOptions in AppDelegate.swift, add a line to initialize Smooch replacing "<your_app_id>" with your Smooch app ID:
func application(_ application: UIApplication, didFinishLaunchingWithOptions launchOptions: [UIApplicationLaunchOptionsKey: Any]?) -> Bool {
    Smooch.initWith(SKTSettings(appId: "<your_app_id>"))
    return true
}
2. Send messages
When the user enters text input and hits enter we're going to send an app user message to Smooch.
In our endOfInput function in ViewController.swift replace the print statement with the following line:
Smooch.conversation()?.sendMessage(SKTMessage(text: text))The endOfInput function should now look like this:
@objc func endOfInput(){
    messageInput.resignFirstResponder()
    let text = messageInput.text!.trimmingCharacters(in: .whitespacesAndNewlines)
    if text.count > 0 {
        Smooch.conversation()?.sendMessage(SKTMessage(text: text))
    }
    messageInput.text = ""
}
3. Display messages
Now we're going to pass our initial conversation state to the Table View's data source.
Add a line to assign items to the value of Smooch's conversation history to the viewDidLoad delegate method:
override func viewDidLoad() {
    ...
    if let messages = Smooch.conversation()?.messages {
        self.items = messages
    }
}
Next, in our cellForRowAt method, we want to set the value of the cell to the message and name of the sender.
Replace the code that sets the value of the cell to "Item" with this:
let message = items[indexPath.row] as! SKTMessage
let text = message.role == "appMaker" ? "\(message.name!) says \(message.text!)" : message.text!
cell.textLabel!.text = text
The cellForRowAt method should now look like this:
func tableView(_ tableView: UITableView, cellForRowAt indexPath: IndexPath) -> UITableViewCell {
    let cell = tableView.dequeueReusableCell(withIdentifier: "MessageCell", for: indexPath)
    let message = items[indexPath.row] as! SKTMessage
    let text = message.role == "appMaker" ? "\(message.name!) says \(message.text!)" : message.text!
    cell.textLabel!.text = text
    return cell
}
4. Update the UI with new messages
Smooch exposes conversation delegate methods that allow you to capture incoming and outgoing messages as well as other events. We're going to use these methods to display new messages in our UI.
First we're going to extend our ViewController class with SKTConversationDelegate like so:
class ViewController: UIViewController, UITableViewDataSource, SKTConversationDelegate {...}In the viewDidLoad delegate method, we need to attach our ViewController as delegate to the Smooch conversation by adding this line:
override open func viewDidLoad() {
    ...
    Smooch.conversation()?.delegate = self
}
Now, we can add conversation delegate methods to our class. We'll start with willSendMessage to capture newly sent messages in the UI. Add the following method to your ViewController class:
class ViewController: UIViewController, UITableViewDataSource, SKTConversationDelegate {
    ...
    func conversation(_ conversation: SKTConversation, willSend message: SKTMessage) -> SKTMessage {
        self.items.append(message)
        conversationHistory.reloadData()
        return message
    }
}
Lastly, in order to receive new messages from the business, we can implement the didReceiveMessages conversation delegate method. Add the following method to your ViewController class:
class ViewController: UIViewController, UITableViewDataSource, SKTConversationDelegate {
    ...
    func conversation(_ conversation: SKTConversation, didReceiveMessages messages: [Any]) {
        if let allMessages = Smooch.conversation()?.messages {
            self.items = allMessages
        }

        conversationHistory.reloadData()
    }
}
Wrap up
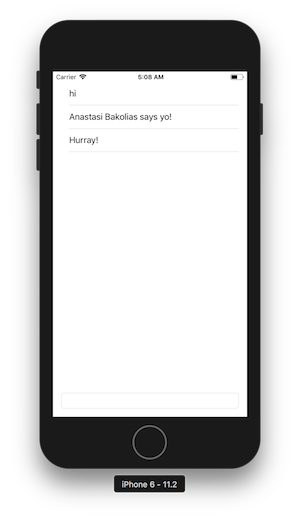
You've created your own UI for the Smooch iOS SDK. It should look like this:
Now you might want to consider how you'll represent more complex messages and activities, such as:
You can also follow these instructions for handling push notifications.
Running the code in this repository
The complete code for this guide is included in this repository. To run the code:
- clone the repo
- run
pod install - open custom-ui-ios.xcworkspace in Xcode
- replace <your_app_id> in AppDelegate.swift with your Smooch app ID
- and build and run the project in the device emulator.


