Modular Control Architecture
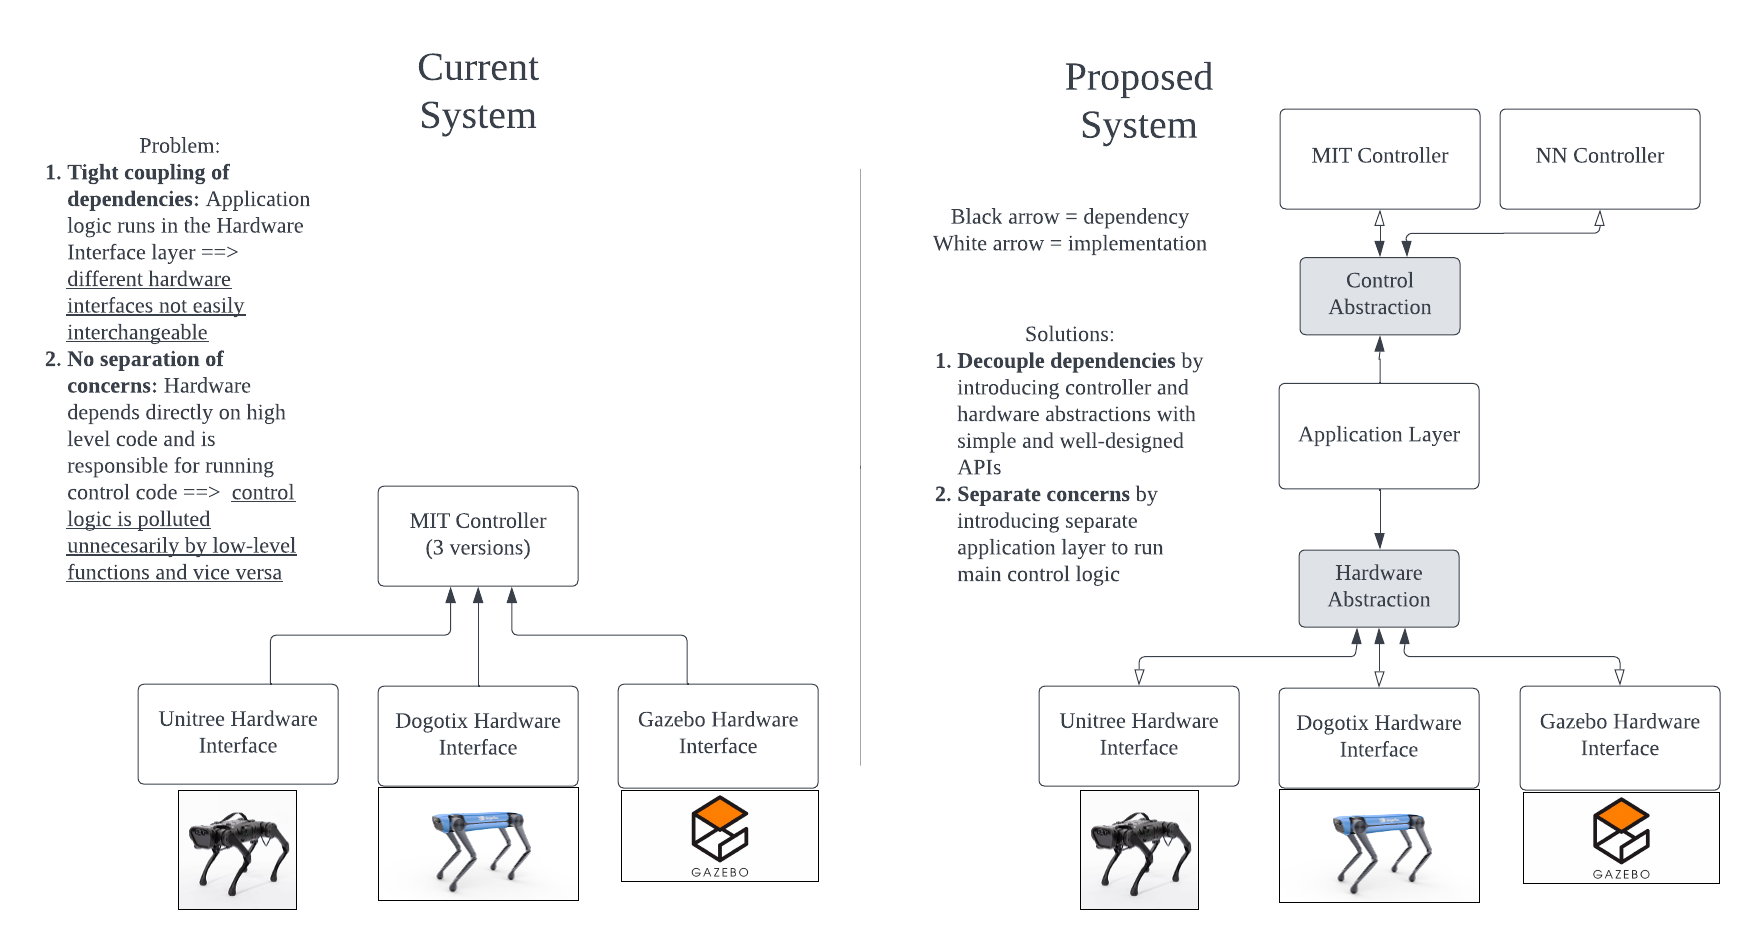
This repo aims to design a unified and modular control architecture that enables easy interchanging of high-level controllers and low-level hardware.
Design
Motivation
API
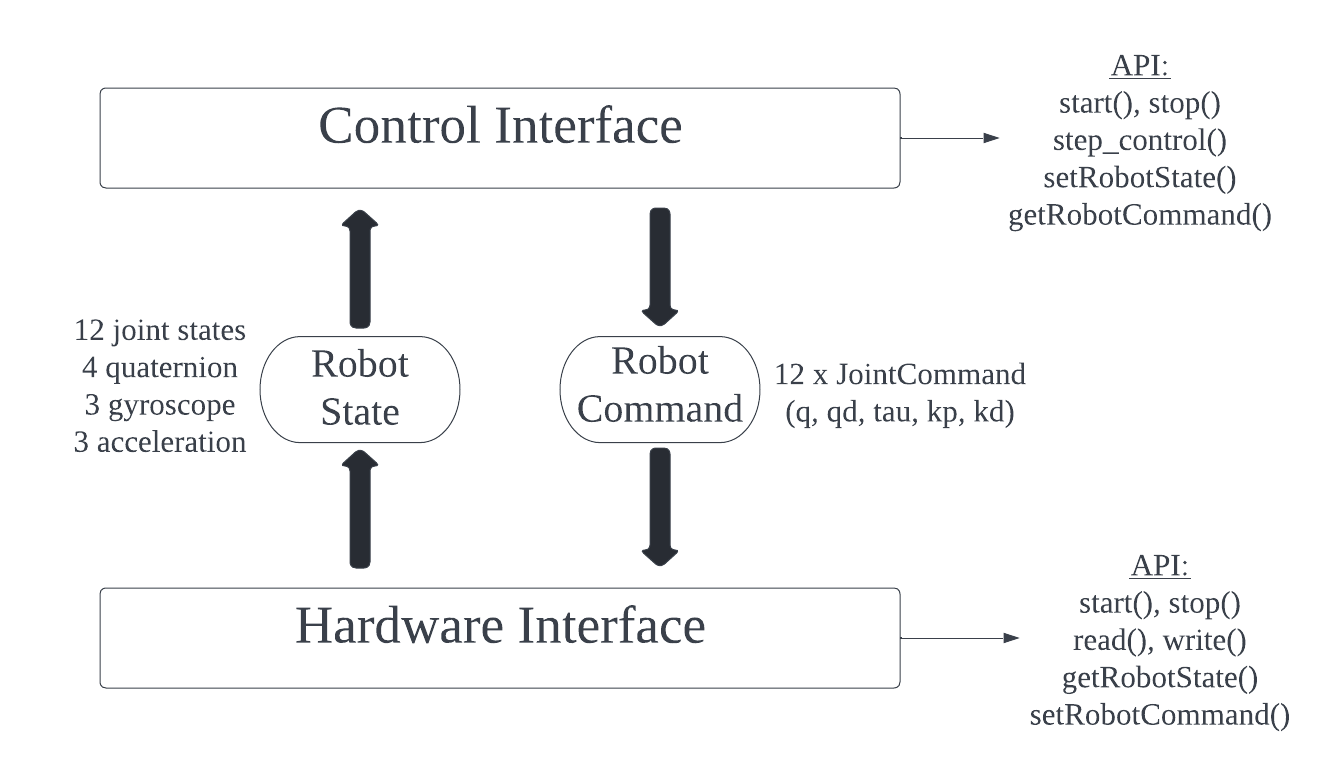
The API for the controller and hardware interfaces is defined in interfaces
Example Application
Using this architecture, control and hardware construction and initialization details are abstracted away and hidden behind simple interfaces.
    auto hardware = FakeHardware();
    auto controller = FakeController();
    hardware.start();
    controller.start();

    // Initialize static memory
    static interfaces::RobotState robotState;
    static interfaces::RobotCommand robotCommand;
A minimal control loop can be compactly defined in about 10 lines of code.
    // Implement control loop
    while (true)
    {
        // Communicate robot state from hardware to controller
        hardware.read();
        hardware.getRobotState(robotState);
        controller.setRobotState(robotState);
        // Compute control command
        controller.step_control();
        // Communicate robot command from controller to hardware
        controller.getRobotCommand(robotCommand);
        hardware.setRobotCommand(robotCommand);
        hardware.write();
    }
The above control loop serves as a simple base on which to implement other features, e.g.:
- sleeping for a set time every loop
- implementing thread-safety with mutexes
Roadmap
- Design interfaces
- Implement example dummy hardware and controller
- Implement Unitree hardware
- Implement example controller
- Verify that full control setup works on hardware
Quickstart
Install Dependencies (Docker)
This repository comes bundled with a Docker development container that bundles the dependencies necessary to build the project. It can be opened using VSCode Remote Containers extension
Build Executables
mkdir build
cd build
cmake ..
make
Development Guide
It is recommended to adhere to the interfaces provided:
- The Controller layer computes the control action from the robot state
- The Hardware layer accepts the control action and passes it to the hardware, then reads in the new robot state
- The application runs both Controller and Hardware in a loop.
examples/fake_application demonstrates how to implement a simple application with dummy controller and hardware.
examples/ros_application demonstrates implementing an application that requires communication over ROS channels.
Compiling
All three example applications can be built and compiled in the provided Docker environment. It is convenient to use VSCode Remote Containers extension for this purpose
Running on Unitree Hardware
See docs/deploy_hardware.md for detailed instructions on running binaries on Unitree robots.
Running ROS node
examples/ros_application.cpp contains an example application that runs a ROS node in isolation. It can be built with just CMake and without catkin (which is CMake-based anyway).
The ROS application assumes roscore is already running and sets up publishers and subscribers on the same channels used by the Gazebo simulation stack found here: https://github.com/mcx-lab/static_walker
After you have started the Gazebo simulation, the example ROS application can be used to run the controller. SineController will likely not be strong enough for the robot to stand up, but can be replaced with a more functional controller.
Modifying Unitree legged msgs
The ROS application depends on custom messages defined in hardware/ros_hardware/include/unitree_legged_msgs. The header files are obtained by compiliing unitee_legged_msgs (refer to https://github.com/mcx-lab/quadruped_controller_ros/tree/main/unitree_ros/unitree_legged_msgs) in a catkin workspace. The header files can be found in devel/include/unitree_legged_msgs. Note that this process must be done again if the unitree_legged_msgs are ever changed.
Extending the interfaces
ControllerInterface and HardwareInterface provide a simple and minimal interface for control. Where possible, it is recommended to keep the existing interfaces as-is and use subclasses to implement additional functionality.
For example, if we have terrain perception, the Hardware class can be extended to include a getTerrainState() method, and the Controller class can include a setTerrainState() method. Then, a custom application can be written that includes both the new methods in the control loop.

