Turn any raw text into a high-quality custom dataset for training new LLMs, using AI that can run on your computer. Make data gathering a painless step of the model creation process. Augmentoolkit is the easy-to-use, customizable, open-source, and cost-effective data generation solution. No OpenAI needed.
Augmentoolkit is an AI-powered tool that lets you create domain-specific data to finetune LLMs, using open-source AI.
Cite:
Augmentoolkit makes LLM data easy.
- Cheap: Augmentoolkit uses open-source LLMs, and so can be run on consumer hardware for hardly any cost, or cheaply via APIs like Together.ai.
- Effortless: Augmentoolkit can be run by putting some files in a folder, and then running a Python script. If that's too much, you can also use the graphical user interface. Previously-started runs are continued automatically, so you don't need to worry about interruptions costing you time and/or money.
- Fast: when using APIs, you can generate millions of trainable tokens in under an hour. Fully async code lets you get results quickly.
- Anti-hallucination, quality data: Augmentoolkit checks all important outputs for hallucinations and failures, ensuring high data quality throughout every generated dataset. Delicately-crafted few-shot examples force the open-source models used to be consistent and smart.
We've also done our best to facilitate the step after you generate your data -- training your LLM:
- Train an AI for the cost of a dinner: with the provided training config, you can perform the equivalent of a full finetune of an AI, on your own data, for a tiny sum of money. VRAM usage varies by model, of course -- and this can work in your favor.
- Create your LLM in less than a day: with reasonable dataset sizes and the provided training configs, LLM training can be done before the day is out. Iterate quickly and cheaply.
- When you use the same recipe, you get the same bread: Augmentoolkit datasets have been used successfully for professional consulting projects. Video documentation is linked in this README that shows exactly how to use this tool to do the same. The code, settings, and prompts you need is all here.
- Train AI with confidence, especially if it's your first time: between the video docs and active GitHub issues support, you can be confident you'll get a good LLM out of this.
Finally, using the model you create should be easy and valuable:
- Training a model as a means of learning: dealing with a large and complex subject that you need to master? Training an LLM with Augmentoolkit creates an assistant that understands the big picture of what you're trying to figure out. I have learned from AI I have created before, and you — or your users/employees/clients — can too.
- Documented LLM setup (RAG included!): from quantizing to chatting, it might take 30 minutes of following provided step-by-step video instructions (easy!) to set it up the first time you do this. The second it will likely take less than five or ten. Tutorials are taken seriously here.
Note that Video Documentation is currently built for Augmentoolkit, a sister project of Augmentoolkit built for the Verus community. The process of running it should be the same, and the process of training the LLM is definitely the same. But when it mentions "Augmentoolkit" and the Verus project, that is why.
Augmentoolkit-specific video docs are in the works.
Video Documentation 1 — Dataset generation
Video Documentation 2 — Model Training, Quantizing, and Chatting
- Quickstart
- Vision (Introduction)
- Usage
- What to do with what you get out
- Roadmap
- Self Promotion
- Latest Update Info
- Think this is cool? Connect with me elsewhere!
- Contributing
- Join A Discord for Dataset Generation!
- Using "Aphrodite mode" (deprecated)
After installing the dependencies:
- Get the repo onto a computer with an internet connection
- Install its dependencies (
pip install -r requirements.txt) - Open
config.yaml - Paste your API key, favorite model name, and the endpoint URL of your preferred AI service, into the relevant fields inside
config.yaml. Be sure to keep the quotes. Recommendation: Together.ai with Hermes Mixtral works really nicely both as a LARGE_LOGICAL_MODEL and as the LOGICAL_MODEL. - Open this project's folder in a command line and type
python processing.pyand hit enter (fires off the script version).
- Install the dependencies (
pip install -r requirements.txt) - Find the absolute path to the
raw_txt_inputfolder - Run
export GRADIO_TEMP_DIR=<raw_txt_input_absolute_path> - Run
python app.py

Dataset creation is currently the most painful, and most important, step of the finetune-creation process. Most people have to resort to either A) burning an obscene number of OpenAI API credits, or B) spending dozens, if not hundreds, of hours accumulating a hybrid dataset based off of your own conversations with bots. The OpenAI approach is based on a paid service (whose TOS you're violating) that can ban you at any second, whose writing style you probably hate, which is getting worse every month, and whose synthetic data critically lacks variety. Handwriting the examples is far too slow to iterate on, and does not scale at all, meaning you're missing out on huge potential performance increases that come with more data. If you're a company and you pay people to create examples in bulk, then it's possibly pricier than even OpenAI — also not scalable at all. And moreover, if we're literally creating machines that can write, why do we spend most of our time writing?
Augmentoolkit is meant to make high-quality data generation easy, fast, shareable, configurable, and for everyone. It is meant to allow the easy creation of datasets about any knowledge that exists in plain text. It is meant to allow models to bootstrap additional training data for themselves. It is meant to allow any enthusiast, regardless of computer strength, to contribute to the advancement of AI by generating swathes of data for cheap. It's meant to expand the possibilities of what finetunes can be built, by making data gathering as easy as running a script. Whether you're finetuning a company chatbot to understand your business's information, are creating an AI ambassador for your community that can explain your mission and goals, or are doing something else entirely, Augmentoolkit exists to make your data problems a bit less problematic.
A flowchart of Augmentoolkit's operation can be found in the Usage section.
The high-level is: books or manuals in, information-rich conversations out. Train the model on the conversations, it learns the information. Extensive validation keeps hallucinations to a minimum.
More in-depth and jargon-filled: Augmentoolkit takes human-written text with information in it, and turns it into instruct-tuning data. Basically, it uses LLMs to convert pretraining data into conversational multi-turn QA data:
- It takes the input text, and splits it into chunks.
- It uses each chunk's information to generate questions that test the information, and it also generates answers to the questions that use the information.
- It checks whether the generated questions and answers are accurate and only use information provided in the text (ensuring that the LLM did not hallucinate new information).
- Finally, it writes an interaction between a human and an AI, where the human asks the questions and the AI answers them..
- After checking that this conversation faithfully includes the original questions and answers, the result is saved as part of the newly-generated dataset. You can see a flowchart of this process over in Usage.
First, get the repository onto your computer:
git clone https://github.com/e-p-armstrong/augmentool.git
Then, install the project's dependencies.
pip install -r requirements.txt
You may get some messages saying that torchvision and torchaudio require older versions of Pytorch. This should be safely ignorable.
If you want to use Aphrodite inside the code, you'll also need to add
pip install aphrodite-engine
However, it is recommended to just run whatever local inference engine you're using in another window, and put its API endpoint in config.yaml, rather than using the built-in aphrodite mode. That mode can be considered deprecated at this point.
NOTE it is likely more cost-effective for large scale dataset generation to rent GPUs for a couple bucks/hr on a service like Vast.ai or Runpod, than it is to use APIs like Together.ai. However, APIs are faster and require little setup. So the currently advised process is: experiment with APIs, and generate for production with rented compute.
I will make a video tutorial on local dataset generation with Augmentoolkit sometime soon.
Augmentoolkit resumes previously-started runs if the output folder is not empty. Rename or move it elsewhere if you are not trying to continue interrupted dataset generation.
You can easily customize how a given run of Augmentoolkit proceeds by modifying config.yaml. The WebUI also has the ability to customize settings. Let's walk through each field in the YAML file so that you can understand how to change it to suit your needs:
First up, we have the API section:
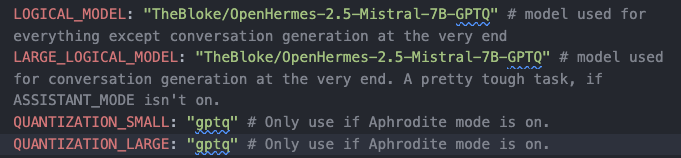
API:
  API_KEY: your key here
  BASE_URL: https://api.together.xyz
  LARGE_LOGICAL_MODEL: meta-llama/Llama-3-70b-chat-hf
  LOGICAL_MODEL: meta-llama/Llama-3-70b-chat-hf
  QUANTIZATION_SMALL: "gptq"
  QUANTIZATION_LARGE: "gptq"
Field-by-field:
API_KEYthis is where you put the API key for your favorite API provider. If you're running a local server, put a dummy value in here so that the formatting of the request does not break.BASE_URLthis is the base URL for the API provider you are using. Some possible values:- http://127.0.0.1:5000/v1/ <- local models.
- https://api.together.xyz <- together.ai, which offers quality open-source models for cheap prices. Their service has reliability issues sometimes, however.
- https://api.groq.com/openai/v1 <- Groq. They offer their API for free but have low rate limits.
- https://api.openai.com/v1/ # <- OpenAI
- anything else that accepts OAI-style requests, so basically any API out there (openrouter, fireworks, etc...)
LARGE_LOGICAL_MODELthe name of the large model you want to use. This is the model that will be used for the final generation step. This should be a decently-strong model. The model used to power Augmentoolkit is separated into two models to save costs on easier steps early on in the pipeline. (This field is likely irrelevant if you're using a local server.)LOGICAL_MODELthe name of the model you want to use for the first few generation steps. It can be a decently cheap model, but stronger models will still result in better final outputs.QUANTIZATION_...change these if you are running with Aphrodite mode on. The method (e.g., "gptq", "awq") must match the kind of model quantization being used._SMALLsets the quantization type for theLOGICAL_MODELwhereas_LARGEsets the type for theLARGE_LOGICAL_MODEL. **This setting does nothing and can be ignored if Augmentoolkit is not in Aphrodite mode (aphrodite mode is deprecated anyway since it is better to run it as a local server than using its code).
Next up, we have the PATH section:
PATH:
  INPUT: "./raw_text_input_vision_paper"
  OUTPUT: "./output"
  DEFAULT_PROMPTS: "./prompts"
  PROMPTS: ./prompts_vision_paper
Field-by-field:
INPUTthe relative path to the folder where the raw text input is stored. This is the folder that contains the text files that you want to use as input to the pipeline. The files can be any format, and some can be nested inside folders if you want, so very little cleanup work is required when working with a new source of data.OUTPUTthe relative path to the folder where the output of the pipeline will be stored. This is the folder that will contain the dataset files (.jsonl) that are generated by the pipeline, as well as a complementary continued-pretraining dataset. Intermediate generations (useful for debugging or interpretability) are also here.DEFAULT_PROMPTSthe relative path to the folder where the core prompts of Augmentoolkit are stored. This is the folder that contains the prompt files that are used throughout the pipeline.DEFAULT_PROMPTSis the fallback folder that Augmentoolkit will use if it can't find a prompt in thePROMPTSfolder.PROMPTSthe relative path to the folder where the prompts for the current run of Augmentoolkit are stored. Compared toDEFAULT_PROMPTS,PROMPTSis essentially an override: if a prompt is found in thePROMPTSfolder, it will be used instead of the prompt of the same name in theDEFAULT_PROMPTSfolder. This allows you to create different prompts for new kinds of input data that the original prompts may not be well-suited for. Seeprompts_code_overrideandprompts_vision_paper_overridefor examples of how this can be used.
Next, we have the SYSTEM section:
SYSTEM:
  CHUNK_SIZE: 1900
  USE_FILENAMES: False
  COMPLETION_MODE: false
  CONCURRENCY_LIMIT: 60
  DOUBLE_CHECK_COUNTER: 1
  FINAL_ASSISTANT_PROMPT_NO_RAG: |
   You are a helpful, friendly AI assistant.
  FINAL_ASSISTANT_PROMPT_RAG: |
   You are a helpful, friendly AI assistant.

   Context information is below:

   ----------------------
   {data}
  MODE: api
  STOP: true
  SUBSET_SIZE: 10
  USE_SUBSET: true
Field-by-field:
CHUNK_SIZEis the maxmimum number of characters to use in a "chunk" of text that will be fed through the pipeline. A chunk is what questions are generated from — it's kinda the core building block of QA datasets built by Augmentoolkit.USE_FILENAMESdetermines whether the AI is allowed to see the name of the file from which each chunk of text/information was taken, when it's generating questions. If this is on, it means that questions may often have the format "What is X, according to filey?" This can be useful if your files are books — so you might get "How do you sabotage a car, according to Simple Sabotage by the OSS?" if it's on. Compare this to when it's off — in which case the question might simply be "How do you sabotage a car?" This is good to have if you want the bot to have some meta-knowledge, but should usually be left off. If you want the AI to know the authors behind files, then format the names astextname, by author name. The comma is important.COMPLETION_MODEis a boolean that determines whether prompts are sent to the provider in chat mode (default, what happens when it's set tofalse) or completion mode (what happens when it's set totrue). Completion mode can produce higher-quality responses with some models, but many providers don't support it.CONCURRENCY_LIMITis an integer; it's the maximum number of concurrent requests that can be made to the provider. This is useful for controlling costs and preventing rate-limiting.DOUBLE_CHECK_COUNTERis an integer; it's the number of times that the pipeline will double-check the questions it produces. For each QA pair, the majority vote goes: if it's positive, the question/answer pair is kept, if it's negative, the QA pair is tossed. Ties are tossed. This is a tradeoff parameter: higher means more quality but far higher cost. 3 is a good starting point.FINAL_ASSISTANT_PROMPT_NO_RAGis a setting used to control the form of the dataset produced at the very end. What you write here will be the system prompt of the AI in the portion of the dataset that does NOT have RAG supporting the outputs. This is where we get the LLM to rely on the knowledge we teach it.FINAL_ASSISTANT_PROMPT_RAGis like its NO_RAG cousin, except it's used in the portion of the dataset that DOES have RAG supporting the outputs. This is where we get the LLM to combine understanding with retrieved information to produce an answer. A key difference: wherever{data}appears, it will be replaced with the RAG context for each sample in the dataset. So place it where you want the context to appear in the prompt.MODEis the mode that the pipeline will run in.apiis the default mode, and is used for running the pipeline with APIs supporting the OpenAI standard.cohereis also supported, and is used for running the pipeline with the Cohere API (BASE_URL does nothing incoheremode).STOPis a boolean that determines whether the pipeline uses stop tokens or not. You should always have this set totrueunless you're using an API that arbitrarily limits the number of stop tokens you can use, like OpenAI.SUBSET_SIZEcontrols the number of chunks fed through the pipeline if USE_SUBSET is on. This is useful for debugging and testing quickly and cheaply — only the firstSUBSET_SIZEchunks will be processed.USE_SUBSETis a boolean that determines whether the pipeline uses a subset of the input data.
Note:
SKIP:
  QUESTION_CHECK: False
  ANSWER_RELEVANCY_CHECK: True # turn on if using the negative question prompt override
This lets you control whether you want to skip certain steps of the pipeline. QUESTION_CHECK should generally not be skipped under any circumstances, but ANSWER_RELEVANCY_CHECK may be skipped if you are using the "negative" prompt overrides, by default located in ./prompts_override_negative_question. So, turn any one of these on if you want the corresponding step to simply be skipped. These options allow a degree of control flow control, without touching code.
Starting from more common things to less common things:
processing.pyis the main file that runs the pipeline. It's where the core control flow of the pipeline is defined.control_flow_functions.pyis where a large number of the helper functions that the pipeline uses are defined. Arguments, sampling parameters, and the control flow of each individual step are defined here. The difference between this andprocessing.pyis thatprocessing.pyis the control flow of the pipeline as a whole, whilecontrol_flow_functions.pyis mostly the control flow of each individual step. This is where theoutput processorsare defined -- if you changed prompts and are getting generation failed issues, this is where you need to look. Look atparse_validation_stepfor an example of what an output processor is like, basically it takes the LLM response as an input and returns a QA pair.engine_wrapper_class.pycontains a class that serves as a single interface for many different LLM APIs. This is where you would need to change the code if you wanted to use a different API provider that is not OpenAI compatible.generation_step_classcontains a class that stores the parameters for a single generation step. A generation step basically holds some sampling parameters, a prompt, and an engine wrapper, and can call that engine wrapper with those settings. Typically you'll change this to add additional logging if you're encountering errors after modifying a step -- the way calls to LLMs work in Augmentoolkit is that a generation step object is created with a path to a prompt and some sampling parameters, and then the object's .generate() method is called with the arguments for a specific call to the LLM.- There are some other miscellaneous utility functions in the
generation_functionsfolder. app.pycontains the gradio WebUI code. This is the graphic interface. The fields are based off ofconfig.yaml.
Here is a flowchart detailing how a typical run of Augmentoolkit may proceed. The source text can be anything with information you can ask questions about.

The important files to look out for in your OUTPUT folder are simplified_data_no_rag.jsonl, simplified_data_rag.jsonl, and pretraining.json. These are what you will most commonly use for training. The other top-level files are there incase you want more information, such as the chunk and name of the file that each conversation was generated from. But for training, you will want simplified_data_no_rag.jsonl, simplified_data_rag.jsonl, and pretraining.json. All are already formatted for use with the Axolotl open-source training library. All you need to do is use these datasets like how the provided configs in _model_training_configs/ are used.
The format of the conversational files is called "shareGPT", and is a common format across many datasets. pretraining.json however is formatted as pretraining data. To bake factual information into an LLM, it is recommended you use a full finetune or (cheaper) GaLore tuning, combined with continued pretraining on the source text + the instruct data that Augmentoolkit generates. If you want a more in-depth example, check out the provided configs, or the second video of the Video Documentation.
In the coming weeks and months, I plan to start using Augmentoolkit to produce open-source models in popular, specific domains. Difficulties encountered will fuel further development of this project. Let me know what kinds of LLMs you want built!
I work with AI SAAS startups that want to create (or improve) specialized LLMs using lots of quality training data. Do you need a dataset for your business's AI? I can modify Augmentoolkit for any domain and for tasks beyond question answering, and I'd be happy to help you painlessly create the data — and data-creation tools — you require. Given that I made the original version of the darn thing, I'm probably the best person in the world for this task. You can schedule a quick call to talk about your needs with me using this Calendly link: https://calendly.com/evanpeterarmstrong/discovery-call.
Note The base version Augmentoolkit is fully open sourced and MIT-licensed. The consulting option is for people who want a bespoke modification and quality results, fast (it took 5 months of learning and iteration for me to master open source model pipelines enough to make Augmentoolkit work well). If you're a hobbyist and have time to experiment with its base version for casual or personal uses, by all means go for it.
Augmentoolkit has received a major update as of Jun 12, 2024. Two whole new prompt override folders let you generate data designed to make your model smarter and more detailed, while also getting more instruct data for your pretraining buck. Tweaks have been made based on hard-earned experience to optimize for final model quality. Prompt overhauls make the pipeline more flexible and powerful. YAML now is used instead of JSON for prompts because of newline support. An early version of an entirely new datagen program, built to create datasets even without any text input, can be found in ./pure_synthetic_pipeline. There's better logging for common errors. Oh, and the code has been almost entirely refactored!
In the most recent update, RP mode was removed. You can revert to previous versions if you need that. The code is now much cleaner and more maintainable as a result of this.
Many of these changes are inspired by the recently-released Augmentoolkit which I developed for (and as part of) the Verus community. Augmentoolkit is specific for Verus, but it's open-sourced, and so I ported its key improvements back here. Go check it out if you're interested the future of blockchain technology!
If you think this project is cool and useful, great! I'm genuinely happy that you're interested by my work. If you're really interested by this project you might be interested by some of my other endeavors:
- A newsletter/blog about Prompt Engineering Open-Source models — the art and science that is the backbone of Augmentoolkit and complex LLM projects like it. I also consult for prompt engineering, if you're curious.
- I sometimes post stuff and sometimes join spaces on X/Twitter
- Let's connect on LinkedIn!
- I'm pretty active on TheBloke's discord server and a bunch of other AI discords. Find me as @heralax!
- By the way, did I mention I consult? :) I might be able to help your AI business get even better, using Augmentoolkit or straight-up prompting. We should chat at least and connect
- Email me at: evanpeterarmstrong@gmail.com
Contributions are appreciated! Whether it's a new API endpoint, or a set of prompts you've found to work really well, please submit a PR! Reviews are fast here. Anything that can further the goal of democratized dataset generation is welcome.
MrDragonFox -- one of the moderators of the Mistral and TheBloke Discords -- has a server where he's working on a new quantization engine. There's a corner to discuss Augmentoolkit there! Come check it out and connect at https://discord.com/invite/foxengine-ai!
NOTE: Aphrodite mode is pretty much deprecated. If you are running on your own or rented hardware, unless you are doing a truly massive amount of data generation, it is advisable to just use the best model you can for all steps. This means you can just run processing.py as normal.
- First off, make sure you're on a Linux operating system. If you want local generation with a non-Linux operating system, it is recommended that you run a local inference engine with an openai-compatible API, and then point Augmentoolkit at the local inference engine by changing the BASE_URL.
- Then install aphrodite engine and get it working. That's a whole process, you can find the details on their repo
- Follow the first few steps of the quickstart: get the repo onto your computer and install its dependencies.
- Open the file
config.yamland change the MODE to "aphrodite"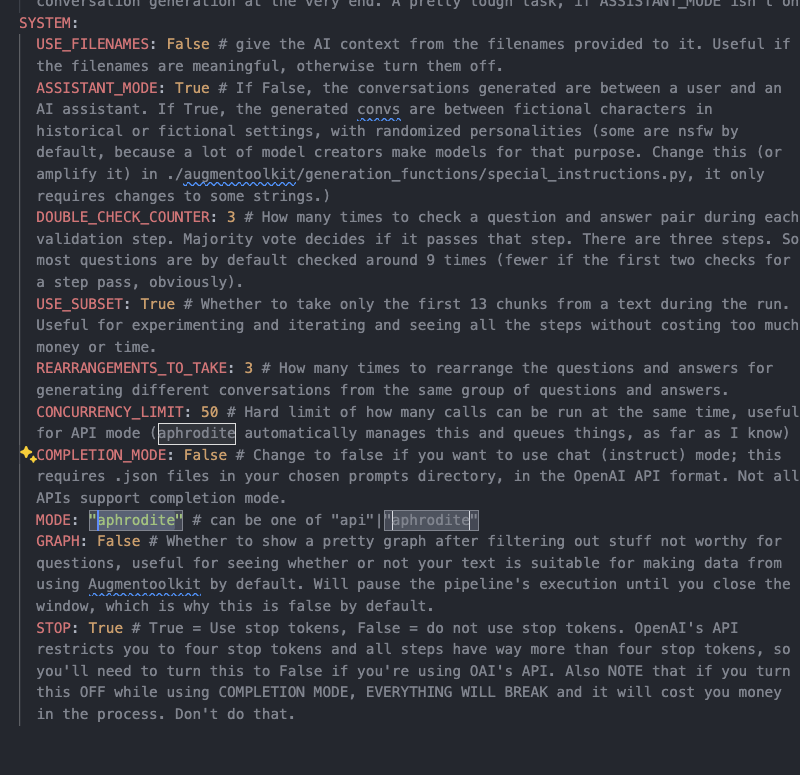
- In
config.yaml, change the MODEL field to a HuggingFace Path to a model. Make sure it has a large enough context window! And be sure to use the right quantization mode for your chosen model. The model should have some indication of what quantization type it uses. Also, changeCOMPLETION_MODEto True
- Run
(aphrodite_use)_processing_phase_1.py - Run
(aphrodite_use)_processing_phase_2.pyonce phase 1 finishes. - Control + C when it logs stuff about saving dataset files to
simplified_data.jsonl. It seems that something about Aphrodite's code has changed since I implemented it in here, and it no longer automatically exits the script.


I'm considering removing aphrodite mode and just letting local inference be done via local OAI-compatible servers, but incase people want it specifically I'm leaving it for now. I hope that this set of instructions is complete enough to follow.
Q: Why do I have to run this in two phases? A: Because it's difficult to switch between two different models when doing local inference.