
QRS API Notification Example DevOps Workflow -- Promoting Apps Cross Site(s) with Approvals, Email Alerts, Auto-Promotion on Reloads, and Versioning
This repository is intended to be used as an example and should not be used in Production
- Qlik Sense Enterprise April 2018+
- About
- Scenario & Workflow
- Architecture & Components
- Installation & Configuration
- Creating Windows Services
- Qlik Sense Auditing Dashboard
Integrated workflow requests are becoming more and more common with Qlik Sense. What all of these requests have in common is:
- when a particular event occurs in Qlik Sense, I want to automatically do x, y, z.
Enter the Notification endpoint via the QRS API. The /qrs/notification endpoint allows you to "Add a change subscription that makes the QRS call a URL when the specified entity has changed." For example, whenever an app is updated, POST to this URL a JSON block including the GUID of the changed object, for which you can then construct some code to do x, y, z.
For more information on the Notification endpoint of the QRS API, please refer to:
The solution I've chosen to create to illustrates app promotion from Qlik Sense site → site(s) with an integrated approval process, versioning, and email alerting. This program also supports the ability to auto-promote application to target site(s) on reloads of the application. Traditional approaches to each of these facets would either require bulk queries against the Repository API or batch commands to be run at regular intervals. Rather than using approaches which are not coupled with actual events in Qlik Sense, I am using the Notification endpoint to issue a push notification to a series of Python modules where the actions of users are evaluated in real time. This combined with a handful of custom properties applied to Qlik Sense applications, allows for granular control of an approval, versioning, and promotion work-flow. The end result is a more governed approach to development inside of Qlik Sense.
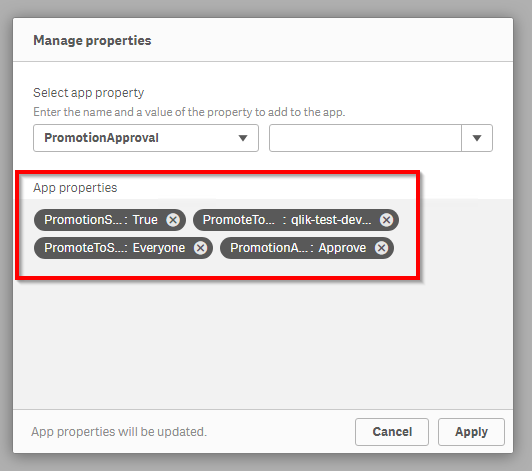
For example, if a user selects the value of 'Approve' in the PromotionApproval custom property along with values in several other custom properties (whether to overwrite or duplicate the app, what stream(s) on the other server should it go to, should it be versioned in S3, should it be unpublished after promotion), on submit of those custom properties, the Repository Service will ping an endpoint that will evaluate those custom properties and their values and promote the app to a new site (among other things) if the conditions have been met.
High-level Workflow
-
Sales Rep creates an app that he wants to publish to the "Sales" stream on their
Devtier. They right-click and publish the app.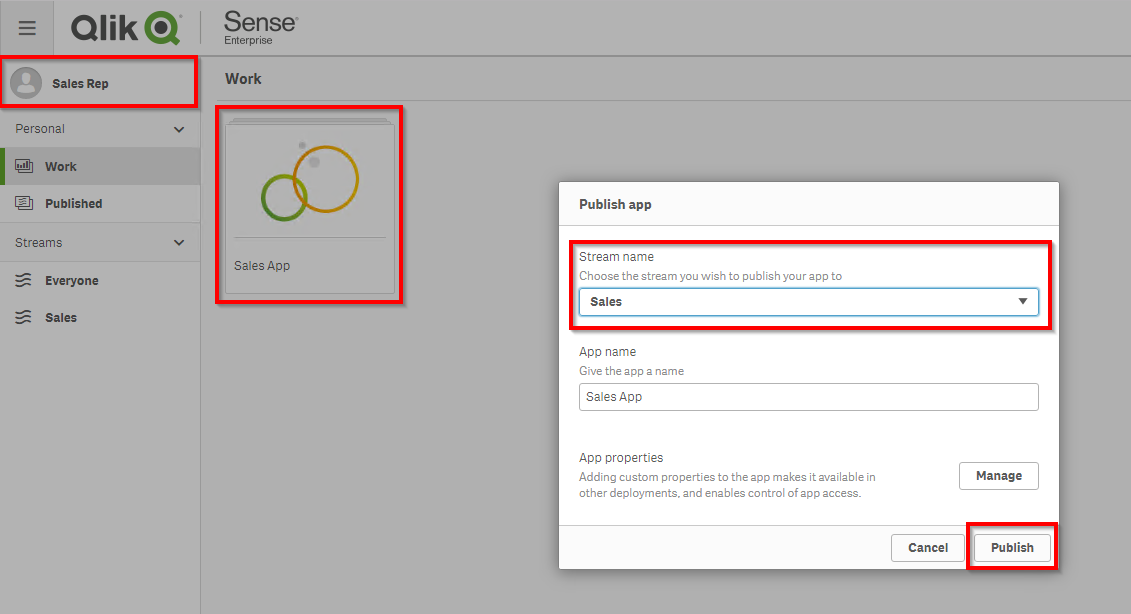
-
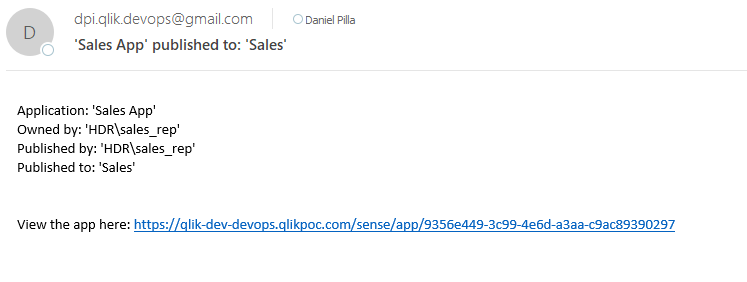
Sales Manager gets an email alert that a new app has been published to the "Sales" stream, as he is pre-configured on a list of admin emails for the "Sales" stream.
-
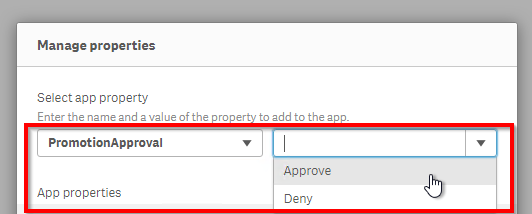
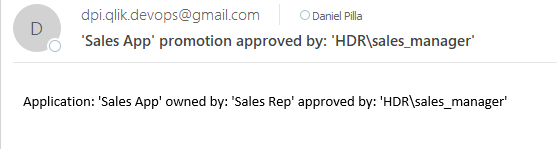
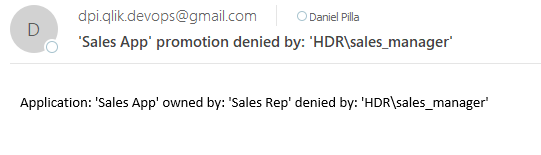
Sales Manager reviews the app, and chooses whether to 'Approve' or 'Deny' it for promotion to
Test. Sales Manager can see these custom properties, while Sales Rep cannot. If Sales Manager has selected 'Approve', they must also select values in the "PromoteToServer" and "PromoteToStream" to promote the app up toTest. These custom properties dictate whether the app will overwrite any existing apps with the same name in the destination stream(s) if they exist, or whether to instead duplicate the stream(s). If they select 'Deny', the app will not be promoted regardless of the other custom properties, and will instead (optionally) be duplicated and reassigned back to the owner and will also be deleted from the stream. Additionally, if the administrator has versioning in Amazon S3 enabled, they can choose to version the app in S3 by setting "PromotionS3Versioning" to 'True'. The administrator can also choose to have all apps auto-versioned as well, without the need for any additional custom properties.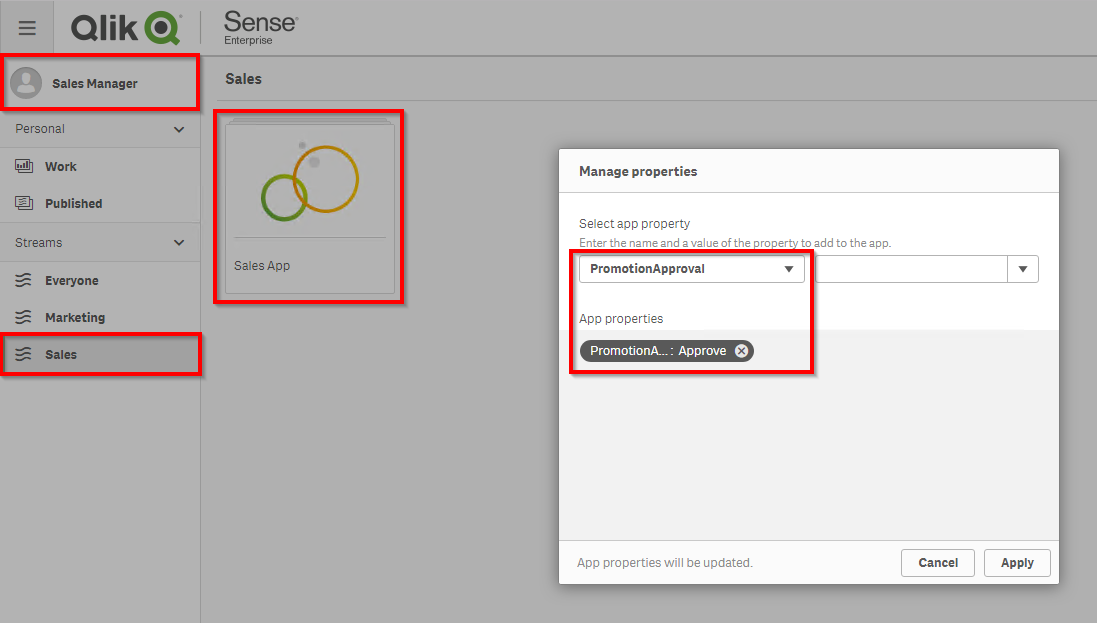
-
Sales Rep receives either an approval or denial email depending on what Sales Manager decided.
You will also then recieve two additional emails: - An email showing where the applications are intended to be published to. - A promotion results email showing where the applications have been published to.
-
Optionally, depending on how you've configured the program, it will duplicate the app and assign it back to the owner, and then delete the published app from the "Sales" stream -- ultimately unpublishing it. This is the default behavior, but it can be modified if the app should stay in the stream.


Versioning in Amazon S3
As a part of this workflow, I've also chosen to allow the option to upload the app without data to an S3 bucket with versioning enabled. Enabling this functionality illustrates how to directly couple promotion of applications across tiers in Qlik Sense to versioning of applications. It is setup assuming the machine you are executing it from has programmatic access to the S3 bucket, e.g. an IAM Role or otherwise. This feature is toggled off by default. You could choose to use your AWS access key id and secret access key, but to do so would require some lightweight modifications to the code in Modules/app_promote.py. Right now you will see:
s3 = boto3.client("s3")`
That code would need to be altered per the boto3 docs to something like this:
s3 = boto3.client(
    's3',
    aws_access_key_id=ACCESS_KEY,
    aws_secret_access_key=SECRET_KEY
)
Please reference the boto3 docs here: https://boto3.amazonaws.com/v1/documentation/api/latest/guide/configuration.html
Promotion Process
Regarding the promotion specifically, the high-level concept is that you would select a value(s) in "PromoteToServer", e.g. 'Test Server - Overwrite', and then select 1-n streams from the "PromoteToStream" custom property. If the streams exist on the remote server(s), for each stream that exists, the application will export the app, upload it to the new server, and publish it (either overwriting existing apps with the same name, or creating a duplicate depending on if you selected Overwrite or Duplicate). If the streams exist on the server but there aren't any matching apps in it, it will upload the app and publish the app to those streams. If you have selected multiple remote servers, and some streams exist on some but not others, it will publish the apps to all available streams. There are additional custom properties regarding approval, versioning, and unpublishing that further enhance this process -- those are detailed below.

I have chosen to develop the application in Python using Flask, however the same concept could be created in something like NodeJS and Express as well.
Note that all Python programs must be executed in the root directory of the project's structure!
The first Python program that needs to be run is the Console. You can find this in the root directory as configuration_console.py. This is a flask servlet that hosts the configuration website locally. The port on which this site runs on is configurable in console_port.json. The default port is 5001. All of the configuration settings are handled from here.

Two Python programs that should be run as windows services on system startup (no dependencies needed):
-
The listener using Flask. This is the main application that listens for app changes, and acts on them accordingly
-
A lightweight program that creates (and validates that the notification subscription exists) every 60 seconds. This is required as the notification subscriptions do not persist, and are gone after the repository service stops. This program runs continuously to ensure that they are always available, created the notification within 60 seconds of the repository service startup.
-
Port 4242 must be opened on the remote server(s) (and local server, if not installed on a Qlik server) inbound from whatever machine you've installed these program. Port 4242 is required as we are leveraging certificates to communicate with the QRS API, as opposed to going over the proxy.
-
Download or clone the package to a location on a machine that has access to the Qlik Server of the site that you want to promote from. You can choose to install the required Python libraries however you would like (virtual env, etc), and this program requires the following:
pip install -r /path/to/requirements.txtor just:pip install requests flask boto3- Note that
boto3is only required if you have configured S3 versioning
- Note that
-
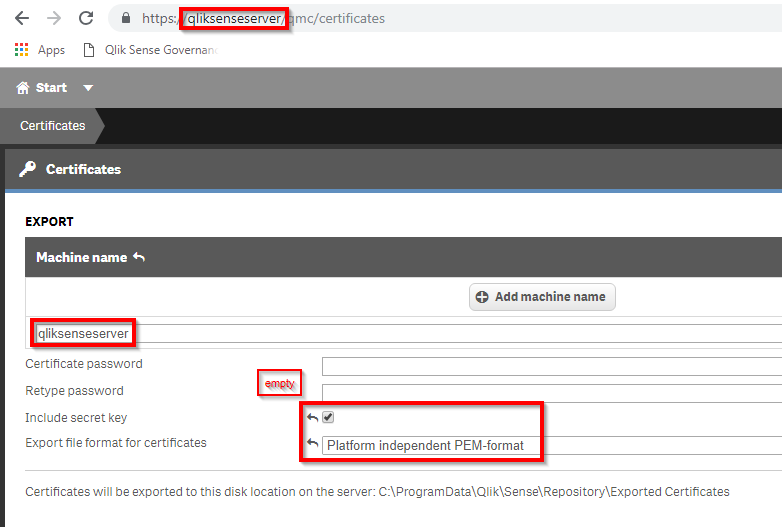
Export certificates from the local Qlik site's QMC with the server name and no password, then do the same for the remote server(s)
-
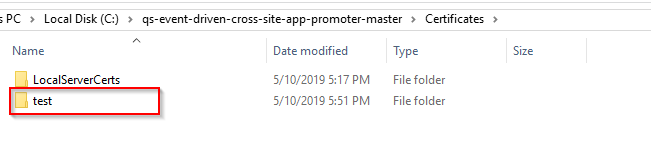
Take the client.pem and client_key.pem from the local site export and place them in the
/Certificates/LocalServerCerts/folder -
Take the client.pem and client_key.pem from the remote site(s) export and place them in the
/Certificates/<your server alias here>/folder(s), where <your server alias here> is the friendly name of the server that you will enter in the configuration console here: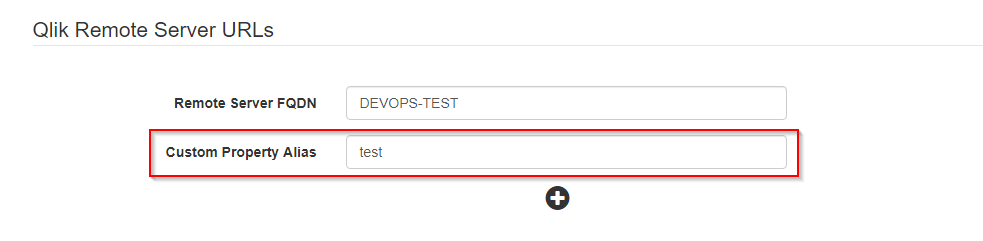 So the folder structure resembles:
-
Open up a command prompt and navigate to the folder location where you extracted this package. Execute
python configuration_console.pywhich will run a Flask servlet that defaults to port5001. This will serve the configuration console locally. If you require a different port, edit the console_port.json file. You can then access the configuration console at http://localhost:5001/console or at whichever port you've chosen.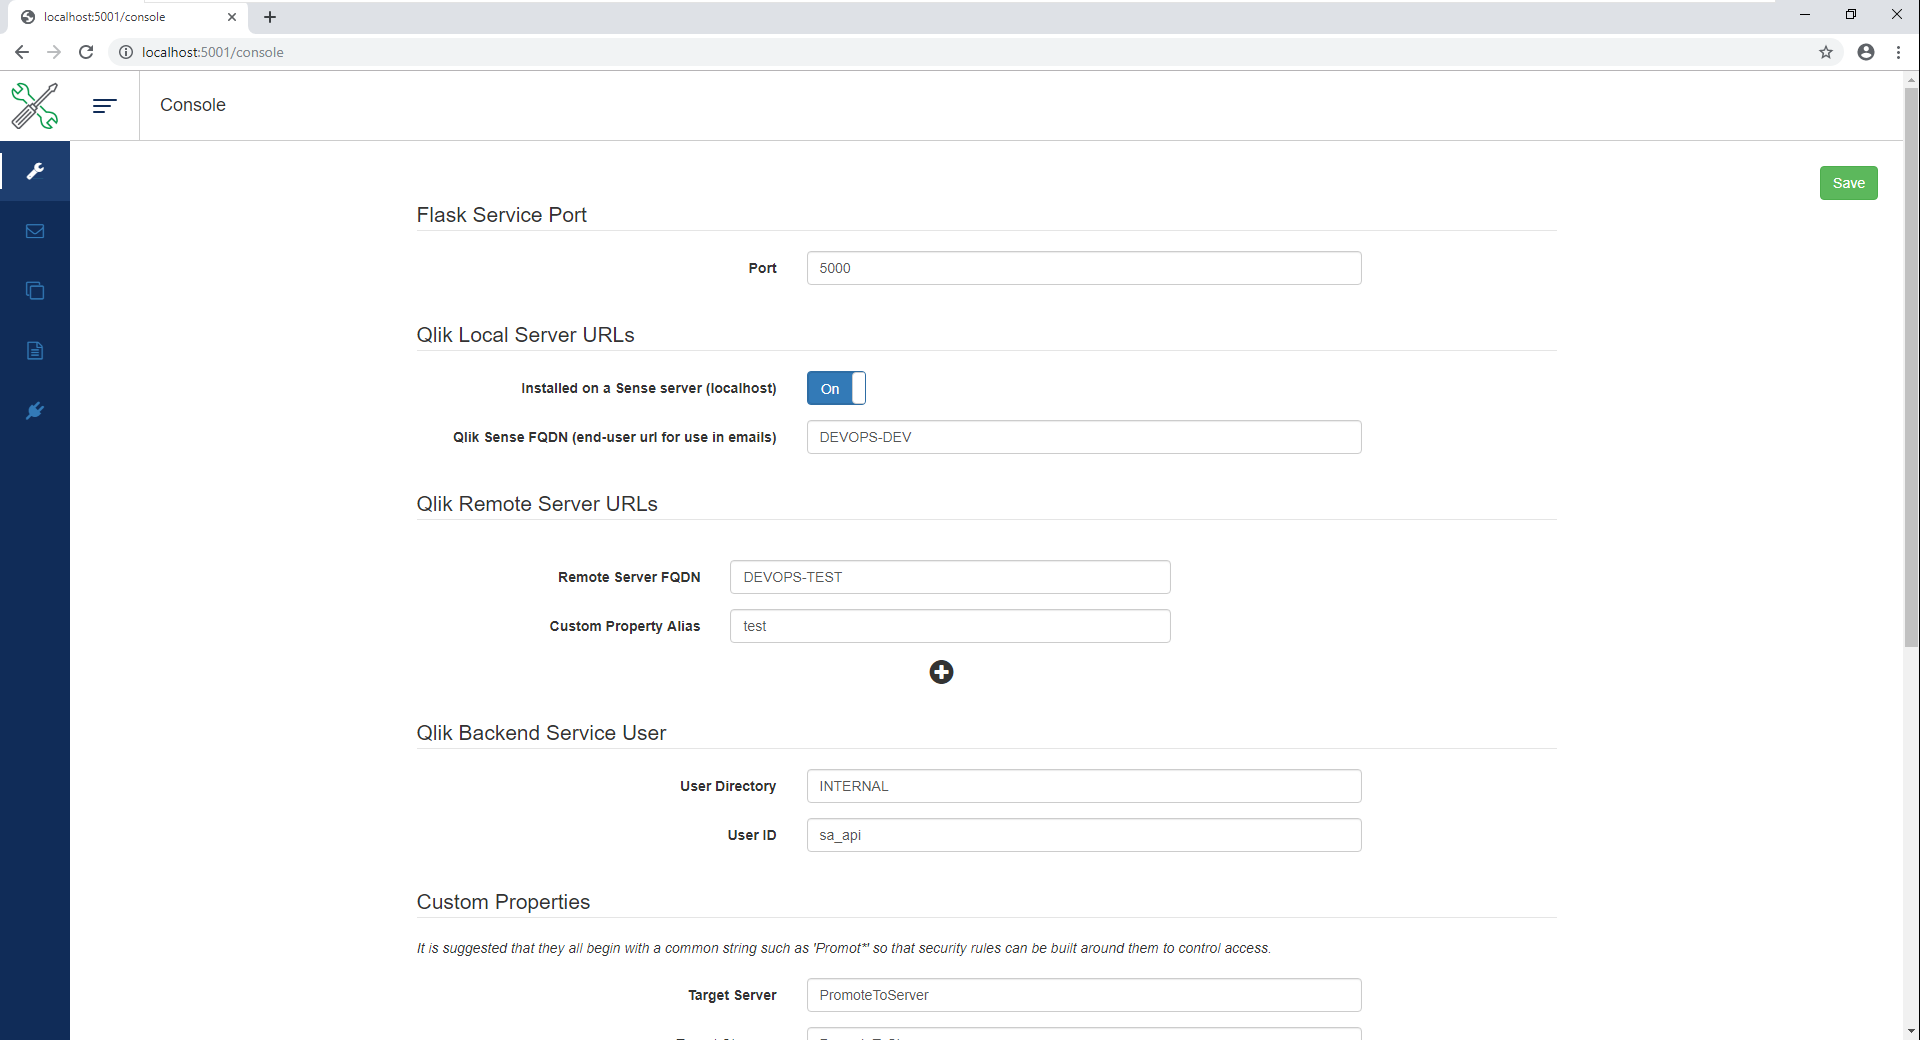
-
Complete all sections of the configuration console. This console includes options for: Note that whenever you change these settings, you will need to bounce the notification_flask_listener.py service for them to take effect.
- General Settings
- Email Configuration (including an smtp tester)
- Versioning
- Logging
- QRS Connection Testing
- General Settings
-
Create the following custom properties in the local server's QMC (whichever are necessary given your chosen configuration above) (note that many of them start with 'Promot*', as this is key to a security rule that controls the visibility of custom properties by their names. You can change the names of these custom properties as they are referenced in the configuration console above, but ensure that any of the properties below that begin with 'Promot*' follow a similar naming convention that can be reflected in the associated security rule as well.):
-
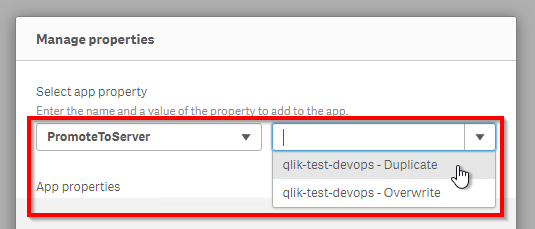
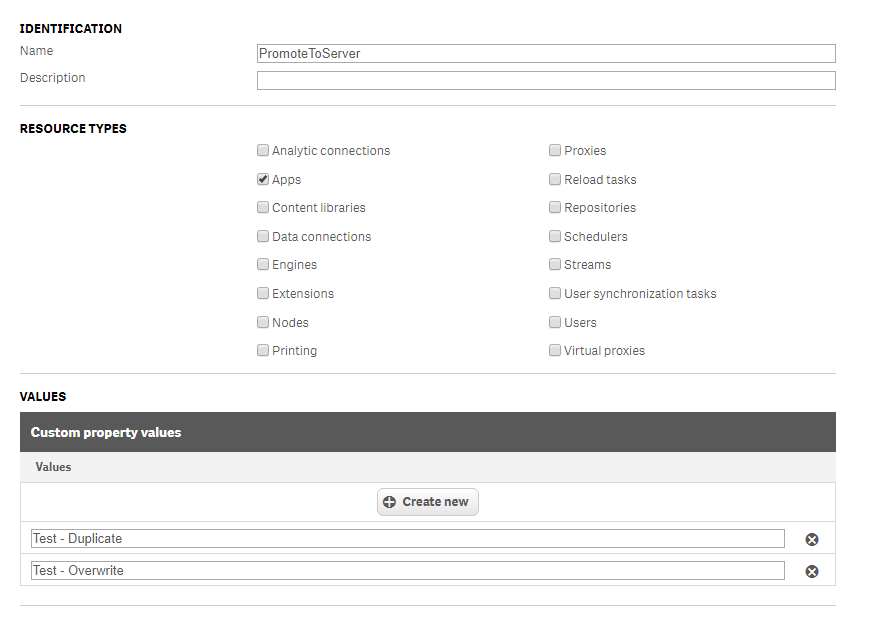
PromoteToServer (Apps)
-
Contains the alias (see step 7) of your Qlik Sense site that you want the option of promoting to, as well as a the string 'Overwrite' or 'Duplicate'. Note that this custom property can only serve a single Qlik Sense site by default.
-
Example values:
test - Overwritetest - Duplicateprod - Overwriteprod - Duplicate
-
-
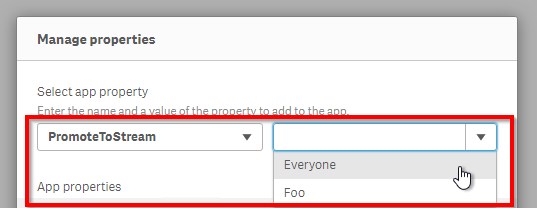
PromoteToStream (Apps)
-
Contains the target stream names (verbatim) on the target server for which you want to give users the option to publish the apps to.
-
Example values:
EveryoneReview

-
-
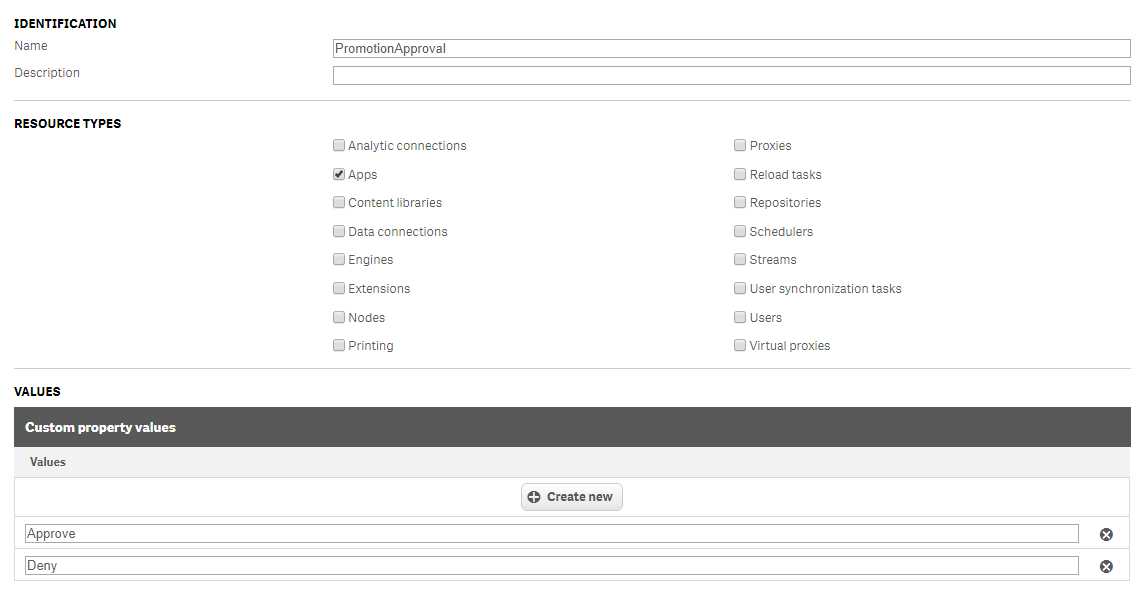
PromotionApproval (Apps)
- Contains the values
ApproveandDeny - This custom property allows for users to approve or deny the promotion of applications.
- Contains the values
-
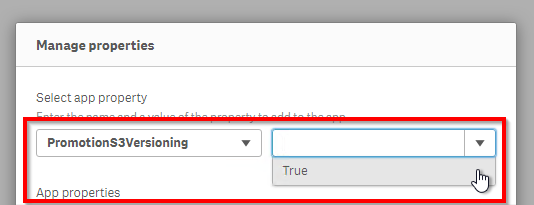
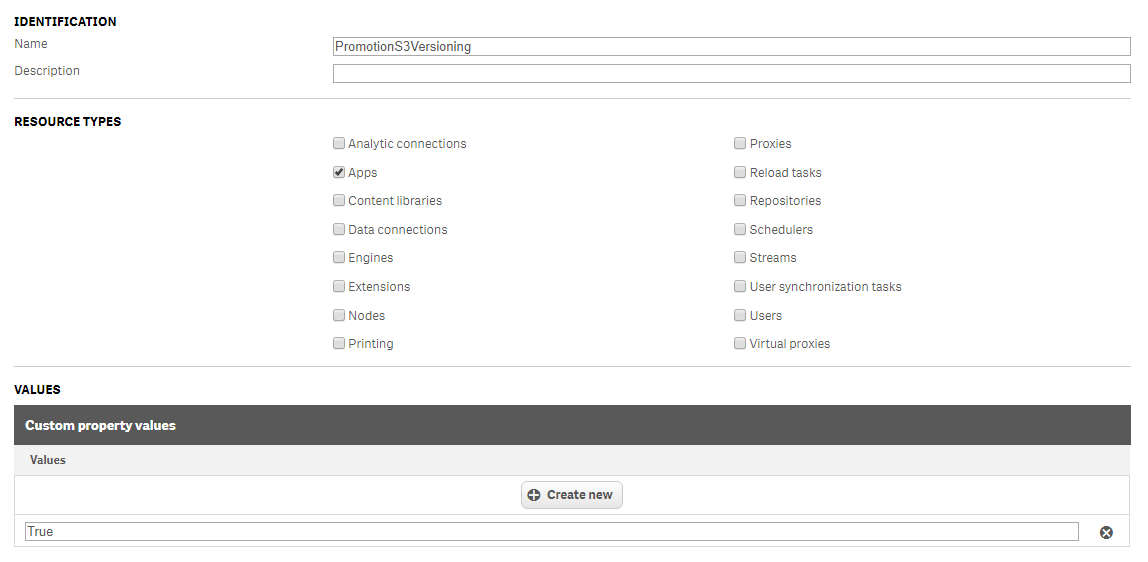
PromotionS3Versioning (Apps) Optional
-
Contains the value
Truethat is applied to any app that you'd like versioned in your Amazon S3 bucket -
-
-
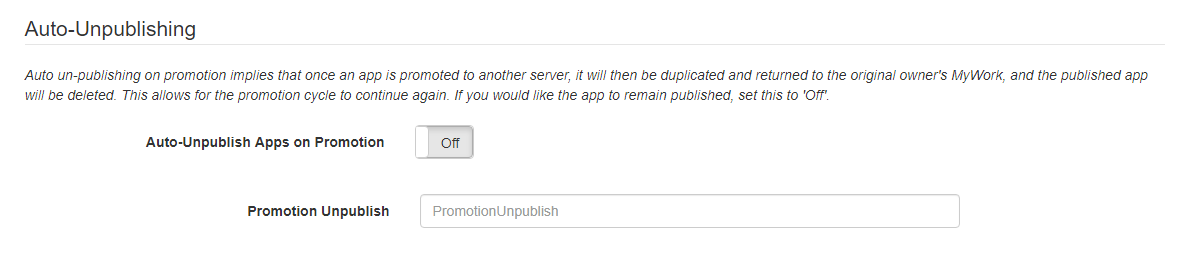
PromotionUnpublish (Apps) Optional
- Contains the value
True - The default behavior of the program is to automatically unpublish the app (duplicate it, assign it to the owner, and then delete the published app -- essentially unpublish) on the approval or denial of the app's promotion. This however can be altered by changing "auto_unpublish" value in config.json to 'false' and providing another custom property. This will change the default behavior to not unpublish the app unless the custom property "PromotionUnpublish" exists with the value of
Truein conjunction with the "PromotionApproval"ApproveorDeny. 
- Contains the value
-
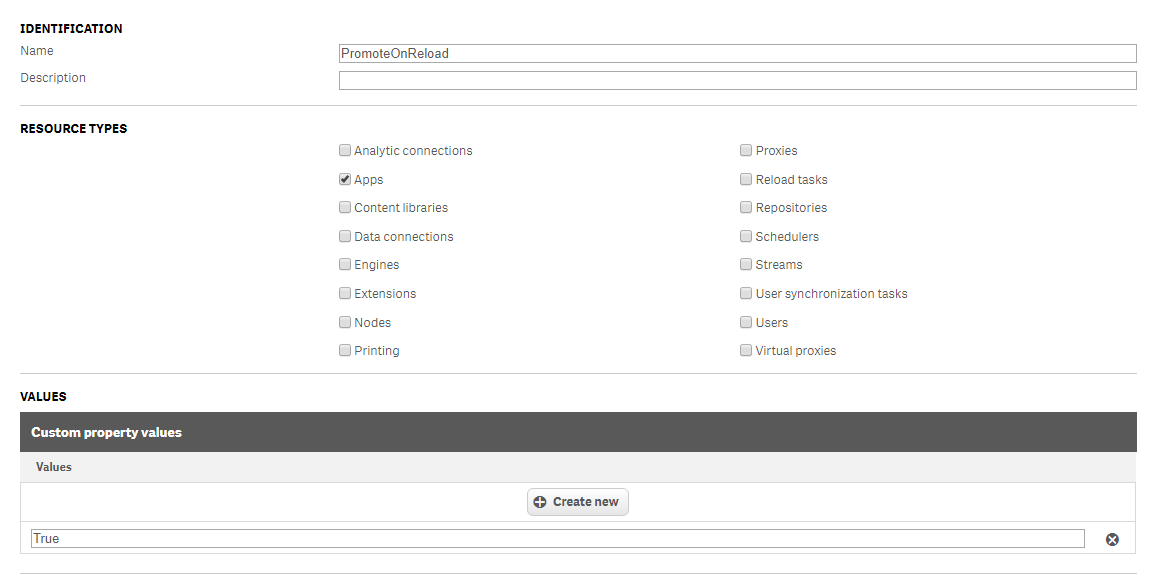
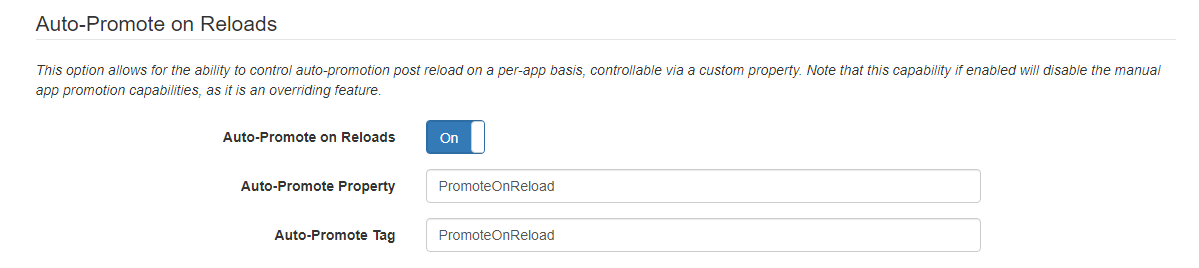
PromoteOnReload (Apps) Optional
- Contains the value
True - This custom property allows for the application to be automatically promoted to the target server(s) on reload of the application. It must be enabled in the console, and requires a tag. If the application is set to this property and contains the other mandatory values, the application will be tagged so that it will be excluded from the other processes (ignoring emails, won't strip custom properties off, won't unpublish, etc). Note that you will need to create this tag!
- Contains the value
-
CanPromote (Users)
- Contains the value
True - The purpose of this custom property is to only allow certain users the ability to promote an app to another Qlik Sense site. There are suggested security rules that leverage this custom property so that only users with this property applied can see custom properties that begin with 'Promot*'

- Contains the value
-
CanPromoteFrom (Streams)
- Contains the value
True - The purpose of this custom property is to control what streams non-owners can promote from. If Bob publishes an app to the Sales stream and Bill has the custom property "CanPromote" with the value
True, if the stream has "CanPromoteFrom" set toTrueand matching group values (explained later), Bill could promote Bob's app. However, if Bill created the app and published it to the Sales stream and that stream did not have the "CanPromoteFrom" set toTrue, Bill could still promote the app, as he is the app owner and also has a value in "CanPromote". The custom properties in these security rule examples are only modified such that some are either available or not. 
- Contains the value
-
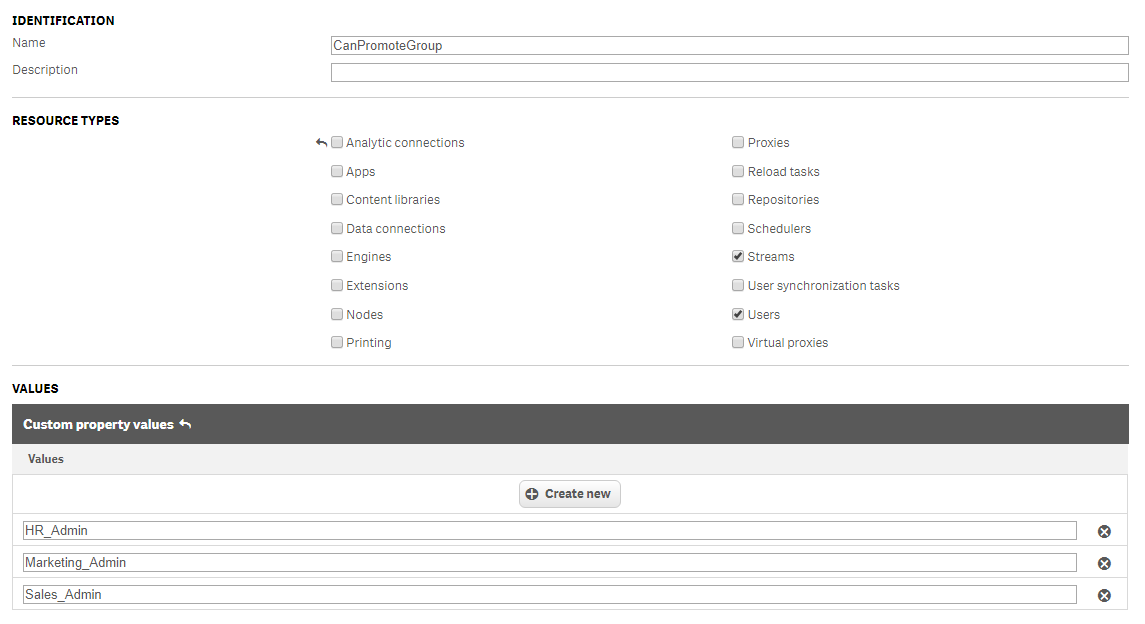
CanPromoteGroup (Streams, Users)
-
Contains Group values that would be defined within your organization. This can just be directed to streams if you want to use something like AD groups instead with user.group. Note that this should be a higher privilege than your standard chosen group for Read access. For example, users with the group of Sales may have read access to the "Sales" stream, however you might only want users with the group of SalesAdmins to have access to promote apps cross-site from "Sales"
-
Example values
HR_AdminMarketing_AdminSales_Admin
-
The purpose for this additional custom property is to control where a non-owner of an application that has the "CanPromote" custom property can promote from. George might have the ability to see the Sales stream and the Marketing stream, but you might only want him to be able to promote apps from Sales. This custom property is used in a custom security rule to enable that functionality.
-
-
-
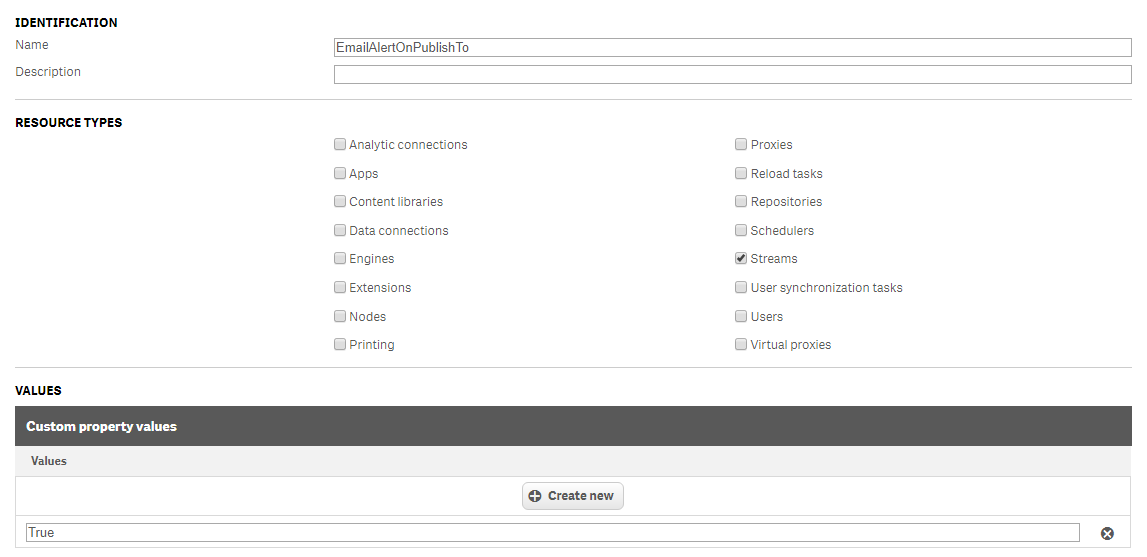
EmailAlertOnPublishTo (Streams) Optional
-
Contains the value
True -
If you have email alerts enabled in the config, this is the custom property that the program checks for whenever an app is published to a stream. If the stream has this custom property, alerts will be sent to the email addresses associated with the stream's ID in ApprovalStreamsToEmailAddressMap.csv.
-
Example csv extract:
- StreamID, ApprovalEmailAddress 90081726-8077-4a1b-8320-86986ac3e55c, you@you.net cb2f9262-daf5-4131-ba4f-8c857caeca34, them@who.org 946d762a-6573-4bd7-86de-c8e2ce26b04d, bark@dog.woof
-
-
-
-
Security Rules
-
OwnerUpdateApp: Disabled -
ReadCustomProperties: Disabled -
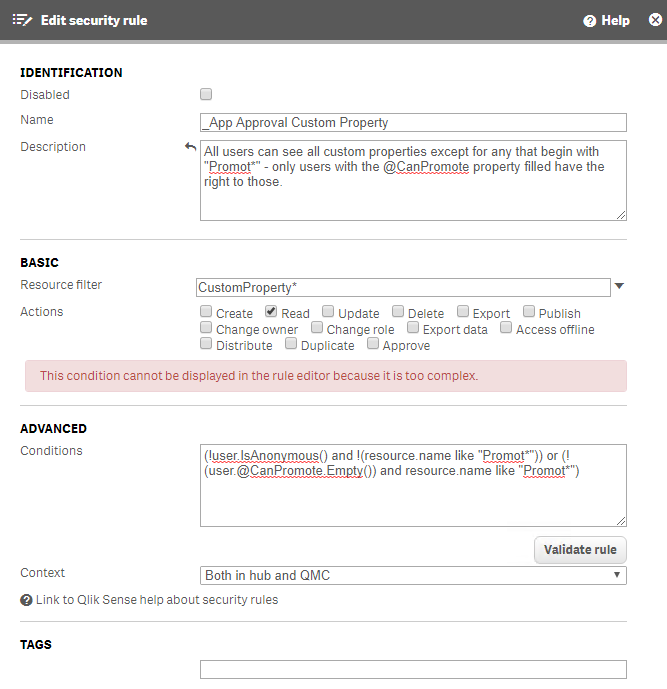
New Rule #1
-
Purpose: All users can see all custom properties except for any that begin with "Promot*" - only users with the "CanPromote" property filled have the right to those.
-
Resource filter:
CustomProperty* -
Actions:
Update -
Conditions
(!user.IsAnonymous() and !(resource.name like "Promot*")) or (!(user.@CanPromote.Empty()) and resource.name like "Promot*") -
Context:
Both in hub and QMC
-
-
New Rule #2
-
Purpose: If the user owns the application or ((the stream as the custom property "CanPromoteFrom" and the user has "CanPromote") and (the stream "CanPromoteGroup" is equal to the user's "CanPromoteGroup")).
-
Resource filter:
App_* -
Actions:
Update -
Conditions:
(resource.IsOwned() and resource.owner = user) or (!resource.stream.@CanPromoteFrom.empty() and !user.@CanPromote.Empty() and (resource.stream.@CanPromoteGroup = user.@CanPromoteGroup)) -
Context:
Both in hub and QMC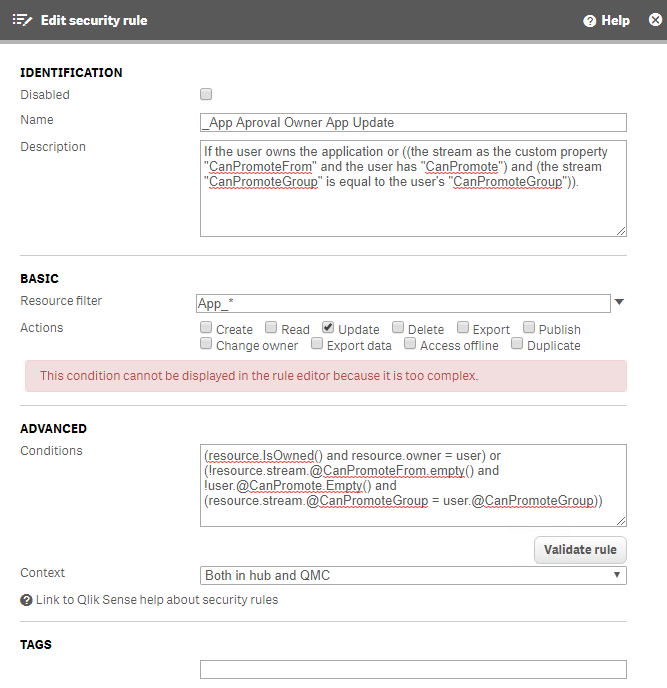
-
-
New Rule #3 (publish is optional here)
-
Purpose: If the user's @Group (replace with AD group with .group if you'd like) equals the Stream's @Group, the user can read and publish to the stream.
-
Resource filter:
Stream_* -
Actions:
Read, Update -
Conditions:
((user.@Group=resource.@Group)) -
Context:
Both in hub and QMC

-
-
-
For initial testing, manually run notification_flask_listener.py and notification_creator.py Make sure that you run them from the main program directory, so that the Log/ folder is created in the appropriate place! It is created in the directory where the programs are run, and you will need to leverage it for the auditing dashboard if you choose to use it.
-
Create windows services out of the above two py files to run on system startup using something like NSSM (instructions below) – be sure to stop both of your manually run py files before running the services. Make sure the services are running with an account that is an administrator and that the account has access to the Qlik Sense fileshare location - as that is where it writes the logs to (see config.json above). You can always opt to run the services as the Qlik service account if the account is also an administrator (which it most commonly is).


I personally use NSSM to easily create windows services. You can follow the below examples, referencing your own Python path and directory path, running nssm from an elevated command prompt with the command nssm install <YourServiceName>
The default path for python.exe is C:\Users\<USER>\AppData\Local\Programs\Python\{PythonVersion}\python.exe Make sure that you run them from the main program directory, so that the Log/ folder is created in the appropriate place! It is created in the directory where the programs are run, and you will need to leverage it for the auditing dashboard if you choose to use it.


There is also a dashboard that is included that monitors all of the logs. This dashboard shows app promotion flow across sites, tracks app versioning lineage, monitors emails, and more. To configure it, simply make a data connection to the directory of the Log/ folder in the parent directory, and update the variable vLogDirectory under the "Variables" tab in the load script. You can find the qvf in the parent directory of this project.
